Alena Prokharchyk, chief software engineer of Rancher Labs, was invited to give a speech at the KubeCon + CloudNativeCon 2017 North American Summit, the top event in the Kubernetes field hosted by CNCF on December 6-8, 2017. This article is organized from the content of the speech.

As Kubernetes has grown in popularity, so has the amount of integration and monitoring around it. A key component of all such functionality written in Golang is kubernetes/client-go - a package for communicating with the Kubernetes cluster API. In this article, we'll discuss the basics of client-go usage and how it can save developers the time required to write actual application logic. We'll also showcase best practices for using the package and share what we've learned from the perspective of developers who integrate with Kubernetes on a daily basis. Content will include:
● Client authentication in the cluster vs. client authentication outside the cluster
● Basic list, use client-go to create and delete Kubernetes objects
● How to monitor and react to K8s events using ListWatch and Informers
● How to manage package dependencies
Kubernetes is a platform
There's a lot to like about Kubernetes. Users love its rich features, stability, and performance. For contributors, the Kubernetes open source community is not only large, but also easy to get started with and quick to respond to. What really makes Kubernetes attractive to third-party developers is its extensibility. The project provides many ways to add new functionality, extend existing functionality without breaking the main codebase. It is these that make Kubernetes a platform.
Here are some ways to extend Kubernetes:
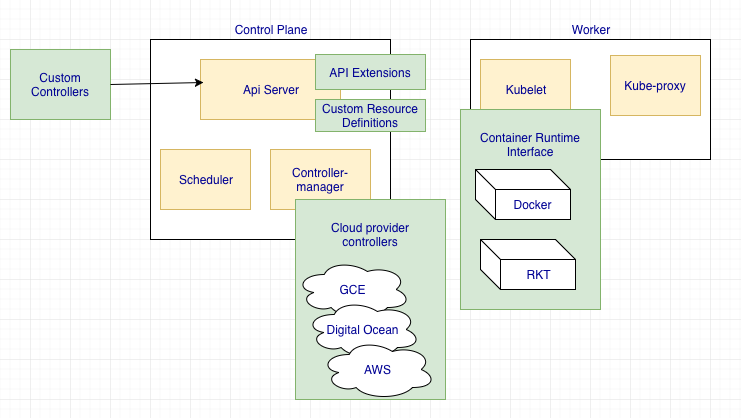
As you can see in the image above, you can see that each Kubernetes cluster component, whether it's a Kubelet or an API server, can be scaled in some way. Today we're going to focus on a "custom controller" approach, which I'll call the Kubernetes Controller from now on, or simply the Controller.
What exactly is a Kubernetes controller?
The most common definition of a controller is code that brings the current state of the system to the desired state. But what exactly does this mean? Let's take the Ingress controller as an example. Ingress is a Kubernetes resource that defines external access to services in the cluster. Usually uses HTTP and has load balancing support. However, there is no implementation of ingress in the core code of Kubernetes. The implementation of the third-party controller will contain:
-
Monitor ingress/services/endpoint resource events (create, update, delete)
-
Load balancer inside or outside the program
-
Update the Ingress with the address of the load balancer
"Desired state" in Ingress refers to an IP address pointing to a running load balancer implemented by the user according to the rules defined by the ingress specification. And it is the responsibility of the external Ingress controller to transfer ingress resources to this state.
The implementation of controllers and the way they are deployed may also vary for the same resource. You can choose the nginx controller and deploy it on every node in the cluster as a Daemon Set, or you can choose to run the ingress controller outside the Kubernetes cluster and program F5 as a load balancer. There are no hard and fast rules here, Kubernetes is just so flexible.
Client-go
There are several ways to get information about a Kubernetes cluster and its resources, which you can do using Dashboard, kubectl, or using programmatic access to the Kubernetes API. Client-go The most widely used library of all tools written in Go, there are versions in many other languages (java, python, etc.). If you haven't written controllers yourself, I recommend you try go/client-go first.
Kubernetes is written in Go, and I find it more convenient to develop plugins in the same language as the main project.
Let's build...
To be familiar with the relevant platforms and tools, the best way is to practice, to achieve something. Let's start simple and implement a controller as follows:
-
Monitoring Kubernetes Nodes
-
Alerts when mirrors on nodes take up storage space and can be changed
The implementation of this part, the source code can be found here: https://github.com/alena1108/kubecon2017
Basic process
configuration item
As a developer, my Rancher Labs colleagues and I prefer to use light and simple tools, here I will share 3 of my favorite tools that will help us with our first project.
-
go-skel - MicroService skeleton for Go language, just execute run ./skel.sh test123, it will create a skeleton for the new go project test123.
-
trash - A vendor management tool for Go. There are actually a lot of dependency management tools out there, but when it comes to ad-hoc dependency management, trash is excellent and simple to use.
-
dapper - A tool that wraps any existing build tool in a consistent environment
Add client-go as a dependency
To facilitate the use of client-go code, we must set it as a dependency of the project. Add this to the vendor.conf file:

Then run trash. It will pull all dependencies defined in vendor.conf into the vendor folder of the project. Here you need to make sure that client-go is compatible with the Kubernetes version corresponding to your cluster.
create a client
Before creating a client that communicates with the Kubernetes API, we must first decide how to run our tool: inside or outside the Kubetnetes cluster. When the application runs inside the cluster, it is containerized and deployed as a Kubernetes pod. It also provides some extra features: you can choose how to deploy it (Deamon set runs on each node, or as a deployment of n replicas), configure checks against it, and more. When the application runs outside the cluster, it needs to be managed by itself. The following configuration makes our tool more flexible and supports two ways of defining clients based on the config flag:
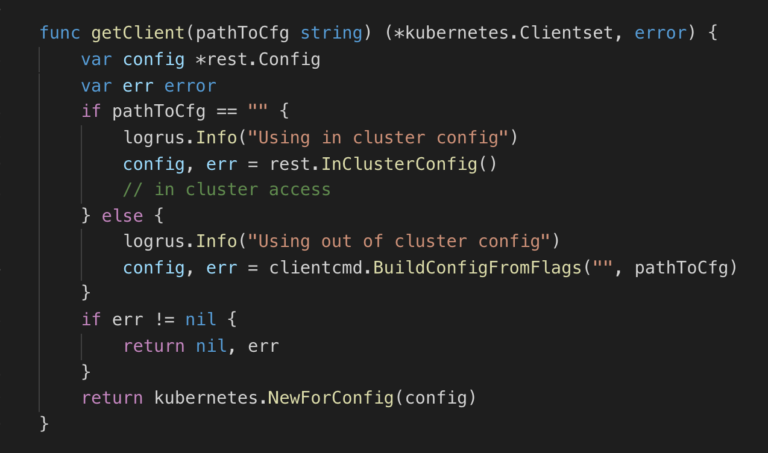
We'll use the run-out-of-cluster approach when debugging the application so that you don't need to build the image every time and redeploy it as a Kubernetes pod. After testing the application, we can build the image and deploy it to the cluster.
As you can see in the screenshot, the configuration is being built and passed to kubernetes.NewForConfig to generate the client.
Use basic CRUDs
Our tool needs to monitor nodes. Before implementing the logic flow, let's get familiar with using client-go to perform CRUD operations:
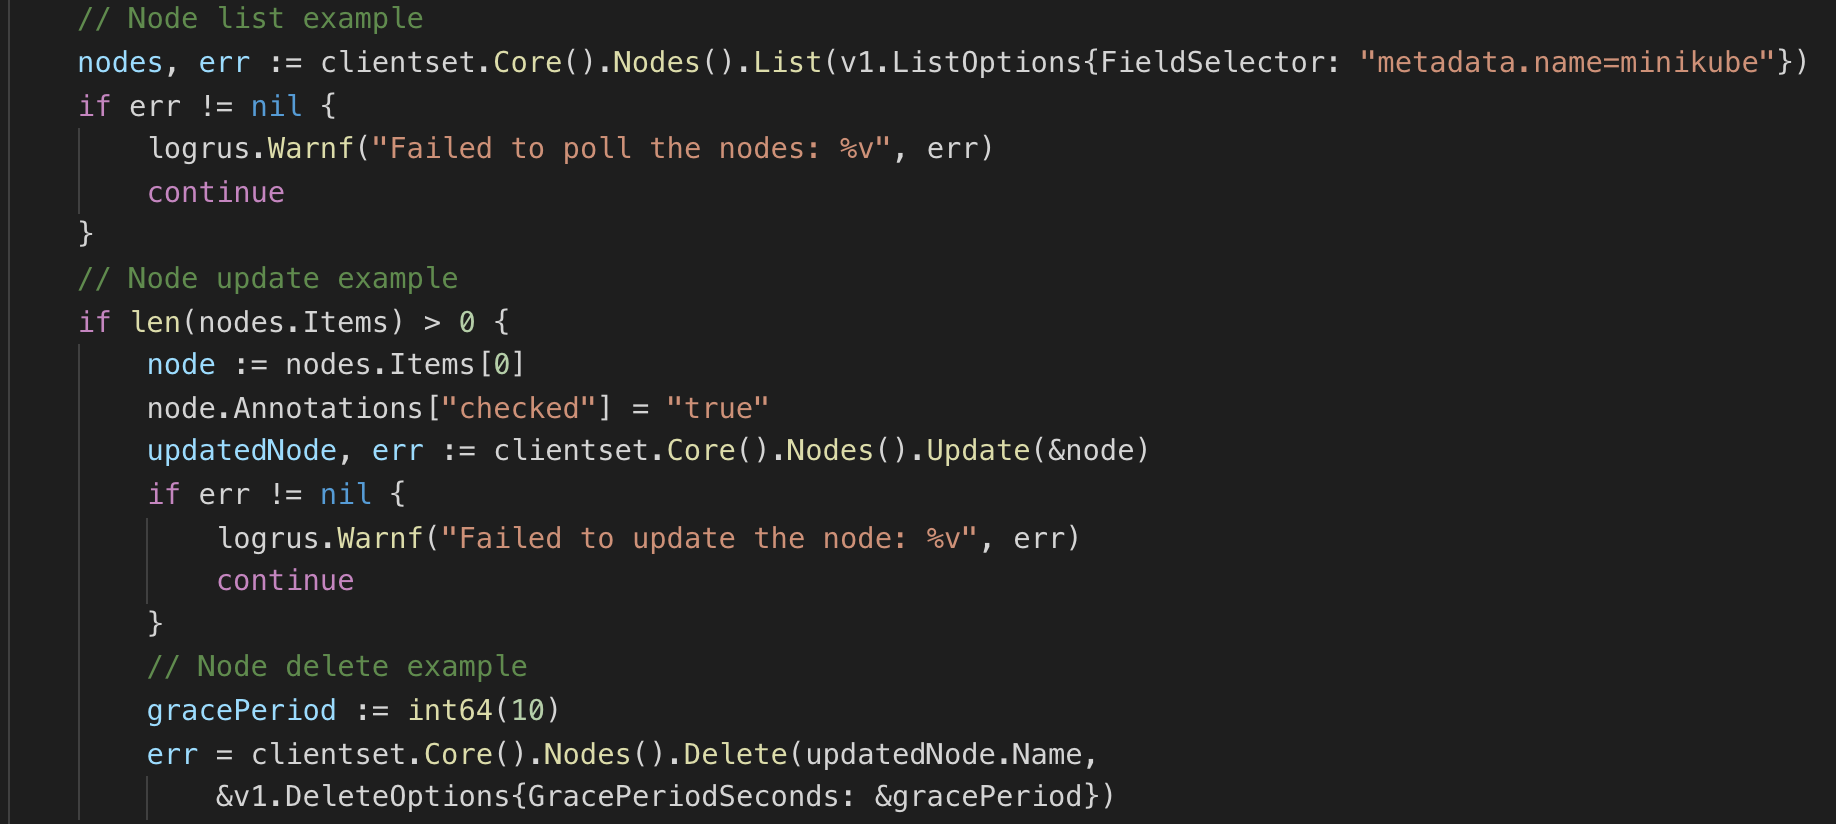
The screenshot above shows:
-
List node minikube, implemented through FieldSelector filter
-
Update the node with the new label
-
Use the gracePerios=10 seconds command to delete nodes - meaning that the delete operation will not be performed until 10 seconds after the command is executed
All of the above steps are performed using the clientset we created earlier.
We also need information about the mirror on the node; it can be retrieved by accessing the corresponding field:

Use Informer for monitoring/notification
Now we know how to get nodes from the Kubernetes APIs and get image information from them. So how do we monitor changes in image size? The easiest way is to periodically poll the nodes, calculate the current mirror storage capacity, and compare it with the results of previous polls. The downside here is that the list call we perform fetches all nodes regardless of whether they have changed or not, which can be expensive - especially when the polling interval is short. And what we really want to achieve is - to be notified when the node changes, and only after that execute our logic flow. These are what client-go's Informer does.
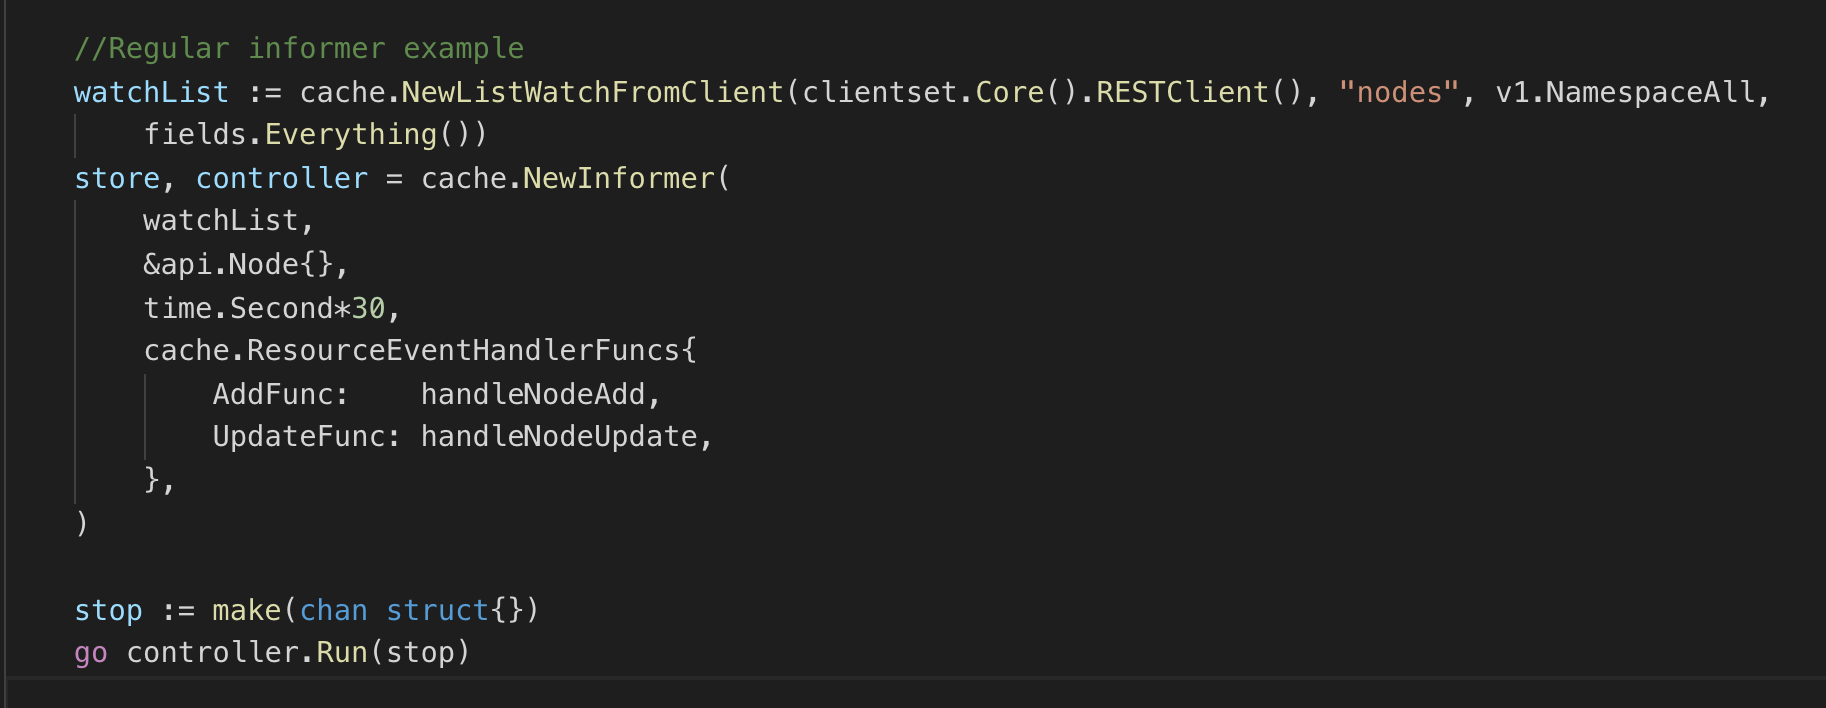
In this example, we create an Informer for the node object through the watchList command to monitor the node, set the object type to api.Node and a synchronization period of 30 seconds to periodically poll the node, regardless of whether the node changes - this way is in An update event is fine to undo when it terminates for some reason. In the last parameter, we pass 2 callback functions - handleNodeAdd and handleNodeUpdate. These callback functions have the actual logic and are fired when the image occupancy storage on the node changes. NewInformer returns 2 objects - controller and store. Once the controller starts, it will start monitoring node.update and node.add and call the callback function. The storage area of this part of the code is located in the memory cache, which is updated by the informer. In addition, you can get node objects in the cache area without calling Kubernetes APIs directly:

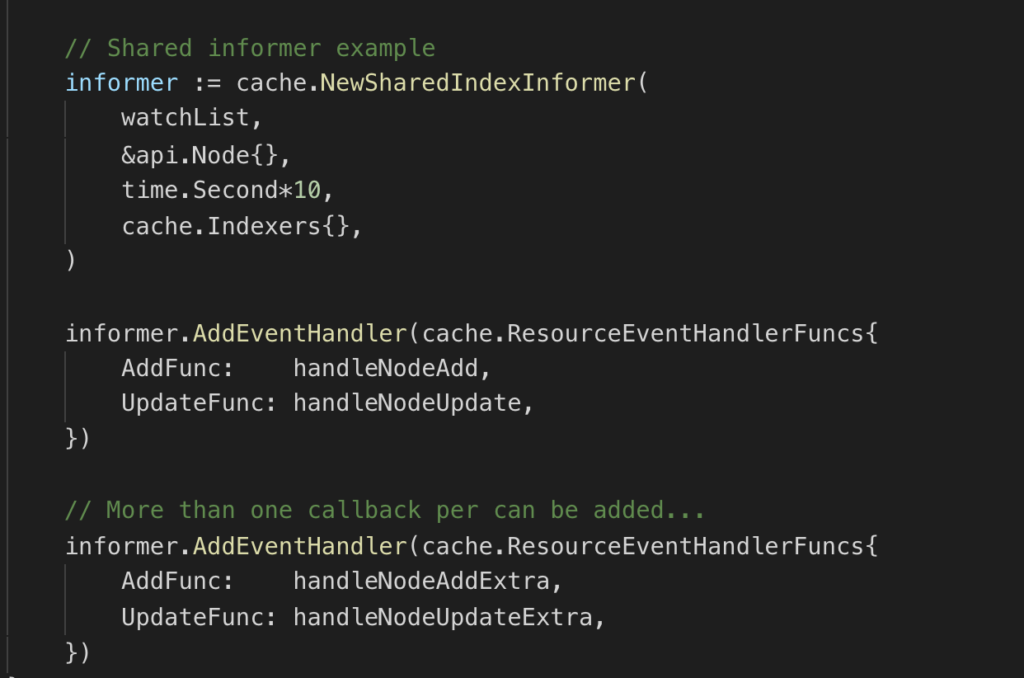
We only have one controller in our project, and using a regular Informer is enough. However, if in the future your project ends up with multiple controllers for the same object, I suggest you use SharedInformer. In this way, you don't need to add Informer to each controller one by one, you only need to register a Shared informer, and let each controller register its own set of callback functions to return the shared cache, which can reduce memory usage:
Deployment time
Time to deploy and test the code! For the first run, we just need to create a go binary and run it in out-of-cluster mode:

To change the message output, deploy a pod with an image that is not present on the current node.
After the basic functionality has been tested, the next step is to try running it in cluster mode. To do this we must first create the image and define its Dockerfile:
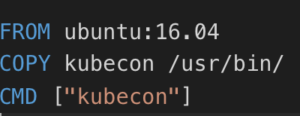
And create an image with docker build, which will generate an image that can be used to deploy pods in Kubernetes. Now your application can run as a pod on the Kubernetes cluster. Here is an example of a deployment definition that I used to deploy our application in the previous screenshot:

In this paper we have done the following work:
- Create a go project
- Add the dependencies of the client-go package to the project
- Create a client for communicating with the Kubernetes api
- Define an Informer that monitors node object changes and executes a callback function once it happens
- Implement an actual logic in the callback function
- Run the binary outside the cluster to test the code and deploy it to the cluster
For more dry goods articles, please pay attention to our WeChat public account (RancherLabs)~