RabbitMQ is developed in erlang, and clustering is very convenient, because erlang is a distributed language by nature, but it does not support load balancing itself. Rabbit mode is roughly divided into the following three modes: single mode, normal mode and mirror mode.
Single mode : The simplest case, non-cluster mode.
have nothing to say.
Normal Mode : The default cluster mode.
For Queue, the message entity only exists in one of the nodes, and the two nodes A and B only have the same metadata, that is, the queue structure. After the message enters the Queue of node A, when the consumer pulls from node B, RabbitMQ will temporarily transfer the message between A and B, take out the message entity in A and send it to the consumer through B. Therefore, the consumer should try to connect every A node from which to fetch messages. That is, for the same logical queue, physical queues must be established on multiple nodes. Otherwise, regardless of whether the consumer is connected to A or B, the exit will always be at A, which will cause a bottleneck. A problem with this mode is that when node A fails, node B cannot get the message entity that has not been consumed in node A. If you do message persistence, you have to wait for the A node to recover before it can be consumed; if there is no persistence, then there is no such thing...
Mirror mode : Make the required queue into a mirror queue, which exists in multiple nodes, and belongs to the HA scheme of RabbitMQ.
This mode solves the above problems. The difference between this mode and the ordinary mode is that the message entity will actively synchronize between the mirror nodes, rather than temporarily pulling data when the consumer fetches data. The side effects of this mode are also obvious. In addition to reducing system performance, if there are too many mirror queues and a large number of messages entering, the network bandwidth inside the cluster will be greatly consumed by this synchronous communication. It is suitable for occasions with high sexual requirements.
6.1 Basic Concepts in Clustering
The cluster nodes of RabbitMQ include memory nodes and disk nodes. As the name implies, memory nodes put all data in memory, and disk nodes put data on disk. However, as mentioned above, if message persistence is turned on when delivering a message, even if it is an in-memory node, the data is still safely placed on disk.
A RabbitMQ cluster can share users, vhosts, queues, exchanges, etc. All data and state must be replicated on all nodes, with one exception being those message queues that currently only belong to the node that created it, although they are visible and available. read by all nodes. RabbitMQ nodes can dynamically join the cluster. A node can join the cluster or perform a basic load balancing from the cluster ring cluster.
There are two types of nodes in the cluster :
- Memory nodes : only save state to memory (with one exception: persistent content of persistent queues will be saved to disk);
- Disk node : saves state to memory and disk. Although memory node does not write to disk, it performs better than disk node. In a cluster, only one disk node is needed to save the state. If there are only memory nodes in the cluster, it cannot be Stop them or all state, messages, etc. will be lost.
Ideas :
So how to achieve high availability of RabbitMQ, let's build a common cluster mode first, and then configure the mirror mode to achieve high availability on the basis of this mode, add a reverse proxy in front of the Rabbit cluster, and producers and consumers access the RabbitMQ cluster through the reverse proxy .
Architecture diagram :
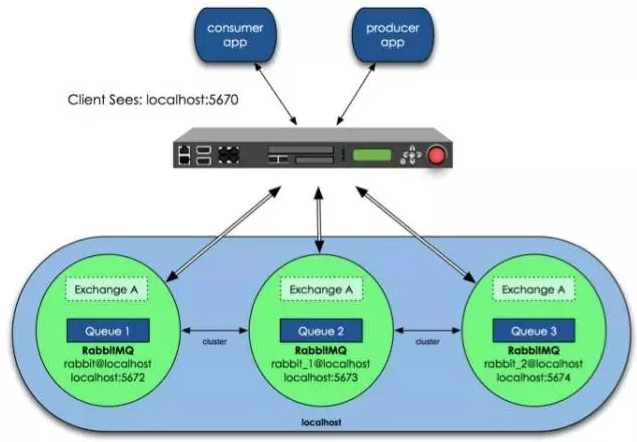
In the above figure, three RabbitMQs are running on the same host, using different service ports. Of course, in our actual production, multiple RabbitMQs must be running on different physical servers, otherwise the significance of high availability will be lost.
6.2 Cluster Mode Configuration
The design architecture can be as follows: In a cluster, there are 4 machines, one of which uses disk mode and the other two use memory mode. 2 nodes in memory mode are undoubtedly faster, so clients (consumer, producer) connect to access them. On the other hand, the nodes in disk mode are only used for data backup because disk IO is relatively slow, and the other one is used as a reverse proxy.
The hostnames of the four servers are: queue, panyuntao1, panyuntao2, and panyuntao3 (ip:172.16.3.110)
Configuring a RabbitMQ cluster is very simple and requires only a few commands. The configuration steps are as follows:
Step 1 : queue, panyuntao1, and panyuntao2 are used as RabbitMQ cluster nodes, install RabbitMq-Server respectively, and start RabbitMq-server respectively after installation.
For startup commands # Rabbit-Server start, installation procedures and startup commands, see:http://www.cnblogs.com/flat_peach/archive/2013/03/04/2943574.html
Step 2 : In the installed three node servers, modify the /etc/hostsfiles respectively and specify the hosts of queue, panyuntao1 and panyuntao2, such as
172.16.3.32 queue

172.16.3.107 panyuntao1

172.16.3.108 panyuntao2- 1
- 2
- 3
- 4
- 5
The hostname file should also be correct, namely queue, panyuntao1, panyuntao2. If you modify the hostname, it is recommended to modify it before installing rabbitmq. Please note that the RabbitMQ cluster nodes must be in the same network segment, if it is across the WAN, the effect will be poor.
Step 3 : Set each node cookie. The cluster of RabbitMQ relies on the cluster of erlang to work, so the cluster environment of erlang must be built first. Each node in the Erlang cluster is implemented by a magic cookie, which is stored in /var/lib/rabbitmq/.erlang.cookiethe file with 400 permissions. Therefore, it is necessary to ensure that the cookie of each node is consistent, otherwise the communication between nodes will not be possible.
-r--------. 1 rabbitmq rabbitmq 20 3月 5 00:00 /var/lib/rabbitmq/.erlang.cookie- 1
Copy the value on one of the nodes .erlang.cookieand save it to other nodes, or you scpcan use the method, but pay attention to the file permissions and the owner group. Let's copy the cookies in the queue to panyuntao1 and panyuntao2, and modify the .erlang.cookiepermissions in panyuntao1 and panyuntao2 first:
#chmod 777 /var/lib/rabbitmq/.erlang.cookie - 1
Copy the queue /var/lib/rabbitmq/.erlang.cookiefile to the same location of panyuntao1 and panyuntao2 (and vice versa). This file is the verification key for communication between cluster nodes. All nodes must be the same. After copying, restart RabbitMQ. Don't forget after copying Restore .erlang.cookiepermissions, otherwise you may encounter errors:
#chmod 400 /var/lib/rabbitmq/.erlang.cookie - 1
After setting the cookie, restart the RabbitMQ of the three nodes:
# rabbitmqctl stop
# rabbitmq-server start- 1
- 2
Step 4 : Stop the RabbitMQ service of all nodes, and then use the detached parameter to run it independently. This step is very important, especially if the node is stopped and the node is restarted after adding a node, you can refer to this order if it fails to start.
queue# rabbitmqctl stop
panyuntao1# rabbitmqctl stop
panyuntao2# rabbitmqctl stop

queue# rabbitmq-server -detached
panyuntao1# rabbitmq-server -detached
panyuntao2# rabbitmq-server -detached- 1
- 2
- 3
- 4
- 5
- 6
- 7
Look at each node separately:
queue# rabbitmqctl cluster_status
Cluster status of node rabbit@queue ...
[{nodes,[{disc,[rabbit@queue]}]},
{running_nodes,[rabbit@queue]},
{partitions,[]}]
...done.

panyuntao1# rabbitmqctl cluster_status
Cluster status of node rabbit@panyuntao1...
[{nodes,[{disc,[rabbit@panyuntao1]}]},
{running_nodes,[rabbit@panyuntao1]},
{partitions,[]}]
...done.

panyuntao2# rabbitmqctl cluster_status
Cluster status of node rabbit@panyuntao2...
[{nodes,[{disc,[rabbit@panyuntao2]}]},
{running_nodes,[rabbit@panyuntao2]},
{partitions,[]}]
...done.- 1
- 2
- 3
- 4
- 5
- 6
- 7
- 8
- 9
- 10
- 11
- 12
- 13
- 14
- 15
- 16
- 17
- 18
- 19
- 20
Step 5 : Connect panyuntao1 and panyuntao2 as memory nodes with the queue, and execute the following command on panyuntao1
panyuntao1# rabbitmqctl stop_app
panyuntao1# rabbitmqctl join_cluster --ram rabbit@queue
panyuntao1# rabbitmqctl start_app

panyuntao2# rabbitmqctl stop_app
panyuntao2# rabbitmqctl join_cluster --ram rabbit@queue
panyuntao2# rabbitmqctl start_app- 1
- 2
- 3
- 4
- 5
- 6
- 7
The above command first stops the RabbitMQ application, then calls the cluster command to connect panyuntao1 to make the two become a cluster, and finally restarts the RabbitMQ application. Under this cluster command, panyuntao1 and panyuntao2 are memory nodes, and queue is a disk node (after RabbitMQ is started, it is a disk node by default).
queue If you want panyuntao1 or panyuntao2 to be a disk node in the cluster, you can join_clusterremove the --ramparameter from the command.
#rabbitmqctl join_cluster rabbit@queue - 1
As long as it includes itself in the node list, it becomes a disk node. In a RabbitMQ cluster, at least one disk node must exist.
Step 6 : On queue, panyuntao1, and panyuntao2, run the cluster_statuscommand to check the cluster status.
[root@queue ~]# rabbitmqctl cluster_status
Cluster status of node rabbit@queue ...
[{nodes,[{disc,[rabbit@queue]},{ram,[rabbit@panyuntao2,rabbit@panyuntao1]}]},
{running_nodes,[rabbit@panyuntao2,rabbit@panyuntao1,rabbit@queue]},
{partitions,[]}]
...done.

[root@panyuntao1 rabbitmq]# rabbitmqctl cluster_status
Cluster status of node rabbit@panyuntao1 ...
[{nodes,[{disc,[rabbit@queue]},{ram,[rabbit@panyuntao2,rabbit@panyuntao1]}]},
{running_nodes,[rabbit@panyuntao2,rabbit@queue,rabbit@panyuntao1]},
{partitions,[]}]
...done.

[root@panyuntao2 rabbitmq]# rabbitmqctl cluster_status
Cluster status of node rabbit@panyuntao2 ...
[{nodes,[{disc,[rabbit@queue]},{ram,[rabbit@panyuntao2,rabbit@panyuntao1]}]},
{running_nodes,[rabbit@panyuntao1,rabbit@queue,rabbit@panyuntao2]},
{partitions,[]}]
...done.- 1
- 2
- 3
- 4
- 5
- 6
- 7
- 8
- 9
- 10
- 11
- 12
- 13
- 14
- 15
- 16
- 17
- 18
- 19
- 20
At this time, we can see the cluster information of each node, there are two memory nodes and one disk node respectively.
Step 7 : Write a message queue to any cluster node, and it will be copied to another node. We will see that the number of message queues on the two nodes is the same.
root@panyuntao2 :~# rabbitmqctl list_queues -p hrsystem

Listing queues …
test_queue 10000
…done.

root@panyuntao1 :~# rabbitmqctl list_queues -p hrsystem
Listing queues …
test_queue 10000
…done.

root@queue:~# rabbitmqctl list_queues -p hrsystem
Listing queues …
test_queue 10000
…done.- 1
- 2
- 3
- 4
- 5
- 6
- 7
- 8
- 9
- 10
- 11
- 12
- 13
- 14
- 15
where the -pparameter is the vhost name.
In this way, the RabbitMQ cluster works normally,
This mode is more suitable for non-persistent queues, only if the queue is non-persistent, the client can reconnect to other nodes in the cluster and recreate the queue. If the queue is persistent, the only way is to recover the failed node.
Why doesn't RabbitMQ replicate the queue to every node in the cluster? This conflicts with the design of its cluster, which is designed to linearly increase performance (CPU, memory) and capacity (memory, disk) when more nodes are added. The reasons are as follows:
storage space: If every cluster node had a full copy of every queue, adding nodes wouldn’t give you more storage capacity. For example, if one node could store 1GB of messages, adding two more nodes would simply give you two more copies of the same 1GB of messages.
performance: Publishing messages would require replicating those messages to every cluster node. For durable messages that would require triggering disk activity on all nodes for every message. Your network and disk load would increase every time you added a node, keeping the performance of the cluster the same (or possibly worse).
Of course, the new version of RabbitMQ cluster also supports queue replication (there is an option to configure). For example, in a cluster with five nodes, the content of a queue can be specified to be stored on two nodes, so as to achieve a balance between performance and high availability.
6.3 Mirror Mode Configuration
The default cluster mode of RabbitMQ is configured above, but it does not guarantee the high availability of the queue. Although switches and bindings can be copied to any node in the cluster, the content of the queue will not be copied. Although this mode solves part of the node pressure, the queue node The downtime directly makes the queue unusable and can only wait for restart. Therefore, if the queue node is down or fails, it is necessary to copy the queue content to each node in the cluster, and a mirror queue needs to be created.
Next, let's take a look at how mirroring mode can solve the problem of replication, thereby improving availability.
Step 1: Add a load balancer
Regarding load balancers, commercial ones such as F5's BIG-IP and Radware's AppDirector are hardware architecture products that can achieve high processing power. But the expensive price of these products will stop people, so we also have software load balancing solutions. Software LB commonly used by Internet companies generally includes LVS, HAProxy, and Nginx. LVS is a kernel-layer product, mainly responsible for packet forwarding at the fourth layer, which is more complicated to use. HAProxy and Nginx are products at the application layer, but Nginx is mainly used to handle HTTP, so here we choose HAProxy as the LB of the RabbitMQ front end.
The installation and use of HAProxy is very simple, directly under CentOS yum install haproxy, and then change /etc/haproxy/haproxy.cfgthe file. The content of the file is as follows:
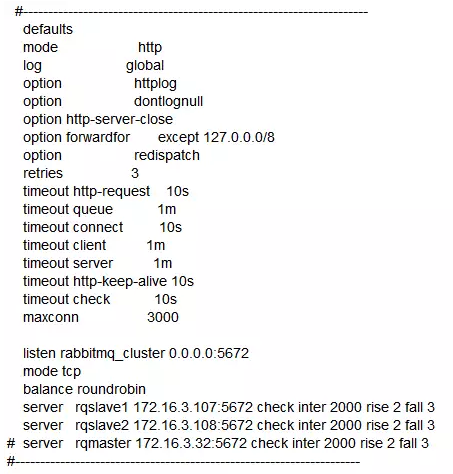
The load balancer will monitor port 5672, poll our two memory nodes 172.16.3.107and 172.16.3.108port 5672, which 172.16.3.32are disk nodes. They only do backup and are not provided to producers and consumers. Of course, if our server resources are sufficient, we can configure multiple Disk nodes, so that disk nodes will not be affected by failures unless they fail at the same time.
Step 2: Configure the policy
Using the Rabbit mirroring function needs to be implemented based on the RabbitMQ policy, which is used to control and modify the cluster-wide behavior of a vhost queue and Exchange. Enable the policy on any node in the cluster, and the policy will be automatically synchronized to the cluster nodes:
# rabbitmqctl set_policy -p hrsystem ha-allqueue"^" '{"ha-mode":"all"}'- 1
This line of command creates a policy on the vhost name hrsystem, the policy name is ha-allqueue, the policy mode is all, that is, copied to all nodes, including new nodes, and the policy regular expression is “^”all matches all queue names. E.g:
rabbitmqctl set_policy -p hrsystem ha-allqueue "^message" '{"ha-mode":"all"}'- 1
Note : "^message"This rule should be modified according to yourself. This refers to "message"the queue name at the beginning of synchronization. The one we use when configuring is applied to all queues, so the expression is "^", see the official set_policydescription:
set_policy [-p vhostpath] {name} {pattern} {definition} [priority]- 1
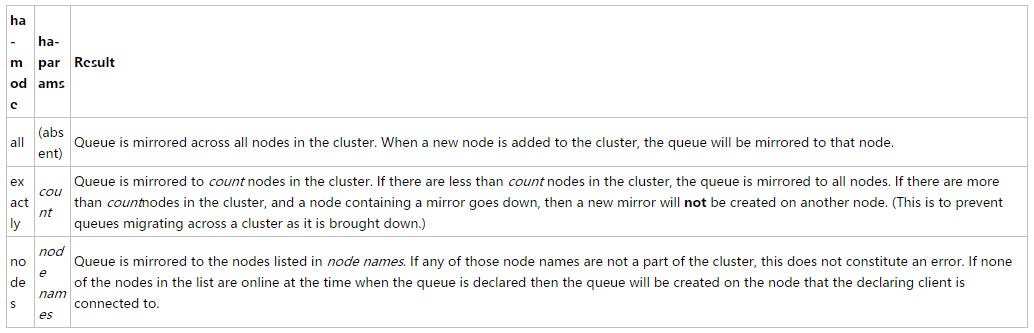
ha-mode:
step3:
When creating a queue, you need to specify haparameters. If you don't specify x-ha-prolicyit, you will not be able to copy it. C#Code snippet below :
using ( var bus = RabbitHutch.CreateBus(ConfigurationManager .ConnectionStrings["RabbitMQ"].ToString())) {
    bus.Subscribe< TestMessage>("word_subscriber" , message => RunTable(message),x=>x.WithArgument("x-ha-policy" , "all"));
    Console.WriteLine("Subscription Started. Hit any key quit" );
    Console.ReadKey();
}- 1
- 2
- 3
- 4
- 5
The client uses the load server 172.16.3.110(panyuntao3) to send messages, and the queue will be replicated to all nodes. Of course, the policy can also be configured to formulate certain nodes. At this time, any node failure or restart will not affect our normal use of a certain queue. At this point, we have completed the high availability configuration of RabbitMQ (there is no way if all nodes are down). Using the RabbitMQ management side, you can see the column status in the cluster mirroring mode:

The following is the content of the textbook, there is a problem: (It should be that the plugin is not disabled)
1. Make sure all rabbitMQ services are closed (rabbitmqctl stop), close all plugins or uninstall all plugins
2. The default port is 5672, so starting the three directly will conflict. It is necessary to use the RABBITMQ_NODENAME and RABBITMQ_NODE_PORT environment variables to formulate the unique node name and segment slogan.
$ RABBITMQ_NODE_PORT=5672 RABBITMQ_NODENAME=rabbit rabbitmq-server -detached
Warning: PID file not written; -detached was passed.
$ RABBITMQ_NODE_PORT=5673 RABBITMQ_NODENAME=rabbit_1 rabbitmq-server -detached
Warning: PID file not written; -detached was passed.
$ RABBITMQ_NODE_PORT=5674 RABBITMQ_NODENAME=rabbit_2 rabbitmq-server -detached
Warning: PID file not written; -detached was passed.
In order to ensure success, the loaded plugins need to be disabled: (refer to an article I reproduced)
The next steps are simple:
1. Stop the RabbitMQ application on the second node:
rabbitmqctl -n rabbit_1@localhost stop_app
rabbitmqctl -n rabbit_2@localhost stop_app
2. Clear sky
rabbitmqctl -n rabbit_1@localhost reset
rabbitmqctl -n rabbit_2@localhost reset
3. Add:
rabbitmqctl -n rabbit_1@localhost cluster rabbit@localhost rabbit_1@localhost
What finally succeeded was:
rabbitmqctl -n rabbit_1@localhost join_cluster rabbit@localhost
Clustering node rabbit_1@localhost with rabbit@localhost ...
rabbitmqctl -n rabbit_2@localhost join_cluster rabbit@localhost --ram [in order to add rabbit_2 to ram, the other two are disc]
4. Restart
rabbitmqctl -n rabbit_1@localhost start_app
rabbitmqctl -n rabbit_2@localhost start_app