1. git tutorial
1. Installation
Install Git on Windows
To use Git on Windows, you can download the installer directly from the Git official website (for students with slow internet speeds, please move to the domestic mirror ), and then install it according to the default options.
After the installation is complete, find "Git" -> "Git Bash" in the start menu, and a similar command line window pops up, indicating that the Git installation is successful!
After the installation is complete, you need to set the last step, enter at the command line:
$ git config --global user.name "Your Name"
$ git config --global user.email "[email protected]"
2. Create a repository
What is a repository? Repository, also known as warehouse, English name repository , you can simply understand it as a directory, all files in this directory can be managed by Git, and the modification and deletion of each file can be tracked by Git, so that it can be tracked at any time. History, or can be "reverted" at some point in the future.
So, creating a repository is very simple. First, choose a suitable place and create an empty directory ( Note: If you use Windows system, in order to avoid encountering various inexplicable problems, please make sure that the directory path does not contain Chinese. )
git initThe second step is to turn this directory into a repository that Git can manage through the command
$ git init
It can be found that there is one more directory under the current directory .git. This directory is used by Git to track and manage the repository. If you have nothing to do, please do not manually modify the files in this directory. Otherwise, the changes will destroy the Git repository.
If you don't see .gitthe directory, it's because the directory is hidden by default, and ls -ahyou can see it with the command.
3. Add files to the local repository
-
The first step is to use the git status command to view the modified files
- The second step, use the command
git add <file>, note that it can be used repeatedly, add multiple files, add all modified files with git add . (A solid dot represents all files) -
The third step, use the command
git commit -m “本次提交的代码的说明”, complete.
4. Add remote library
After creating a Git repository locally, create another Git repository on GitHub and synchronize the two repositories remotely
- The first step is to create a project on GitHub

- The second step, generate ssh key reference in git: https://www.cnblogs.com/horanly/p/6604104.html
- The third step is to check the ssh address
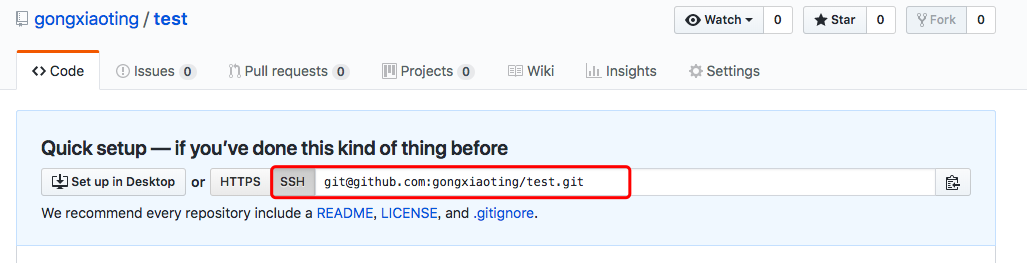
- Step 4: Associate the local library with the remote library
$ git remote add origin [email protected]:gongxiaoting/test.git
- The fifth step, push all the contents of the local local library to the remote library
$ git push -u origin master
Pushing the contents of the local library to the remote, with the git pushcommand, actually pushes the current branch masterto the remote.
Since the remote library is empty, when we push the masterbranch for the first time, we add -uparameters. Git will not only masterpush the local branch content to the remote new masterbranch, but also associate the localmaster branch with the remotemaster branch. The command can be simplified when pushing or pulling.
Note: For team development, it is best for one person to upload the code first, and others to clone the code
clone from remote repository
$ git clone [email protected]:gongxiaoting/test.git
5. Branch management
In order to prevent the original code from being damaged when the team is developing, students are encouraged to upload the code through their own branches, check and merge.
- Create and switch to branch named dev
$ git checkout -b dev
Switched to a new branch 'dev'
git branchView the current branch with the command- upload code to branch
git remote add origin [email protected]:gongxiaoting/test.git
$ git push origin dev
- merge branch
$ git checkout master // switch back to the master branch
$ git merge dev6. Version rollback
- git log view commit history
$ git log
commit 3628164fb26d48395383f8f31179f24e0882e1e0
Author: Michael Liao <[email protected]>
Date:   Tue Aug 20 15:11:49 2013 +0800

    append GPL //current latest version

commit ea34578d5496d7dd233c827ed32a8cd576c5ee85 //The second version of the code
Author: Michael Liao <[email protected]>
Date:   Tue Aug 20 14:53:12 2013 +0800

    add distributed //Second version name

commit cb926e7ea50ad11b8f9e909c05226233bf755030 //The first version of the code
Author: Michael Liao <[email protected]>
Date: Mon Aug 19 17:51:55 2013 +0800

    wrote a readme file //name of the first version
Now, we want to roll back the current version "append GPL" to the previous version "add distributed", we can use the git resetcommand:
$ git reset --hard HEAD^ //Return to the previous version
HEAD is now at ea34578 add distributed
Go back to the previous version git reset --hard HEAD^^
Go back to the previous version git reset --hard HEAD^^^
After returning to the old version and regretting it, you can use git reset --hard (version number) to go back to this version
For example, git reset --hard 3628164fb returns to the append GPL version (only the first few digits of the version number are written, and the system can separate them)
Reference from: https://www.liaoxuefeng.com/wiki/0013739516305929606dd18361248578c67b8067c8c017b000
If you have any questions about git, you can leave me a message, and I will answer it in time and update it in the blog~