Day 2: After configuring the environment, we will implement a small demo today. In addition, you need to know some shortcut keys that are common in the development process. I think it's still very important.
First create a new Dynamic Web Project, and then create an option to create a web.xml. You can also build this yourself.
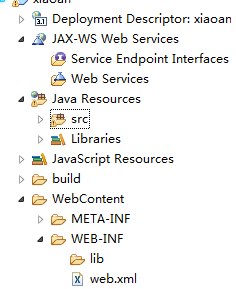
Create a directory like this. Then we can start writing our little Demo. Create a new package in the Src folder, and then create a new servlet in it. as follows
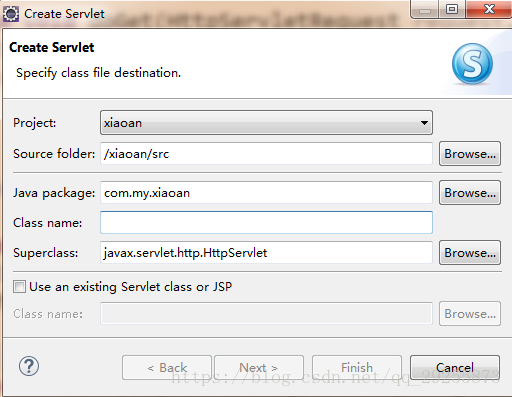
What you can see is an inheritance of HttpServlet. Then we need to write a service method, either DoGet or DoPost can be used. mine
package com.my.xiaoan;
import java.io.IOException;
import javax.servlet.ServletException;
import javax.servlet.ServletRequest;
import javax.servlet.ServletResponse;
import javax.servlet.annotation.WebServlet;
import javax.servlet.http.HttpServlet;
import javax.servlet.http.HttpServletRequest;
import javax.servlet.http.HttpServletResponse;
import org.apache.catalina.servlet4preview.RequestDispatcher;
import org.apache.jasper.tagplugins.jstl.core.Out;
/**
* Servlet implementation class myservet
*/
@WebServlet("/myservet")
public class myservet extends HttpServlet {
private static final long serialVersionUID = 1L;
/**
* @see HttpServlet#HttpServlet()
*/
public myservet() {
super();
// TODO Auto-generated constructor stub
}
/**
* @see HttpServlet#doGet(HttpServletRequest request, HttpServletResponse response)
*/
protected void doGet(HttpServletRequest request, HttpServletResponse response) throws ServletException, IOException {
// TODO Auto-generated method stub
response.getWriter().append("Served at: ").append(request.getContextPath());
}
/**
* @see HttpServlet#doPost(HttpServletRequest request, HttpServletResponse response)
*/
protected void doPost(HttpServletRequest request, HttpServletResponse response) throws ServletException, IOException {
// TODO Auto-generated method stub
doGet(request, response);
}
public void service(ServletRequest request, ServletResponse response)throws ServletException, IOException{
System.out.println("执行了");
String name = request.getParameter("name");
String pass = request.getParameter("pass");
if(name.equals("test") && pass.equals("123")) { request.getRequestDispatcher("/Sucess.jsp").forward(request, response);//页面跳转,还有其它两种方式。 }else { request.getRequestDispatcher("/Failure.jsp").forward(request,response); } }
}
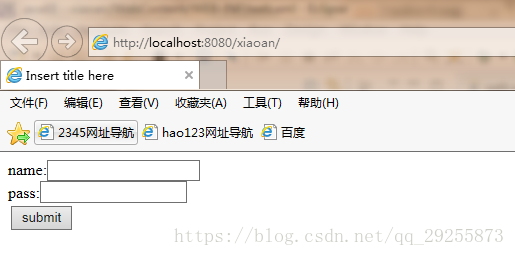
The class is written, then write a simple page.
The page only needs to contain a Form form.
<form method = "post" action = "./Action">
name:<input name = "name" type = "text"><br/>
pass:<input type = "password" name = "pass"><br/>
<table>
<tr>
<td><input type = "submit" value = "submit">
</tr>
</table>
</form>
Next, it's time to configure web.xml.
<servlet>
<servlet-name>Action</servlet-name>
<servlet-class>
com.my.xiaoan.myservet
</servlet-class>
</servlet>
<servlet-mapping>
<servlet-name>Action</servlet-name>
<url-pattern>/Action</url-pattern>
</servlet-mapping>
This is actually like a router, specifying the path for you. The class attribute corresponds to the class name you write.
After these are configured, you can start Tomcat for viewing.
After clicking submit, the service method will be executed. It will also jump to the interface you specified. On the third day, we started to learn the three major frameworks of Java. Contrast that with using servlets directly, and you'll see the convenience of a framework.