The Spring framework is very familiar to Java back-end programmers. Before, I only knew that it was implemented by reflection, but after I understood it, I realized that there are many ingenious designs in it. If you don't look at Spring's source code, you will lose an opportunity to learn from the master: its code specifications and design ideas are worth learning. Most of us programmers are wild and do not know what code specification is. After writing the code for a month, other old drivers have to spend 3 days refactoring. I believe that most old drivers have a headache to read the novice code.
Without further ado, let's get to the point of today, in the design of web applications, the MVC pattern has been widely used. SpringMVC takes the DispatcherServlet as the core, which is responsible for coordinating and organizing different components to complete the work of request processing and returning the response, and implements the MVC pattern. To implement your own SpringMVC framework, you need to start with the following points:
1. Understand the SpringMVC running process and nine major components
Second, sort out your own SpringMVC design ideas
3. Implement your own SpringMVC framework
1. Understand the SpringMVC running process and nine major components
1. The running process of SpringMVC
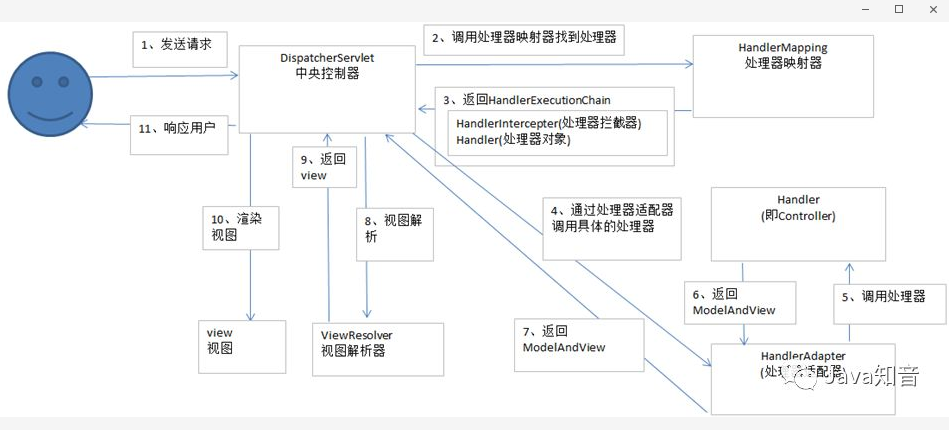
(1) The user sends a request to the front-end controller DispatcherServlet
⑵ DispatcherServlet receives the request and calls the HandlerMapping handler mapper.
(3) The processor mapper finds the specific processor according to the request url, generates the processor object and the processor interceptor (if any) and returns it to the DispatcherServlet.
⑷ DispatcherServlet calls the processor through the HandlerAdapter processor adapter
⑸ Execute the processor (Controller, also called back-end controller).
⑹ Controller execution completes and returns to ModelAndView
⑺ HandlerAdapter returns the controller execution result ModelAndView to DispatcherServlet
⑻ DispatcherServlet passes ModelAndView to ViewReslover view resolver
⑼ ViewReslover returns the specific View after parsing
⑽ DispatcherServlet renders the View (that is, fills the model data into the view).
⑾ DispatcherServlet responds to users.
As can be seen from the above, DispatcherServlet has the functions of receiving requests, responding results, and forwarding. With DispatcherServlet, the coupling between components can be reduced.
2. Nine components of SpringMVC
protected void initStrategies(ApplicationContext context) {
//用于处理上传请求。处理方法是将普通的request包装成
//MultipartHttpServletRequest,后者可以直接调用getFile方法获取File.
	initMultipartResolver(context);
//SpringMVC主要有两个地方用到了Locale:一是ViewResolver视图解析的时候;
//二是用到国际化资源或者主题的时候。
	initLocaleResolver(context);
//用于解析主题。SpringMVC中一个主题对应一个properties文件,
//里面存放着跟当前主题相关的所有资源、//如图片、css样式等。SpringMVC的主题也支持国际化,
	initThemeResolver(context);
//用来查找Handler的。
	initHandlerMappings(context);
//从名字上看,它就是一个适配器。Servlet需要的处理方法的结构却是固定的,
//都是以request和response为参数的方法。//如何让固定的Servlet处理方法调用灵活的Handler来进行处理呢?
//这就是HandlerAdapter要做的事情
	initHandlerAdapters(context);
//其它组件都是用来干活的。在干活的过程中难免会出现问题,出问题后怎么办呢?
//这就需要有一个专门的角色对异常情况进行处理,
//在SpringMVC中就是HandlerExceptionResolver。
	initHandlerExceptionResolvers(context);
//有的Handler处理完后并没有设置View也没有设置ViewName,
//这时就需要从request获取ViewName了,
//如何从request中获取ViewName就是RequestToViewNameTranslator要做的事情了。
	initRequestToViewNameTranslator(context);
//ViewResolver用来将String类型的视图名和Locale解析为View类型的视图。
//View是用来渲染页面的,也就是将程序返回的参数填入模板里,
//生成html(也可能是其它类型)文件。
	initViewResolvers(context);
//用来管理FlashMap的,FlashMap主要用在redirect重定向中传递参数。
	initFlashMapManager(context);
}
Second, sort out the design ideas of SpringMVC
This article only implements its own @Controller, @RequestMapping, and @RequestParam annotations, and readers of other SpringMVC functions can try to implement them by themselves.
1. Read the configuration
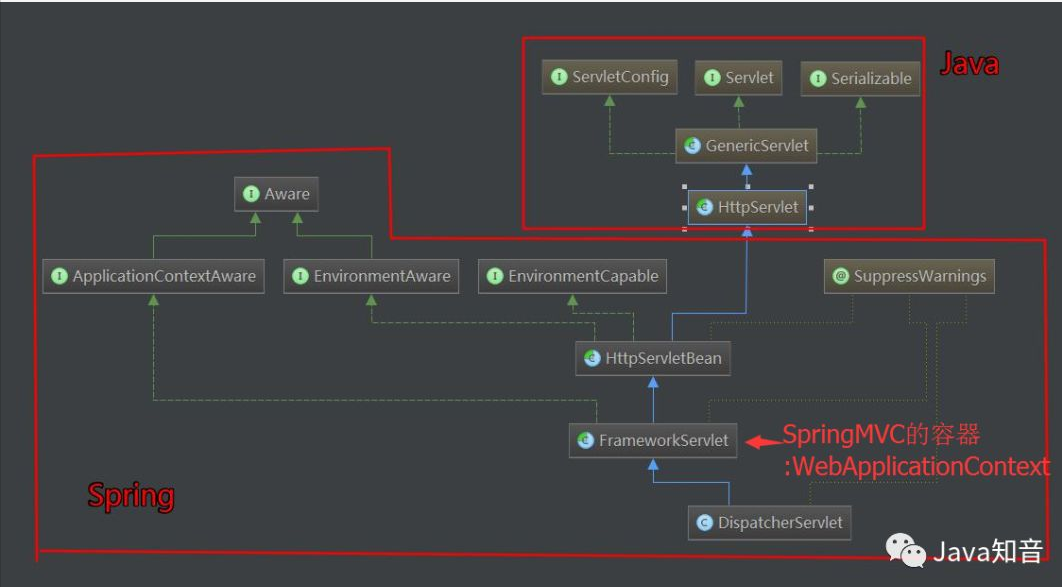
As can be seen from the figure, SpringMVC is essentially a Servlet, which inherits from HttpServlet. FrameworkServlet is responsible for initializing the SpringMVC container and setting the Spring container as the parent container. Because this article only implements SpringMVC, I won't explain too much about the Spring container.
In order to read the configuration in web.xml, we use the ServletConfig class, which represents the configuration information of the current Servlet in web.xml. Load our own MyDispatcherServlet and read the configuration file through web.xml.
2. Initialization stage
Earlier we mentioned that the initStrategies method of DispatcherServlet will initialize 9 major components, but here will implement some of the most basic components of SpringMVC, not all, including in order:
-
load configuration file
-
Scan all classes under the user configuration package
-
Get the scanned class and instantiate it through the reflection mechanism. And put it in the ioc container (Map's key-value pair beanName-bean) beanName is lowercase by default
-
初始化HandlerMapping,这里其实就是把url和method对应起来放在一个k-v的Map中,在运行阶段取出
3、运行阶段
每一次请求将会调用doGet或doPost方法,所以统一运行阶段都放在doDispatch方法里处理,它会根据url请求去HandlerMapping中匹配到对应的Method,然后利用反射机制调用Controller中的url对应的方法,并得到结果返回。按顺序包括以下功能:
-
异常的拦截
-
获取请求传入的参数并处理参数
-
通过初始化好的handlerMapping中拿出url对应的方法名,反射调用
三、实现自己的SpringMVC框架
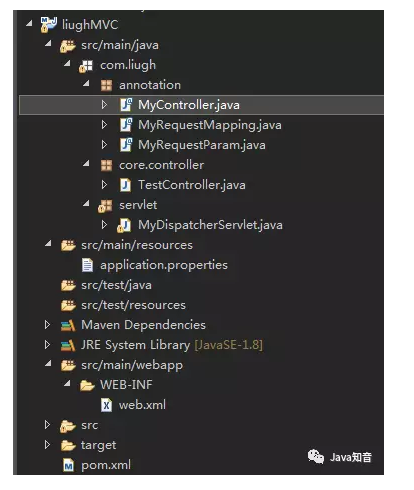
工程文件及目录:
首先,新建一个maven项目,在pom.xml中导入以下依赖:
<project xmlns="http://maven.apache.org/POM/4.0.0"
 xmlns:xsi="http://www.w3.org/2001/XMLSchema-instance"
 xsi:schemaLocation="http://maven.apache.org/POM/4.0.0
http://maven.apache.org/xsd/maven-4.0.0.xsd">
  <modelVersion>4.0.0</modelVersion>
  <groupId>com.liugh</groupId>
  <artifactId>liughMVC</artifactId>
  <version>0.0.1-SNAPSHOT</version>
  <packaging>war</packaging>
  	<properties>
		<project.build.sourceEncoding>UTF-8</project.build.sourceEncoding>
		<maven.compiler.source>1.8</maven.compiler.source>
		<maven.compiler.target>1.8</maven.compiler.target>
		<java.version>1.8</java.version>
	</properties>

	<dependencies>
	     <dependency>
  		   <groupId>javax.servlet</groupId>
		   <artifactId>javax.servlet-api</artifactId>
		   <version>3.0.1</version>
		   <scope>provided</scope>
		</dependency>
    </dependencies></project>
接着,我们在WEB-INF下创建一个web.xml,如下配置:
<?xml version="1.0" encoding="UTF-8"?>
<web-app xmlns:xsi="http://www.w3.org/2001/XMLSchema-instance"
        xmlns="http://java.sun.com/xml/ns/javaee"
        xmlns:web="http://java.sun.com/xml/ns/javaee/web-app_2_5.xsd"
	xsi:schemaLocation="http://java.sun.com/xml/ns/javaee
            http://java.sun.com/xml/ns/javaee/web-app_3_0.xsd"
	version="3.0">
	<servlet>
		<servlet-name>MySpringMVC</servlet-name>
		<servlet-class>com.liugh.servlet.MyDispatcherServlet</servlet-class>
		<init-param>
			<param-name>contextConfigLocation</param-name>
			<param-value>application.properties</param-value>
		</init-param>
		<load-on-startup>1</load-on-startup>
	</servlet>
	<servlet-mapping>
		<servlet-name>MySpringMVC</servlet-name>
		<url-pattern>/*</url-pattern>
	</servlet-mapping></web-app>
application.properties文件中只是配置要扫描的包到SpringMVC容器中。
scanPackage=com.liugh.core创建自己的Controller注解,它只能标注在类上面:
package com.liugh.annotation;
import java.lang.annotation.Documented;
import java.lang.annotation.ElementType;
import java.lang.annotation.Retention;
import java.lang.annotation.RetentionPolicy;
import java.lang.annotation.Target;
@Target(ElementType.TYPE)
@Retention(RetentionPolicy.RUNTIME)
@Documentedpublic @interface MyController {
    /**
     * 表示给controller注册别名
     * @return
     */
    String value() default "";

}
RequestMapping注解,可以在类和方法上:
package com.liugh.annotation;
import java.lang.annotation.Documented;
import java.lang.annotation.ElementType;
import java.lang.annotation.Retention;
import java.lang.annotation.RetentionPolicy;
import java.lang.annotation.Target;
@Target({ElementType.TYPE,ElementType.METHOD})
@Retention(RetentionPolicy.RUNTIME)
@Documentedpublic
@interface MyRequestMapping {
   /**
     * 表示访问该方法的url
     * @return
     */
    String value() default "";

}
RequestParam注解,只能注解在参数上
package com.liugh.annotation;
import java.lang.annotation.Documented;
import java.lang.annotation.ElementType;
import java.lang.annotation.Retention;
import java.lang.annotation.RetentionPolicy;
import java.lang.annotation.Target;
@Target(ElementType.PARAMETER)
@Retention(RetentionPolicy.RUNTIME)
@Documentedpublic
@interface MyRequestParam {
    /**
     * 表示参数的别名,必填
     * @return
     */
    String value();

}
然后创建MyDispatcherServlet这个类,去继承HttpServlet,重写init方法、doGet、doPost方法,以及加上我们第二步分析时要实现的功能:
package com.liugh.servlet;

import java.io.File;
import java.io.IOException;
import java.io.InputStream;
import java.lang.reflect.Method;
import java.net.URL;
import java.util.ArrayList;
import java.util.Arrays;
import java.util.HashMap;
import java.util.List;
import java.util.Map;
import java.util.Map.Entry;
import java.util.Properties;

import javax.servlet.ServletConfig;
import javax.servlet.ServletException;
import javax.servlet.http.HttpServlet;
import javax.servlet.http.HttpServletRequest;
import javax.servlet.http.HttpServletResponse;

import com.liugh.annotation.MyController;
import com.liugh.annotation.MyRequestMapping;

public class MyDispatcherServlet extends HttpServlet{

 private Properties properties = new Properties();

 private List<String> classNames = new ArrayList<>();

 private Map<String, Object> ioc = new HashMap<>();

 private Map<String, Method> handlerMapping = new  HashMap<>();

 private Map<String, Object> controllerMap  =new HashMap<>();


 @Override
 public void init(ServletConfig config) throws ServletException {

   //1.加载配置文件
   doLoadConfig(config.getInitParameter("contextConfigLocation"));

   //2.初始化所有相关联的类,扫描用户设定的包下面所有的类
   doScanner(properties.getProperty("scanPackage"));

   //3.拿到扫描到的类,通过反射机制,实例化,并且放到ioc容器中(k-v  beanName-bean) beanName默认是首字母小写
   doInstance();

   //4.初始化HandlerMapping(将url和method对应上)
   initHandlerMapping();


 }


 @Override
 protected void doGet(HttpServletRequest req, HttpServletResponse resp) throws ServletException, IOException {
   this.doPost(req,resp);
 }

 @Override
 protected void doPost(HttpServletRequest req, HttpServletResponse resp) throws ServletException, IOException {
   try {
     //处理请求
     doDispatch(req,resp);
   } catch (Exception e) {
     resp.getWriter().write("500!! Server Exception");
   }

 }


 private void doDispatch(HttpServletRequest req, HttpServletResponse resp) throws Exception {
   if(handlerMapping.isEmpty()){
     return;
   }

   String url =req.getRequestURI();
   String contextPath = req.getContextPath();

   url=url.replace(contextPath, "").replaceAll("/+", "/");

   if(!this.handlerMapping.containsKey(url)){
     resp.getWriter().write("404 NOT FOUND!");
     return;
   }

   Method method =this.handlerMapping.get(url);

   //获取方法的参数列表
   Class<?>[] parameterTypes = method.getParameterTypes();

   //获取请求的参数
   Map<String, String[]> parameterMap = req.getParameterMap();

   //保存参数值
   Object [] paramValues= new Object[parameterTypes.length];

   //方法的参数列表
       for (int i = 0; i<parameterTypes.length; i++){
           //根据参数名称,做某些处理
           String requestParam = parameterTypes[i].getSimpleName();


           if (requestParam.equals("HttpServletRequest")){
               //参数类型已明确,这边强转类型
             paramValues[i]=req;
               continue;
           }
           if (requestParam.equals("HttpServletResponse")){
             paramValues[i]=resp;
               continue;
           }
           if(requestParam.equals("String")){
             for (Entry<String, String[]> param : parameterMap.entrySet()) {
              String value =Arrays.toString(param.getValue()).replaceAll("\\[|\\]", "").replaceAll(",\\s", ",");
              paramValues[i]=value;
            }
           }
       }
   //利用反射机制来调用
   try {
     method.invoke(this.controllerMap.get(url), paramValues);//第一个参数是method所对应的实例 在ioc容器中
   } catch (Exception e) {
     e.printStackTrace();
   }
 }


 private void  doLoadConfig(String location){
   //把web.xml中的contextConfigLocation对应value值的文件加载到流里面
   InputStream resourceAsStream = this.getClass().getClassLoader().getResourceAsStream(location);
   try {
     //用Properties文件加载文件里的内容
     properties.load(resourceAsStream);
   } catch (IOException e) {
     e.printStackTrace();
   }finally {
     //关流
     if(null!=resourceAsStream){
       try {
         resourceAsStream.close();
       } catch (IOException e) {
         e.printStackTrace();
       }
     }
   }

 }

 private void doScanner(String packageName) {
   //把所有的.替换成/
   URL url  =this.getClass().getClassLoader().getResource("/"+packageName.replaceAll("\\.", "/"));
   File dir = new File(url.getFile());
   for (File file : dir.listFiles()) {
     if(file.isDirectory()){
       //递归读取包
       doScanner(packageName+"."+file.getName());
     }else{
       String className =packageName +"." +file.getName().replace(".class", "");
       classNames.add(className);
     }
   }
 }


 private void doInstance() {
   if (classNames.isEmpty()) {
     return;
   }
   for (String className : classNames) {
     try {
       //把类搞出来,反射来实例化(只有加@MyController需要实例化)
       Class<?> clazz =Class.forName(className);
        if(clazz.isAnnotationPresent(MyController.class)){
         ioc.put(toLowerFirstWord(clazz.getSimpleName()),clazz.newInstance());
       }else{
         continue;
       }


     } catch (Exception e) {
       e.printStackTrace();
       continue;
     }
   }
 }


 private void initHandlerMapping(){
   if(ioc.isEmpty()){
     return;
   }
   try {
     for (Entry<String, Object> entry: ioc.entrySet()) {
       Class<? extends Object> clazz = entry.getValue().getClass();
       if(!clazz.isAnnotationPresent(MyController.class)){
         continue;
       }

       //拼url时,是controller头的url拼上方法上的url
       String baseUrl ="";
       if(clazz.isAnnotationPresent(MyRequestMapping.class)){
         MyRequestMapping annotation = clazz.getAnnotation(MyRequestMapping.class);
         baseUrl=annotation.value();
       }
       Method[] methods = clazz.getMethods();
       for (Method method : methods) {
         if(!method.isAnnotationPresent(MyRequestMapping.class)){
           continue;
         }
         MyRequestMapping annotation = method.getAnnotation(MyRequestMapping.class);
         String url = annotation.value();

         url =(baseUrl+"/"+url).replaceAll("/+", "/");
         handlerMapping.put(url,method);
         controllerMap.put(url,clazz.newInstance());
         System.out.println(url+","+method);
       }

     }

   } catch (Exception e) {
     e.printStackTrace();
   }

 }


 /**
  * 把字符串的首字母小写
  * @param name
  * @return
  */
 private String toLowerFirstWord(String name){
   char[] charArray = name.toCharArray();
   charArray[0] += 32;
   return String.valueOf(charArray);
 }


}
这里我们就开发完了自己的SpringMVC,现在我们测试一下:
package com.liugh.core.controller;

import java.io.IOException;

import javax.servlet.http.HttpServletRequest;
import javax.servlet.http.HttpServletResponse;

import com.liugh.annotation.MyController;
import com.liugh.annotation.MyRequestMapping;
import com.liugh.annotation.MyRequestParam;

@MyController
@MyRequestMapping("/test")
public class TestController {


  @MyRequestMapping("/doTest")
   public void test1(HttpServletRequest request, HttpServletResponse response,
       @MyRequestParam("param") String param){
    System.out.println(param);
     try {
           response.getWriter().write( "doTest method success! param:"+param);
       } catch (IOException e) {
           e.printStackTrace();
       }
   }


  @MyRequestMapping("/doTest2")
   public void test2(HttpServletRequest request, HttpServletResponse response){
       try {
           response.getWriter().println("doTest2 method success!");
       } catch (IOException e) {
           e.printStackTrace();
       }
   }
}
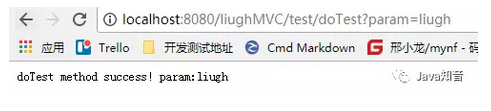
访问http://localhost:8080/liughMVC/test/doTest?param=liugh如下:
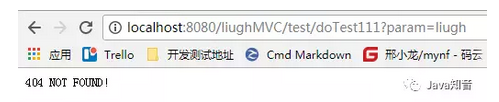
访问一个不存在的试试:
到这里我们就大功告成了!
我是个普通的程序猿,水平有限,文章难免有错误,欢迎牺牲自己宝贵时间的读者,就本文内容直抒己见,我的目的仅仅是希望对读者有所帮助。源码地址:https://github.com/qq53182347/liughMVC