The main contents of this chapter are as follows:
- 1) Window component (QWidget)
- 2) QT coordinate system
- 3) Initial exploration of message processing (signals and slots)
Window component (QWidget)
introduce
- Qt builds graphical user interfaces as component objects
- A top-level component without a parent component in Qt is called a window
- The types of components are divided into:
- Container class (parent component) : interface component used to contain functionality
- Functional class (subcomponent) : used to implement specific interactive functions
As shown below:
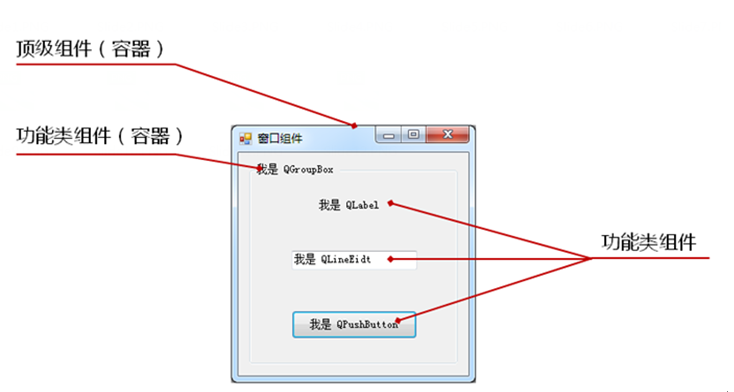
For example, the above QgroupBox is a functional class (sub-component) that belongs to the top-level component , and is also the parent component (container) of three functional class components.
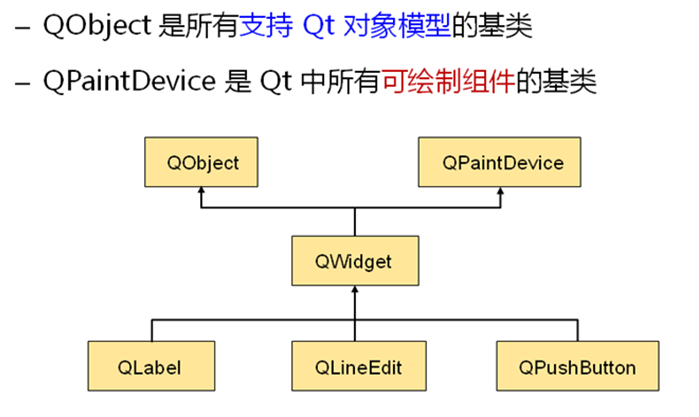
component inheritance
All window components in Qt inherit from the QWidget class , which in turn inherits from the QObject class and the QPaintDevice class.
As shown in the following figure (only 3 window component classes are exemplified):
Introduction to QWidget components
- QWidget can draw itself (because it inherits the QPaintDevice class) , and can also handle user input, such as clicking a button
- QWidget is the parent class of the Qt window component class
- Every widget in Qt can be used as a QWidget (because subclasses can initialize the parent class)
- QWidget class objects are often used as parent components or top-level components
A Preliminary Study of QWidget
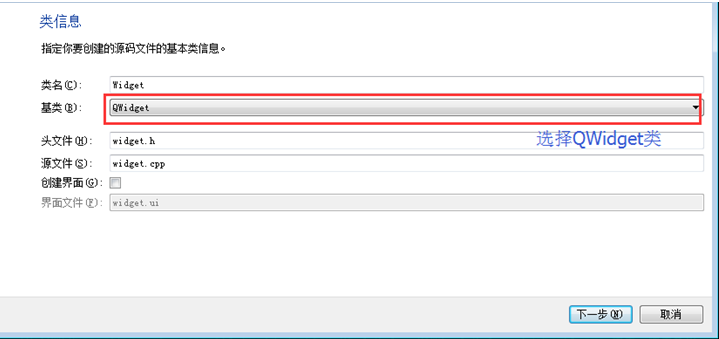
1) Create a new project, select the Qt Gui application, and set the class information:
2) Generate QWidget template
Run the template:
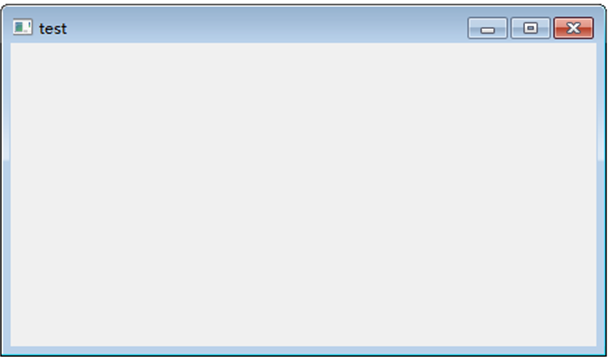
You can see that a window is generated, and then let's take a look at how the template code is generated.
3) The template code looks like this
#include <QtGui/QApplication>

#include "widget.h"

int main(int argc, char *argv[])

{

    QApplication a(argc, argv);

    QWidget w;                  // Create QWidget class object

    w.show();                   // Display QWidget class object


    return a.exec();

}
According to the content mentioned before, it can be found that since the above QWidget w object has no parent component, QWidget w becomes a top-level component without a parent component, thus generating a window .
Qt coordinate system
introduce
- Qt uses a unified coordinate system to position and size widgets
- The QWidget class provides component classes with the coordinate system member functions required by widgets
In Qt, coordinate types are divided into
- Positioning of top-level widgets
- Positioning of widgets within a window
- Widget size settings
Coordinate location diagram, as shown below

Common coordinate system member functions provided by the QWidget class are:
- resize() : Set the width and height inside the window (width() and height() values)
- move() : set the x,y coordinates of the entire window (x() and y() values)
- setGeometry() : Set the x, y, w, h inside the window (excluding the title and window border)
- size() : Get the size of the widget
- pos() : Get the position of the widget
- x() : Get the x coordinate of the entire window
- y() : Get the y coordinate of the entire window
- width() : Get the width inside the window (excluding the width of the outer border)
- height() : 获取窗口内部的高度(不包括窗口标题栏的高度)
- const QRect& geometry () : 获取窗口内部的x,y,w,h(不包括标题和窗口边框)
- const QRect& framgeometry () : 获取整个窗口的x,y,w,h
可以参考下图所示
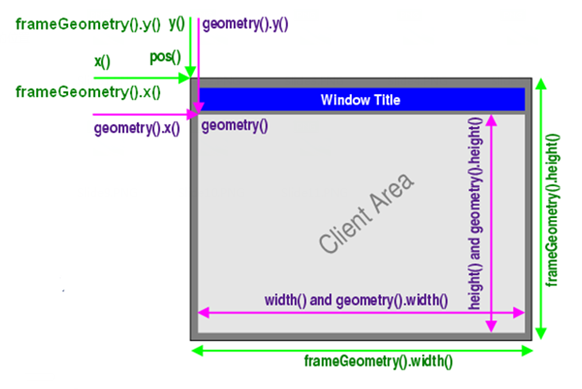
注意: 在代码里,执行show()后, 再获取 x,y,w,h坐标 才有效
接下来我们通过3组不同的获取坐标函数,来打印(x,y,w,h)坐标信息
代码如下所示:
#include <QtGui>
#include "widget.h"
int main(int argc, char *argv[])
{
    QApplication a(argc, argv);
    Widget w;
    QPushButton b("button",&w);   //生成 QPushButton对象, 其父组件为 QWidget

    /*设置窗口大小位置*/
    w.resize(200,300);
    w.move(300,300);

    /*设置按钮大小位置*/
    b.resize(100,50);
    b.move(50,100);
    w.show();

    qDebug()<<"QWidget:";
    qDebug()<<"x()="<<w.x();
    qDebug()<<"y()="<<w.y();
    qDebug()<<"width()="<<w.width();
    qDebug()<<"height()="<<w.height();
    qDebug()<<"QWidget::geometry()";
    qDebug()<<"x="<<w.geometry().x();
    qDebug()<<"y="<<w.geometry().y();
    qDebug()<<"w="<<w.geometry().width();
    qDebug()<<"h="<<w.geometry().height();
    qDebug()<<"QWidget::frameGeometry()";
    qDebug()<<"x="<<w.frameGeometry().x();
    qDebug()<<"y="<<w.frameGeometry().y();
    qDebug()<<"w="<<w.frameGeometry().width();
    qDebug()<<"h="<<w.frameGeometry().height();
    return a.exec();
}
运行打印:
QWidget:
x()= 300
y()= 300
width()= 200
height()= 300

QWidget::geometry()
x= 308
y= 330
w= 200
h= 300

QWidget::frameGeometry()
x= 300
y= 300
w= 216
h= 338
可以看到,获取的窗内坐标(x,y)永远比窗外坐标大,窗外大小(w,h)永远比窗内大小大
初探消息处理(信号与槽)
QT封装了具体操作系统的消息机制,如下图所示:
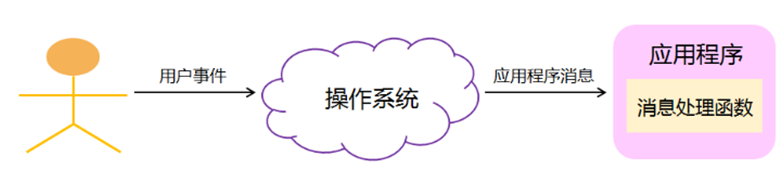
Qt中定义了与系统信息相关的概念
信号(signal)
- 由操作系统产生的消息,比如按键消息
槽(slot)
- 程序中的消息处理函数,用来处理信号,比如处理按键点击信号
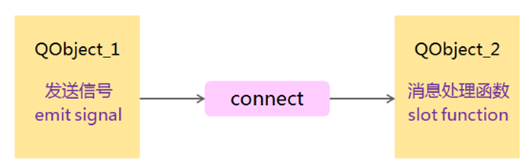
连接(Connect)
- 将系统信息绑定到信息处理函数(信号到槽的连接),通过connect()函数实现,且必须发生在两个Qt类对象之间,如下图所示:
connect()函数原型
bool QObject::connect (
        const QObject * sender,                 //发送对象
        const char * signal,                     //消息名(信息)
        const QObject * receiver,                //接收对象
        const char * method,                     //接收对象的成员函数(槽)
        Qt::ConnectionType type = Qt::AutoConnection ) ;   //正常情况不需要设置

//当出现sender对象的signal信号,则会自动调用receiver对象的method槽
在信号与槽里,Qt引进了几个新的关键字:
- SIGNAL :指定消息名(信号),用于connect()函数里
- SLOT : 指定消息处理函数名(槽),用于connect()函数里
- Q_OBJECT : 指定该类拥有槽(消息处理),在类声明的内部开始处加上Q_OBJECT即可
- slots : 用于在类中声明消息处理函数,比如:
private slots:
         void buttonCliked();
初探信号与槽
通过点击按钮,使程序自动退出,代码如下所示:
#include <QtGui>
#include <QApplication>
#include <QPushButton>

int main(int argc,char * argv[])
{
  QApplication app(argc,argv);
  QPushButton *quitButton = new QPushButton("Quit");

  QObject::connect(quitButton, SIGNAL(clicked()), &app, SLOT(quit()));
  //*quitButton(发送对象), &app(接收对象)
  //quit()作用是退出程序, QApplication的成员函数
  //clicked()作用是鼠标点击, 很多常用组件的成员函数

    quitButton->show();
    return app.exec();
}
其中上面的quit() 和clicked()都是系统预定义好的,接下来我们自定义槽
首先需要注意
- 类中声明槽(处理信号的成员函数)时,需要slots声明
- 槽和信号的函数参数必须一致,比如clicked()和quit()都是无参数的
- SIGNAL和SLOT指定的函数(信号和槽)只能包含参数类型,不能包含参数名
开始试验,通过不同按钮点击,来打印不同的信息
写QButtonDebug.h:
#ifndef QBUTTONDEBUG_H
#define QBUTTONDEBUG_H

#include <QWidget>
#include <QPushButton>

class QButtonDebug : public QWidget
{
    Q_OBJECT       //指定该类拥有slots(槽)

private:
    QPushButton *mbton1;
    QPushButton *mbton2;

private slots:              //通过slots 声明 槽
    void buttonCliked();

public:
    explicit QButtonDebug(QWidget *parent=0,Qt::WindowFlags f=0);
};

#endif
写QButtonDebug.cpp:
#include "QButtonDebug.h"
#include <QDebug>

QButtonDebug:: QButtonDebug(QWidget *parent,Qt::WindowFlags f) :
    QWidget(parent,f)   //显示初始化父类
{
    mbton1 = new QPushButton("button1",this);
    mbton2 = new QPushButton("button2",this);
    /*设置按钮坐标*/
    mbton1->resize(100,50);
    mbton1->move(50,50);
    mbton2->resize(100,50);
    mbton2->move(50,100);
    /*设置连接*/
    QObject::connect(mbton1,SIGNAL(clicked()),this,SLOT(buttonCliked()));
    QObject::connect(mbton2,SIGNAL(clicked()),this,SLOT(buttonCliked()));
    QWidget::show();
}

void QButtonDebug:: buttonCliked()            //消息处理函数
{
    QPushButton* p_buton =(QPushButton*)sender();    //获取发送信号的对象
    qDebug()<< p_buton->text();                      //更据不同的按钮 打印不同信息
}
写main.cpp
#include <QtGui>
#include <QApplication>
#include "QButtonDebug.h"

int main(int argc,char * argv[])
{
  QApplication a(argc, argv);

  QButtonDebug b(NULL,Qt::WindowCloseButtonHint);
                     // Qt::WindowCloseButtonHint:去掉标题按钮提示

  return a.exec();
}
运行测试
如下图所示,可以看到通过点击不同的按钮,便能打印不同的信息出来
