Original address: http://www.cnblogs.com/caca/p/centos_hadoop_install.html
Download and install
download hadoop from
http://hadoop.apache.org/releases.html#Download
download zip file (not rpm)
[v 1.1.2 bin]
http://mirrors.tuna.tsinghua.edu.cn/apache/hadoop/common/hadoop-1.1.2/hadoop-1.1.2-bin.tar.gz
[v 2.0.5-alpha]
http://mirrors.tuna.tsinghua.edu.cn/apache/hadoop/common/hadoop-2.0.5-alpha/hadoop-2.0.5-alpha.tar.gz
[v 2.1.0-beta]]
http://mirror.bit.edu.cn/apache/hadoop/common/hadoop-2.1.0-beta/hadoop-2.1.0-beta.tar.gz
tar vxf hado......gz
mv hado..... /usr/hadoop
Create user hadoop
$ useradd
-d /home/hadoop -s /bin/bash
hadoop
$ passwd hadoop
hadoop
You can add hadoop users to sudoer (using the visudo command) to facilitate management.
Change the owner of /usr/hadoop to hadoop
chown -R hadoop:hadoop hadoop
cd /usr/hadoop
mkdir tmp
configure hadoop
hadoop configuration directory /usr/hadoop/conf
vim ./hadoop-env.sh
export JAVA_HOME=/usr/java/jdk1.7.0_21
[debian] openjdk home directory /usr/lib/jvm/java-7-openjdk-armhf/
The Hadoop configuration files are in the conf directory. The configuration files of previous versions are mainly Hadoop-default.xml and Hadoop-site.xml. Due to the rapid development of Hadoop and the sharp increase in the amount of code, the code development is divided into three parts: core, hdfs and map/reduce, and the configuration file is also divided into three parts:
core-site.xml, hdfs-site.xml, and mapred-site.xml
. core-site.xml and hdfs-site.xml are configuration files from the perspective of HDFS; core-site.xml and mapred-site.xml are configuration files from the perspective of MapReduce.
core-site.xml
, please backup it first. [IP address can also be changed to localhost]
vim core-site.xml
<configuration>
<property>
<name>hadoop.tmp.dir</name>
<value>/usr/hadoop/tmp</value>
<description>.</description>
</property>
<property>
<name>fs.default.name</name>
<value>hdfs://192.168.1.249:9000</value>
</property>
</configuration>
hdfs-site.xml
replication is the number of data copies, the default is 3, if the salve is less than 3, an error will be reported
<configuration>
<property>
<name>dfs.replication</name>
<value>1</value>
</property>
<configuration>
mapred-site.xml
Modify the configuration file of MapReduce in Hadoop, and configure the address and port of the JobTracker.
<configuration>
<property>
<name>mapred.job.tracker</name>
<value>http://192.168.1.249:9001</value>
</property>
</configuration>
masters
127.0.0.1 #master's ip,
if it is in fully distributed mode and the SecondaryNameNode is on a certain machine, the configuration is set to SecondaryNameNode
Slaves
(files on the host), add the hostname or ip of the slave If it is in full distribution mode, remove the master (namenode)
hostname
127.0.0.1
Configure the slave in the number of slave machines
scp copy mster's /usr/hadoop to each slave
environment variable
vim /etc/profile
export HADOOP_HOME=/usr/hadoop
export PATH=$PATH:$HADOOP_HOME/bin
vim ./hadoop-env.sh
export JAVA_HOME=/usr/java/jdk1.7.0_10/
[note] debian's openjdk home directory /usr/lib/jvm/java-7-openjdk-armhf/
The slaves file does not need to be configured;
Configure ssh passwordless communication
yum instal openssh-server openssh openssh-client
/home/hadoop/.ssh/authorized_keys for each server
The local public key (id_rsa.pub) should also be added to the local authorized_keys
Notice:
1 Set the auth
orized_keys permission to 600, the owner has rw permission, and others must not have w permission;
2 Set up vim /etc/ssh/sshd_config
RSAAuthentication yes # Enable RSA authentication
PubkeyAuthentication yes # Enable public key and private key pairing authentication method
AuthorizedKeysFile .ssh/authorized_keys # Public key file path (same as the file generated above)
重启ssh:service ssh restart // service ssh restart
Test local login:
ssh localhost
ssh 192.168.1.xxx
$ ssh-keygen
$ ls ~/.ssh
id_rsa id_rsa.pub
Corresponding public/private key
Copy the public key to authorized_keys
Start Hadoop
Format HDFS file system (master
& slaves)
h
adoop namenode -format
start up
Turn off the firewalls of all machines in the cluster before starting, otherwise the datanode will be turned off automatically after it is turned on
service iptables stop
Start: ./bin/start-all.sh
First start namenode then start datanode1, datanode2,..., then start secondarynamenode. Start jobtracker again, then start tasktracker1, tasktracker2, . . .
After successfully starting hadoop, the dfs folder is generated in the tmp folder in the Master, and the dfs folder and the mapred folder are both generated in the tmp folder in the Slave.
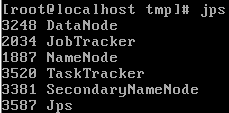
verify hadoop
jps
.png)
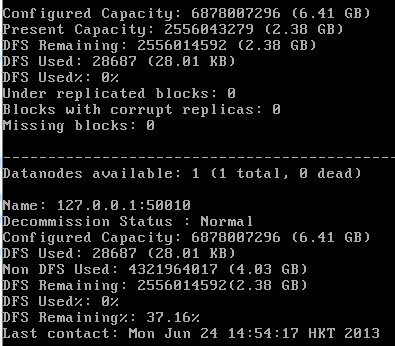
hadoop dfsadmin -report
.png)
Web page to view cluster information
http://192.168.1.249:50030
http://192.168.1.249:50070
Download and install
download hadoop from
http://hadoop.apache.org/releases.html#Download
download zip file (not rpm)
[v 1.1.2 bin]
http://mirrors.tuna.tsinghua.edu.cn/apache/hadoop/common/hadoop-1.1.2/hadoop-1.1.2-bin.tar.gz
[v 2.0.5-alpha]
http://mirrors.tuna.tsinghua.edu.cn/apache/hadoop/common/hadoop-2.0.5-alpha/hadoop-2.0.5-alpha.tar.gz
[v 2.1.0-beta]]
http://mirror.bit.edu.cn/apache/hadoop/common/hadoop-2.1.0-beta/hadoop-2.1.0-beta.tar.gz
tar vxf hado......gz
mv hado..... /usr/hadoop
Create user hadoop
$ useradd
-d /home/hadoop -s /bin/bash
hadoop
$ passwd hadoop
hadoop
You can add hadoop users to sudoer (using the visudo command) to facilitate management.
Change the owner of /usr/hadoop to hadoop
chown -R hadoop:hadoop hadoop
cd /usr/hadoop
mkdir tmp
configure hadoop
hadoop configuration directory /usr/hadoop/conf
vim ./hadoop-env.sh
export JAVA_HOME=/usr/java/jdk1.7.0_21
[debian] openjdk home directory /usr/lib/jvm/java-7-openjdk-armhf/
The Hadoop configuration files are in the conf directory. The configuration files of previous versions are mainly Hadoop-default.xml and Hadoop-site.xml. Due to the rapid development of Hadoop and the sharp increase in the amount of code, the code development is divided into three parts: core, hdfs and map/reduce, and the configuration file is also divided into three parts:
core-site.xml, hdfs-site.xml, and mapred-site.xml
. core-site.xml and hdfs-site.xml are configuration files from the perspective of HDFS; core-site.xml and mapred-site.xml are configuration files from the perspective of MapReduce.
core-site.xml
, please backup it first. [IP address can also be changed to localhost]
vim core-site.xml
<configuration>
<property>
<name>hadoop.tmp.dir</name>
<value>/usr/hadoop/tmp</value>
<description>.</description>
</property>
<property>
<name>fs.default.name</name>
<value>hdfs://192.168.1.249:9000</value>
</property>
</configuration>
hdfs-site.xml
replication is the number of data copies, the default is 3, if the salve is less than 3, an error will be reported
<configuration>
<property>
<name>dfs.replication</name>
<value>1</value>
</property>
<configuration>
mapred-site.xml
Modify the configuration file of MapReduce in Hadoop, and configure the address and port of the JobTracker.
<configuration>
<property>
<name>mapred.job.tracker</name>
<value>http://192.168.1.249:9001</value>
</property>
</configuration>
masters
127.0.0.1 #master's ip,
if it is in fully distributed mode and the SecondaryNameNode is on a certain machine, the configuration is set to SecondaryNameNode
Slaves
(files on the host), add the hostname or ip of the slave If it is in full distribution mode, remove the master (namenode)
hostname
127.0.0.1
Configure the slave in the number of slave machines
scp copy mster's /usr/hadoop to each slave
environment variable
vim /etc/profile
export HADOOP_HOME=/usr/hadoop
export PATH=$PATH:$HADOOP_HOME/bin
vim ./hadoop-env.sh
export JAVA_HOME=/usr/java/jdk1.7.0_10/
[note] debian's openjdk home directory /usr/lib/jvm/java-7-openjdk-armhf/
The slaves file does not need to be configured;
Configure ssh passwordless communication
yum instal openssh-server openssh openssh-client
/home/hadoop/.ssh/authorized_keys for each server
The local public key (id_rsa.pub) should also be added to the local authorized_keys
Notice:
1 Set the auth
orized_keys permission to 600, the owner has rw permission, and others must not have w permission;
2 Set up vim /etc/ssh/sshd_config
RSAAuthentication yes # Enable RSA authentication
PubkeyAuthentication yes # Enable public key and private key pairing authentication method
AuthorizedKeysFile .ssh/authorized_keys # Public key file path (same as the file generated above)
重启ssh:service ssh restart // service ssh restart
Test local login:
ssh localhost
ssh 192.168.1.xxx
$ ssh-keygen
$ ls ~/.ssh
id_rsa id_rsa.pub
Corresponding public/private key
Copy the public key to authorized_keys
Start Hadoop
Format HDFS file system (master
& slaves)
h
adoop namenode -format
start up
Turn off the firewalls of all machines in the cluster before starting, otherwise the datanode will be turned off automatically after it is turned on
service iptables stop
Start: ./bin/start-all.sh
First start namenode then start datanode1, datanode2,..., then start secondarynamenode. Start jobtracker again, then start tasktracker1, tasktracker2, . . .
After successfully starting hadoop, the dfs folder is generated in the tmp folder in the Master, and the dfs folder and the mapred folder are both generated in the tmp folder in the Slave.
verify hadoop
jps
hadoop dfsadmin -report
Web page to view cluster information
http://192.168.1.249:50030
http://192.168.1.249:50070