Content list
- About Charles
- Install Charles
- Charles initialization settings
- Filter network requests
- Intercept HTTP/HTTPS data
- Simulate weak network environment
- Modify network request
- Modify the content returned by the server
- Server stress test
- reverse proxy
- Resolve conflicts with circumvention software
About Charles
Charles is one of the most mainstream network debugging tools (Charles, Fiddler, Wireshark...). For a developer, dealing with the network is a daily requirement, so many times we need to debug parameters, return data structures, view network Various header information, protocol, response time, etc. of the request. So get to know Charles and use it
Charles implements the interception and analysis of network requests by setting himself as the system's network access proxy server, so that all network requests will pass through it.
Chareles can analyze not only the network requests (HTTP and HTTPS) of the computer, but also the network requests of mobile devices.
Charles is a paid software. The author has developed such a great tool that is convenient for developers to use. We encourage the use of genuine software, but for some poor or students, it is better to have a cracked version. Don't worry, I am ready for these , the next section will explain how to download and install.
Install Charles
- Method 1: Charles official website address , choose the appropriate download method according to your computer operating system. At this time, the download is required to be charged, and students who are not poor can of course buy it directly. purchase link
- Method 2: Go to the official website to download according to method 1, and then download the corresponding JAR package . Taking MAC as an example, open Finder , select the application, select Charles, right-click and select "Show Package Contents", see the Contents directory, click to select the Java folder, and drag the downloaded JAR package to replace it. So far, Charles' cracking is completed.
Charles initialization settings
Charles works by setting itself up as the system's proxy server to capture all network requests. So to use Charles, we must set Charles as the system's proxy server.
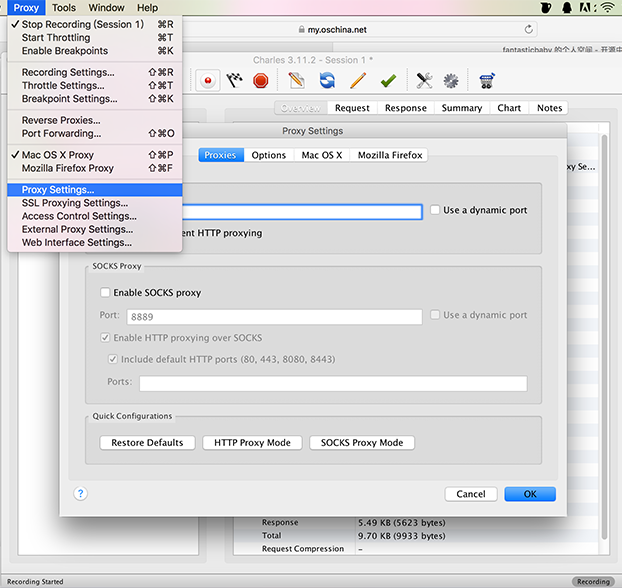
Open Charles, when you start it for the first time, if you haven't purchased or cracked it, there will be a countdown, and then you will see the main interface of the software, and then you will be asked to give it permission to act as a system agent. Clicking Authorize will let you enter the password of the current system user. Of course, you can also ignore or reject the request, and then set it as the system's proxy server when you want to capture packets. Steps: **Choose "Proxy" -> "Mac OS X Proxy" in the menu. **As shown below:
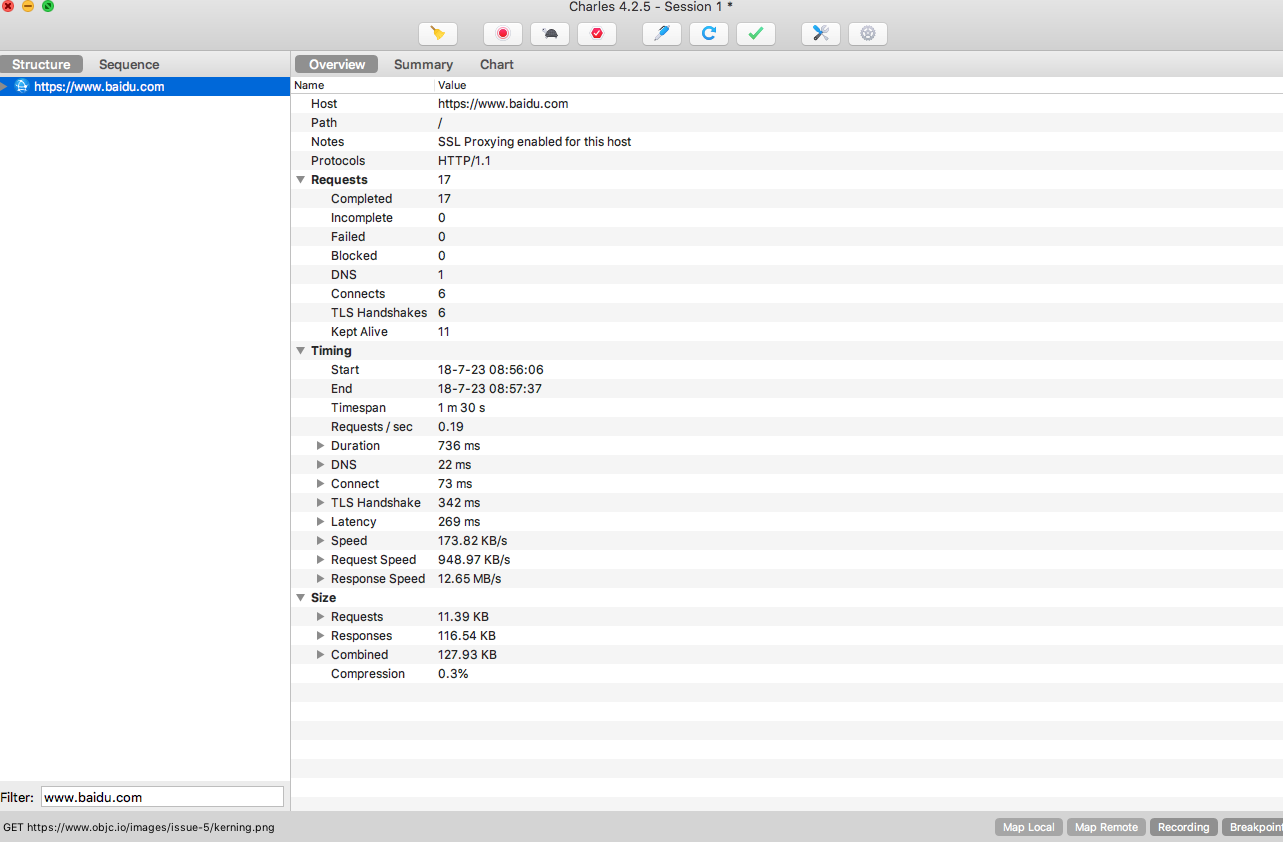
After that any network request on your computer can be seen in Charles' request panel
Take a look at Charles' main interface
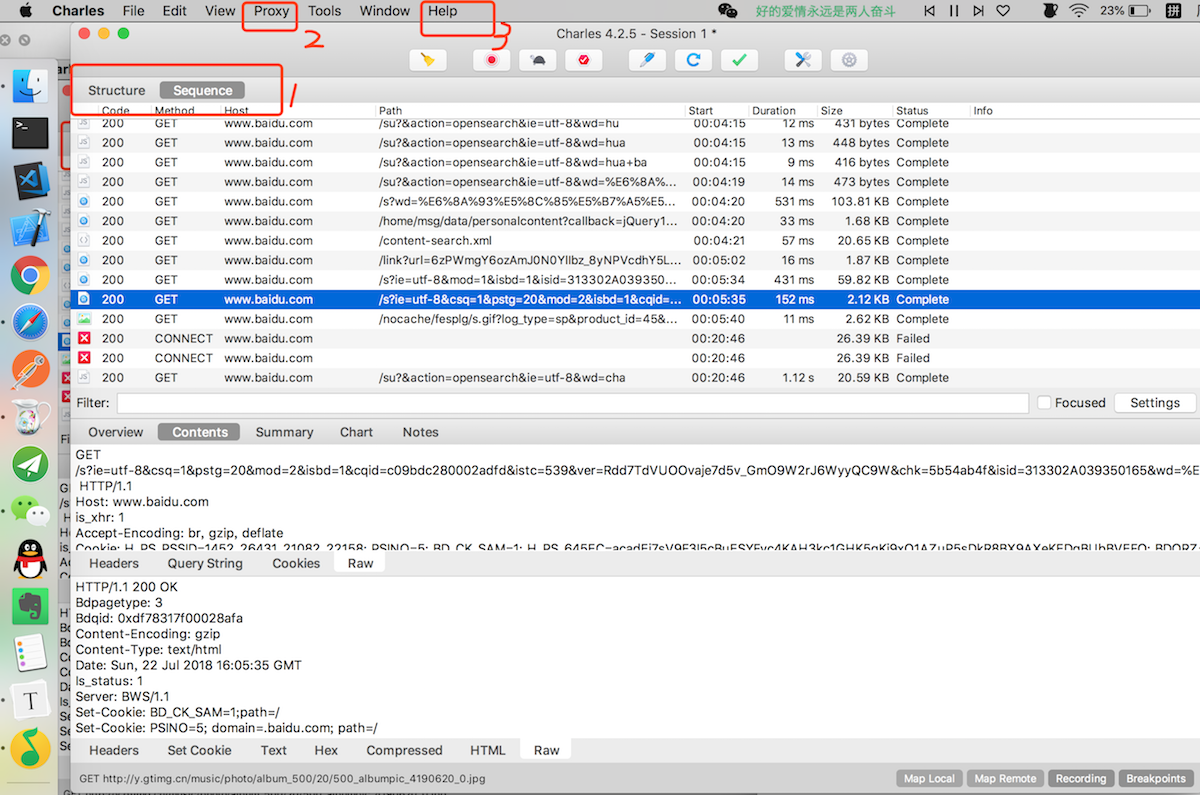
- The red circle 1 on the figure: This represents how all network requests are displayed. They are named "Structure" and "Sequence".
- Structure divides and displays all network requests by domain name
- Sequence sorts and displays all network requests by time
- The red circle 2 on the picture: some network request settings such as HTTPS and port information are set in this menu bar
- The red circle 3 on the picture: the certificate settings are all done here
Filter network requests
Since Charles can capture all network requests of the computer or the mobile phone that has been set up, and our analysis of network transmission should be based on the packet capture analysis under a specific network, in order to clearly see the network requests we are interested in will usually be Use Charles' "Function to Filter Network Requests".
-
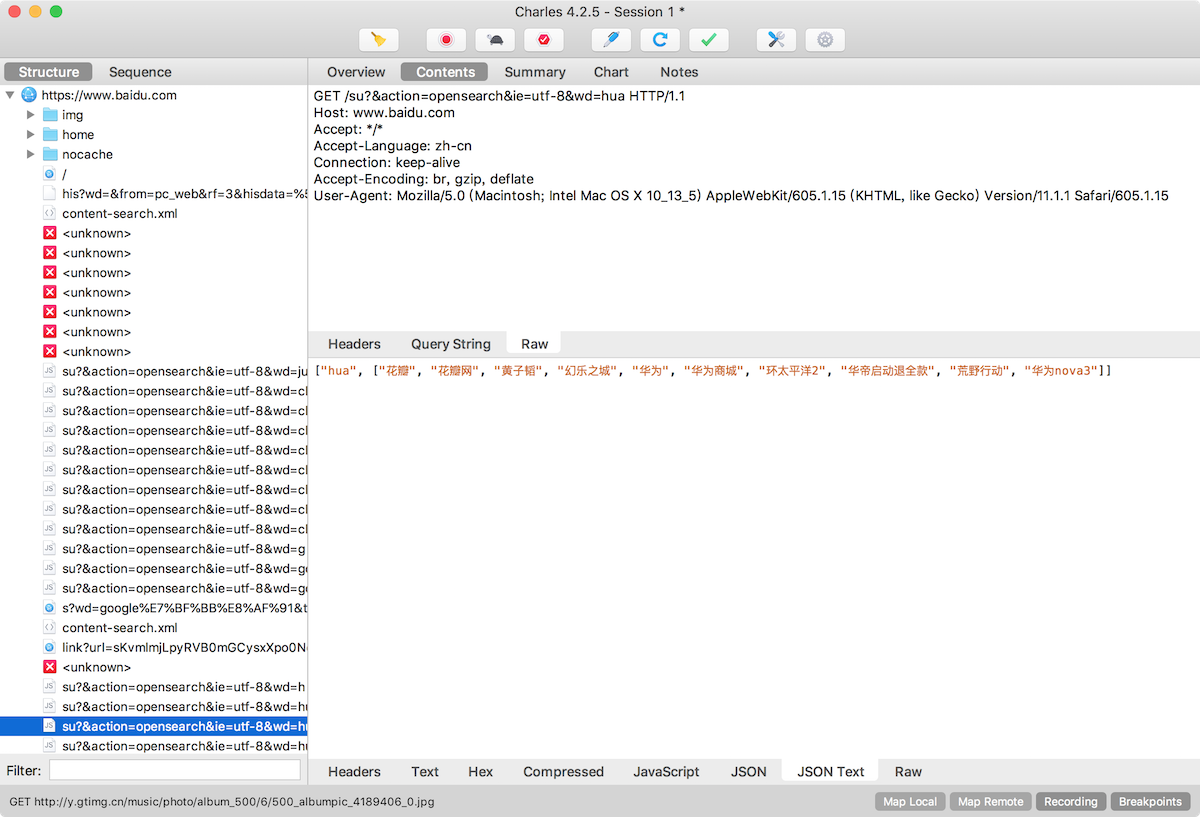
Method 1: Below all network requests on the left side of the Charles main panel, you can see a "Filter" input field, where you can enter keywords to filter out the network requests you are interested in. For example, the network request I want to analyze comes from "www.baidu.com", you can enter "baidu" below.
-
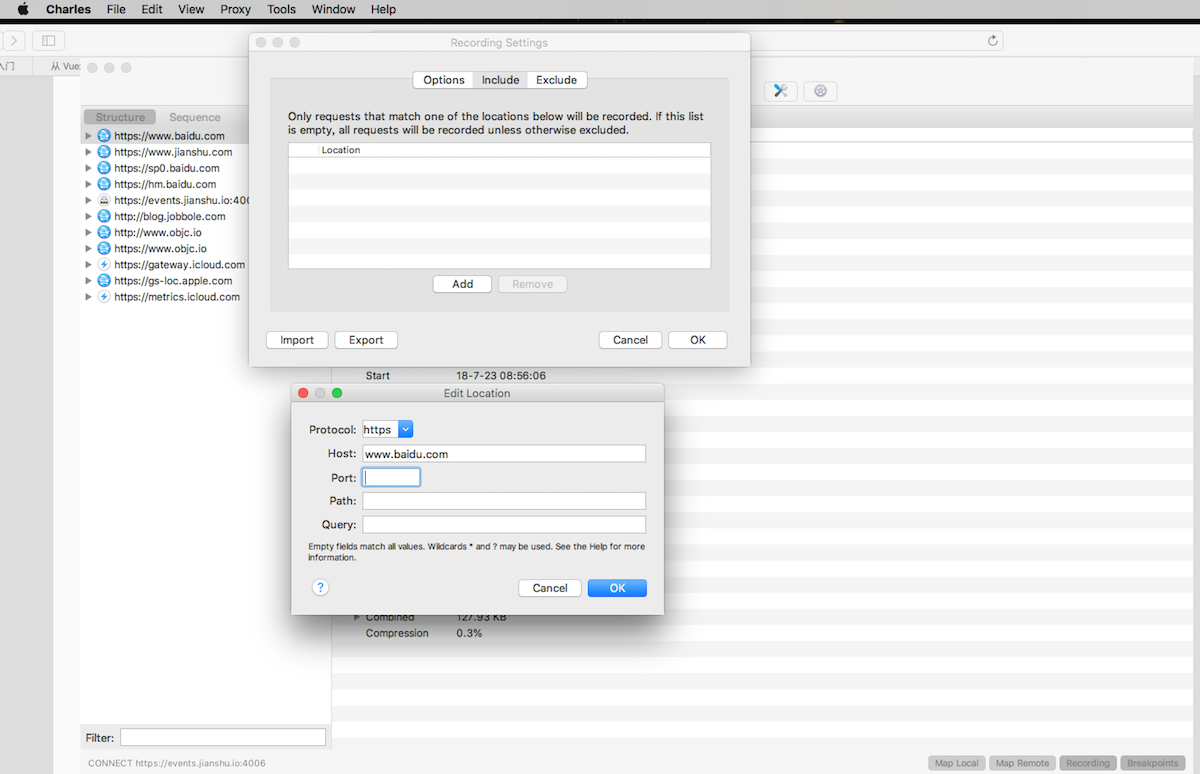
Method 2: You will see the "Proxy" option at the top of the Charles menu bar, click the menu bar and select "Proxy" -> "Recording Settings" . Select "include". You can see that there is an "Add" button on the panel. After clicking it, set the protocol, hostname, port, path, and parameters of the network request we need to analyze in the pop-up panel . Of course, you can also only set some main information, such as A combination of protocol and hostname.
-
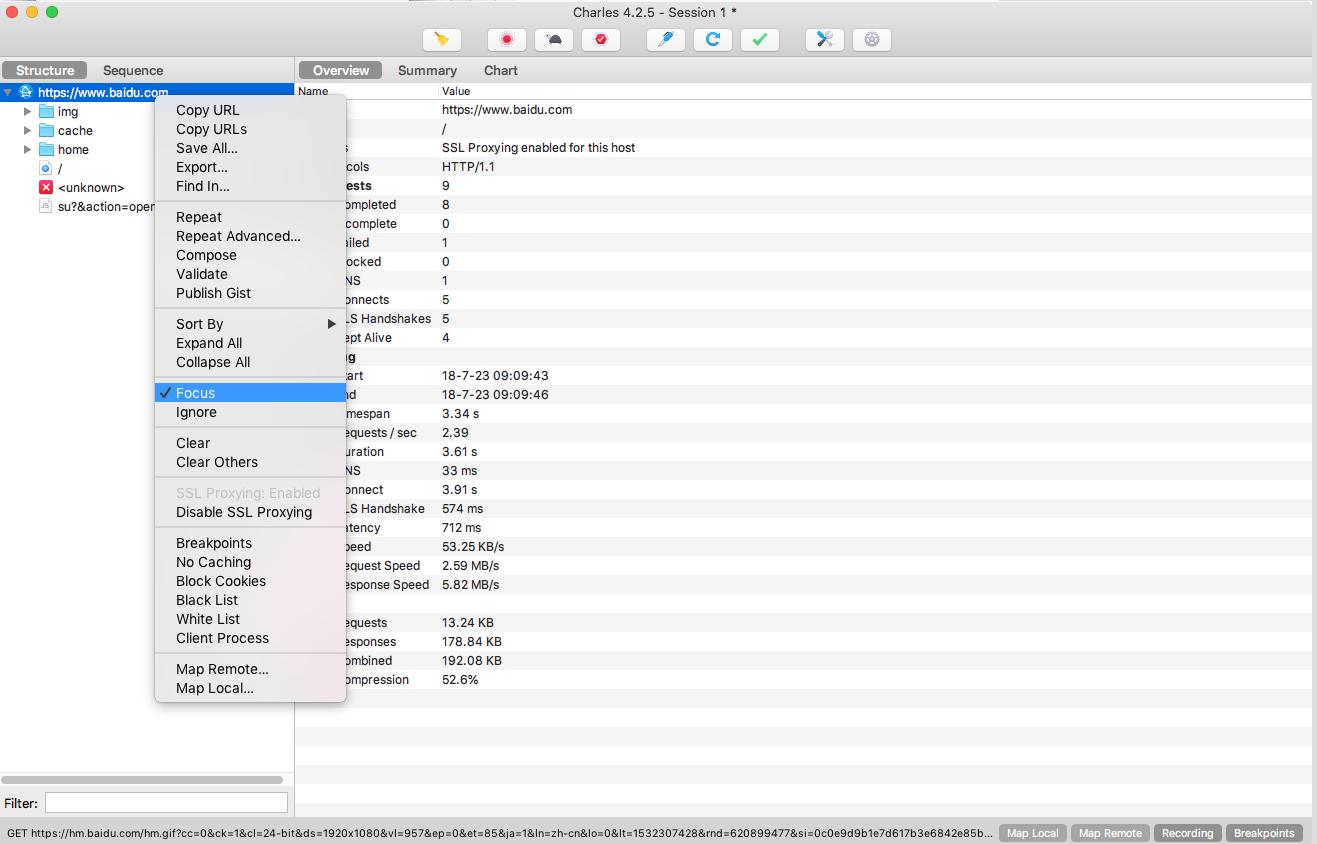
Method 3: Generally, after opening Charles and setting the configuration information (such as the computer or a mobile phone with a proxy), all network requests will be displayed on the Charles panel, and if the network requests we are interested in are also displayed on the panel If so, in the "Structure" mode, you can select the network request to be analyzed, right-click and select "Focus" . In "Sequence" mode, you can see a Focus** button in the lower right corner of the panel's network request display panel. After clicking it, Charles will only display the network requests you are interested in.
Intercept HTTP/HTTPS data
Intercept HTTP requests
The main purpose of Charles is to capture and capture network requests. Here we take the capture of iPhone as an example.
Charles' settings
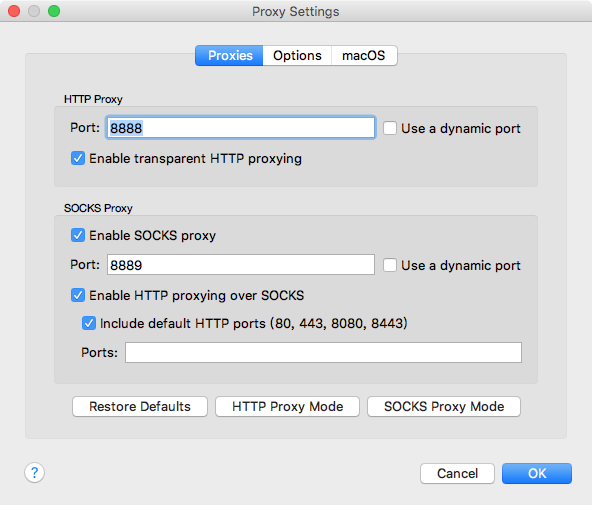
To intercept the iPhone's network request, you need to enable the proxy function for Charles. Select "Proxy" -> "Proxy Settings" in the menu bar . Fill in the port number of the proxy and check "Enable transparent HTTP proxying"**.
Settings on iPhone
Open the network in the "System Preferences" center of the computer to view the IP address of the machine, open the "Settings" -> "Wireless LAN" of the mobile phone, enter the currently used network, and click to enter the details page of the current WIFI (you can see the basic information of the current WIFI). , including subnet mask, port, IP address, router), you can see **"DNS" and "HTTP proxy" 2 sections in the bottom corner . We click "Configure Proxy"**, set the HTTP proxy and select "Manual". Fill in the IP address of the computer at the server and write 8888 for the port. After setting, we open any application on the iPhone that needs network request, we can see Charles pop up the request confirmation menu, click the "Allow" button to complete the setting.

Intercept HTTPS requests
If you need to capture network requests of the HTTPS protocol, then you need to install Charles' CA certificate. Proceed as follows;
-
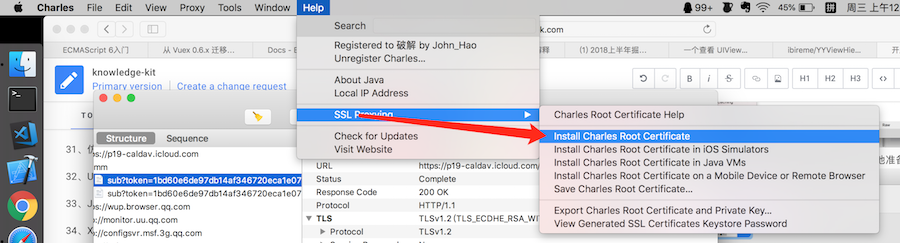
First you need to install the certificate on the MAC. Click on the menu bar at the top of Charles and select "Help" -> "SSL Proxying" -> "Install Charles Root Certificate" .
-
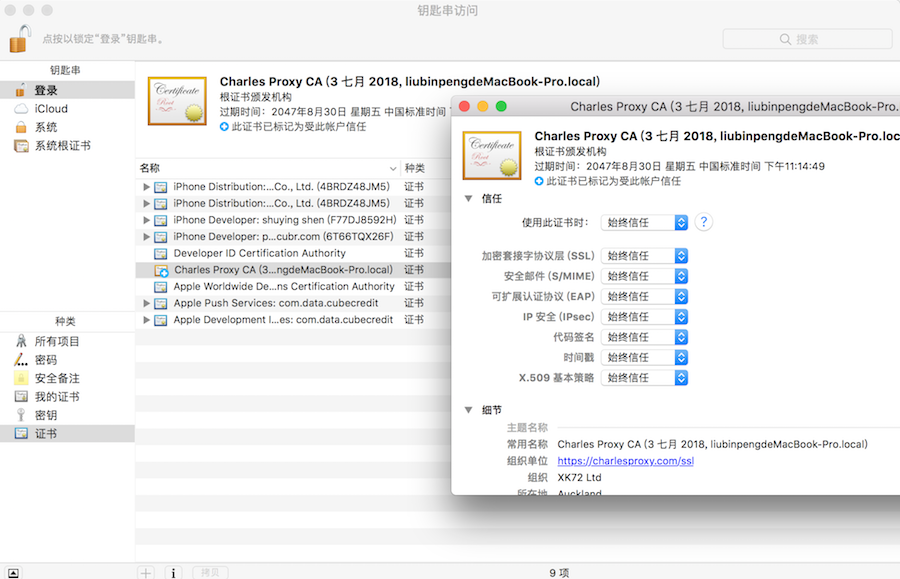
Set the newly installed certificate to be permanently trusted at the keychain
-
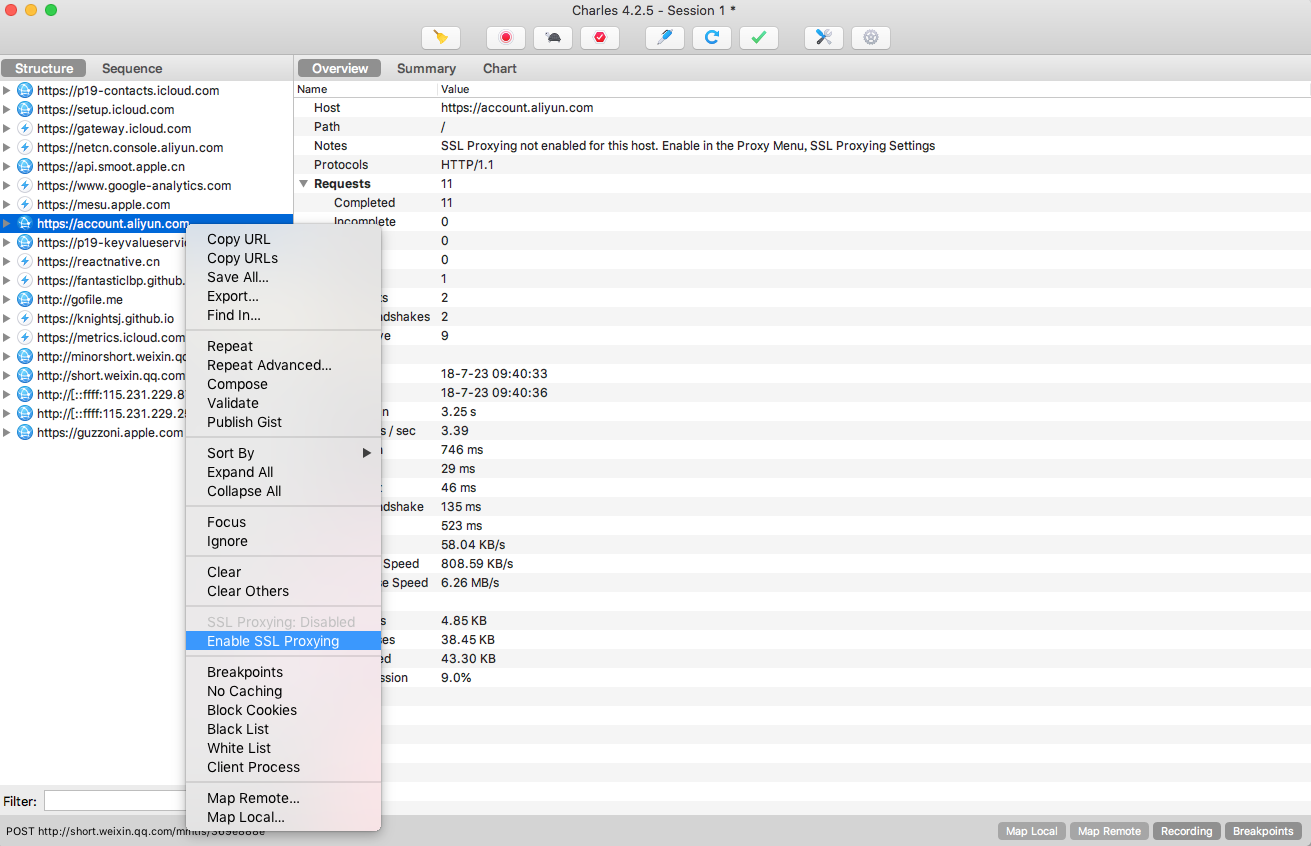
Even if the CA certificate is installed, Charles does not capture the network request of the HTTPS protocol by default, so if we need to capture and analyze the network request under a certain host, select the network request and right-click to select "SSL Proxying Enabled" . This will allow us to see the HTTPS network requests we are interested in.
If you need to capture HTTPS network requests from mobile devices, you need to install a certificate on the mobile device and make simple settings
-
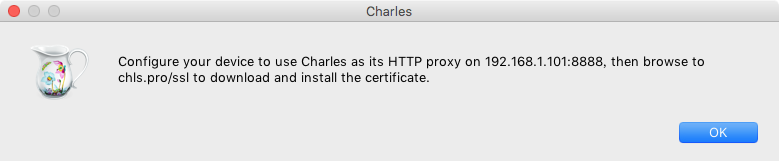
Select Charles from the top menu bar and select "Help" -> "Install Charles Root Certificate on a Mobile Device or Remote Browser" . Then you can see the installation instructions that Charles pops up.
-
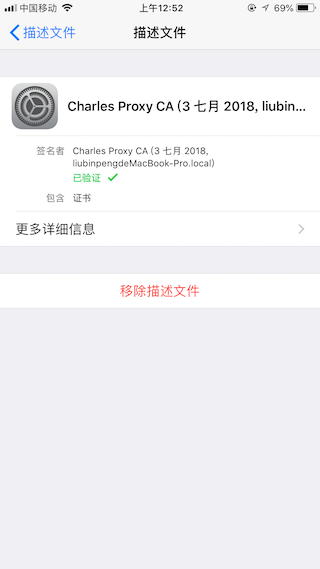
When the Charles proxy is set on the mobile phone, enter "chls.pro/ssl" in the mobile phone browser . The installation prompts to download the CA certificate .
-
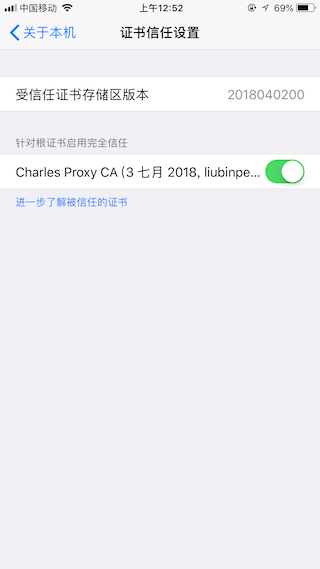
Verify the CA certificate you just installed
-
iPhone Open Settings -> General -> About This Mac -> Certificate Trust Settings -> On Switch
-
In the Charles menu bar Proxy -> SSL Proxying Setting -> click the Add button -> in the pop-up dialog box, set the HTTPS domain that needs to be monitored (*: represents a wildcard)

-
Once set up, enjoy grabbing the HTTPS web requests you want.
-
Simulate weak network environment
In normal development, we often need to simulate the weak network environment and do the adaptation work in the weak network environment. Charles provides this service for us.
Select "Proxy" -> "Throttle Settings" in the Charles menu bar . Set the parameters of the network request (uplink, downlink bandwidth, utilization, reliability, etc.) on the pop-up panel. As shown below.
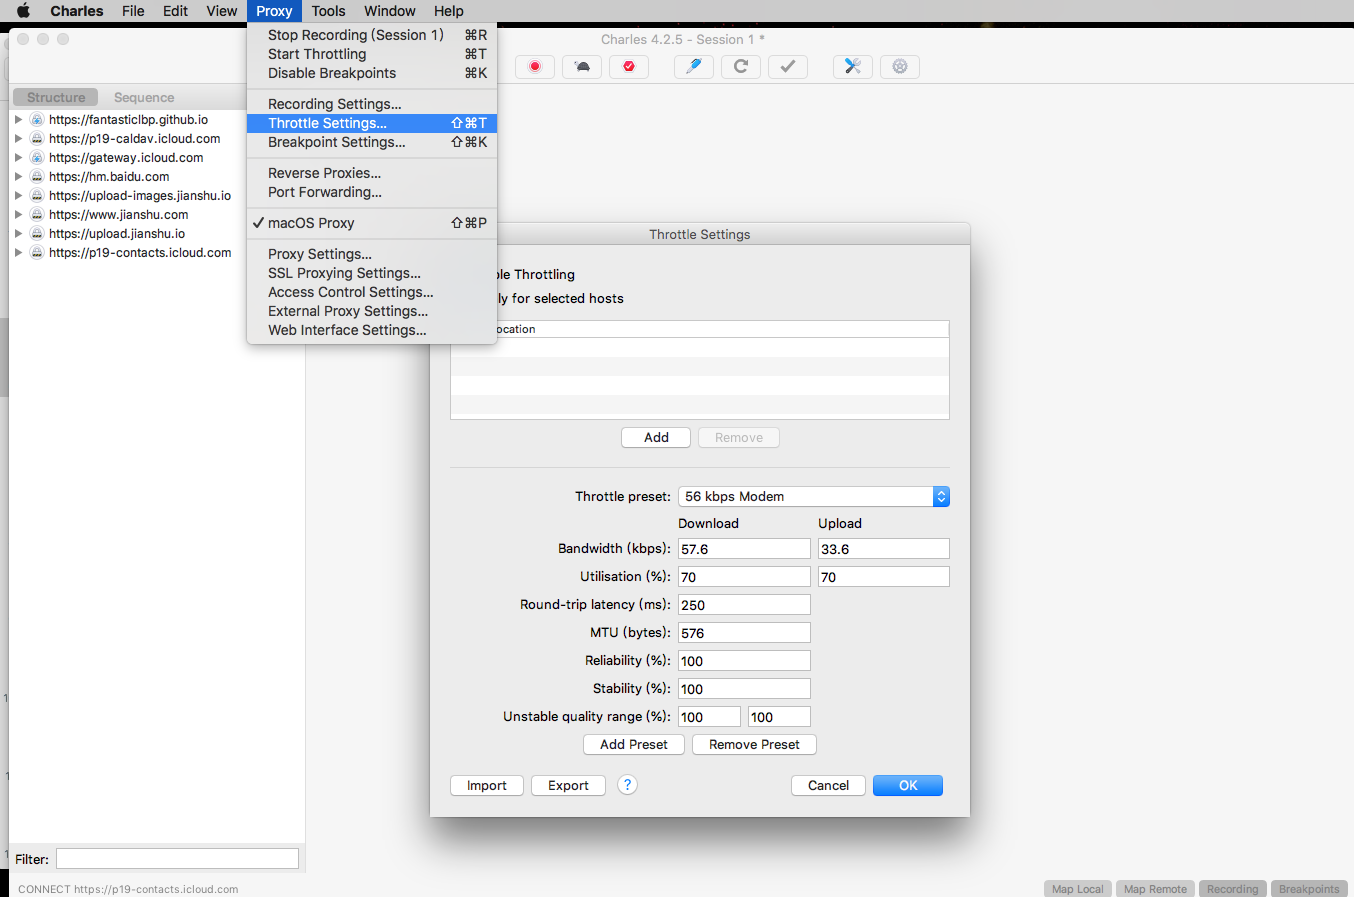
If you want to test the specified host in a weak network environment, you can click the "Add" button in the figure above, and set the protocol, host, and port on the pop-up panel to perform weak network settings for the specified host.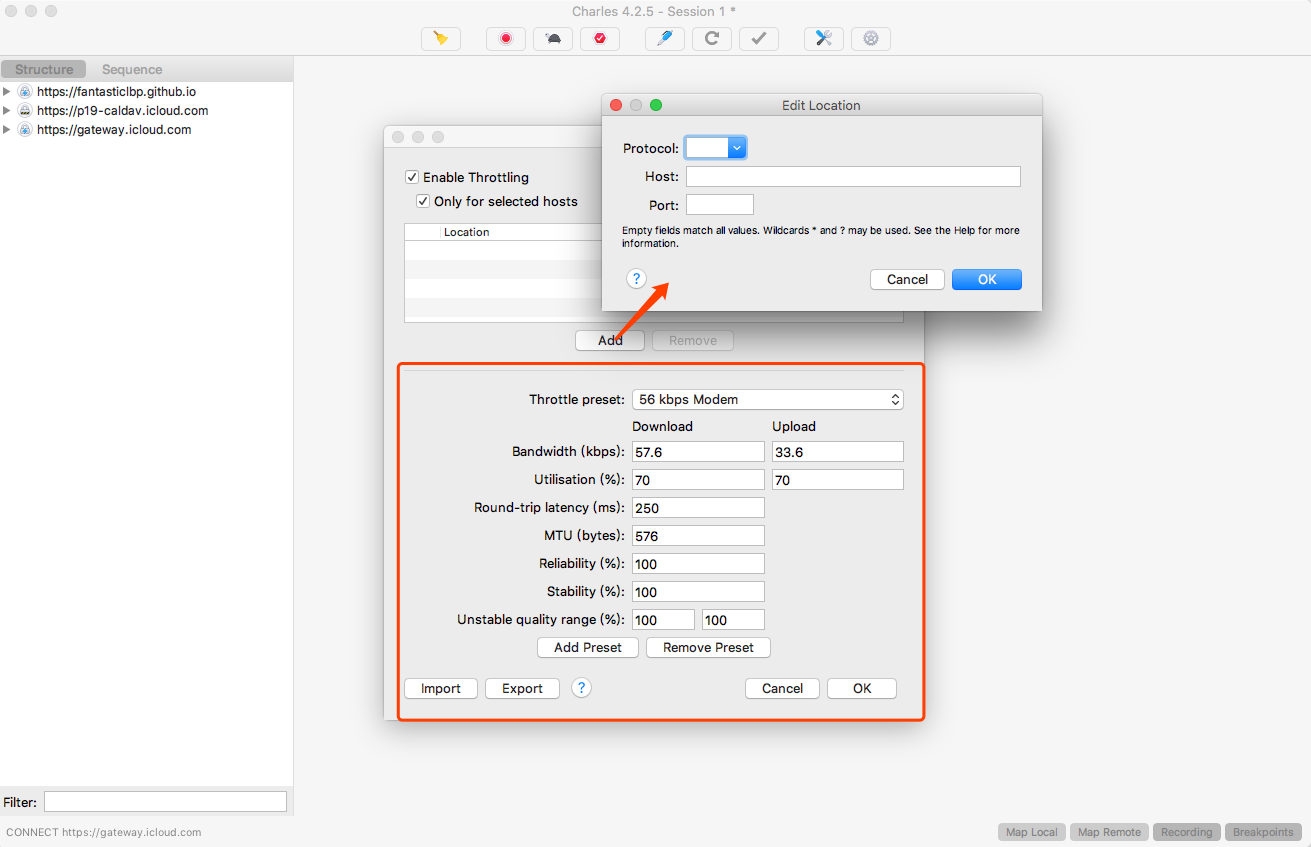
Modify network request
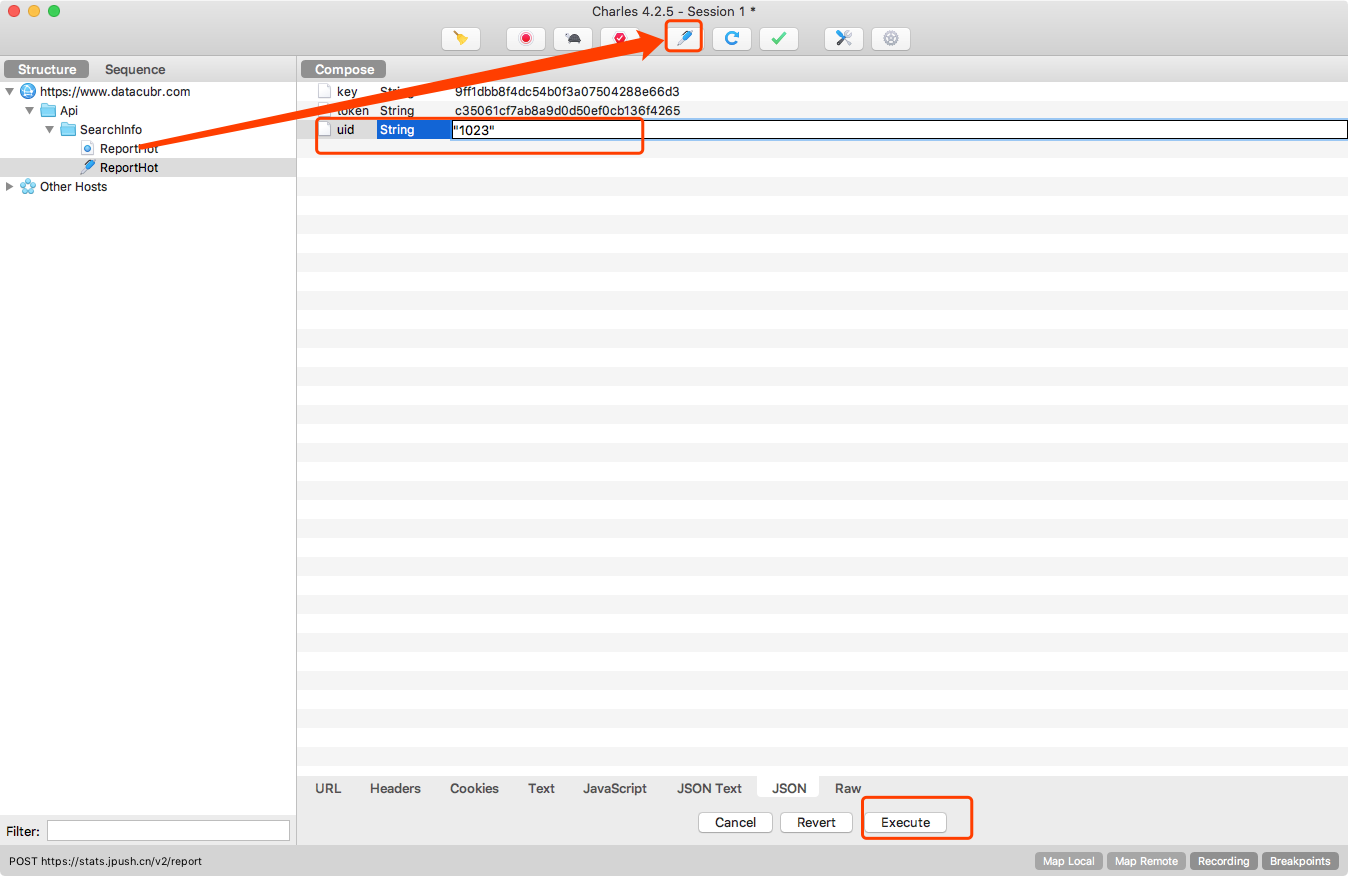
For captured network requests, we often need to modify the cookie, headers, Url and other information of the network request. Charles provides editing and resending capabilities for network requests. Just select the network request that needs to be modified and edited, and you will see a "pen" button in the corresponding upper right corner. After clicking, you can edit the selected network request. After editing, you can see the Execute button in the lower right corner. This way our edited network request can be executed.
Modify the content returned by the server
In many cases, in order to facilitate the debugging of the code, we have the need to modify the data node or content returned by the interface, or even the status code. For example, the data is empty, the data is abnormal, the request fails, and there are multiple pages of data. Charles provides us with super practical functions, "Map (Map Local, Map Remote) function", Rewrite function, Breakpoints function , all of which can realize the function of modifying the data returned by the server. But there are differences and applicable scenarios:
- The Map function is suitable for long-term redirection of a request to another specified network address or local JSON file
- The Rewrite function is suitable for some regular replacement of network requests
- The Breakpoints function is suitable for making some temporary modifications to network requests (similar to the breakpoints we developed)
Map function
The Map function is divided into Map Local (redirects a network request to a local JSON file) and Map Remote function (redirects a network request to another network interface).
Select "Tools" -> "Map Remote" or "Map Local" in the Charles menu bar to enter the corresponding function module.
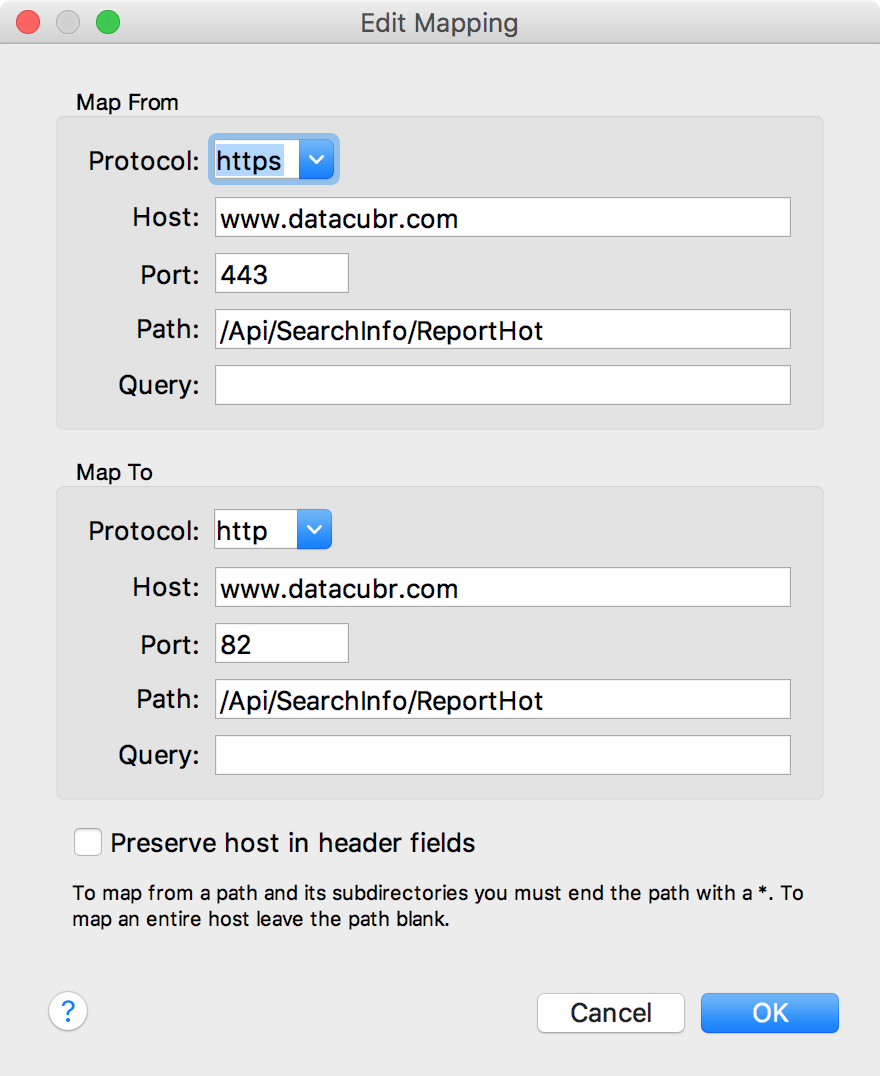
Map Remote function
It is suitable for the scenario of switching online to local, test service to formal service. For example, the following figure switches from formal service to test service
Map Local function
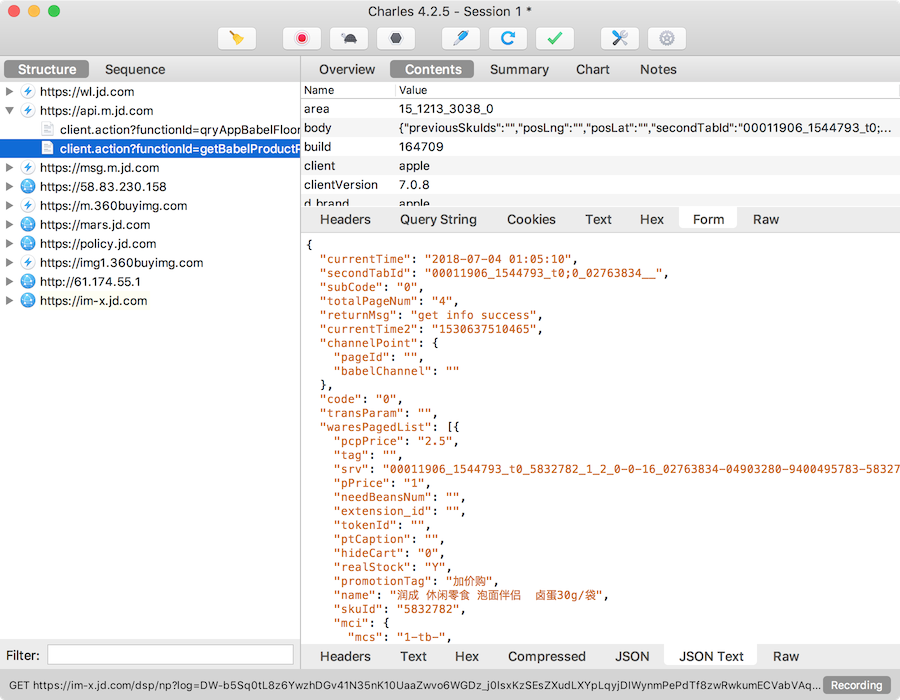
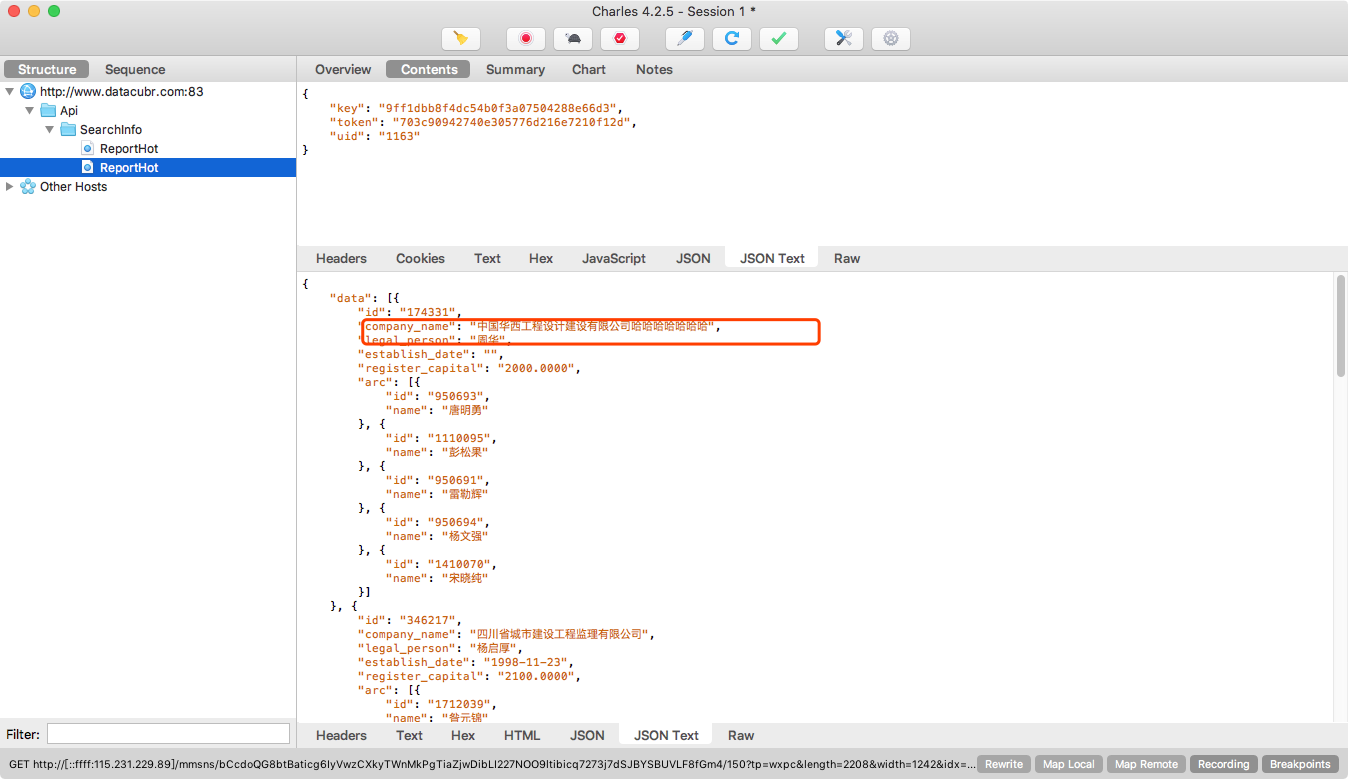
We need to fill in the redirected original address information and local target file. We can first save the response content of an interface (select the corresponding network request, right-click and click Save Response ) as a data.json file. Then we edit the status, message, data and other information inside for the target mapping file we want.
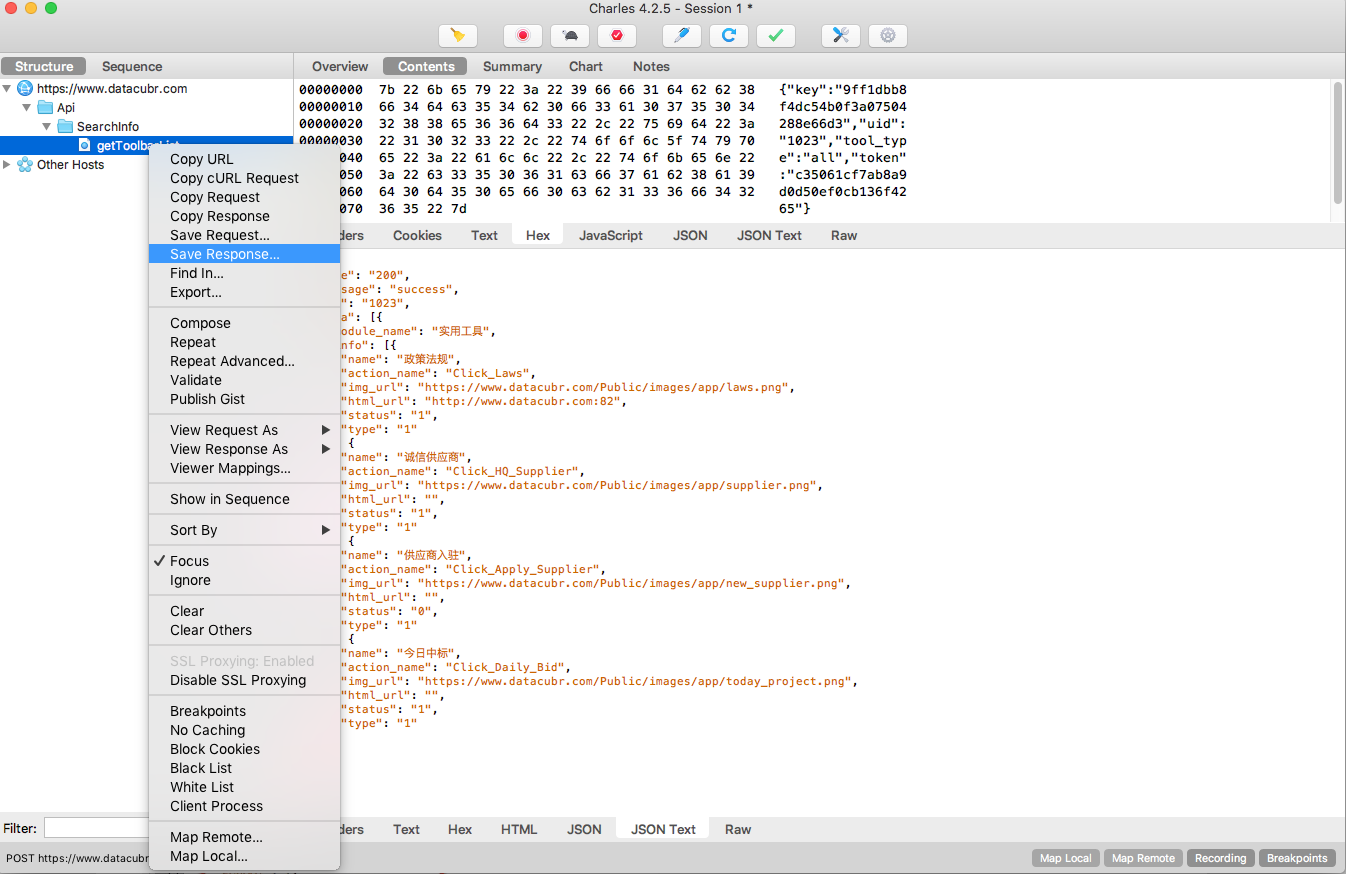
As shown below, I map the content of a network request to a JSON file on my local. After that, the content of this request changed from the network to returning my local data.
Map Local may have a small defect. The HTTP Response Header it returns is different from normal network requests. If the program sets the verification Header information, Map Local will fail at this time. The solution is to use the Rewrite function at the same time. Rewrite the HTTP header information into the information we need
Rewrite function
Rewrite is suitable for regular replacement of a network request to achieve the purpose of modifying the result.
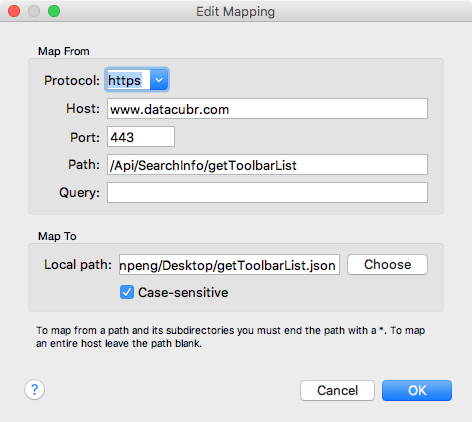
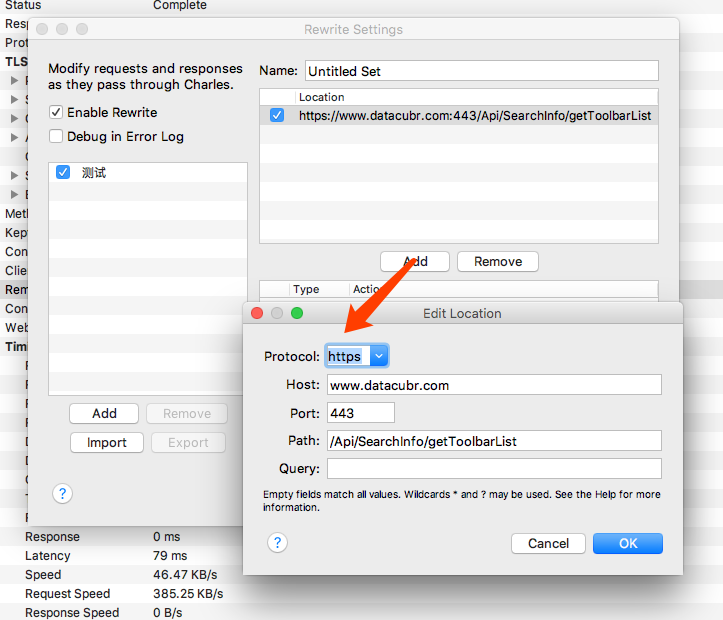
If the displayed function modules and their click events on the interface of my App are completed according to the interface, I would like to achieve the purpose of replacing the names of the function modules. Steps: Click **"Tools" -> "Rewrite"** on the top menu bar. Check "Enable Rewrite" on the pop-up panel . Click the Add button in the lower left corner, and write the name of this configuration in the **Name:** in the upper right corner (if there are multiple Rewrites, it is easy to distinguish later).
- Rewrite can be performed for specific network requests. You can click the Add button under the Location panel in the upper right corner . Set the network request configuration information on the pop-up panel. Note that you need to set Protocol, Port, Host, Path information at the same time (I tested adding Protocol, Host, Port, these three are invalid)
-
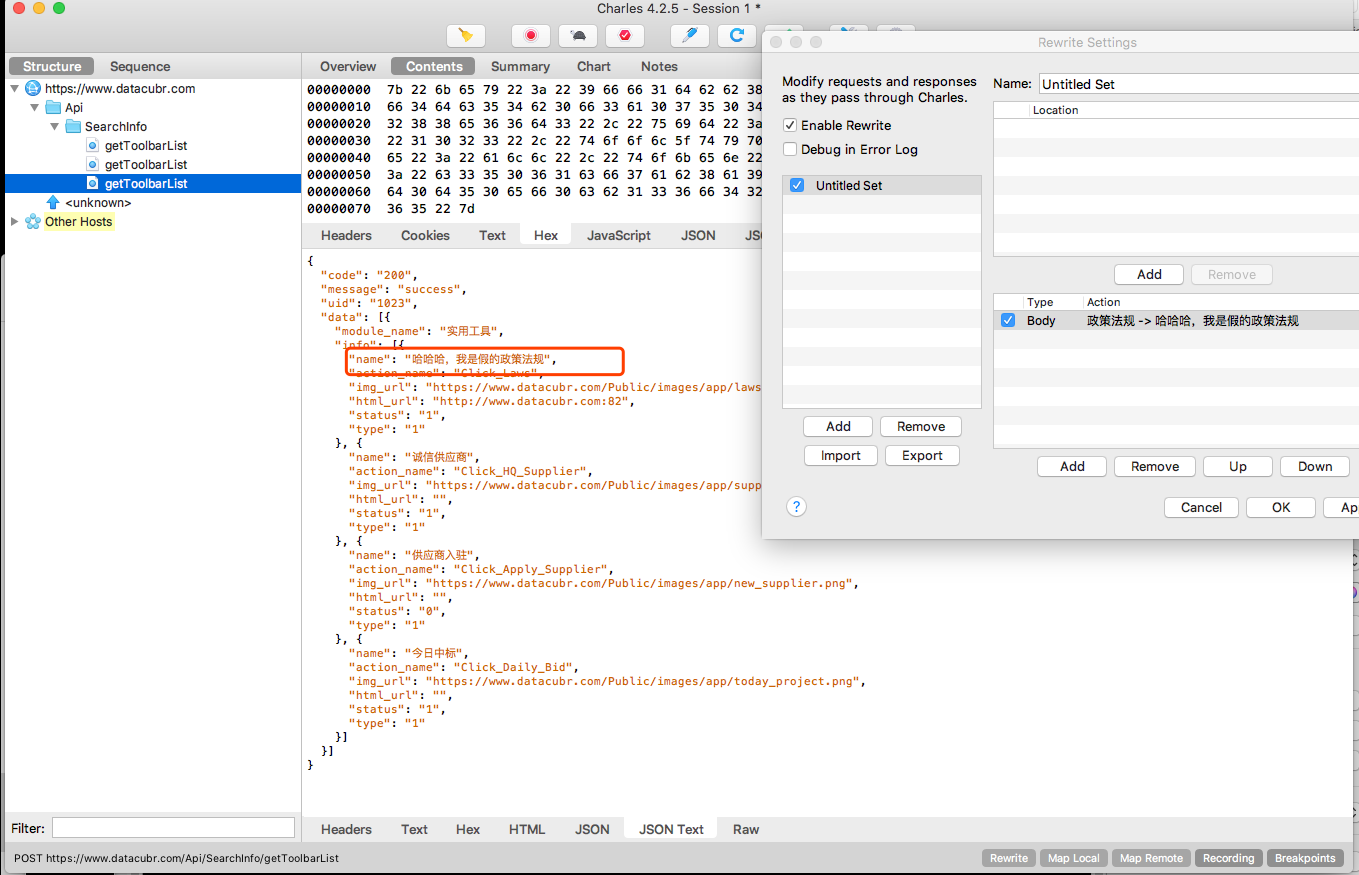
Then rewrite the specified Type and Action .
Type mainly includes Add Header, Modify Header, Remove Header, Host, Path and so on.
Where can select Request and Response. Refers to whether the following modification is for Request or Response

-
After completing the settings, click the Apply button to take effect. The next time we continue to request the network, the content returned is the content we just set. For example, the current "policies and regulations" should become "Hahaha, I am fake policies and regulations". At this time, you can use the Rewrite function
Breakpoints function
Breakpoints 相比于其他几个修改网络请求的特点是只是针对当前的网络请求,Breakpoints 只存在于设置过的当前的网络请求,Charles 关闭后下次打开 Breakpoints 消失了。想要修改网络请求 Breakpoints 步骤最简单,跟我们调试工具里面设置的断点一样方便。
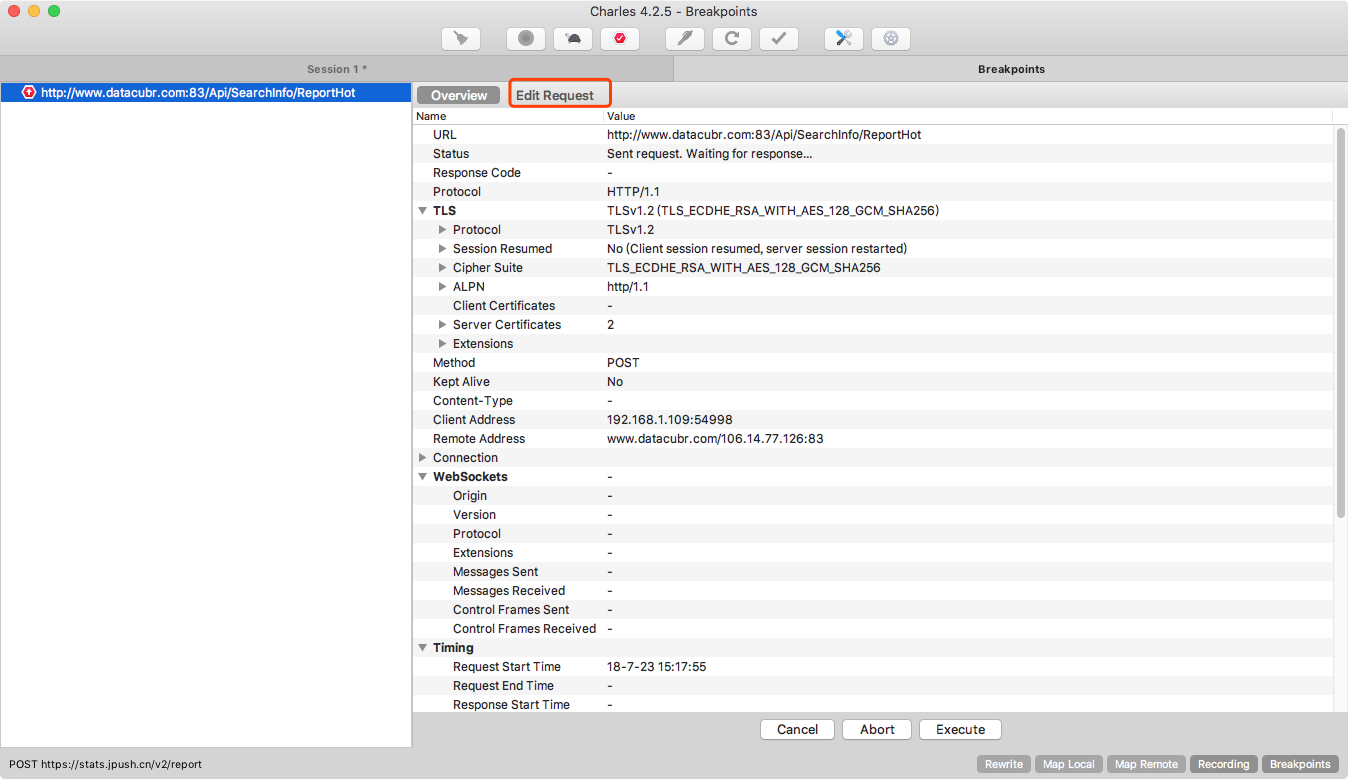
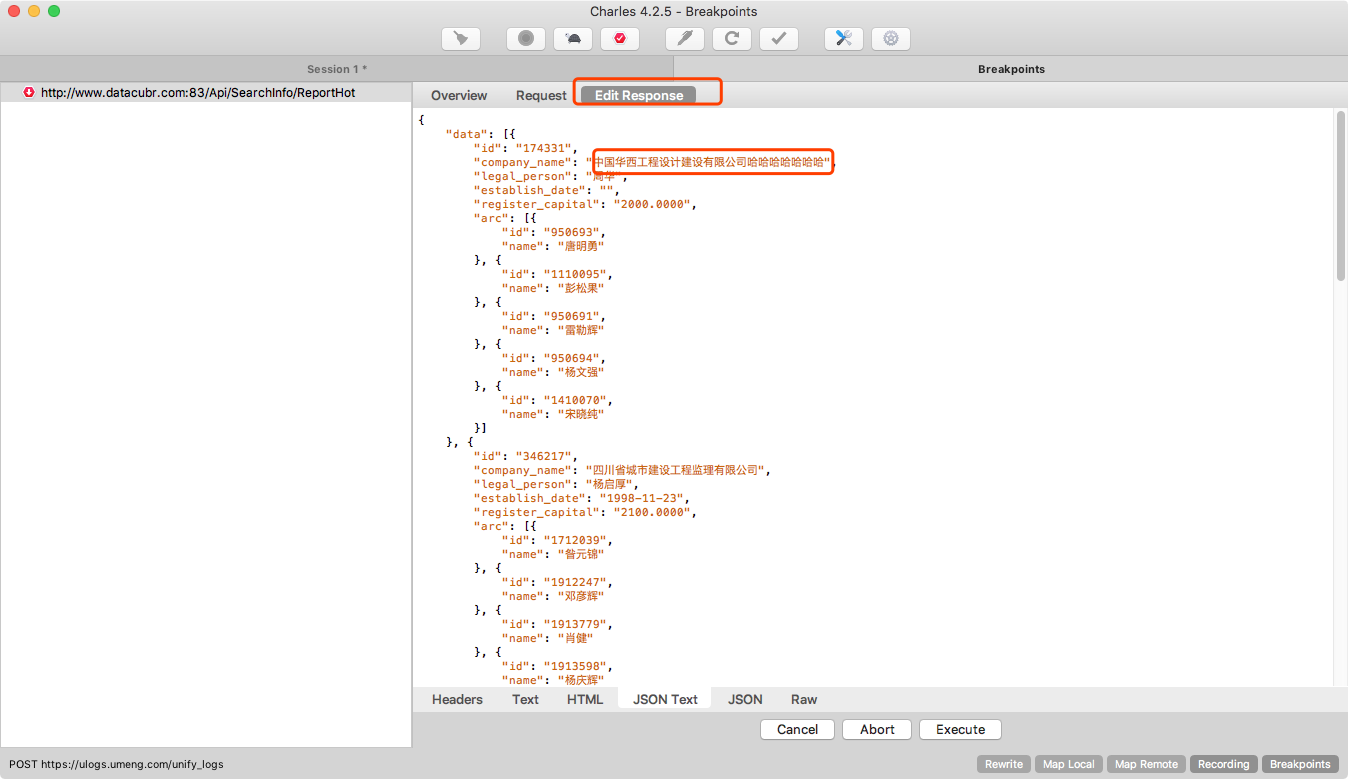
对于我们设置了 Breakpoints 的网络请求, Charles 会在下次继续访问该请求的时候停止掉,就跟 debug 一样。此时我们可以 Edit Request,修改过 Request 之后点击右下角的 Execute 按钮。然后等到服务端返回的时候继续是断点状态,此时可以 Edit Response。步骤: 选中某个网络请求 -> 右击 -> 点击“Breakpoints”。
如下图:对该接口设置了 Breakpoints。请求网络后 Edit Response,点击 execute 后服务端返回的结果就是我们编辑的内容了。
服务器压力测试
我们可以使用 Charles 的 Repeat 功能地对服务器进行并发访问进行压力测试。步骤:**选中某个网络请求 -> 右击 -> Repeat Advanced -> 在弹出的面板里面设置总共的迭代次数(Iterations)、并发数(Concurrency) -> 点击“OK” 。**开始执行可以看到以设置的并发数的规模,进行总共达设置的总共迭代次数的访问。(专业的压力测试工具:Load Runner)

反向代理
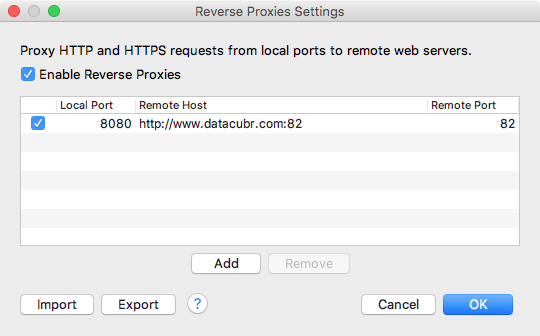
Charles 的反向代理功能允许我们将本地指定端口的请求映射到远程的另一个端口上。设置:点击顶部菜单栏 Proxy -> 点击 Reverse Proxies。
如下所示,我将本地的 8080 端口映射到远程的 80 端口上,点击 OK 生效后,当我继续访问本地的 80 端口,实际返回的就是远程 80 端口的提供的内容了。
解决与翻墙软件的冲突
Charles 的工作原理是把自己设置为系统的代理服务器,但是我们开发者经常会利用 VPN 翻墙访问谷歌查找资料(这些翻墙软件的工作原理也是把自己设置成为系统的代理服务器),为了2者和平共处。我们可以在 Charles 的 External Proxy Settings 中将翻墙的代理端口等信息填写。同时我们需要关闭翻墙软件的自动设置,更改为**“手动模式”**。(使其不主动修改系统代理)
总结
Charles 功能强大、界面简洁,读完这篇文章并做出练习,相信你能很快掌握它,“工欲善其事,必先利其器” ,掌握了它,相信可以为你大大提高开发中调试网络的效率。Enjoy yourself