This tutorial and the full set of source code have been open sourced on OSChina Code Cloud and will be updated continuously. For the latest version, please visit https://gitee.com/goeasy-io/GoEasyDemo-html-LiveChatroom
The live broadcast of the past two years is really indescribable! Friends often ask, I want to implement a live chat or I want to develop a chat room, how do I start?
Today, the editor will teach you how to use GoEasy to make a chat room, and of course it can also be used for interaction in the live broadcast room. The full set of source code has been open source, git address: https://gitee.com/goeasy-io/GoEasyDemo-html-LiveChatroom
The main purpose of this tutorial is to introduce the implementation ideas to everyone. In order to ensure that this tutorial can help friends who use different front-end technologies, the HTML + JQuery method is adopted. stay tuned.
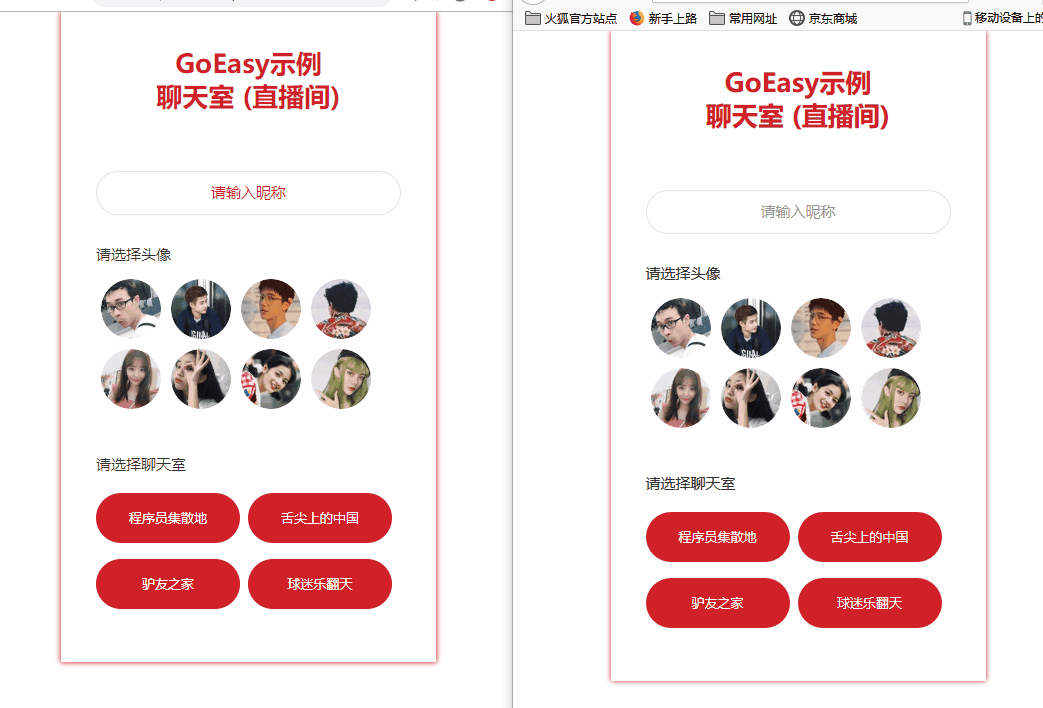
The chat room we want to implement this time has two interfaces, namely:
- login interface
- chat room interface
Log in

For the login interface, we expect:
- Users can enter their own nickname
- Users can choose their favorite avatar
- Users can choose to enter different chat rooms (live rooms)
Implementation steps
The implementation of the login interface, needless to say, because it is really So Easy! A simple interface that only contains three simple logics:
- Verify that a nickname is entered
- Verify that an avatar is selected
- Enter the corresponding chat room according to the selection
The following focuses on the realization of the chat room.
Chat room (live room)
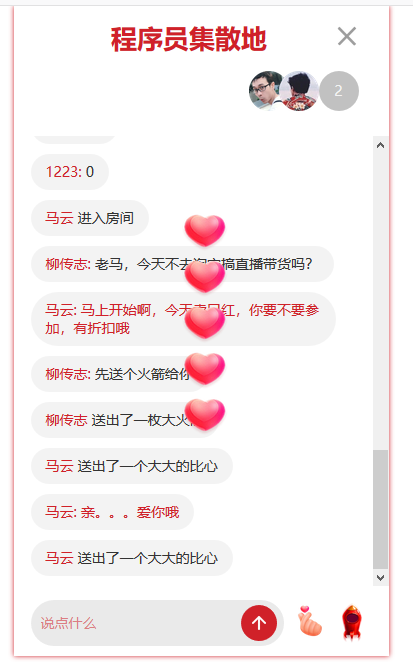
When we enter a chat room, we expect:
- Users can see how many users are currently online, and this number can be updated in real time
- Users can see the avatars of current online users, and can update in real time
- If a user enters or leaves the chat room
a. The chat room will have a prompt of "XXX has come in" or "XXX has left"
b. The number of online users and the list of users' avatars will be automatically updated accordingly - User can speak in chat
- User can send props: rocket or heart
Implementation steps
Step 1: Chat room interface display
**1. Initialization: ** When the user selects a chat room, before displaying the chat room interface, we first need to perform the following initialization work:
- Initialize the current user currentUser, user id, nickname, avatar
- Initialize the current chat room ID: currentRoomId
- To initialize the GoEasy object, be sure to add the userId parameter (which can be the user's uuid or id and other unique identifiers. Only when the client with the userId set goes online and offline will the online and offline reminder be triggered). At the same time, we need to put the avatar and nickname into userData. When we receive a user online reminder, we need to know the user's avatar and nickname.
- Initialize onlineUsers. OnlineUsers is used to store the current number of online users in the chat room and the list of online users. Use the current chat room ID (currentRoomId) as the channel, execute goEasy.hereNow to query the number of online users and user list in the chat room at the moment, and assign it to onlineUsers. In addition to initializing onlineUsers when entering a chat room, onlineUsers are also dynamically updated when a user enters or leaves.
- Using the id (currentRoomId) of the current chat room as the channel, execute the subscriber method to listen to and receive new messages from the chat room.
- Using the id (currentRoomId) of the current chat room as the channel, execute subscriberPresence to monitor user entry and exit events.
Reference code: service.js
//初始化聊天室
this.joinRoom = function(userId,nickName, avatar, roomID) {
        //初始化当前用户
        this.currentUser = new User(userId, nickName, avatar);
        //初始化当前聊天室id
        this.currentRoomId = roomID;
        //初始化goeasy,建立长连接
        this.goeasy = new GoEasy({
            host: "hangzhou.goeasy.io",
            appkey: "您的appkey",
            userId: this.currentUser.id,
            userData: '{"nickname":"' + this.currentUser.nickname + '","avatar":"' + this.currentUser.avatar + '"}',
            onConnected: function () {
                console.log( "GoEasy connect successfully.")
            },
            onDisconnected: function () {
                console.log("GoEasy disconnected.")
            }
        });
        //查询当前在线用户列表,初始化onlineUsers对象
        this.initialOnlineUsers();
        //监听用户上下线提醒,实时更新onlineUsers对象
        this.subscriberPresence();
        //监听和接收新消息
        this.subscriberNewMessage();
};
2. Page display:
After completing the initialization, jump to the live broadcast room interface and display the following data on the page:
- The name of the current chat room
- Chat history, and display the chat room interface
- Show chat room interface
Reference code: controller.js
//页面切换到聊天室界面
function showChatRoom() {
    //更新房间名
    $("#chatRoom-header").find(".current-chatRoom-name").text(loginCommand.roomName);

    //加载聊天历史
    var chatHistory = service.loadChatHistory();
    chatHistory.forEach(function (item) {
        //展示发送的消息
        var otherPerson = createCurrentChatRoomPerson(item.senderNickname + ":", item.content)
        $(".chatRoom-content-box").append($(otherPerson));
    });

    //隐藏登录界面
    $(".chat-login-box").hide();
    // //显示聊天界面
    $(".chatRoom-box").show();
    // //滑动到最后一行
    scrollBottom();
}
So far, we have completed the initialization of the goeasy long connection, and a static display of a chat room. Next, let's take a look at how to make this chat room move.
Step 2: Chat room interaction
1. Real-time update of online users and avatar list
The onlineUsers object has been initialized in the service.initialOnlineUsers method before, but there are users entering and leaving the chat room at any time, so we also need to be able to update onlineUsers in real time when a user goes online or offline, and display it on the page in real time . When we receive a user online reminder, we store the information of the newly online user in the online user object onlineUsers, and delete it from the local online user list when a user leaves.
Reference code: service.js
//监听用户上下线时间,维护onlineUsers对象
this.subscriberPresence = function() {
    var self = this;
    this.goeasy.subscribePresence({
        channel: this.currentRoomId,
        onPresence: function(presenceEvents) {
            presenceEvents.events.forEach(function(event) {
                var userId = event.userId;
                var count = presenceEvents.clientAmount;
                //更新onlineUsers在线用户数
                self.onlineUsers.count = count;
                //如果有用户进入聊天室
                if (event.action == "join" || event.action == "online") {
                    var userData = JSON.parse(event.userData);
                    var nickName = userData.nickname;
                    var avatar = userData.avatar;
                    var user = new User(userId, nickName, avatar);
                    //将新用户加入onlineUsers列表
                    self.onlineUsers.users.push(user);
                    //触发界面的更新
                    self.onJoinRoom(user.nickname, user.avatar);
                } else {
                    for (var i = 0; i < self.onlineUsers.users.length; i++) {
                        var leavingUser = self.onlineUsers.users[i];
                        if (leavingUser.id == userId) {
                            var nickName = leavingUser.nickname;
                            var avatar = leavingUser.avatar;
                            //将离开的用户从onlineUsers中删掉
                            self.onlineUsers.users.splice(i, 1);
                            //触发界面的更新
                            self.onLeaveRoom(nickName, avatar);
                        }
                    }
                }
            });
        },
        onSuccess : function () {
            console.log("监听成功")
        },
        onFailed : function () {
            console.log("监听失败")
        }
    });
};
2. Send a message
- Initialize a chatMessage object, including sender id, nickname, message content, and the message type is chat
- Convert chatMessage to a string in Json format
- Call the Publish method of GoEasy to complete the sending of the message
Reference code (service.js)
this.sendMessage = function(content) {
    var message = new ChatMessage(this.currentUser.id,this.currentUser.nickname, MessageType.CHAT, content);
    var self = this;
    this.goeasy.publish({
        channel: self.currentRoomId,
        message: JSON.stringify(message),
        onSuccess: function() {
            console.log("消息发布成功。");
        },
        onFailed: function(error) {
            console.log("消息发送失败,错误编码:" + error.code + " 错误信息:" + error.content);
        }
    });
};
3. Receive and display new messages/props
Earlier we have executed service.subscriberNewMessage() when initializing the page, when we receive a message:
- Judging whether it is a chat message or a prop according to the message type
- If you receive a chat message, display it directly to the interface
- If it's a prop, play the animation
Reference code (service.js)
//监听消息或道具
this.subscriberNewMessage = function() {
    var self = this;
    this.goeasy.subscribe({
        channel: this.currentRoomId, //替换为您自己的channel
        onMessage: function(message) {
            var chatMessage = JSON.parse(message.content);
            //todo:事实上不推荐在前端收到时保存, 一个用户开多个窗口,会导致重复保存, 建议所有消息都是都在发送时在服务器端保存,这里只是为了演示
            self.restapi.saveChatMessage(self.currentRoomId, chatMessage);
            //如果收到的是一个消息,就显示为消息
            if (chatMessage.type == MessageType.CHAT) {
                var selfSent = chatMessage.senderUserId == self.currentUser.id;
                var content = JSON.parse(message.content);
                self.onNewMessage(chatMessage.senderNickname, content, selfSent);
            }
            //如果收到的是一个道具,就播放道具动画
            if (chatMessage.type == MessageType.PROP) {
                if (chatMessage.content == Prop.ROCKET) {
                    self.onNewRocket(chatMessage.senderNickname);
                }
                if (chatMessage.content == Prop.HEART) {
                    self.onNewHeart(chatMessage.senderNickname);
                }
            }
        }
    });
};
4. Send and receive and display props
In fact, the implementation of sending a message is almost the same. For the specific code, please refer to the sendProp method of service.js and the onNewHeart() method of controller.js. The animation playback uses the TweenMax library, mainly to show an implementation idea. The editor does not know whether this library has good compatibility, and whether it can be used in Uniapp and small programs. Friends who know it can leave a message to share. for everyone.
this.sendProp = function(prop) {
    var self = this;
    var message = new ChatMessage(this.currentUser.id,this.currentUser.nickname, MessageType.PROP, prop);
    this.goeasy.publish({
        channel: self.currentRoomId,
        message: JSON.stringify(message),
        onSuccess: function() {
            console.log("道具发布成功。");
        },
        onFailed: function(error) {
            console.log("道具发送失败,错误编码:" + error.code + " 错误信息:" + error.content);
        }
    });
};
So far, a chat room is done, isn't it easy?
If you have any problems reading this article or developing, you are also welcome to add GoEasy as a friend on the GoEasy official website to get more technical support
GoEasy official website: https://www.goeasy.io/
GoEasy series of tutorials:
-
Several issues that must be considered when building a websocket message push service
-
websocket IM chat tutorial - teach you to quickly implement IM chat with GoEasy
-
Websocket live room chat room tutorial - GoEasy quickly implements chat room
-
WeChat applet uses GoEasy to realize websocket real-time communication
-
Uniapp uses GoEasy to implement websocket real-time communication