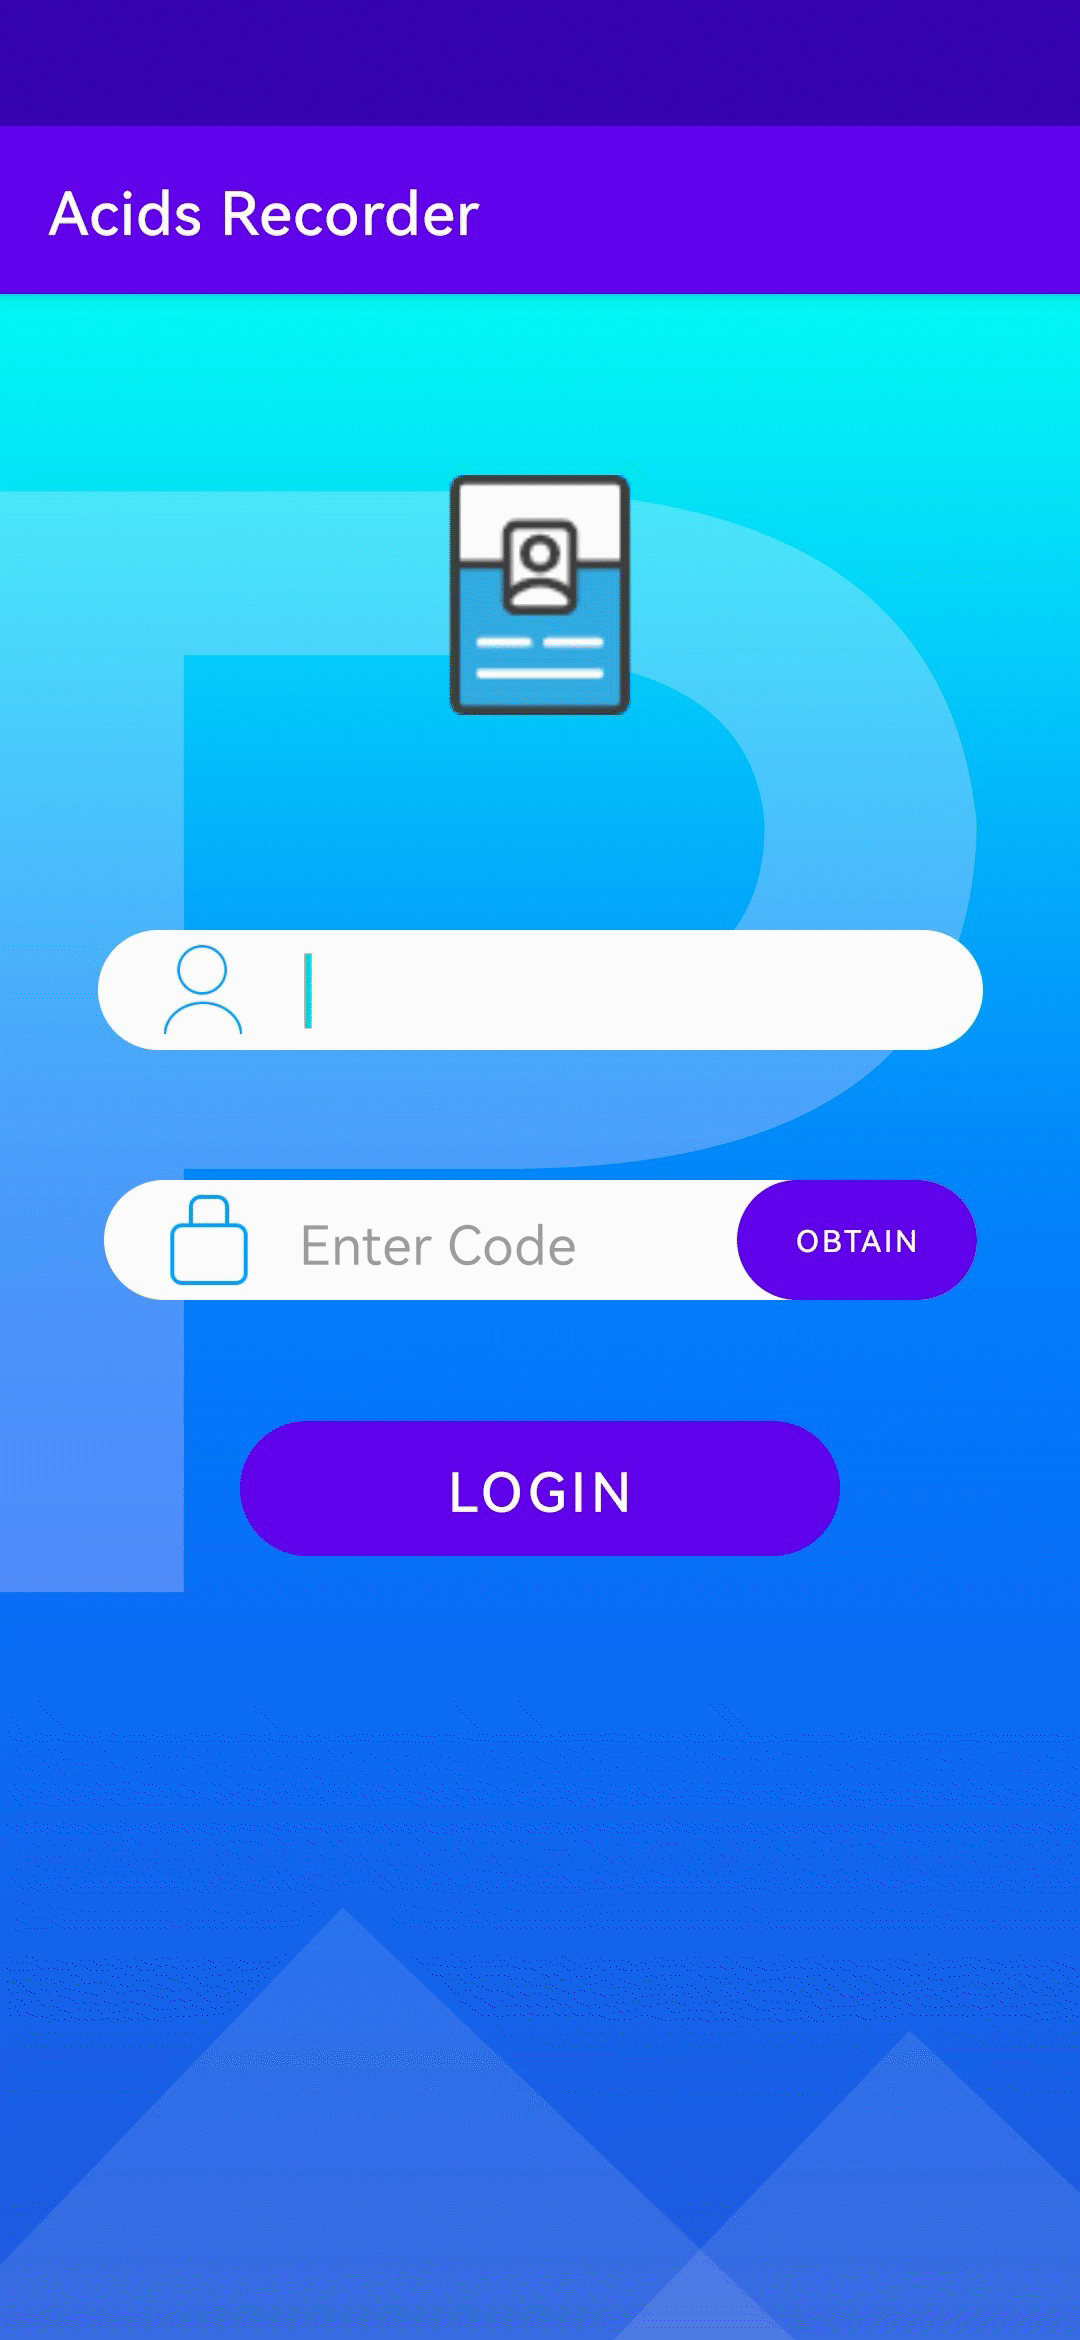
The above ([Codelabs Challenge Example Explanation 1] Nucleic Acid Test Result Authentication Query System - Authentication Login) realizes the function of the authentication login part of the nucleic acid test result authentication query system. After the authentication and login is completed, the next step is to realize the nucleic acid test result. Data import and query functions.
Cloud database is a device-cloud collaborative database product that provides collaborative management of device-cloud data, a unified data model, and rich data management API interfaces, which can fully satisfy the data query function.
The activity of "Codelabs Challenge - Building a Certification Query System from Zero Basics" is in full swing. Share your works and have the opportunity to win great gifts such as Huawei freebuds pro wireless earphones, Huawei band 6nfc version, and alliance backpacks. Come and participate >> https: //developer.huawei.com/consumer/cn/forum/topic/0202851788421280176?fid=0102822233052010012
Integrated SDK
1.1 Integrated SDK
AppGallery Connect opens up its data management function in the form of SDK . Before developing the data management function, you need to integrate the cloud database SDK first , and you need to download the JSON file provided by AGC to obtain the basic information of the application and data processing location information; secondly, The display of data needs to rely on tables. This time, we chose the open source automated table framework -SmartTable , which also needs to integrate the SDK first .
1. Before integrating cloud database and SmartTable SDK , please ensure that you have completed the integration of maven warehouse, AGC plugin and compilation dependencies.
2. Configure the integrated cloud database and SmartTable SDK under the application-level build.gradle file .
dependencies {
    //agc-core的依赖
    implementation 'com.huawei.agconnect:agconnect-core:1.6.0.300'
    implementation 'androidx.appcompat:appcompat:1.3.0'
    implementation 'com.google.android.material:material:1.3.0'
    implementation 'androidx.constraintlayout:constraintlayout:2.0.4'
    testImplementation 'junit:junit:4.+'
    androidTestImplementation 'androidx.test.ext:junit:1.1.3'
androidTestImplementation 'androidx.test.espresso:espresso-core:3.4.0'
//云数据库sdk
implementation 'com.huawei.agconnect:agconnect-cloud-database:1.4.9.300'
compile 'com.github.huangyanbin:SmartTable:2.0'
    }
After the above SDK or dependencies are added, you need to click " Sync Now " in the upper right corner to wait for the synchronization to complete.
development preparation
1.1 Opening the service
1. Log in to the AGC console, click "My Projects", and select the previously created project.
2. Find "Build-Cloud Database" in the menu directory, click "Activate Now" in the upper right corner, the interface is as follows after activation, so far, the cloud database service has been activated successfully.
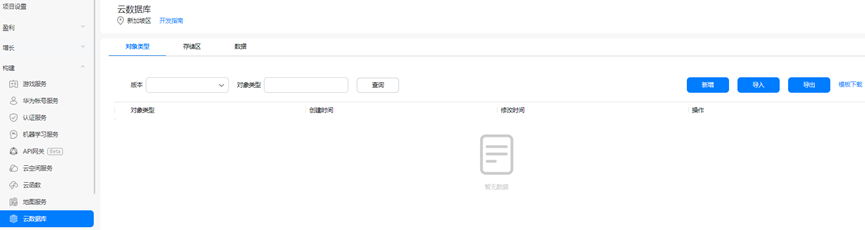
1.2 Added cloud database data objects
Before managing the cloud database, you need to add a new cloud database data object. The data object mainly specifies the type of data in the database storage area, which can be added to the project for use in the future.
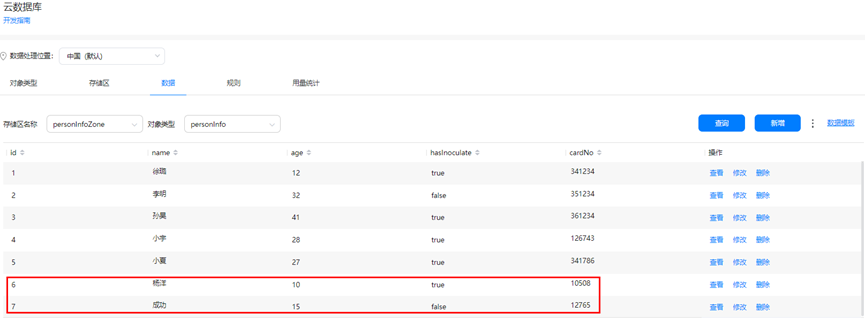
1. Select the "Object Type" tab on the cloud data service interface, click "Add", fill in " personInfo " for the object type, and add " id ", " name ", " age ", " hasInoculate ", " cardNo " fields Used to store the identity data of the detected population.
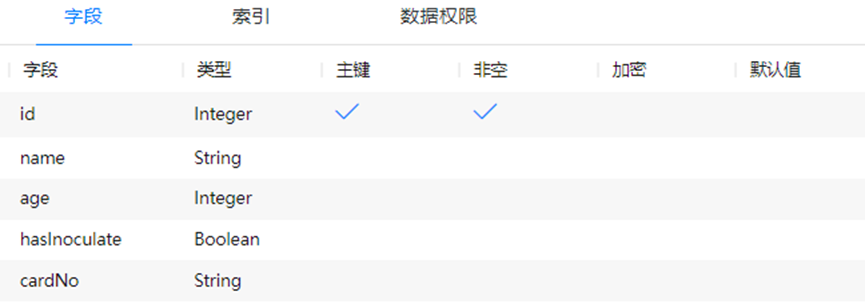
2. Set the index of the object type or the index of a field in the object type. Here I only set the index to name , which can be set as appropriate.
3. Set the permissions for data management. Here, according to my product positioning, the administrator and data creator have all permissions. For more roles, see Privilege Management .

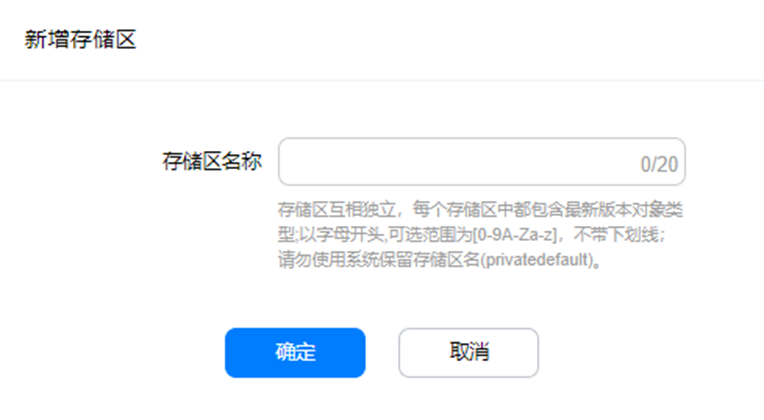
1.3 New storage area
Data additions, deletions and queries need to be performed in the data storage area. Before performing the above operations to manage data of a certain object type, you need to create a storage area. Here, you only need to specify the name of the storage area, and then insert the data of an object type into which storage area in the code.
On the cloud data service interface, select the "Storage Zone" tab, click "Add", and fill in the name of the storage zone to create. Here is an example of creating a storage zone named " personInfoZone ".
PS : Under the "Data" tab, you can query data according to the storage area and object type. After the data is inserted, it can be used as cloud-side query data.
1.4 Import data
You can choose to import inspection data in two ways: "Manual Import" and "Batch Import".
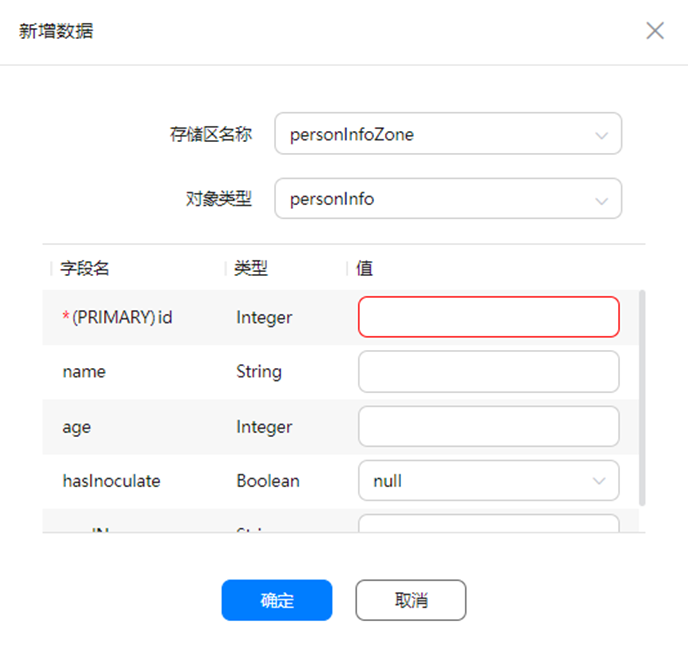
1. Manual import
On the Data tab, select the object type to be created and the name of the storage area, and click Add.

Add data according to the fields in the object type. Here we take " personInfo " as an example:
2. Batch import
On the "Data" tab, select the object type to be created and the name of the storage area, and click "Data Template".
Note: The data template is a sample data json file containing information about the storage area and object type. You can directly add data and then import it.

Open the data template json file and add data according to the object type field. As follows, two new valid data are added:
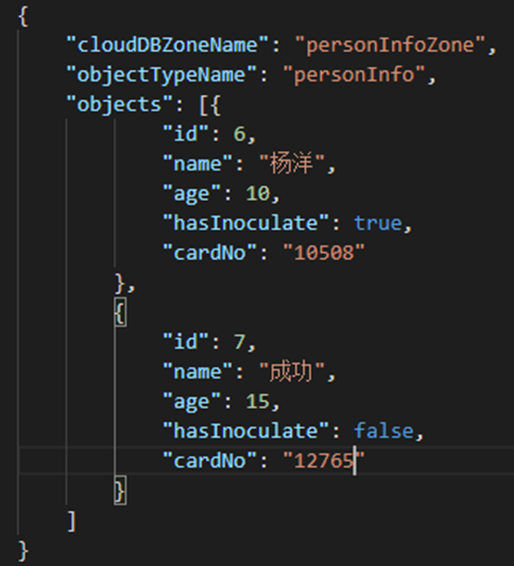
Click " ... > Import" to import the newly added data, and the data in json can be added incrementally , as shown in the following figure:
Note: If the data is stored in an Excel file, it can be converted to a json file before adding it. For the Excel -to- json method, please Google it yourself .
1.5 Update configuration file
After the cloud database service is activated, the AGC will write the object type and other information of the cloud database into the JSON file. Therefore, you need to download the " agconnect-services.json " file again and update it in the Android Studio project. For details, please refer to "Integration" in the first part of the series SDK - Adding Configuration Files" chapter.
interface design
The design of the main function interface is relatively simple, including the following:
1. Display form of test data;
2. Logout button.
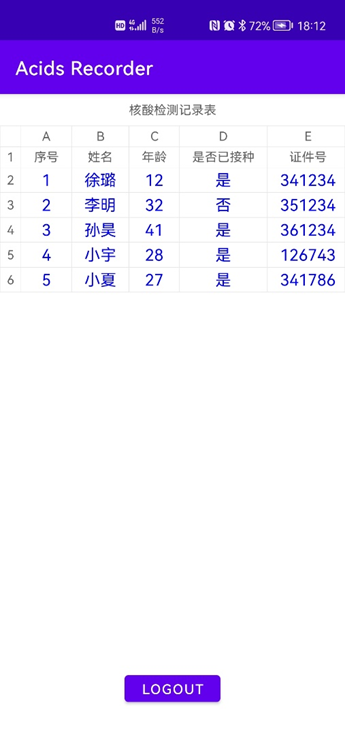
Note: Here is an example of the interface for successfully querying data, and the table is initially empty.
data object import
The data objects created in the development preparation chapter must be imported into the Android Studio project before you can perform operations such as creating, inserting, and modifying objects in the code. The specific operations are as follows:
1. Log in to AGC and enter the cloud database service under the project.
2. Under the Object Type tab, click "Export" in the upper right corner, and select " java " format for the export file format (because we are developing an Android project, for projects such as web , AGC also provides object type format files in js format, etc.) .
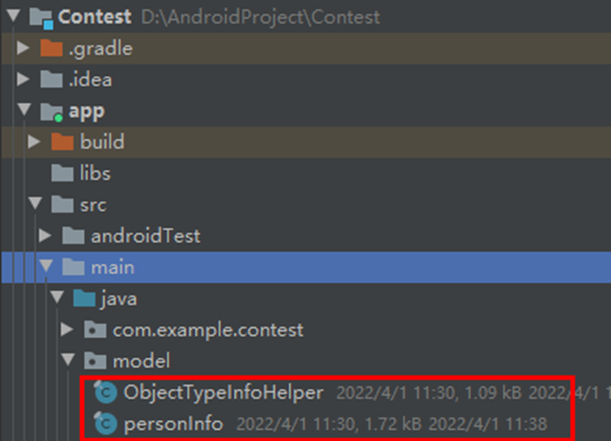
3. In the src\main\java\com\example\packagename directory, create a new package named model , and place the personInfo object file and object help file just downloaded in this directory.
Database initialization
The business requirement of this system is to enter the main interface, that is, to query the imported detection data. Before querying, the database needs to be initialized. For details, please refer to the official document - initialization .
1. Initialize AGConnectCloudDB , database configuration and storage area. After initialization, the database needs to be operated at any time during the life cycle, so the following global variables need to be defined.
//初始化数据库
AGConnectCloudDB mCloudDB;
//初始化数据库配置
CloudDBZoneConfig mConfig;
//初始化存储区
CloudDBZone mCloudDBZone;
//初始化表格
private SmartTable table;
//云端数据对象List
private static List<personInfo> personInfoList = new ArrayList<>();
2. Complete a series of operations to obtain an AGConnect CloudDB instance, create an object type, and open the Cloud DB Zone . ( personInfo needs to be replaced with the actual storage area name, where the synchronization configuration attribute of Cloud DB Zone is cache mode, and the access attribute is public storage area).
private void initView() {
        //初始化云数据库
        AGConnectCloudDB.initialize(getApplicationContext());
        AGConnectInstance instance = AGConnectInstance.buildInstance(new AGConnectOptionsBuilder().setRoutePolicy(AGCRoutePolicy.CHINA).build(getApplicationContext()));
        mCloudDB = AGConnectCloudDB.getInstance(instance, AGConnectAuth.getInstance(instance));
        Log.i(TAG,"The cloudDB is" + mCloudDB);
        try {
            mCloudDB.createObjectType(model.ObjectTypeInfoHelper.getObjectTypeInfo());
            mConfig = new CloudDBZoneConfig("personInfoZone",
                    CloudDBZoneConfig.CloudDBZoneSyncProperty.CLOUDDBZONE_CLOUD_CACHE,
                    CloudDBZoneConfig.CloudDBZoneAccessProperty.CLOUDDBZONE_PUBLIC);
            mConfig.setPersistenceEnabled(true);
            Task<CloudDBZone> openDBZoneTask = mCloudDB.openCloudDBZone2(mConfig, true);
            openDBZoneTask.addOnSuccessListener(new OnSuccessListener<CloudDBZone>() {
                @Override
                public void onSuccess(CloudDBZone cloudDBZone) {
                    Log.i("open clouddbzone", "open cloudDBZone success");
                    mCloudDBZone = cloudDBZone;
                    //开始绑定数据
                    bindData();
                    // Add subscription after opening cloudDBZone success
                    //addSubscription();
                }
            }).addOnFailureListener(new OnFailureListener() {
                @Override
                public void onFailure(Exception e) {
                    Log.w("open clouddbzone", "open cloudDBZone failed for " + e.getMessage());
                }
            });
        } catch (AGConnectCloudDBException e) {
            Toast.makeText(DatabaseActivity.this, "initialize CloudDB failed" + e, Toast.LENGTH_LONG).show();
        }
    }
bind and query data
1. The function of bindData in the previous step is to bind the data imported from the AGC cloud to the SmartTable table frame, and then display it.
private void bindData() {
        CloudDBZoneQuery<personInfo> query = CloudDBZoneQuery.where(personInfo.class);
        queryPersonInfo(query);
}
private List<personInfo> queryPersonInfo(CloudDBZoneQuery<personInfo> query) {
        if (mCloudDBZone == null) {
            Log.w(TAG, "CloudDBZone is null, try re-open it");
            return null;
        }

        Task<CloudDBZoneSnapshot<personInfo>> queryTask = mCloudDBZone.executeQuery(query,
                CloudDBZoneQuery.CloudDBZoneQueryPolicy.POLICY_QUERY_FROM_CLOUD_ONLY);
        //List<personInfo> tmpInfoList = new ArrayList<>();
        queryTask.addOnSuccessListener(new OnSuccessListener<CloudDBZoneSnapshot<personInfo>>() {
            @Override
            public void onSuccess(CloudDBZoneSnapshot<personInfo> snapshot) {
                try {
                    personInfoList = processQueryResult(snapshot);
                } catch (AGConnectCloudDBException e) {
                    Log.e(TAG, "onfailed: "+e.getErrMsg() );
                }
                Log.i(TAG, "onSuccess: query result success");
            }
        }).addOnFailureListener(new OnFailureListener() {
            @Override
            public void onFailure(Exception e) {
                mUiCallBack.updateUiOnError("Query failed");
                Log.i(TAG, "onSuccess: query result failed");
            }
        });
        return personInfoList;
    }
2. processQueryResult is the main function for processing and displaying cloud data. Here, the fields in the data object need to be added to the list and added to the SmartTable.
private List<personInfo> processQueryResult(CloudDBZoneSnapshot<personInfo> snapshot) throws AGConnectCloudDBException {
        CloudDBZoneObjectList<personInfo> bookInfoCursor = snapshot.getSnapshotObjects();
        List<personInfo> bookInfoList = new ArrayList<>();
        List<PersonInfo> list = new ArrayList<>();
        table = findViewById(R.id.table);
        try {
            while (bookInfoCursor.hasNext()) {
                personInfo info = bookInfoCursor.next();
                bookInfoList.add(info);
                list.add(new PersonInfo(info.getId(),info.getName(),info.getAge(),info.getHasInoculate()==true?"是":"否",info.getCardNo()));
//                list.add(new PersonInfo(1,"xuhao",34,true,"12321"));
            }
        } catch (AGConnectCloudDBException e) {
            Log.w(TAG, "processQueryResult: " + e.getMessage());
        } finally {
            snapshot.release();
            mCloudDB.closeCloudDBZone(mCloudDBZone);
        }
        table.setData(list);
        table.getConfig().setContentStyle(new FontStyle(50, Color.BLUE));
        mUiCallBack.onAddOrQuery(bookInfoList);
        return bookInfoList;
    }
3. After the account is logged out, the system will jump to the login interface and call the AGConnectAuth. signOut method. No need to go into details.
findViewById(R.id.login_out).setOnClickListener(new View.OnClickListener(){

            @Override
            public void onClick(View view) {
                AGConnectAuth.getInstance().signOut();

                Intent intent = new Intent();
                intent.setClass(DatabaseActivity.this, LoginActivity.class);
                startActivity(intent);
                Log.i(TAG, "onClick: log out successfully");
            }
        });
So far, the development of the nucleic acid detection result query system has been completed. After running, you can log in to the system to query all the detection data in the cloud database cloud.
Summarize
The device-cloud data synchronization capability provided by the AGC cloud database service is still very practical, eliminating the workload of server deployment and data management. Of course, in addition to data query, common data operations such as adding or deleting data can also be directly implemented in the system. The capabilities provided by cloud database services are far more than just querying.
So far, we have completed the functional development of the nucleic acid detection result system. This system is only the basic realization of the thematic functions of the Codelab Challenge. You can build more possibilities for AGC Serverless services based on the guidance documents and Demo , combined with your own imagination. sex.
Reference documentation:
How to initialize cloud database: https://developer.huawei.com/consumer/cn/doc/development/AppGallery-connect-Guides/agc-clouddb-get-started-0000001127676473#section10889116163412
Cloud database Cloud data query:
Required reading for development preparation and SDK integration :
SmartTable original project and integration guide:
https://github.com/huangyanbin/smartTable
Another example explanation is attached: [Codelabs Challenge Example Explanation 1] Nucleic Acid Test Result Authentication Query System - Authentication Login