Get into the habit of writing together! This is the 5th day of my participation in the "Nuggets Daily New Plan · April Update Challenge", click to view the details of the event .
0 is written in front
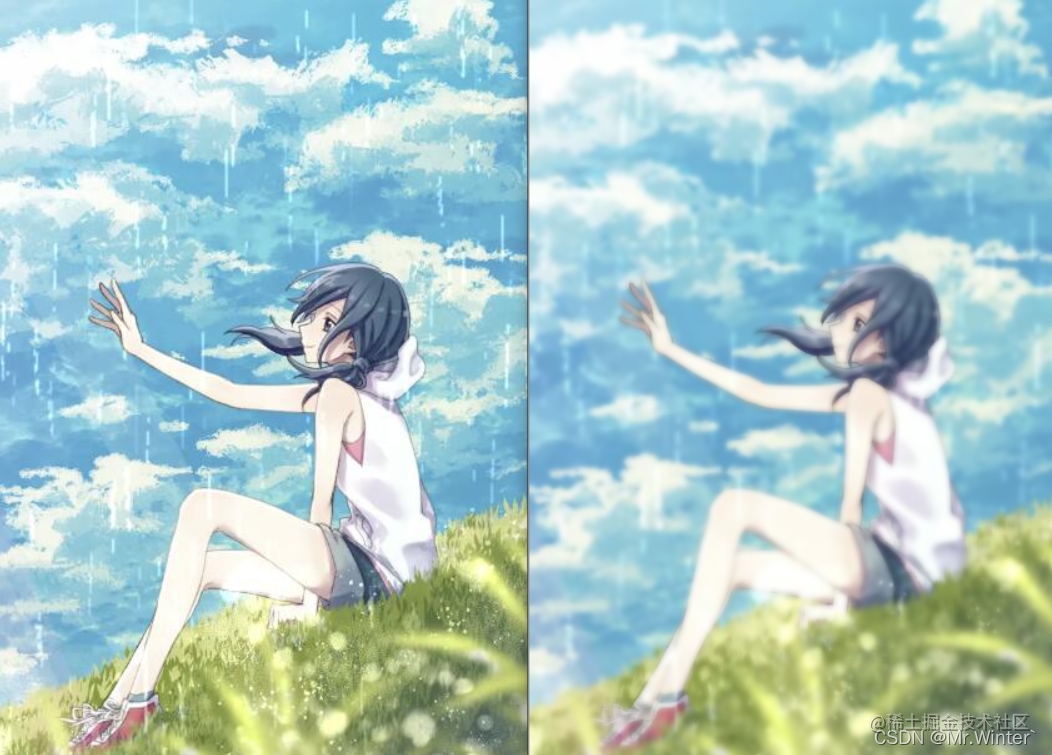
I believe that students who have used the camera know about the blur effect, which is an effect that makes the focus focus on the subject and makes the background blurry, such as the background blur effect realized at the end of this article.
What is the principle behind the camera blur effect? What does it have to do with computer vision? This article takes you through these questions.
1 Small hole imaging
We know from elementary school that an image does not exist without light, and in order to produce an image, a scene must have one or more, direct or indirect, light sources.
As shown in the figure, lighting is mainly divided into three categories:
- scattering
- direct light
- diffuse reflection
After the light source is obtained, a ray from the object to the detection plane is produced.
Since there are countless scattered rays of light reaching the detection plane from a certain point A on the object, it can be considered that the imaging point A' of A is evenly distributed on the imaging plane, and the same is true for other points. Therefore, in this case, the detection plane is the aliasing of countless object images, resulting in blurred or even impossible imaging.
Faced with a piece of white paper, you can't see your face, not because there is no light from you on the white paper, but because the light from different parts of you overlaps on the white paper, don't believe me, try it?
How to image on white paper?
In fact, it is very simple, using the small hole imaging that was tried in elementary school
Essentially, the small hole is equivalent to a ==filter==, retaining only a few light rays from the object point, and a clear image should be obtained at this time.
2 Optical imaging
The disadvantage of pinhole imaging is that the imaging light is less and the brightness is low . In order to obtain more light and prevent the image points from being scattered on the detection surface to cause image overlap, a light-condensing lens is introduced . The essence of lens imaging and pinhole imaging is to avoid the inability to image due to scattered image points. The former uses condensing light, while the latter uses filtering.
现代相机在应用上通常使用透镜成像,但不管是透镜成像还是小孔成像,都是计算机视觉研究的基本模型和假设,例如透视几何、相机内参矩阵、畸变修正等等,因此本节对于建立机器视觉的研究思维很有帮助。
3 虚化效果
介绍完前面的基础知识,终于开始图像虚化特效的原理啦!
理想透镜应保证光线聚焦于一点——焦点,这个点不会产生任何成像混叠,图像最清晰。在焦点前后光线开始四散,形成不同程度的成像重叠区域,称为弥散圆,对于人眼而言,在一定范围内影象产生的模糊是不能辨认的,不能辨认的弥散圆范围称为容许弥散圆
当对被摄主体平面调焦时,因为容许弥散圆的存在,在一定离焦范围内,成像仍然清晰,这个范围称为焦深。调整成像面和镜头距离,使成像面处于焦深内,物体可以清晰成像的过程,称为对焦。
类似地,对被摄物体而言,位于调焦物平面前后的能相对清晰成像的景物间纵深距离称为景深。图像虚化效果就和这个景深有关系!
- 景深越小,被摄物体前后能清晰成像的范围越小,也就相应地出现朦胧虚化的效果
- 景深越大,被摄物体前后能清晰成像的范围越大,也就没有虚化效果
如何调节景深?记住一句话:光圈越大景深越小,所以拿手机拍照的时候,大光圈也就代表了虚化效果!
所以下次有机会给女生拍照的话,请先确认
“请问你喜欢小景深还是大景深?”
4 代码实战
The camera background blur effect can be realized by using guided filter in image processing. The source code is as follows.
//引导滤波器
Mat guidedFilter(Mat& srcMat, Mat& guidedMat, int radius, double eps)
{
    srcMat.convertTo(srcMat, CV_64FC1);
    guidedMat.convertTo(guidedMat, CV_64FC1);
    // 计算均值
    Mat mean_p, mean_I, mean_Ip, mean_II;
    boxFilter(srcMat, mean_p, CV_64FC1, Size(radius, radius));                      // 生成待滤波图像均值mean_p
    boxFilter(guidedMat, mean_I, CV_64FC1, Size(radius, radius));                   // 生成引导图像均值mean_I
    boxFilter(srcMat.mul(guidedMat), mean_Ip, CV_64FC1, Size(radius, radius));      // 生成互相关均值mean_Ip
    boxFilter(guidedMat.mul(guidedMat), mean_II, CV_64FC1, Size(radius, radius));   // 生成引导图像自相关均值mean_II
    // 计算相关系数、Ip的协方差cov和I的方差var------------------
    Mat cov_Ip = mean_Ip - mean_I.mul(mean_p);
    Mat var_I = mean_II - mean_I.mul(mean_I);
    // 计算参数系数a、b
    Mat a = cov_Ip / (var_I + eps);
    Mat b = mean_p - a.mul(mean_I);
    // 计算系数a、b的均值
    Mat mean_a, mean_b;
    boxFilter(a, mean_a, CV_64FC1, Size(radius, radius));
    boxFilter(b, mean_b, CV_64FC1, Size(radius, radius));
    // 生成输出矩阵
    Mat dstImage = mean_a.mul(srcMat) + mean_b;
    return dstImage;
}
复制代码
We will open a new chapter for the related principles of the guided filter next time.
The filter can be called in the main function, and the effect is shown at the beginning of the text.
int main()
{
    Mat resultMat;
    Mat vSrcImage[3], vResultImage[3];
    Mat vResultImage[3];
    Mat srcImage = imread("1.jpg");
    imshow("源图像", srcImage);
    // 对源图像进行通道分离,并对每个分通道进行引导滤波
    split(srcImage, vSrcImage);
    for (int i = 0; i < 3; i++)
    {
        Mat tempImage;
        vSrcImage[i].convertTo(tempImage, CV_64FC1, 1.0 / 255.0);
        Mat cloneImage = tempImage.clone();
        Mat resultImage = guidedFilter(tempImage, cloneImage, 5, 0.3);
        vResultImage[i] = resultImage;
    }
    // 将分通道导向滤波后结果合并
    merge(vResultImage, 3, resultMat);
    imshow("背景虚化特效", resultMat);
    waitKey(0);
    return 0;
}
复制代码
A small image blurring effect, which involves various principles of optical imaging, builds the foundation of the computer vision model. Like each of us, maybe you feel very small, maybe you are the mainstay of others!
Please pay attention to the complete project file~
Computer Vision Fundamentals Course Outline
Chapter No. Content
0 Color Spaces and Digital Imaging
1 Fundamentals of computer geometry
2 Image enhancement, filtering, pyramids
3 Image Feature Extraction
4 Image Feature Description
5 Image Feature Matching
6 Stereoscopic vision
7 Project combat
More high-quality content and supporting codes are welcome to my AI channel "AI Technology Club"