1. Introduction to Azkaban
1.1 What is Azkaban
AzkabanIt is a batch workflow task scheduling tool open sourced by Linkedin, which is used to run a set of jobs and processes in a specific order within a workflow. AzkabanA k/v (properties) format file is defined to establish dependencies between tasks, and an easy-to-use web user interface is provided to maintain and track workflow.
1.2 Why use Azkaban
A complete data analysis system usually consists of a large number of task units, such as shell scripts, Java programs, MapReduce programs, hive scripts, and so on. There is a time sequence or dependency relationship between each task unit. In order to organize these task units to execute according to plan, a powerful workflow scheduling system is needed to schedule execution.
Azkaban is an open source, lightweight task invocation tool, its function is similar to the timing task crontab of the Linux operating system. But in practical applications, we will use crontab to define simple task calls. In the Hadoop field, we will use some more powerful task schedulers, such as Azkaban, Oozie, etc.
Two, Azkaban installation
2.1 Compile
First, download the tarball from github, Download: https://github.com/azkaban/azkaban. After the download is complete, a compile operation is required. Azkaban requires java8 or above to be installed.
# 编译安装,但不运行测试
cd /export/servers/azkaban-3.51.0
bin/gradlew build installDist -x test
2.2 Stand-alone mode installation
Step 1: Enter the /export/servers/azkaban-3.51.0/azkaban-solo-server/build/distributionsdirectory, where two compressed packages are stored.

Step 2: Unzip one of the compressed packages to the /export/serversdirectory;
tar -zxvf azkaban-solo-server-0.1.0-SNAPSHOT.tar.gz -C /export/servers/
Step 3: Enter the /export/servers/azkaban-solo-server-0.1.0-SNAPSHOT/confdirectory, edit the azkaban.propertiesfile, and modify the time zone configuration information;
default.timezone.id=Asia/Shanghai
Step 4: Enter the /export/servers/azkaban‐solo‐server‐0.1.0‐SNAPSHOT/plugins/jobtypesdirectory, edit the commonprivate.propertiesfile, execute.as.userand memCheck.enabledset the sum to false;
# 如果为true,代表可以使用非登录用户执行任务
execute.as.user=false

# 关闭内存检测
memCheck.enabled=false
Step 5: Start the service;
cd  /export/servers/azkaban‐solo‐server‐0.1.0‐SNAPSHOT
bin/start‐solo.sh
If you are not running in the root directory of azkaban-solo-server bin/start-solo.sh, the following error will appear: After the

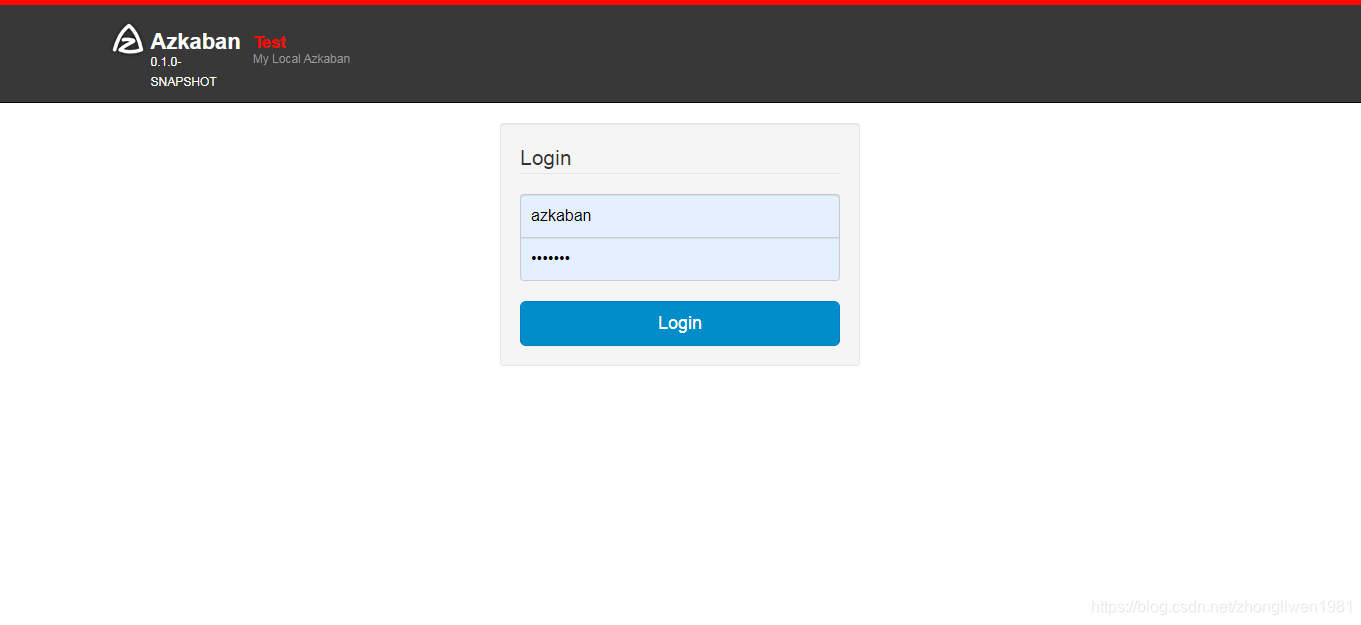
startup is successful http://node01:8081, enter the user name (default: azkaban) and password (default: azkaban) to log in after entering the browser .
2.3 Cluster Mode Installation
If it is in stand-alone mode, all data information is stored in the default H2 database. If it is a cluster mode, you need to install the mysql database in the server environment.
2.3.1 Import database
First enter the /export/servers/azkaban-3.51.0/azkaban-db/build/sqldirectory, which stores the script file for creating the database create-all-sql-0.1.0-SNAPSHOT.sql.
Steps to import mysql database:
- Step 1: Open the mysql terminal and log in to the mysql database;
mysql ‐uroot ‐p
- Step 2: Create a database;
CREATE DATABASE azkaban;
use azkaban;
- Step 3: Create a database user and authorize;
CREATE USER 'azkaban'@'%' IDENTIFIED BY 'azkaban';
GRANT all privileges ON azkaban.* to 'azkaban'@'%' identified by 'azkaban' WITH GRANT OPTION;
flush privileges;
- Step 4: Import the database;
source /export/servers/azkaban-3.51.0/azkaban-db/build/sql/create-all-sql-0.1.0-SNAPSHOT.sql;
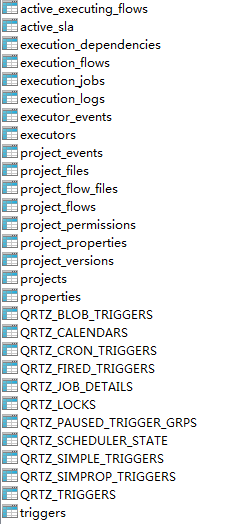
All tables built in azkaban:
2.3.2 Decompression software
After executing the previous compilation operation, azkaban-3.51.0two subdirectories will be generated in the directory: azkaban-exec-serverand azkaban-web-server. The azkaban-exec-server module is responsible for performing specific tasks; the azkaban-web-server module is responsible for providing web interface display and receiving http requests.
The following is how to decompress these two modules:
# 解压azkaban-exec-server
cd /export/servers/azkaban-3.51.0/azkaban-exec-server/build/distributions
tar -zxvf azkaban-exec-server-0.1.0-SNAPSHOT.tar.gz -C /export/servers

# 解压azkaban-exec-server
cd /export/servers/azkaban-3.51.0/azkaban-web-server/build/distributions
tar -zxvf azkaban-web-server-0.1.0-SNAPSHOT.tar.gz -C /export/servers
2.3.3 Generate ssl certificate
In order to be able to use https to access the web service, we need to azkaban-web-server-0.1.0-SNAPSHOTgenerate the SSL certificate in the unzipped directory.
cd /export/servers/azkaban-web-server-0.1.0-SNAPSHOT
keytool -keystore keystore -alias jetty -genkey -keyalg RSA
2.3.4 Install azkaban web server
Enter the /export/servers/azkaban-web-server-0.1.0-SNAPSHOT/confdirectory, and then modify the azkaban.propertiesfile.
# 修改时区
default.timezone.id=Asia/Shanghai

# 启用ssl
jetty.use.ssl=true

# 配置ssl
jetty.ssl.port=8443
jetty.keystore=/export/servers/azkaban-web-server-0.1.0-SNAPSHOT/keystore
jetty.password=azkaban
jetty.keypassword=azkaban
jetty.truststore=/export/servers/azkaban-web-server-0.1.0-SNAPSHOT/keystore
jetty.trustpassword=azkaban

# 无需刷新执行程序统计信息即可处理的最长时间(以毫秒为单位)
azkaban.activeexecutor.refresh.milisecinterval=10000
# 从Web服务器初始化中启用队列处理器
azkaban.queueprocessing.enabled=true
# 无需刷新执行程序统计信息即可处理的最大队列流数
azkaban.activeexecutor.refresh.flowinterval=10
# 刷新执行程序统计信息的最大线程数
azkaban.executorinfo.refresh.maxThreads=10
2.3.5 Install azkaban executor server
The first step: Enter the /export/servers/azkaban-exec-server-0.1.0-SNAPSHOT/confdirectory, and then modify the azkaban.propertiesfile.
# 修改时区
default.timezone.id=Asia/Shanghai

# 启用ssl
jetty.use.ssl=true

# 配置ssl
jetty.keystore=/export/servers/azkaban-web-server-0.1.0-SNAPSHOT/keystore
jetty.password=azkaban
jetty.keypassword=azkaban
jetty.truststore=/export/servers/azkaban-web-server-0.1.0-SNAPSHOT/keystore
jetty.trustpassword=azkaban

azkaban.webserver.url=https://node01:8443
Step 2: Enter the /export/servers/azkaban-3.51.0/az-exec-util/src/main/cdirectory and execute-as-user.ccopy the files to the /export/servers/azkaban-exec-server-0.1.0-SNAPSHOT/plugins/jobtypesdirectory;
cd /export/servers/azkaban-3.51.0/az-exec-util/src/main/c
cp execute-as-user.c /export/servers/azkaban-exec-server-0.1.0-SNAPSHOT/plugins/jobtypes
The third step: execute compilation;
cd /export/servers/azkaban-exec-server-0.1.0-SNAPSHOT/plugins/jobtypes
gcc execute-as-user.c -o execute-as-user
chown root execute-as-user
chmod 6050 execute-as-user
Step 4: Modify the commonprivate.propertiesconfiguration file;
cd /export/servers/azkaban-exec-server-0.1.0-SNAPSHOT/plugins/jobtypes
vi commonprivate.properties

# 添加下面两行配置信息
memCheck.enabled=false
azkaban.native.lib=/export/servers/azkaban-exec-server-0.1.0-SNAPSHOT/plugins/jobtypes
2.3.6 Start service
The first step: start azkaban-exec-server;
cd /export/servers/azkaban-exec-server-0.1.0-SNAPSHOT
bin/start-exec.sh
Step 2: Activate azkaban-exec-server;
# 可以在任意目录下执行如下命令做激活操作
curl -G "node01:$(<./executor.port)/executor?action=activate" && echo
Step 3: Start azkaban-web-server;
cd /export/servers/azkaban-web-server-0.1.0-SNAPSHOT
bin/start-web.sh
After the startup is complete, enter in the browser https://node01:8443, and then enter the user name and password (the same as azkaban) to log in to the management platform.
It should be noted here that because we have activated the ssl function, the https protocol is required to access the address of the background.
Three, actual combat
3.1 Single type job
- The first step: create a text file, the file encoding format uses "UTF-8 without bom";
vi single_command.job

type=command
command=echo 'hello world'
- Step 2: Pack the files into a zip package;
zip single_command.zip single_command.job
- Step 3: Create a project in the azkaban management background and upload the zip package;
- Step 4: Start the job;
3.2 Multi-type job
- Step 1: Create a new text file, named foo.job, the content of the file is as follows:
type=command
command=echo 'foo'
- Step 2: Create a second text file and name it bar.job. The content of the file is as follows:
type=command
command=echo 'bar'
dependencies=foo
- Step 3: Pack the two files into zip format;
- Step 4: Deploy the zip package to azkaban and run the job;
3.3 Operating HDFS
- Step 1: Create a text file with the following content:
type=command
command=/export/servers/hadoop‐3.1.1/bin/hdfs dfs ‐mkdir /azkaban
Step 2: Pack the file into zip format;
Step 3: Upload the zip package to azkaban, and run the job;
3.4 MapReduce task
- Step 1: Create a text file, the content of the file is as follows:
type=command
command=/export/servers/hadoop‐3.1.1/bin/hadoop jar /export/servers/hadoop-3.1.1/share/hadoop/mapreduce/hadoop-mapreduce-examples-3.1.1.jar pi 3 5
- Step 2: Pack the file into zip format, and then upload it to azkaban;
- The third step: start the job;
3.5 Run Hive script
- Step 1: Prepare the hive script file and name it
hive.sql;
create database if not exists azkaban;
use azkaban;
create table if not exists emp(id string,name string) row format
delimited fields terminated by '\t';
- Step 2: Create a job file, the content of the file is as follows:
type=command
command=/export/servers/apache‐hive‐3.1.1‐bin ‐f 'hive.sql'
- Step 3: Pack the job file and the hive script file into a zip package;
- Step 4: Upload the zip package to azkaban and start the job;
3.6 Timing tasks
azkaban provides the scheduler function to realize the timing scheduling of our job tasks.
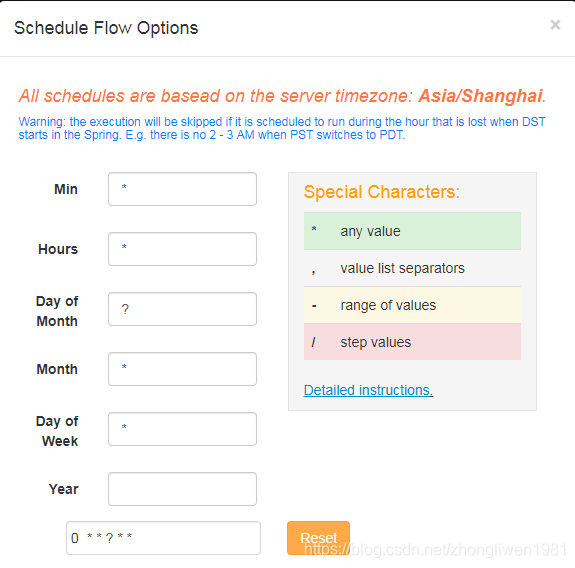
*/1 * ? * *Execute the scheduled task every minute;
0 1 ? * *execute this task at one o'clock in the morning every night ; execute this task
0 */2 ? * *regularly every two hours; execute this task
30 21 ? * *at 9:30 every night