table of Contents
2. Stacked widget QStackedWidget
Three. Dock control QDockWidget
Four. The window that accommodates multiple documents
The purpose of using container controls : to make more controls on the screen
1. Tab control QTabWidget
What is a tab control?
Example:
 Different tab controls correspond to different interfaces, so that too many things can not fit on a page, that is, one tab corresponds to one window.
Code:
import sys
from PyQt5.QtWidgets import *
from PyQt5.QtCore import *
from PyQt5.QtGui import *


class TabWidget(QTabWidget): #直接一整个屏幕就是一个选项卡窗口
    def __init__(self,parent=None):
        super(TabWidget, self).__init__(parent)
        self.setWindowTitle('选项卡控件:QTabWidget')
        self.resize(400,200)
        #创建用于显示控件的窗口
        self.tab1=QWidget()
        self.tab2 = QWidget()
        self.tab3 = QWidget()
        #将窗口和选项卡绑定
        self.addTab(self.tab1,'选项卡1')
        self.addTab(self.tab2, '选项卡2')
        self.addTab(self.tab3, '选项卡3')

        self.tab1UI()
        self.tab2UI()
        self.tab3UI()

    def tab1UI(self):
        #表单布局
        layout=QFormLayout()
        layout.addRow('姓名',QLineEdit())
        layout.addRow('地址',QLineEdit())
        # 将第一个选项卡窗口重命名
        self.setTabText(0,'联系方式')
        self.tab1.setLayout(layout)#别忘了tab1就是一个窗口

    def tab2UI(self):
        layout=QFormLayout()
        sex=QHBoxLayout()#水平布局,横向排列
        #单选框
        sex.addWidget(QRadioButton('男'))
        sex.addWidget(QRadioButton('女'))
        layout.addRow(QLabel('性别'),sex)
        layout.addRow('生日',QLineEdit())
        self.setTabText(1,'个人详细信息')
        self.tab2.setLayout(layout)

    def tab3UI(self):
        layout=QHBoxLayout()
        layout.addWidget(QLabel('科目'))
        #复选框
        layout.addWidget(QCheckBox('物理'))
        layout.addWidget(QCheckBox('高数'))
        self.setTabText(2,'教育程度')
        self.tab3.setLayout(layout)


if __name__=='__main__':
    app=QApplication(sys.argv)
    main=TabWidget()
    main.show()
    sys.exit(app.exec_())
operation result:


2. Stacked widget QStackedWidget
Switch pages by index
Code:
import sys
from PyQt5.QtWidgets import *
from PyQt5.QtCore import *
from PyQt5.QtGui import *


class StackedExample(QWidget): #直接一整个屏幕就是一个选项卡窗口
    def __init__(self,parent=None):
        super(StackedExample, self).__init__(parent)
        self.setWindowTitle('堆栈窗口控件:QStackedWidget')
        #self.resize(400,200)
        self.setGeometry(800,450,10,10)
        #列表控件
        self.list=QListWidget()
        self.list.insertItem(0,'联系方式')
        self.list.insertItem(1,'个人信息')
        self.list.insertItem(2,'教育程度')

        self.stack1=QWidget()
        self.stack2 = QWidget()
        self.stack3 = QWidget()

        self.tab1UI()
        self.tab2UI()
        self.tab3UI()
        #堆栈窗口控件对象
        self.stack=QStackedWidget()
        self.stack.addWidget(self.stack1)
        self.stack.addWidget(self.stack2)
        self.stack.addWidget(self.stack3)

        self.list.currentRowChanged.connect(self.display)

        hbox=QHBoxLayout()
        hbox.addWidget(self.list)
        hbox.addWidget(self.stack)
        self.setLayout(hbox)

    def tab1UI(self):
        #表单布局
        layout=QFormLayout()
        layout.addRow('姓名',QLineEdit())
        layout.addRow('地址',QLineEdit())
        self.stack1.setLayout(layout)#别忘了tab1就是一个窗口

    def tab2UI(self):
        layout=QFormLayout()
        sex=QHBoxLayout()#水平布局,横向排列
        #单选框
        sex.addWidget(QRadioButton('男'))
        sex.addWidget(QRadioButton('女'))
        layout.addRow(QLabel('性别'),sex)
        layout.addRow('生日',QLineEdit())
        self.stack2.setLayout(layout)

    def tab3UI(self):
        layout=QHBoxLayout()
        layout.addWidget(QLabel('科目'))
        #复选框
        layout.addWidget(QCheckBox('物理'))
        layout.addWidget(QCheckBox('高数'))
        self.stack3.setLayout(layout)

    def display(self,index):
        #通过索引来切换页面
        self.stack.setCurrentIndex(index)


if __name__=='__main__':
    app=QApplication(sys.argv)
    main=StackedExample()
    main.show()
    sys.exit(app.exec_())
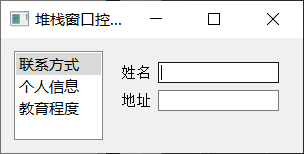
operation result:
Three. Dock control QDockWidget
Code:
import sys
from PyQt5.QtWidgets import *
from PyQt5.QtCore import *
from PyQt5.QtGui import *


class DockDemo(QMainWindow): #直接一整个屏幕就是一个选项卡窗口
    def __init__(self,parent=None):
        super(DockDemo, self).__init__(parent)
        self.setWindowTitle('停靠控件:QDockWidget')
        self.setGeometry(800,450,500,500)#x,y,w,h
        #self.resize(400, 200)

        layout=QHBoxLayout()
        #停靠控件对象
        self.items=QDockWidget('Dockable',self)
        #列表控件
        self.listWidget=QListWidget()
        self.listWidget.addItem('item1')
        self.listWidget.addItem('item2')
        self.listWidget.addItem('item3')
        #将列表放到停靠控件上
        self.items.setWidget(self.listWidget)

        self.setCentralWidget(QLineEdit('单行输入'))
        #设置一开始就是悬浮状态
        self.items.setFloating(True)

        #在窗口上设置停靠控件,且悬浮在右侧
        self.addDockWidget(Qt.RightDockWidgetArea,self.items)


if __name__=='__main__':
    app=QApplication(sys.argv)
    main=DockDemo()
    main.show()
    sys.exit(app.exec_())
operation result:

 Just like some left and right windows in the compiler, you can drag, zoom out, change positions, etc. at will. Try it yourself!
Four. The window that accommodates multiple documents
A container that is equivalent to a window. There can be many child windows in it, but the child windows can only move in it.
Needed class:
To accommodate multiple documents: QMdiArea
sub-window: QMdiSubWindow
Code:
import sys
from PyQt5.QtWidgets import *
from PyQt5.QtCore import *
from PyQt5.QtGui import *


class MultiWindows(QMainWindow): #直接一整个屏幕就是一个选项卡窗口
    count=0 #记录当前有多少个菜单项
    def __init__(self,parent=None):
        super(MultiWindows, self).__init__(parent)
        self.setWindowTitle('容纳多文档的窗口')
        self.setGeometry(800,450,500,400)#x,y,w,h

        #容纳多文档容器对象
        self.mdi=QMdiArea()

        bar=self.menuBar()
        file=bar.addMenu('File')
        file.addAction('New')
        file.addAction('cascade') #重叠
        file.addAction('Tiled')  #平铺

        file.triggered.connect(self.windowAction)

        self.setCentralWidget(self.mdi)

    def windowAction(self,q): #q是当前的单击菜单项,通过按钮名来进行不同的操作
        if q.text()=='New':
            self.count=self.count+1
            #子窗口对象
            sub=QMdiSubWindow()
            sub.setWidget(QTextEdit())
            sub.setWindowTitle('子窗口'+str(self.count))
            self.mdi.addSubWindow(sub)
            sub.show()
        #下面两个是对mdi中已有的窗口排布进行操作,而不是生成窗口
        elif q.text()=='cascade':
            self.mdi.cascadeSubWindows()
        elif q.text()=='Tiled':
            self.mdi.tileSubWindows()


if __name__=='__main__':
    app=QApplication(sys.argv)
    main=MultiWindows()
    main.show()
    sys.exit(app.exec_())
operation result:
 First randomly generate (New) four windows, and then try the other two layout effects.
 Overlapping
  tiles
tiles