Prototype mode
1. Prototype mode
Prototype mode is an object creation mode, which is created by copying itself.
(1) Features of the prototype model
- The target object is created by the prototype object itself, that is, the action of object creation is sent from the prototype object itself.
- The target object is a clone of the prototype object. Objects created through Prottype mode not only have the same structure as the target object, but also have the same value as the target object
- According to the deep level of object cloning, there are shallow cloning and deep cloning
Second, the concrete realization of the prototype mode
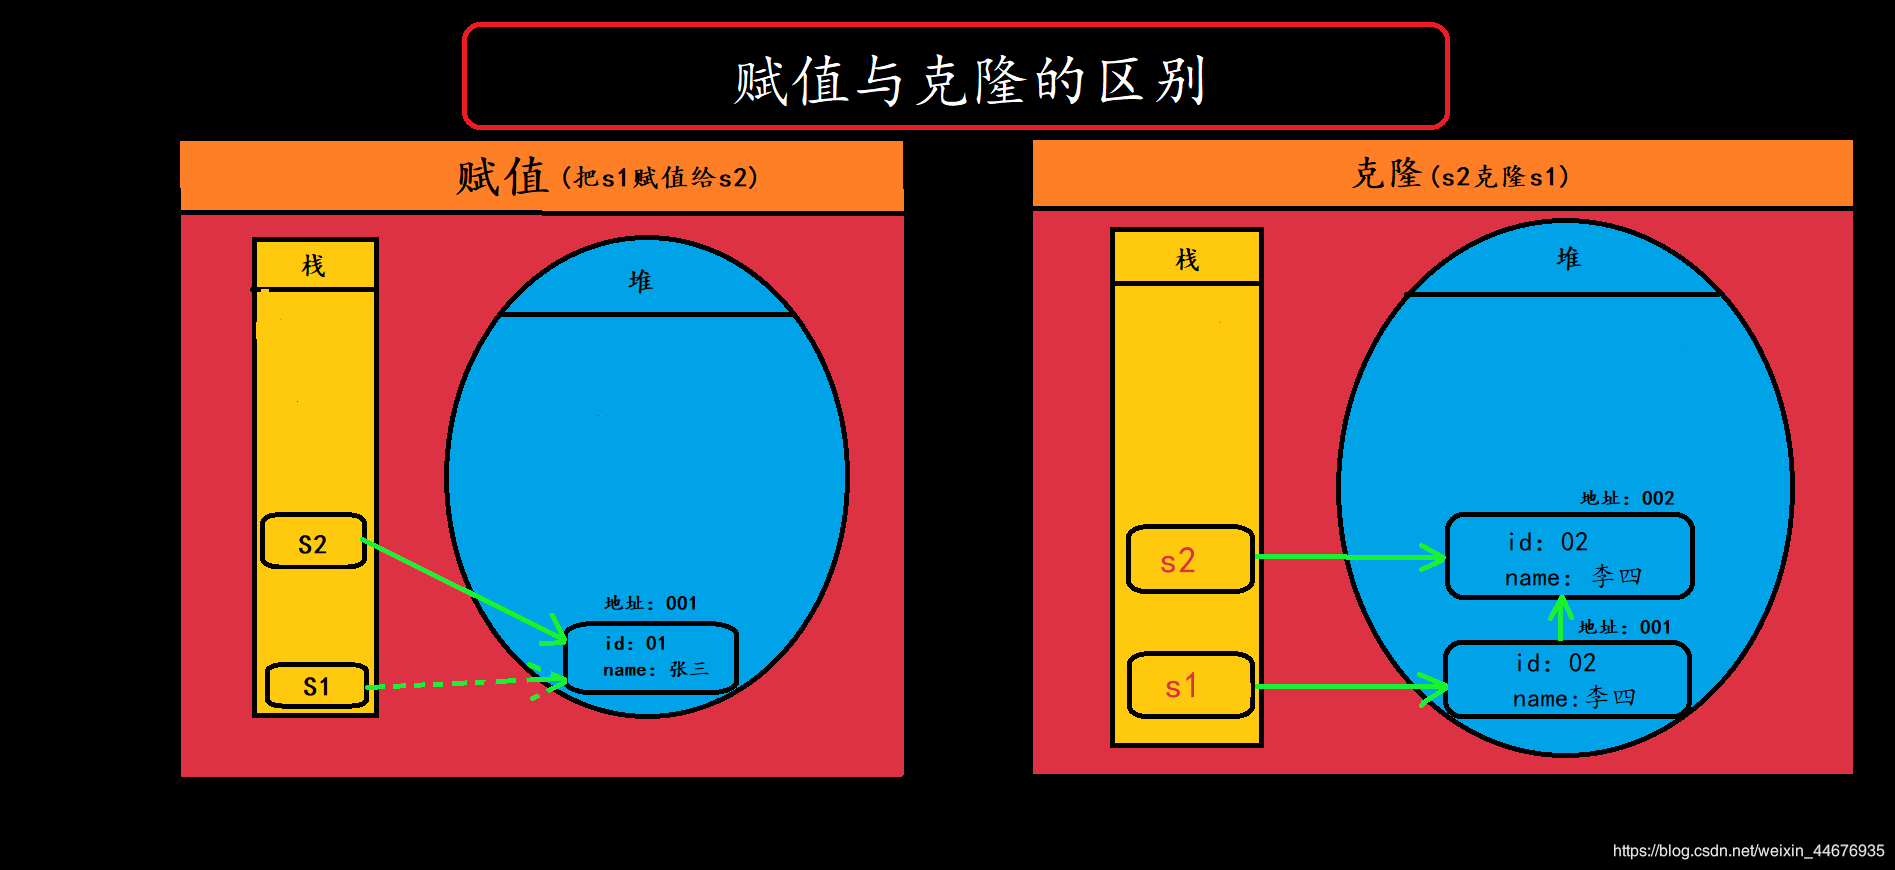
(1) The difference between cloning and copying
Cloning refers to copying an object out of another object with the same object information, and their memory addresses are different, and the object information in the heap is the same but not the same; assignment only changes the memory address between variables.
(2) How to achieve cloning?
- Step 1: Implement the Cloneable interface
- Step 2: Rewrite the clone() method in Object
package 原型模式;
//	第一步实现Cloneable接口
public class Student implements Cloneable{


	private int id;
	private String name;
	private String Sex;
	public int getId() {


		return id;
	}
	public void setId(int id) {


		this.id = id;
	}
	public String getName() {


		return name;
	}
	public void setName(String name) {


		this.name = name;
	}
	public String getSex() {


		return Sex;
	}
	public void setSex(String sex) {


		Sex = sex;
	}
//	重写Object中的clone()方法
	@Override
	protected Student clone() throws CloneNotSupportedException {


		return (Student) super.clone();
	}

}
Call it, is the cloning successful?
package 原型模式;

public class Maintest {


	public static void main(String[] args) {


		System.out.println("      浅度克隆!");
		Student s1 = new Student();
		s1.setId(1);
		s1.setName("张三");
		s1.setSex("男");
		System.out.printf("S1指向内存地址:"+s1+"----");
		System.out.println("S1信息:"+"\tid:"+s1.getId()
		+"\tname:"+s1.getName()+"\tsex"+s1.getSex());
		/* 克隆s1 */
		System.out.println("-----------------------------------------");
		// s1要调用克隆方法
		try {


			Student s2 = s1.clone();
			System.out.printf("S2指向内存地址:"+s2+"----");
			System.out.println("S2信息:"+"\tid:"+s2.getId()
			+"\tname:"+s2.getName()+"\tsex:"+s2.getSex());
		} catch (CloneNotSupportedException e) {


			e.printStackTrace();
		}

	}
}
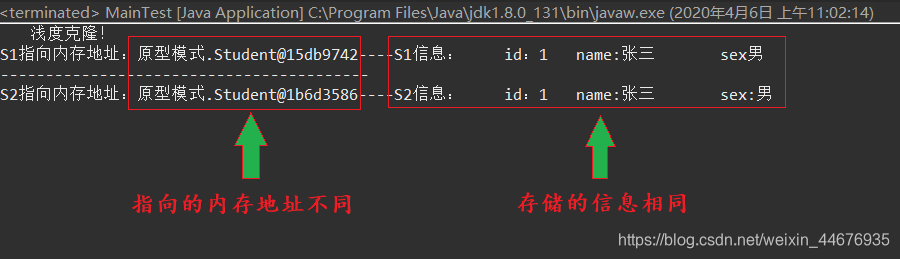
**Print information: **In the print information, you can see that the memory addresses pointed to by S1 and S2 are different, and the information stored in the two memory addresses is the same. This is a clone, and this is just a shallow clone! Shallowness can only achieve the cloning of basic data types, but not
Deep clone
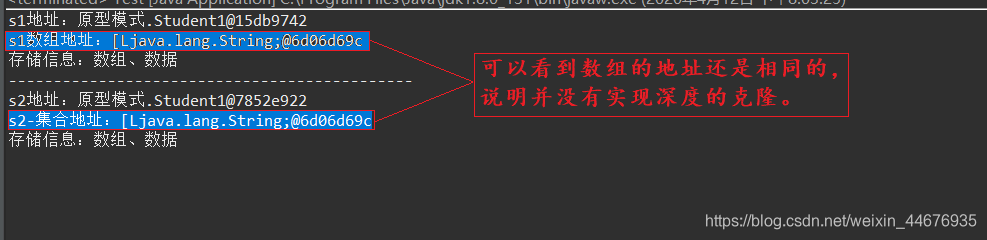
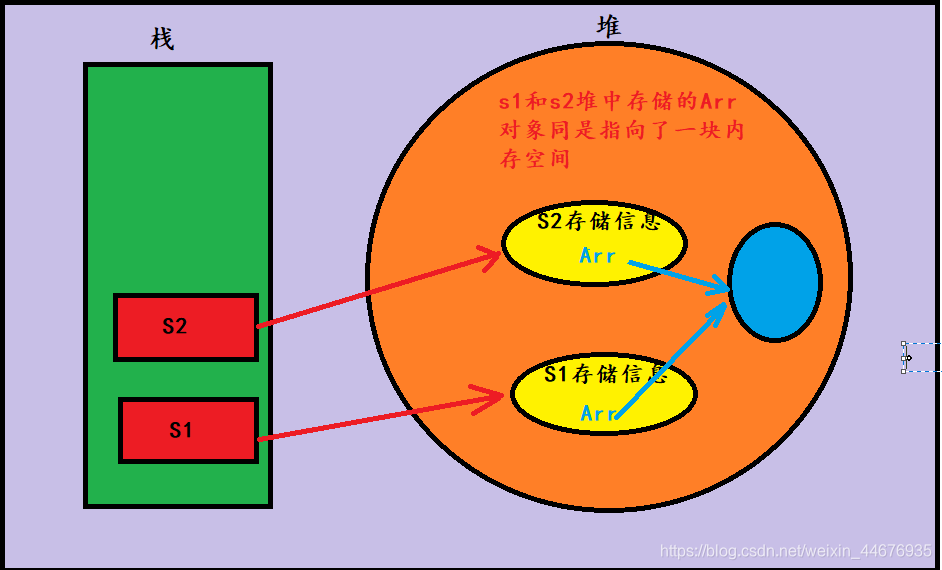
Through the previous case, we have seen that in the implementation of shallow cloning, the cloning is also hierarchical. The shallow cloning is only effective for the attributes of the basic data type, and has no effect on the composite data type! Let's take a look at the case, create an object of Student1, add an array attribute, and then clone the object to see if the addresses of the array are the same!
package 原型模式;

import java.util.List;
//第一步实现Cloneable接口
public class Student1 implements Cloneable{


	private String[] arr = new String[2];
	public String[] getArr() {


		return arr;
	}
	public void setArr(String[] arr) {


		this.arr = arr;
	}
	//	重写Object中的clone()方法
	@Override
	protected Student1 clone() throws CloneNotSupportedException {


		return (Student1) super.clone();
	}
}
package 原型模式;

import java.util.ArrayList;
import java.util.List;

public class Test {


public static void main(String[] args) {


	Student1 s1 = new Student1();
	String[] arr = new String[2];
	arr[0]="数组";
	arr[1]="数据";
	s1.setArr(arr);
	System.out.println("s1地址:"+s1);
	System.out.println("s1数组地址:"+s1.getArr());
	System.out.println("存储信息:"+s1.getArr()[0]+"、"+s1.getArr()[1]);

	System.out.println("---------------------------------------------");

	try {


		Student1 s2 = s1.clone();
		System.out.println("s2地址:"+s2);
		System.out.println("s2-集合地址:"+s2.getArr());
		System.out.println("存储信息:"+s2.getArr()[0]+"、"+s2.getArr()[1]);
	} catch (CloneNotSupportedException e) {


		e.printStackTrace();
	}
}
}
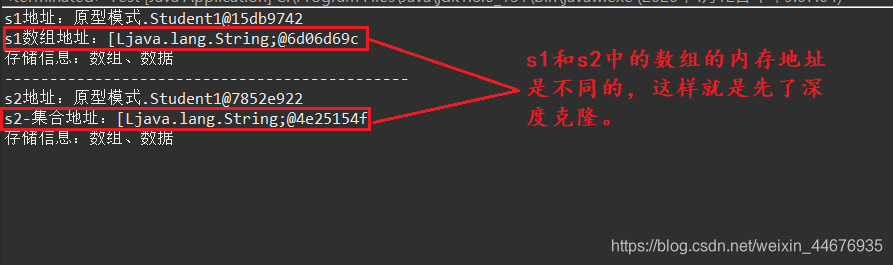
Printed result:
This is
how deep cloning
is implemented in the memory. In fact, when we rewrite the clone() method, we perform manual cloning and then return.
package 原型模式;

import java.util.List;
//第一步实现Cloneable接口
public class Student1 implements Cloneable{


	private String[] arr = new String[2];
	public String[] getArr() {


		return arr;
	}
	public void setArr(String[] arr) {


		this.arr = arr;
	}
	//	重写Object中的clone()方法
	@Override
	protected Student1 clone() throws CloneNotSupportedException {


//		-------------------------实现深度克隆-----------------------
//		先拿到克隆对象
		Student1 student =(Student1)super.clone();
//		然后进行手动克隆,自己进行循环赋值

//		先定义一个数组接受
		String[] arr = new String[this.getArr().length];
//		对拷
		for(int i = 0; i < arr.length; i++) {


			arr[i] = this.getArr()[i];
		}
		student.setArr(arr);

		return student;
//		---------------------------------------------------------
	}
}
package 原型模式;
import java.util.ArrayList;
import java.util.List;
public class Test {


public static void main(String[] args) {


	Student1 s1 = new Student1();
	String[] arr = new String[2];
	arr[0]="数组";
	arr[1]="数据";
	s1.setArr(arr);
	System.out.println("s1地址:"+s1);
	System.out.println("s1数组地址:"+s1.getArr());
	System.out.println("存储信息:"+s1.getArr()[0]+"、"+s1.getArr()[1]);

	System.out.println("---------------------------------------------");

	try {


		Student1 s2 = s1.clone();
		System.out.println("s2地址:"+s2);
		System.out.println("s2-集合地址:"+s2.getArr());
		System.out.println("存储信息:"+s2.getArr()[0]+"、"+s2.getArr()[1]);
	} catch (CloneNotSupportedException e) {


		e.printStackTrace();
	}

}
}
Three, the advantages and disadvantages of the prototype model
(1) Advantages of the prototype model
- Since the clone method is executed by the virtual machine directly copying the memory block, it is faster than using the new method to create an object.
- When the created object instance is more complex, using the prototype mode can simplify the process of object creation.
- The type and state of the object can be dynamically obtained at runtime to create an object
(2) Disadvantages of the prototype model
- Each class needs to be equipped with a cloning method, and the cloning method is located in this class. When the existing class is modified, the source code needs to be modified, which violates the open ratio principle
- When implementing deep cloning, you need to write more complex code, and when there are multiple nested references between objects, in order to achieve deep cloning, each level of object class must support deep cloning, which is more troublesome to implement!