I. Introduction
Since I haven't used Shiro before, I started using it recently, so I read some of its processes and source code, and summarized some of the content and recorded it. This series will not completely analyze all Shiro's code, but only briefly analyze the main (I) need (use) flow (to) process (of) . Since most of this series is for personal understanding and personal learning skills are not good, it is inevitable that there will be "unjust and false confusion". If you find anything, thank you for your corrections. I am very grateful.
Shiro source code analysis complete works:
- Shiro source code analysis①: Simple project construction
- Shiro source code analysis ②: AbstractShiroFilter
- Shiro source code analysis ③: certification process
- Shiro source code analysis ④: authentication process
This article will build a simplest Springboot + Shiro project, the purpose is to prepare for the follow-up Shiro source code analysis, so the construction process will not be introduced in detail. The following first introduces the implementation of two key classes in Shiro.
1. SessionDao
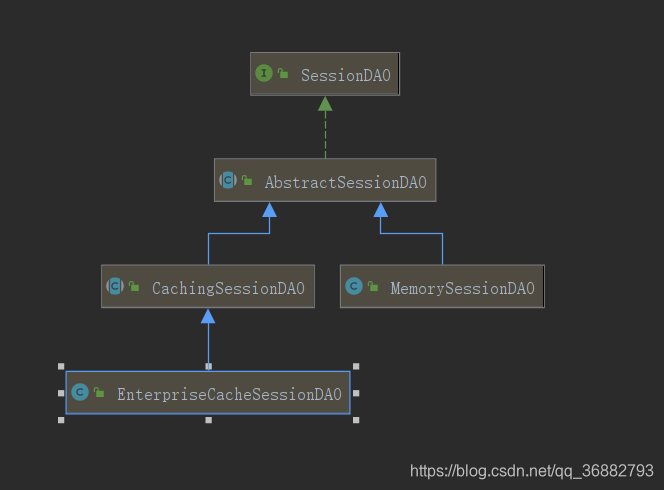
- SessionDAO : defines the standard for operating session from the persistence layer;
- AbstractSessionDAO : Provides the basic implementation of SessionDAO, such as generating session ID, etc.;
- CachingSessionDAO : Provides a transparent session cache function for developers, only need to set the corresponding CacheManager;
- MemorySessionDAO : Perform session maintenance directly in memory;
- EnterpriseCacheSessionDAO : Provides session maintenance for the cache function. By default, it is implemented using MapCache, and ConcurrentHashMap is used internally to save cached sessions.
2. SessionManager
- DefaultSessionManager :JavaSE环境
- ServletContainerSessionManager : Web environment, directly use servlet container session. ServletContainerSessionManager is used by default in DefaultWebSecurityManager
- DefaultWebSessionManager : For the implementation of the Web environment, you can maintain the session for the second one, and directly discard the session management of the Servlet container
3. Various filters
2. Project construction
1. ShiroConfig
This is Shiro's main configuration class
@Configuration
public class ShiroConfig {
/**
* 配置Shiro生命周期处理器。
* 在 Bean创建时调用 init 方法,在 销毁时调用 destroy 方法
*
* @return
*/
@Bean
public LifecycleBeanPostProcessor lifecycleBeanPostProcessor() {
return new LifecycleBeanPostProcessor();
}
/**
* 定制的Realm,来完成认证和鉴权的部分功能
*
* @return
*/
@Bean
public CustomRealm customRealm() {
return new CustomRealm();
}
/**
* SecurityManager :核心类,具有极高的扩展性
*
* @return
*/
@Bean
public SecurityManager securityManager() {
DefaultWebSecurityManager securityManager = new DefaultWebSecurityManager();
// 设置定制的 Realm
securityManager.setRealm(customRealm());
// 配置 Session管理器
securityManager.setSessionManager(sessionManager());
// // 设置缓存管理器
// securityManager.setCacheManager();
// // 设置 RememberMeManager 来管理 RememberMeManager
// securityManager.setRememberMeManager();
return securityManager;
}
/**
* 设置 ShiroFilter
* 这里可以配置 Shiro 对接口的控制权限
*
* @param securityManager
* @return
*/
@Bean
public ShiroFilterFactoryBean shiroFilterFactoryBean(SecurityManager securityManager) {
ShiroFilterFactoryBean shiroFilterFactoryBean = new ShiroFilterFactoryBean();
shiroFilterFactoryBean.setSecurityManager(securityManager);
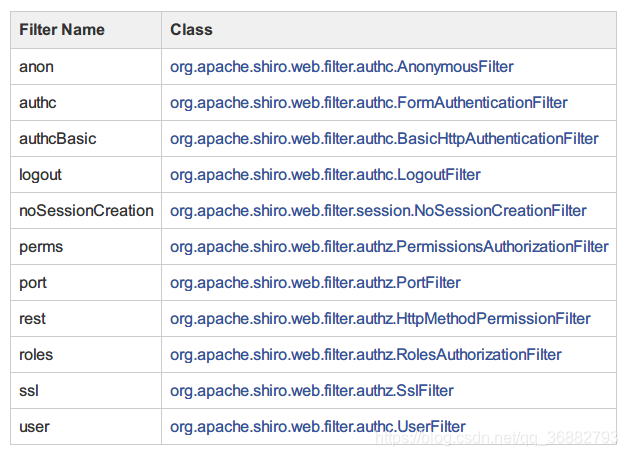
// 使用Map映射,key是接口路径,value为指定的Filter 名称,具体对应名称参考上图
// 这里的配置是有顺序的,如果一个路径匹配多个过滤,那么只有先配置的过滤器生效
Map<String, String> map = new HashMap<>();
//配置登出接口
map.put("/logout", "logout");
// 放行登录接口
map.put("/shiro/login", "anon");
// 拦截其他接口
map.put("/**", "authc");
//设置登录路径,session失效会跳转该页面
shiroFilterFactoryBean.setLoginUrl("/shiro/login");
//登录成功页面
shiroFilterFactoryBean.setSuccessUrl("/success");
//错误页面,认证不通过跳转
shiroFilterFactoryBean.setUnauthorizedUrl("/error");
shiroFilterFactoryBean.setFilterChainDefinitionMap(map);
return shiroFilterFactoryBean;
}
/**
* 这里指定了动态代理的方式使用了 Cglib
*
* @return
*/
@Bean
public DefaultAdvisorAutoProxyCreator defaultAdvisorAutoProxyCreator() {
DefaultAdvisorAutoProxyCreator defaultAdvisorAutoProxyCreator = new DefaultAdvisorAutoProxyCreator();
// 设置是否直接代理目标类,而不是仅代理特定的接口。 默认值为“ false”。
// 将此设置为“ true”可强制代理TargetSource的公开目标类。 如果该目标类是接口,则将为给定接口创建一个JDK代理。 如果该目标类是任何其他类,则将为给定类创建CGLIB代理。
// 注意:如果未指定接口(并且未激活接口自动检测),则根据具体代理工厂的配置,也会应用代理目标类行为
defaultAdvisorAutoProxyCreator.setProxyTargetClass(true);
return defaultAdvisorAutoProxyCreator;
}
/**
* 开启注解支持,包括 RequiresPermissions.class, RequiresRoles.class, RequiresUser.class, RequiresGuest.class, RequiresAuthentication.class。
* 和Aop相同的逻辑,通过注入 Advisor 来增强一些类的和方法
*
* @param securityManager
* @return
*/
@Bean
public AuthorizationAttributeSourceAdvisor authorizationAttributeSourceAdvisor(SecurityManager securityManager) {
AuthorizationAttributeSourceAdvisor authorizationAttributeSourceAdvisor = new AuthorizationAttributeSourceAdvisor();
authorizationAttributeSourceAdvisor.setSecurityManager(securityManager);
return authorizationAttributeSourceAdvisor;
}
/**
* 在 DefaultWebSessionManager 情况下可以自定义Cookies 的一些信息
* @return
*/
public SimpleCookie sessionIdCookie() {
//这个参数是cookie的名称
SimpleCookie simpleCookie = new SimpleCookie("sid");
//setcookie的httponly属性如果设为true的话,会增加对xss防护的安全系数。它有以下特点:
//setcookie()的第七个参数
//设为true后,只能通过http访问,javascript无法访问
//防止xss读取cookie
simpleCookie.setHttpOnly(true);
simpleCookie.setPath("/");
//maxAge=-1表示浏览器关闭时失效此Cookie
simpleCookie.setMaxAge(-1);
return simpleCookie;
}
/**
* 设置SessionManager,由我们自己来控制Session
* @return
*/
@Bean
public SessionManager sessionManager() {
DefaultWebSessionManager sessionManager = new DefaultWebSessionManager();
// Collection<SessionListener> listeners = new ArrayList<SessionListener>();
//配置监听
// listeners.add(sessionListener());
// sessionManager.setSessionListeners(listeners);
// sessionManager.setSessionIdCookie(sessionIdCookie());
// sessionManager.setSessionDAO(sessionDAO());
// sessionManager.setCacheManager(ehCacheManager());
//全局会话超时时间(单位毫秒),默认30分钟 暂时设置为10秒钟 用来测试
sessionManager.setGlobalSessionTimeout(1800000);
//是否开启删除无效的session对象 默认为true
sessionManager.setDeleteInvalidSessions(true);
//是否开启定时调度器进行检测过期session 默认为true
sessionManager.setSessionValidationSchedulerEnabled(true);
//设置session失效的扫描时间, 清理用户直接关闭浏览器造成的孤立会话 默认为 1个小时
//设置该属性 就不需要设置 ExecutorServiceSessionValidationScheduler 底层也是默认自动调用ExecutorServiceSessionValidationScheduler
//暂时设置为 5秒 用来测试
sessionManager.setSessionValidationInterval(3600000);
//取消url 后面的 JSESSIONID
sessionManager.setSessionIdUrlRewritingEnabled(false);
return sessionManager;
}
}
2. CustomRealm
CustomRealm inherits the AuthorizingRealm class for authentication and authentication operations
public class CustomRealm extends AuthorizingRealm {


    /**
     * 权限认证
     *
     * @param principalCollection
     * @return
     */
    @Override
    protected AuthorizationInfo doGetAuthorizationInfo(PrincipalCollection principalCollection) {


        //获取登录用户名
        String name = (String) principalCollection.getPrimaryPrincipal();
        //查询用户名称
        User user = UserConstants.map.get(name);
        //添加角色和权限
        SimpleAuthorizationInfo simpleAuthorizationInfo = new SimpleAuthorizationInfo();
        for (Role role : user.getRoles()) {


            //添加角色
            simpleAuthorizationInfo.addRole(role.getRoleName());
            //添加权限
            for (Permissions permissions : role.getPermissions()) {


                simpleAuthorizationInfo.addStringPermission(permissions.getPermissionsName());
            }
        }
        return simpleAuthorizationInfo;
    }

    /**
     * 认证认证
     *
     * @param authenticationToken
     * @return
     * @throws AuthenticationException
     */
    @Override
    protected AuthenticationInfo doGetAuthenticationInfo(AuthenticationToken authenticationToken) throws AuthenticationException {


        if (StringUtils.isEmpty(authenticationToken.getPrincipal())) {


            return null;
        }
        //获取用户信息
        String name = authenticationToken.getPrincipal().toString();
        User user = UserConstants.map.get(name);
        if (user == null) {


            //这里返回后会报出对应异常
            return null;
        } else {


            //这里验证authenticationToken和simpleAuthenticationInfo的信息
            SimpleAuthenticationInfo simpleAuthenticationInfo = new SimpleAuthenticationInfo(name, user.getPassword(), getName());
            return simpleAuthenticationInfo;
        }
    }
}
3. ShiroDemoController
Here is the control layer for testing. For simplicity, there is no business layer directly here, using simulated data
/**
 * @Author : wlhao
 * @Email : [email protected]
 * @Data: 2020/11/19 14:04
 * @Des:
 */
@RequestMapping("shiro")
@RestController
public class ShiroDemoController {


    @PostMapping("admin")
    // 需要admin角色,这里就说明只有 “张三”的账号才能访问
    @RequiresRoles("admin")
    public String admin() {


        return "admin";
    }

    @PostMapping("user")
    // 需要user角色, 这里只有“李四的账号才能访问”
    @RequiresRoles("user")
    public String user(HttpServletRequest request) {


        HttpSession session = request.getSession(true);
        return "user";
    }

    @PostMapping("login")
    public String login(HttpServletRequest request, HttpServletResponse response) {


        UsernamePasswordToken usernamePasswordToken = new UsernamePasswordToken("张三", "123456");
        Subject subject = SecurityUtils.getSubject();
        subject.login(usernamePasswordToken);
        return "login";
    }
}
4. pojo type
	@Data
	public class Permissions {


	    private String id;
	    private String permissionsName;
	}

	@Data

	public class Role {


	    private String id;
	    private String roleName;
	    /**
	     * 角色对应权限集合
	     */
	    private Set<Permissions> permissions;

	    public Role() {


	    }

	    public Role(String id, String roleName, Set<Permissions> permissions) {


	        this.id = id;
	        this.roleName = roleName;
	        this.permissions = permissions;
	    }
	}

	@Data

	public class User {


	    private String id;
	    private String userName;
	    private String password;
	    /**
	     * 用户对应的角色集合
	     */
	    private Set<Role> roles;

	    public User(String id, String userName, String password, Set<Role> roles) {


	        this.id = id;
	        this.userName = userName;
	        this.password = password;
	        this.roles = roles;
	    }

	    public User() {


	    }
	}
5. UserConstants
Data simulation for User user here
/**
 * @Author : wlhao
 * @Email : [email protected]
 * @Data : 2021/1/28 10:54
 * @Desc : 模拟角色
 */
public class UserConstants {


    /**
     * 两个角色
     * 1. 张三 -》admin :具有 query,add 权限
     * 2. 李四 -》user : 具有 query 权限
     */
    public static Map<String, User> map = new HashMap<>();

    static {


        Permissions addPermissions = new Permissions("1", "query");
        Permissions queryPermissions = new Permissions("2", "add");

        Role adminRole = new Role("1", "admin", Sets.newHashSet(addPermissions, queryPermissions));
        Role userRole = new Role("2", "user", Sets.newHashSet(queryPermissions));

        User user = new User("1", "张三", "123456", Sets.newHashSet(adminRole));
        User user1 = new User("2", "李四", "123456", Sets.newHashSet(userRole));

        map.put(user.getUserName(), user);
        map.put(user1.getUserName(), user1);
    }

}
6. Exception interception
Global exception interception, easy to see and return
@ControllerAdvice
@Slf4j
public class ShiroExceptionHandler {


    @ExceptionHandler
    @ResponseBody
    public String ErrorHandler(AuthorizationException e) {


        log.error("没有通过权限验证!", e);
        return "没有通过权限验证! " + e.getMessage();
    }
}
Three, verification
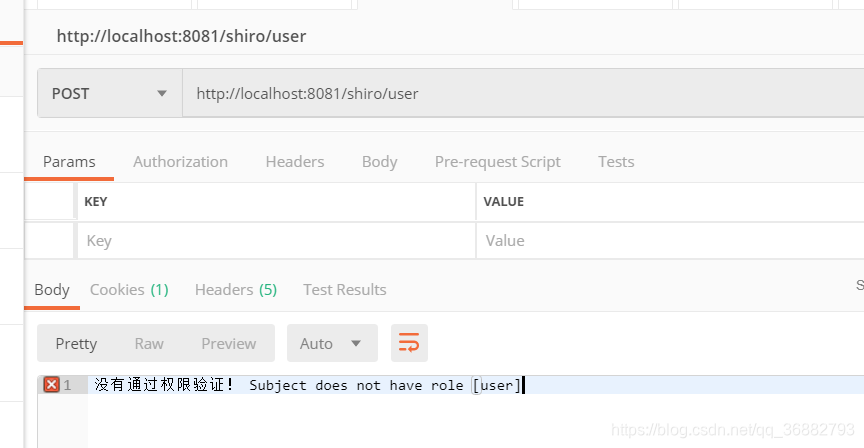
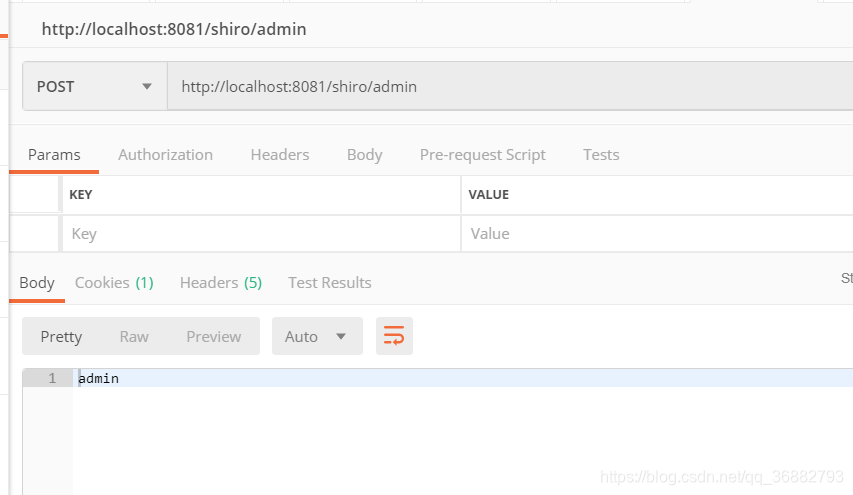
When we log in with the Zhang San account, we don’t have the right to access the user interface, but we can access the admin interface.
Above: For the content, please refer to
https://blog.csdn.net/dgh112233/article/details/100083287
https://www.zhihu.com/pin/1105962164963282944
https://blog.csdn.net/qq_30643885/article/details /91886448
If there is any intrusion, contact to delete it. The content is only used for self-record learning. If there is any error, please correct me