PS: If you can't strictly internalize yourself, you won't have enough mental energy to do in-depth work.
Today I share a previously implemented letter navigation control for the address book. Let's customize a letter navigation View similar to the address book. You can know several elements that need to be customized, such as drawing letter indicators, drawing text, touch monitoring, coordinate calculation, etc. The functions that can be achieved after the customization is completed are as follows:
- Complete the mutual linkage between the list data and the letters;
- Support layout file attribute configuration;
- Related attributes can be configured in the layout file, such as letter color, letter font size, letter indicator color and other attributes;
The main contents are as follows:
- Custom attributes
- Measure
- Coordinate calculation
- draw
- display effect
Custom attributes
Create attr.xml under value and configure the attributes that need to be customized in it, as follows:
<?xml version="1.0" encoding="utf-8"?>
<resources>
    <declare-styleable name="LetterView">
        <!--字母颜色-->
        <attr name="letterTextColor" format="color" />
        <!--字母字体大小-->
        <attr name="letterTextSize" format="dimension" />
        <!--整体背景-->
        <attr name="letterTextBackgroundColor" format="color" />
        <!--是否启用指示器-->
        <attr name="letterEnableIndicator" format="boolean" />
        <!--指示器颜色-->
        <attr name="letterIndicatorColor" format="color" />
    </declare-styleable>
</resources>
Then obtain these attributes in the corresponding construction method and set the relevant attributes, as follows:
public LetterView(Context context, @Nullable AttributeSet attrs) {


    super(context, attrs);
    //获取属性
    TypedArray array = context.obtainStyledAttributes(attrs, R.styleable.LetterView);
    int letterTextColor = array.getColor(R.styleable.LetterView_letterTextColor, Color.RED);
    int letterTextBackgroundColor = array.getColor(R.styleable.LetterView_letterTextBackgroundColor, Color.WHITE);
    int letterIndicatorColor = array.getColor(R.styleable.LetterView_letterIndicatorColor, Color.parseColor("#333333"));
    float letterTextSize = array.getDimension(R.styleable.LetterView_letterTextSize, 12);
    enableIndicator = array.getBoolean(R.styleable.LetterView_letterEnableIndicator, true);

    //默认设置
    mContext = context;
    mLetterPaint = new Paint();
    mLetterPaint.setTextSize(letterTextSize);
    mLetterPaint.setColor(letterTextColor);
    mLetterPaint.setAntiAlias(true);

    mLetterIndicatorPaint = new Paint();
    mLetterIndicatorPaint.setStyle(Paint.Style.FILL);
    mLetterIndicatorPaint.setColor(letterIndicatorColor);
    mLetterIndicatorPaint.setAntiAlias(true);

    setBackgroundColor(letterTextBackgroundColor);

    array.recycle();
}
Measure
To accurately control the custom size and coordinates, the width and height of the current custom View must be measured, and then the relevant coordinates can be calculated from the measured size. The specific measurement process is to inherit the View and rewrite the omMeasure() method to complete the measurement. , The key code is as follows:
@Override
protected void onMeasure(int widthMeasureSpec, int heightMeasureSpec) {


    super.onMeasure(widthMeasureSpec, heightMeasureSpec);
    //获取宽高的尺寸大小
    int widthSize = MeasureSpec.getSize(widthMeasureSpec);
    int heightSize = MeasureSpec.getSize(heightMeasureSpec);
    //wrap_content默认宽高
    @SuppressLint("DrawAllocation") Rect mRect = new Rect();
    mLetterPaint.getTextBounds("A", 0, 1, mRect);
    mWidth = mRect.width() + dpToPx(mContext, 12);
    int mHeight = (mRect.height() + dpToPx(mContext, 5)) * letters.length;

    if (getLayoutParams().width == ViewGroup.LayoutParams.WRAP_CONTENT &&
            getLayoutParams().height == ViewGroup.LayoutParams.WRAP_CONTENT) {


        setMeasuredDimension(mWidth, mHeight);
    } else if (getLayoutParams().width == ViewGroup.LayoutParams.WRAP_CONTENT) {


        setMeasuredDimension(mWidth, heightSize);
    } else if (getLayoutParams().height == ViewGroup.LayoutParams.WRAP_CONTENT) {


        setMeasuredDimension(widthSize, mHeight);
    }

    mWidth = getMeasuredWidth();
    int averageItemHeight = getMeasuredHeight() / 28;
    int mOffset = averageItemHeight / 30; //界面调整
    mItemHeight = averageItemHeight + mOffset;
}
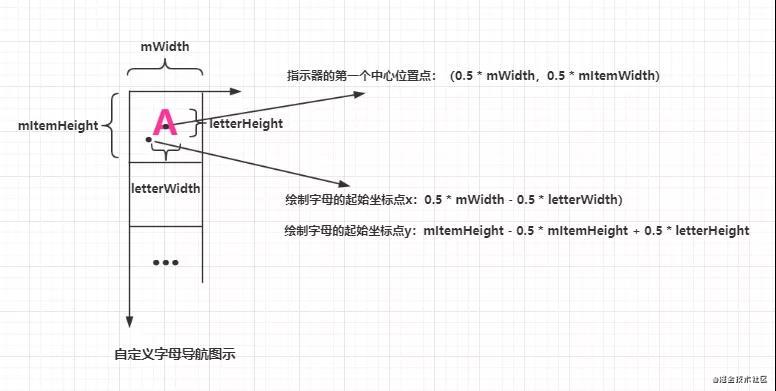
Coordinate calculation
Custom View is actually to find a suitable position on the View, and draw the custom elements in an orderly manner. The most difficult part of the drawing process is how to calculate the right left side according to specific needs. As for drawing, it is all API calls. As long as the coordinate position is calculated, there should be no problem with custom View drawing. The following illustration mainly marks the calculation of the center position coordinates of the letter indicator drawing and the calculation of the starting point position of the text drawing. Make sure that during the drawing process The text is in the center of the indicator, refer to the following:
draw
The drawing operations of the custom View are all carried out in the onDraw() method. The drawing of the circle and the text are mainly used here, specifically the use of the drawCircle() and drawText() methods. In order to avoid the text being occluded, it is necessary to Draw the letter indicator, and then draw the letter, the code reference is as follows:
@Override
protected void onDraw(Canvas canvas) {


    //获取字母宽高
    @SuppressLint("DrawAllocation") Rect rect = new Rect();
    mLetterPaint.getTextBounds("A", 0, 1, rect);
    int letterWidth = rect.width();
    int letterHeight = rect.height();

    //绘制指示器
    if (enableIndicator){


        for (int i = 1; i < letters.length + 1; i++) {


            if (mTouchIndex == i) {


                canvas.drawCircle(0.5f * mWidth, i * mItemHeight - 0.5f * mItemHeight, 0.5f * mItemHeight, mLetterIndicatorPaint);
            }
        }
    }
    //绘制字母
    for (int i = 1; i < letters.length + 1; i++) {


        canvas.drawText(letters[i - 1], (mWidth - letterWidth) / 2, mItemHeight * i - 0.5f * mItemHeight + letterHeight / 2, mLetterPaint);
    }
}
So far, it can be said that the basic drawing of View is over. Now it can be displayed using the custom View interface, but the relevant event operation has not been added yet. The following will implement the relevant logic in the touch event of the View.
Touch event handling
In order to determine which letter corresponds to the current position of the finger, you need to obtain the coordinate position of the current touch to calculate the letter index, re-onTouchEvent() method, listen to MotionEvent.ACTION_DOWN, MotionEvent.ACTION_MOVE to calculate the index position, and listen to MotionEvent.ACTION_UP to get The result is called back, the specific reference is as follows:
@Override
public boolean onTouchEvent(MotionEvent event) {


    switch (event.getAction()) {


        case MotionEvent.ACTION_DOWN:
        case MotionEvent.ACTION_MOVE:
            isTouch = true;
            int y = (int) event.getY();
            Log.i("onTouchEvent","--y->" + y + "-y-dp-->" + DensityUtil.px2dp(getContext(), y));
            int index = y / mItemHeight;

            if (index != mTouchIndex && index < 28 && index > 0) {


                mTouchIndex = index;
                Log.i("onTouchEvent","--mTouchIndex->" + mTouchIndex + "--position->" + mTouchIndex);
            }

            if (mOnLetterChangeListener != null && mTouchIndex > 0) {


                mOnLetterChangeListener.onLetterListener(letters[mTouchIndex - 1]);
            }

            invalidate();
            break;
        case MotionEvent.ACTION_UP:
            isTouch = false;
            if (mOnLetterChangeListener != null && mTouchIndex > 0) {


                mOnLetterChangeListener.onLetterDismissListener();
            }
            break;
    }
    return true;
}
So far, the key part of View customization is basically completed.
Data assembly
The basic idea of letter navigation is to convert a field that needs to be matched with a letter to the corresponding letter, and then sort the data according to the field, and finally make it possible to batch match data with the same initial letter through the first letter of a data field Now, we use pinyin4j-2.5.0.jar to convert Chinese characters into pinyin, and then sort the data items according to the first letter to display the data. The Chinese characters are replaced with pinyin as follows:
//汉字转换为拼音
public static String getChineseToPinyin(String chinese) {


    StringBuilder builder = new StringBuilder();
    HanyuPinyinOutputFormat format = new HanyuPinyinOutputFormat();
    format.setCaseType(HanyuPinyinCaseType.UPPERCASE);
    format.setToneType(HanyuPinyinToneType.WITHOUT_TONE);

    char[] charArray = chinese.toCharArray();
    for (char aCharArray : charArray) {


        if (Character.isSpaceChar(aCharArray)) {


            continue;
        }
        try {


            String[] pinyinArr = PinyinHelper.toHanyuPinyinStringArray(aCharArray, format);
            if (pinyinArr != null) {


                builder.append(pinyinArr[0]);
            } else {


                builder.append(aCharArray);
            }
        } catch (BadHanyuPinyinOutputFormatCombination badHanyuPinyinOutputFormatCombination) {


            badHanyuPinyinOutputFormatCombination.printStackTrace();
            builder.append(aCharArray);
        }
    }
    return builder.toString();
}
As for data sorting, you can use the Comparator interface, so I won’t go into details here, and get the source code link at the end of the article for details.
display effect
The display effect is as follows:

No public Miyuki's reply [keyword] MLetterView View source.