1. Experimental environment
| Host | CPU | RAM | hard disk | Network card | operating system |
|---|---|---|---|---|---|
| ct | Dual-core dual-thread-CPU virtualization enabled | 8G | 300G+1024G (CEPH block storage) | VMnet1 (Local Area Network) 192.168.100.12 / NAT-192.168.139.12 | Centos 7.6 (1810)-Minimal installation |
| ct1 | Dual-core dual-thread-CPU virtualization enabled | 8G | 300G+1024G (CEPH block storage) | VMnet1 (Local Area Network) 192.168.100.13 / NAT-192.168.139.13 | Centos 7.6 (1810)-Minimal installation |
| ct2 | Dual-core dual-thread-CPU virtualization enabled | 8G | 300G+1024G (CEPH block storage) | VMnet1 (Local Area Network) 192.168.100.14 / NAT-192.168.139.14 | Centos 7.6 (1810)-Minimal installation |
2. Environment configuration (all hosts need to be configured)
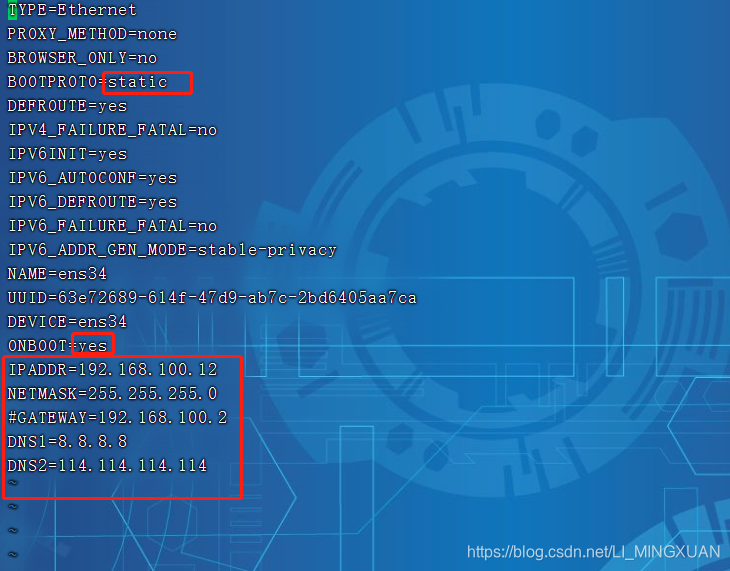
1. Modify and add NAT network card configuration
##外网卡配置##
BOOTPROTO=static			    #修改网卡配置参数,修改为静态IP
ONBOOT=yes					    #开启设备开机启动

IPADDR=192.168.139.12、13、14    #添加字段,静态模式IP自定义
NETMASK=255.255.255.0		    #添加字段,设置网段
GATEWAY=192.168.184.2		    #添加字段,设置网关
DNS1=192.168.184.2			    #添加字段,设置DNS服务器
IPV4_ROUTE_METRIC=90		    #设置网卡优先级,默认100,越低优先级越高,防止出现两张网卡为了抢占优先级导致无法连接问题

##内网卡配置##
BOOTPROTO=static
ONBOOT=yes

#末行添加#
IPADDR=192.168.100.12、13、14    #根据网段,设置VMnet1网段的IP,自定义
NETMASK=255.255.255.0		    #设置掩码

systemcrl restart network       #重启网卡

2. Turn off the firewall and system security mechanism
systemctl stop firewalld
setenforce 0
3. Install the basic environment dependency package
yum -y install net-tools bash-completion vim gcc gcc-c++ make pcre  pcre-devel expat-devel cmake  bzip2 lrzsz   #多次安装确保最新版本
yum -y install centos-release-openstack-train python-openstackclient openstack-selinux openstack-utils   #通用多次安装
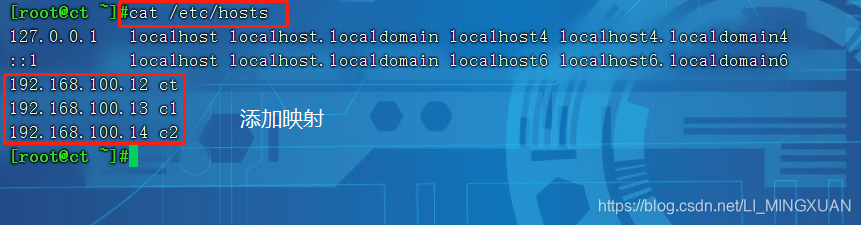
4. Configure the host mapping file
echo '192.168.100.12 ct' >> /etc/hosts
echo '192.168.100.13 c1' >> /etc/hosts
echo '192.168.100.14 c2' >> /etc/hosts
5. Three nodes do free interaction
ssh-keygen -t rsa    #一直回车即可
ssh-copy-id ct
ssh-copy-id c1
ssh-copy-id c2
6. Configure DNS, configure control node time synchronization
- All node operations
echo 'nameserver 114.114.114.114' >> /etc/resolv.conf
- ct node operation (192.168.139.12) time synchronization
yum install chrony -y

vim /etc/chrony.conf

##注释##
#server 0.centos.pool.ntp.org iburst
#server 1.centos.pool.ntp.org iburst
#server 2.centos.pool.ntp.org iburst
#server 3.centos.pool.ntp.org iburst

server ntp6.aliyun.com iburst	       #配置阿里云时钟服务器源
allow 192.168.100.0/24			       #允许192.168.100.0/24网段的主机来同步时钟服务

systemctl enable chronyd
systemctl restart chronyd
chronyc sources                        #使用chronyc sources命令查询时间同步信息

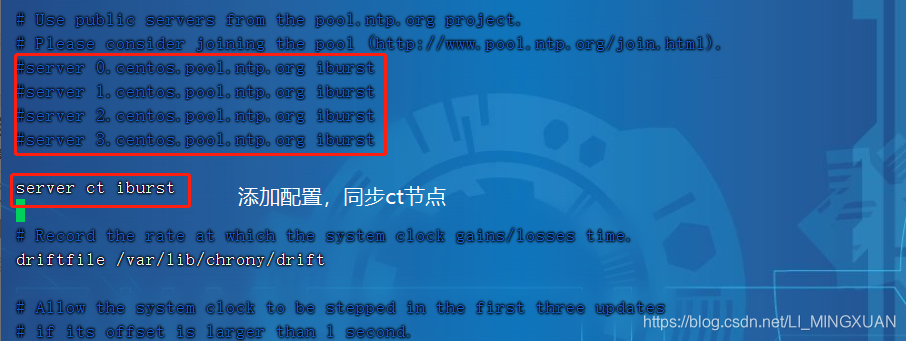
- Compute node ct1, ct2 time synchronization
vim /etc/chrony.conf

##注释##
#server 0.centos.pool.ntp.org iburst
#server 1.centos.pool.ntp.org iburst
#server 2.centos.pool.ntp.org iburst
#server 3.centos.pool.ntp.org iburst

server ct iburst		              #配置阿里云时钟服务器源,同步指向控制节点ct

systemctl enable chronyd.service
systemctl restart chronyd.service
chronyc sources
- Set up a scheduled task, synchronize the time every two minutes (all node operations)
crontab -e		#创建计划任务

*/2 * * * * /usr/bin/chronyc sources >>/var/log/chronyc.log

crontab -l      #查看计划任务

Three. System environment configuration
1. Install and configure MariaDB (control node ct192.168.139.12)
yum -y install mariadb mariadb-server python2-PyMySQL
yum -y install libibverbs
2. Add MySQL sub-configuration file, add the following content
vim /etc/my.cnf.d/openstack.cnf

[mysqld]
bind-address = 192.168.100.12          #填写自己内网ip
default-storage-engine = innodb
innodb_file_per_table = on
max_connections = 4096
collation-server = utf8_general_ci
character-set-server = utf8

systemctl start mariadb                #开启服务
systemctl enable mariadb               #设置开机自启动
3. Execute MariaDB installation and configuration script
mysql_secure_installation

Enter current password for root (enter for none): 	#输入当前root密码,回车
OK, successfully used password, moving on...
Set root password? [Y/n] Y							#是否需要更改root密码,Y确认
Remove anonymous users? [Y/n] Y						#是否移除其他用户,Y确认移除
 ... Success!
Disallow root login remotely? [Y/n] n				#是否不允许root用户远程登陆,输入n,允许root用户远程登陆
 ... skipping.
Remove test database and access to it? [Y/n] Y 		#是否删除test测试库,Y确认删除
Reload privilege tables now? [Y/n] Y 				#是否刷新规则,Y确认刷新
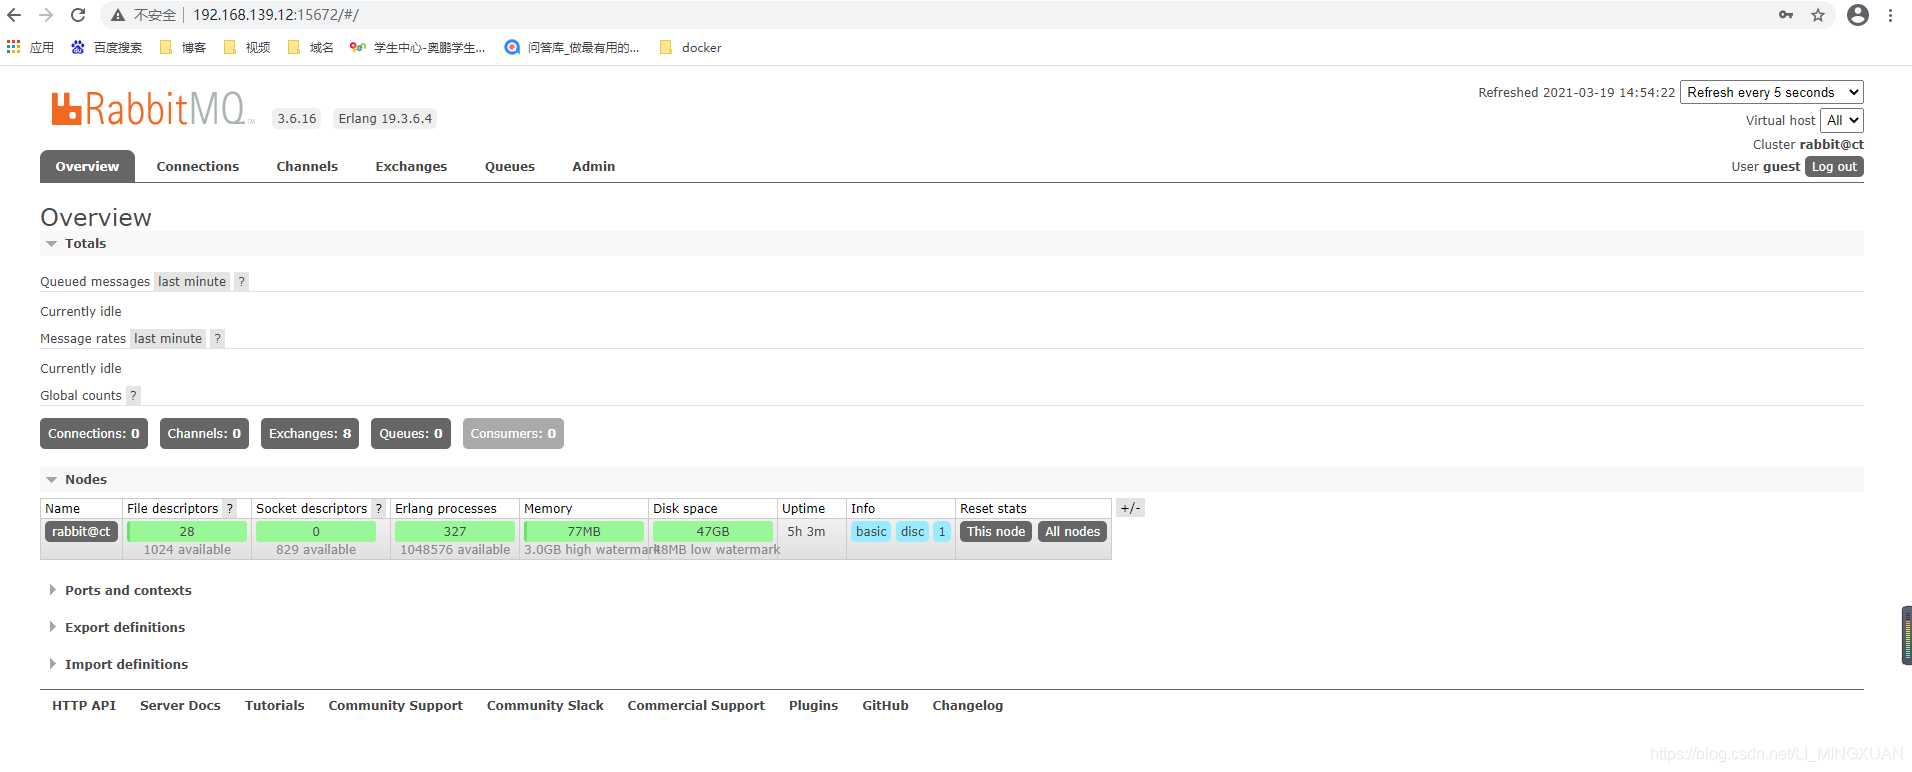
4. Install RabbitMQ
yum -y install rabbitmq-server                        #安装RabbitMQ服务

systemctl start rabbitmq-server.service               #启动服务
systemctl enable rabbitmq-server.service              #设置开机自启动
rabbitmqctl add_user openstack RABBIT_PASS            #创建消息队列用户,用于controler和 计算节点连接rabbitmq的认证(关联)
rabbitmqctl set_permissions openstack ".*" ".*" ".*"  #配置openstack用户的操作权限(正则,配置读写权限)
rabbitmq-plugins list    #查看rabbitmq插件列表
rabbitmq-plugins enable rabbitmq_management           #开启rabbitmq的web管理界面的插件,端口为15672
netstat -natp | grep 5672                             #查看端口

主机访问192.168.139.12:15672                           #默认账号密码为guest

5. Install memcached
yum install -y memcached python-memcachedz
6. Modify the memcached configuration file
vim /etc/sysconfig/memcached
PORT="11211"					#memcached端口11211
USER="memcached"				#用户memcached
MAXCONN="1024"					#最大连接数1024
CACHESIZE="64"					#字符集大小64位
OPTIONS="-l 127.0.0.1,::1,ct" 	#监听地址,127.0.0.1:本地地址,::是ipv6地址,ct是本地VMnet1地址

systemctl start memcached       #开启服务
systemctl enable memcached      #设置开机自启
netstat -nautp | grep 11211     #查看端口
7. Install etcd
yum -y install etcd
8. Modify the etcd configuration file
cd /etc/etcd/
vim etcd.conf

##删除所有内容,复制粘贴以下内容并进行修改##
ETCD_DATA_DIR="/var/lib/etcd/default.etcd"
ETCD_LISTEN_PEER_URLS="http://192.168.100.12:2380"
ETCD_LISTEN_CLIENT_URLS="http://192.168.100.12:2379"
ETCD_NAME="ct"
ETCD_INITIAL_ADVERTISE_PEER_URLS="http://192.168.100.12:2380"
ETCD_ADVERTISE_CLIENT_URLS="http://192.168.100.12:2379"
ETCD_INITIAL_CLUSTER="ct=http://192.168.100.12:2380"
ETCD_INITIAL_CLUSTER_TOKEN="etcd-cluster-01"
ETCD_INITIAL_CLUSTER_STATE="new"
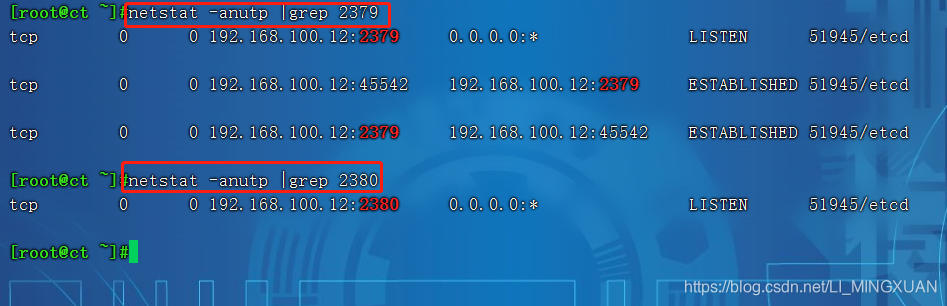
9. Set up auto-start, start service, detect port
systemctl start etcd.service
systemctl enable etcd.service

netstat -anutp |grep 2379
netstat -anutp |grep 2380