Article Directory
- Configure server-side jupyter under linux, local access
- Add conda virtual environment in jupyter
-
- 1. First install ipykernel, execute the command line under terminal
- 2. Create a kernel file in the virtual environment and execute the command line in the terminal
- 3. Activate the conda environment and execute the command line in the terminal:
- 4. Write the environment to the notebook's kernel
- **5. Open the notebook server (see above for remote configuration)
- 6. In addition, list and delete the kernel environment
- Refer
Configure server-side jupyter under linux, local access
0. Background
The laboratory server does not have a graphical interface and can only be accessed through sshlogin, but there are many scripts involved in the alchemy process, and I want to experience the interactive process. After checking, you can configure the server-side jupyter, and then use the local browser to remotely access.
1. Install jupyter notebook
pip install jupyter
2. Generate configuration files
jupyter notebook --generate-config
3. Set login password and generate secret key
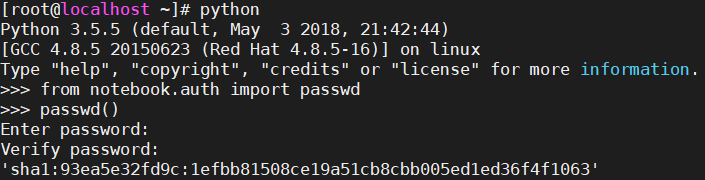
sha1The secret key needs to be copied and used in the next step
4. Modify the configuration file
-
Enter the folder where the configuration file is located:
cd ~/.jupyter -
Edit the configuration file
jupyter_notebook_config.py:vim jupyter_notebook_config.py -
After entering
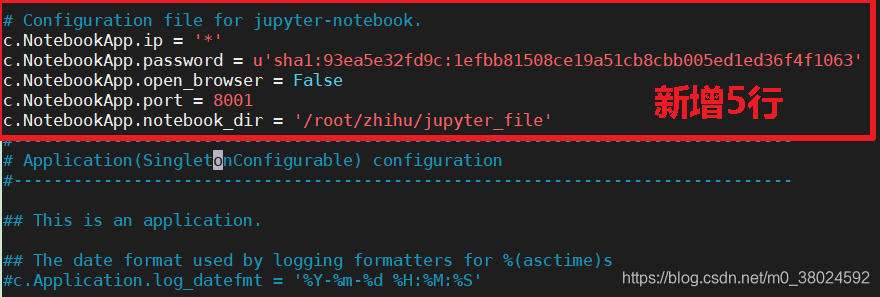
vim, press i to enter edit mode, add configuration information at the end of the file
c.NotebookApp.ip='*'               # *表示所有ip可以访问
c.NotebookApp.password = 'sha1:秘钥'  #第三步生成的秘钥
c.NotebookApp.open_browser = False
c.NotebookApp.port =8888           #端口号
c.NotebookApp.notebook_dir = '/home/user/jupyter_file' #ipython文件保存的路径,按自己的路径修改,必须要配置,不然访问时会出现404错误。
5. Generate jupyter access address on the server
- The following
ipinto your serverip - Replace the port with the port number configured in the above file
jupyter notebook --ip=10.141.222.152 --port=8888 --allow-root

6. Set up the server to run jupyter in the background
nohup jupyter notebook --allow-root > jupyter.log 2>&1 &
- or
nohup jupyter notebook --ip=10.141.222.152 --port=8888 --allow-root > jupyter.log 2>&1 &
- View
ps -a - Delete
kill -9 pidterminate the process
Reference
https://www.cnblogs.com/nxf-rabbit75/p/11906199.html
Add conda virtual environment in jupyter
1. First install ipykernel, execute the command line under terminal
conda install ipykernel
2. Create a kernel file in the virtual environment and execute the command line in the terminal
conda install -n 环境名称 ipykernel
3. Activate the conda environment and execute the command line in the terminal:
source activate 环境名称
4. Write the environment to the notebook's kernel
python -m ipykernel install --user --name 环境名称 --display-name "在jupyter中显示的环境名称"
The name in the quotation marks here can be freely used for identification in jupyter. Here, my jupyterenvironment name is called py36, so my command is:python -m ipykernel install --user --name py36 --display-name "py36"
**5. Open the notebook server (see above for remote configuration)
- In the
terminalimplementation of the command linejupyter notebook - The above related steps can complete
jupyterthe related configuration, but if you need to use it oftenjupyter notebook, it is best to install it when you create the virtual environmentipykernel- The command is as follows
conda create -n 环境名称 python=3.5 ipykernel
6. In addition, list and delete the kernel environment
- List the
kernelenvironment
jupyter kernelspec list
- Delete
kernelenvironment
jupyter kernelspec remove 环境名称