Article Directory
1. Register event (bound event)
1. Overview of registration events
Adding an event to an element is called a registration event or a binding
event. There are two ways to register an event: the traditional way and the way to monitor and register.
The difference between them
Traditional registration method
- Use the on start event onclick
- Features: the uniqueness of registered events
- Only one processing function can be set for the same element and the same event, and the last registered processing function will override the previously registered processing function
Method listener registration method
- w3c standard recommended method
- addEventListener() it is a method
- IF before IE9 does not support methods, you can use attachEvent() instead
- Features: Multiple listeners can be registered for the same element and the same event (the listener here refers to function)
- Execute sequentially in the order of registration
2.addEventListener event monitoring method
evenTarget.addEventListener(type,listener[,useCapture])
The evenTarget.addEventListener() method registers the specified listener to the eventTarget (target object), and when the object triggers the specified event, the event processing function will be executed.
The method accepts three parameters
- type: event type string, such as click, mouseover, note that there is no on
- listener: event processing function. When an event occurs, the listener function will be called
- useCapture: optional parameter, is a boolean value, the default is false. After learning the DOM event flow, come to learn more
Code demo
<body>
    <button>传统注册方式</button>
    <button>方法监听注册事件</button>
    <script>
        var bus = document.querySelectorAll('button')
            // 1.传统的注册事件  传统的后面会把前面的给覆盖掉
        bus[0].onclick = function() {
            alert(11)
        }
        bus[0].onclick = function() {
                alert(22)
            }
            // 2.事件监听注册事件 addEventListener
            // (1)里面的事件类型是字符串的,必须加引号 是不带on的
            // (2)同一个元素同一个事件可以添加多个监听事件 不会覆盖
        bus[1].addEventListener('click', function() {
            alert(11)
        })
        bus[1].addEventListener('click', function() {
            alert(22)
        })
    </script>
</body>
2. Delete event (unbind event)
1. How to delete an event
Traditional registration method delete
eventTarget.onclick = null;
Method listener registration method delete
eventTarget.removeEventListener(type,listener[,useCapture]);
Code demo
    <style>
        div {
            width: 100px;
            height: 100px;
            background-color: red;
            margin-bottom: 10px;
        }
    </style>
</head>

<body>
    <div>1</div>
    <div>2</div>
    <div>3</div>
    <script>
        var dis = document.querySelectorAll('div');
        dis[0].onclick = function() {
                alert('被点击了')
                    // 1.传统方式删除事件
                dis[0].onclick = null
            }
            // 2.removeEventListener 删除事件 我们删除事件的时候要知道删除的是那个函数所以我们添加函数的时候要用到单独声明函数 在把函数名写在里面去 移除的时候移除函数名即可
        dis[1].addEventListener('click', fn) //里面的fn是不需要加上小括号的

        function fn() {
            alert('被点击了')
            dis[1].removeEventListener('click', fn)
        }
    </script>
</body>
Three. DOM event flow
The event flow describes the sequence of
events received from the page. When events occur, they will be propagated in a specific order between element nodes . This propagation process is the DOM event flow.
For example, we register a click event for a div:
1. The acquisition phase
2. The current target phase
2. The bubbling phase
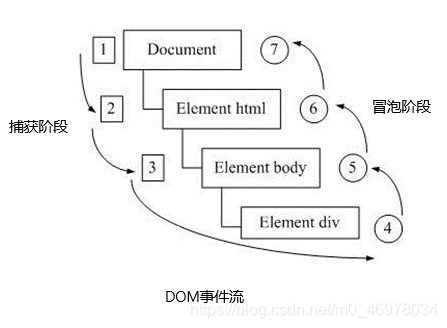
- Event bubbling: IE first proposed that the event is received by the most specific element at the beginning, and then propagated up to the top node of the DOM.
- Event capture: Netscape first proposed the process of starting from the top node of the DOM, and then propagating down to the most specific element receiving process.
note
- Only one phase of capture or bubbling can be performed in JS code.
- Onclick and attachEvent can only get the bubbling phase.
- If the third parameter of addEventListener(type, listener[, useCapture]) is true, it means that the
event handler is called in the event capture phase; if it is false (the default is false if it is not written), it means that the event handler
is called in the event bubbling phase . The capture phase is the bubbling from the document to the target. The phase is from the target to the document.
4. In actual development, we rarely use event capture, and we pay more attention to event bubbling.
5. Some events are not bubbling, such as onblur, onfocus, onmouseenter, onmouseleave
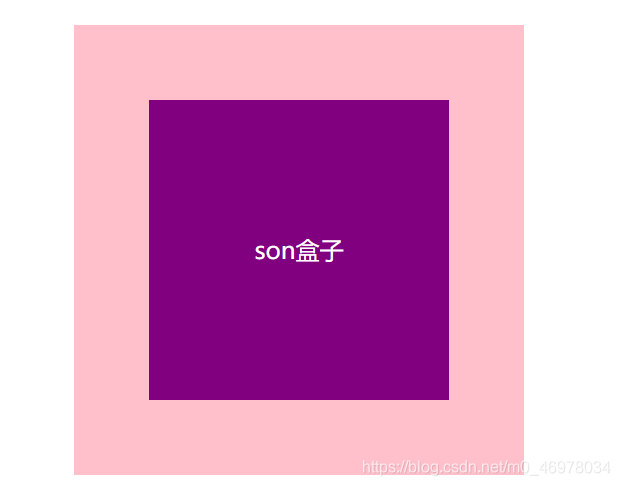
Code demo
    <title>Document</title>
    <style>
        .father {
            overflow: hidden;
            width: 300px;
            height: 300px;
            margin: 100px auto;
            background-color: pink;
            text-align: center;
        }

        .son {
            width: 200px;
            height: 200px;
            margin: 50px;
            background-color: purple;
            line-height: 200px;
            color: #fff;
        }
    </style>
</head>

<body>
    <div class="father">
        <div class="son">son盒子</div>
    </div>
    <script>
        // dom 事件流 三个阶段
        // 1. JS 代码中只能执行捕获或者冒泡其中的一个阶段。
        // 2. onclick 和 attachEvent(ie) 只能得到冒泡阶段。
        // 3. 捕获阶段 如果addEventListener 第三个参数是 true 那么则处于捕获阶段  document -> html -> body -> father -> son
        var father = document.querySelector('.father');
        father.addEventListener('click', function() {
            alert('father');
        }, true);
        var son = document.querySelector('.son');
        son.addEventListener('click', function() {
            alert('son');
        }, true);
        // 4. 冒泡阶段 如果addEventListener 第三个参数是 false 或者 省略 那么则处于冒泡阶段  son -> father ->body -> html -> document
        var son = document.querySelector('.son');
        son.addEventListener('click', function() {
            alert('son');
        }, false);
        var father = document.querySelector('.father');
        father.addEventListener('click', function() {
            alert('father');
        }, false);
        document.addEventListener('click', function() {
            alert('document');
        })
    </script>
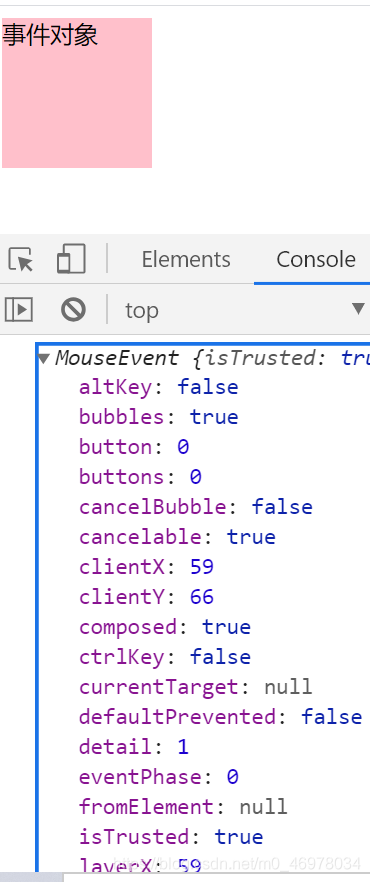
Four. Event Object
1. What is an event object
The event object represents the state of the event, such as the state of the keyboard, the position of the mouse, and the state of the mouse button. It is
simply understood as: After the event occurs, a collection of a series of information related to the event is placed in this object, and this object is the event. Object event, he has many attributes and methods
eventTarget.onclick = function(evevt ){}
eventTarget.addEventListener('click',function( evevt) {} )
Code demo:
    <style>
        div {
            width: 100px;
            height: 100px;
            background-color: pink;
        }
    </style>
</head>

<body>
    <div>事件对象</div>
    <script>
        var div = document.querySelector('div')
            // 可以也有传统法式设置对象
            // div.onclick = function(event) {
            //         console.log(event);
            //     }
            // 也可以用监听方法
        div.addEventListener('click', function(event) {
                console.log(event);
            })
            // 注意点
            // 1.event 就是一个事件对象 写到我们侦听函数的 小括号里面,当形参来看
            // 2.事件对象只有 有了事件才会存在的,它是系统给我们自动创建的,不需要我们传递参数
            // 3.事件对象 是 我们事件的一系列相关数据的集合 跟事件相关的 比如鼠标点击里面就包含了鼠标相关的信息,鼠标的坐标等待,再比如键盘事件里面包含了键盘那些信息,判断用户按下了那个键
            // 4.这个事件对象我们可以自己命名 比如event、evt 、e
            // 5.事件对象也有兼容性问题 ie678 通过window.event 兼容性的写法 e = e || window.evevt;
    </script>
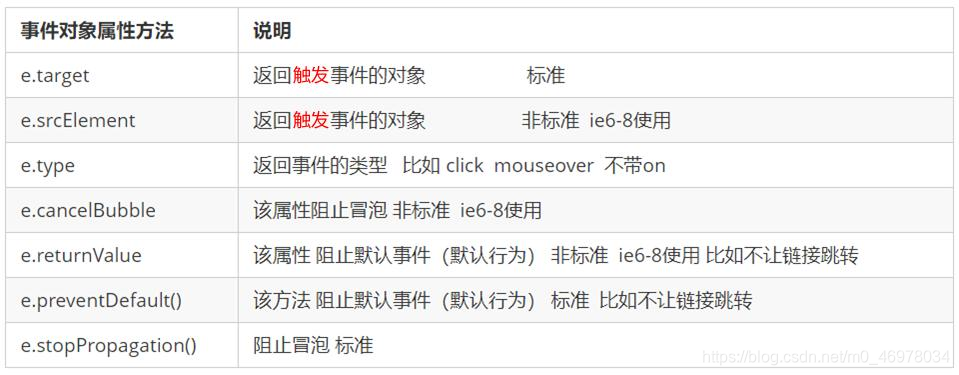
2. Commonly used properties and methods of event objects
Code demonstration
<style>
div {
width: 100px;
height: 100px;
background-color: pink;
}
</style>
</head>
<body>
<div>123</div>
<script>
var div = document.querySelector('div')
div.addEventListener('click', function(event) {
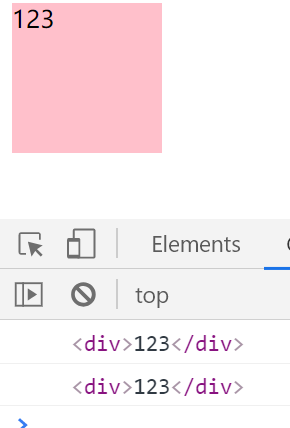
// e.target 返回的是触发事件的对象(元素) this 返回的是绑定事件的对象(元素)
// 他俩的区别e.target 点击了那个元素,就返回那个元素 this 那个元素绑定了这个点击事件 那么就返回谁 比如我们绑定的是ul 那么你点击的是小li 他返回的是ul 而不是li
console.log(event.target);
console.log(this);
})
</script>
Event object organization default behavior
<body>
    <div>123</div>
    <a href="http://www.baidu.com">百度</a>
    <form action="http://www.baidu.com">
        <input type="submit" value="提交" name="sub" id="">
    </form>
    <script>
        // 1.返回事件类型 type
        var div = document.querySelector('div');
        div.addEventListener('click', fn)

        function fn(e) {
            console.log(e.type);
        }
        // 2.让链接不跳转,或者让提交按钮不提交preventDefault()
        var a = document.querySelector('a');
        a.addEventListener('click', function(e) {
            e.preventDefault() //dom 标准写法 ie低版本浏览器不支持因为使用到了addEventListener  我们可以用传统的注册方式
        })
        a.onclick = function(e) {
            // 普通浏览器 e.preventDefault() 方法
            // e.preventDefault()
            // 低版本浏览器 ie678 returnValue 属性
            // e.returnValue
            // 还有一种方法 return false 可以使用不要考虑兼容性 但是 在return后的代码就不会在执行了
        }
    </script>
V. Stop the incident from bubbling up
1. Two ways to prevent event bubbling
Event bubbling: At the beginning, the most specific element is received, and then it propagates up to the top node of the DOM.
The characteristics of event bubbling: good and bad
Prevent events from bubbling up
- Standard writing: use the stopPropagation() method in the event object
e.stopPropagation()
- Non-standard writing: IE 678 uses the cancelBubble property of the event object
e.cancelBubble=true
Code demo
<style>
        .father {
            overflow: hidden;
            width: 300px;
            height: 300px;
            margin: 100px auto;
            background-color: pink;
            text-align: center;
        }

        .son {
            width: 200px;
            height: 200px;
            margin: 50px;
            background-color: purple;
            line-height: 200px;
            color: #fff;
        }
    </style>
</head>

<body>
    <div class="father">
        <div class="son">son儿子</div>
    </div>
    <script>
        // 常见事件对象的属性和方法
        // 阻止冒泡  dom 推荐的标准 stopPropagation()
        var son = document.querySelector('.son');
        son.addEventListener('click', function(e) {
            alert('son');
            e.stopPropagation(); // stop 停止  Propagation 传播
            e.cancelBubble = true; // 非标准 cancel 取消 bubble 泡泡
        }, false);

        var father = document.querySelector('.father');
        father.addEventListener('click', function() {
            alert('father');
        }, false);
        document.addEventListener('click', function() {
            alert('document');
        })
    </script>
Six. Event delegation
The characteristics of event bubbling itself, the disadvantages that it will bring, and the benefits that it will bring, require us to grasp flexibly.
 <ul>
 <li>知否知否,应该有弹框在手</li>
 <li>知否知否,应该有弹框在手</li>
 <li>知否知否,应该有弹框在手</li>
 <li>知否知否,应该有弹框在手</li>
 <li>知否知否,应该有弹框在手</li>
 </ul>
Clicking on each li will pop up a dialog box. Previously, it was very difficult to register events for each li. The more times the DOM was accessed, it
would prolong the interactive readiness time of the entire page.
Event delegation
Event delegation is also called event delegation, which is called event delegation in jQuery.
The principle of event delegation is
not to set the event listener separately for each child node, but to set the event listener on its parent node, and then use the bubbling principle to influence the setting of each child node.
The above case: register a click event for ul, and then use the target of the event object to find the currently clicked li, because clicking on li, the event will bubble up to ul, and if
ul has a registered event, the event listener will be triggered.
The role of event delegation
We only manipulated the DOM once, which improved the performance of the program.
Code demo
<body>
    <ul>
        <li>知否知否,点我应有弹框在手!</li>
        <li>知否知否,点我应有弹框在手!</li>
        <li>知否知否,点我应有弹框在手!</li>
        <li>知否知否,点我应有弹框在手!</li>
        <li>知否知否,点我应有弹框在手!</li>
    </ul>
    <script>
        // 事件委托的核心原理:给父节点添加侦听器, 利用事件冒泡影响每一个子节点
        var ul = document.querySelector('ul');
        ul.addEventListener('click', function(e) {
            // alert('知否知否,点我应有弹框在手!');
            // e.target 这个可以得到我们点击的对象
            e.target.style.backgroundColor = 'pink';


        })
    </script>
</body>
Seven. Commonly used mouse events
1. Prohibit the right mouse button menu
contextmenu mainly controls when the context menu should be displayed, mainly used for programmers to cancel the default context menu
document.addEventListener('contextmenu', function(e) {
e.preventDefault();
})
2. Prohibit mouse selection (selectstart starts to select)
document.addEventListener('selectstart', function(e) {
 e.preventDefault();
 })
Code demo
<body>
    我们的征程是星辰大海
    <script>
        // 1.contextmenu 我们可以禁用右键菜单按钮
        document.addEventListener('contextmenu', function(e) {
                e.preventDefault()
            })
            // 2.禁止选中文字 selectstart
        document.addEventListener('selectstart', function(e) {
            e.preventDefault()
        })
    </script>
</body>
3. Mouse event object
The event object represents the state of the event, a collection of some columns of information related to the event. Mainly mouse event object MouseEvent and keyboard event object KeyboardEvent
Code demo
<style>
body {
height: 3000px;
}
</style>
</head>
<body>
<script>
// 鼠标事件对象 MouseEvent
document.addEventListener('click', function(e) {
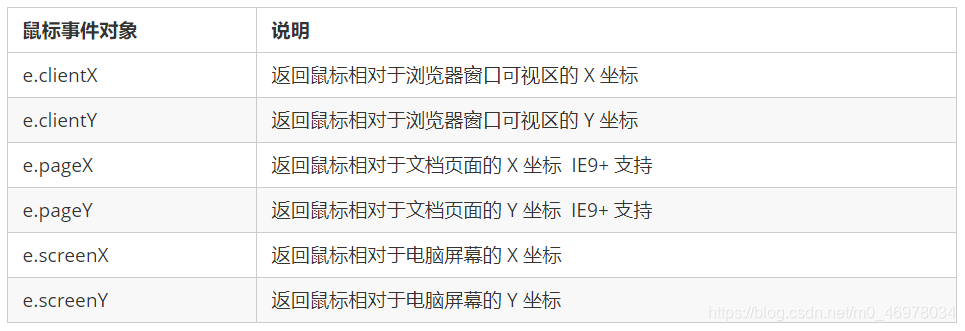
// 1.client 鼠标在可视区的x和y坐标
console.log(e.clientX);
console.log(e.clientY);
// 2. page 鼠标在页面文档的x和y坐标
console.log(e.pageX);
console.log(e.pageY);
// 3.screen 鼠标在电脑屏幕的x和y坐标 简单了解即可
console.log(e.screenX);
console.log(e.screenY);
})
</script>
</body>
8. Commonly used keyboard events
1 Common keyboard events
In addition to using the mouse to trigger the event, you can also use the keyboard to trigger. Pay attention to adding keyboard events to the document
Note:
1. If you use addEvtListener, you don’t need to add on. If you need to add on
, the difference between onkeypress and the previous two is , It does not recognize function keys, such as left and right arrows, shift, etc.
3. The order of execution of the three events is: keydown-keypress-keyup
Code demo
<body>
<script>
// 常用键盘事件
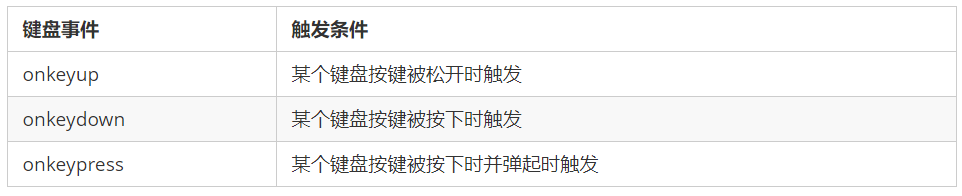
// 1.keyup 按键弹起的时候触发
document.addEventListener('keyup', function() {
console.log('我弹起了');
})
// 2.keypress 按键按下的时候触发 不能识别功能键 比如ctrl shift 箭头等等
document.addEventListener('keypress', function() {
console.log('我按下了');
})
// 3.keydown 按键按下的时候触发 能识别功能键 比如ctrl shift 箭头等等
document.addEventListener('keydown', function() {
console.log('我按下了');
})
</script>
</body>
2. Keyboard event object

Note:
onkeydown and onkeyup do not distinguish between uppercase and lowercase letters, and onkeypress distinguishes between uppercase and lowercase letters. In actual development, keydown and keyup are used more. It can recognize all keys (including function keys). Keypress does not recognize function keys, but the keyCode attribute can be case sensitive and return different ASCll values.
Code demonstration
<body>
<script>
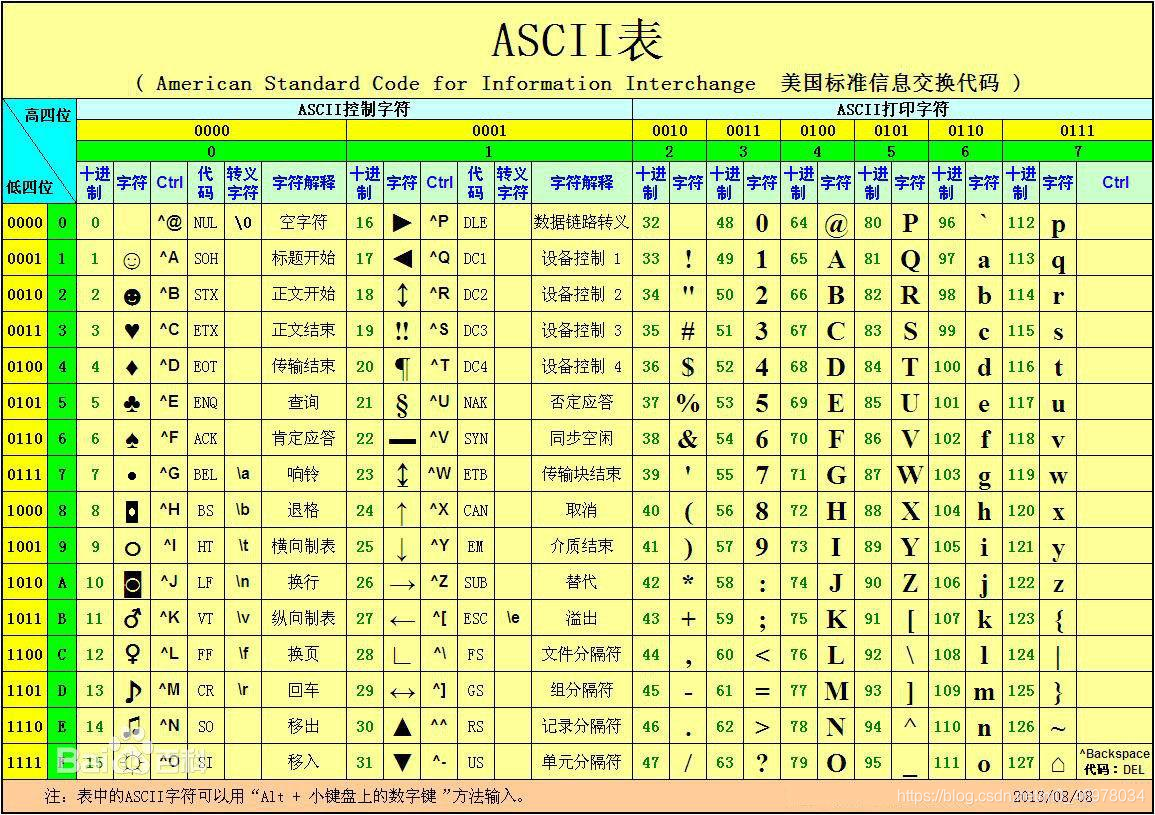
// 键盘事件对象中的keyCode属性可以得到相应键的ASCII码值
// 1. 我们的keyup 和keydown事件不区分字母大小写 a 和 A 得到的都是65
// 2. 我们的keypress 事件 区分字母大小写 a 97 和 A 得到的是65
document.addEventListener('keyup', function(e) {
// console.log(e);
console.log('up:' + e.keyCode);
// 我们可以利用keycode返回的ASCII码值来判断用户按下了那个键
if (e.keyCode === 65) {
alert('您按下的a键');
} else {
alert('您没有按下a键')
}
})
document.addEventListener('keypress', function(e) {
// console.log(e);
console.log('press:' + e.keyCode);
})
</script>
</body>
3. Keyboard event case
1. Imitate JD’s key input
Code demo
<body>
    <input type="text">
    <script>
        // 核心思路,检测用户是否按下了s键 如果按下了就把光标定到搜索框里面
        var ipt = document.querySelector('input')
        document.addEventListener('keyup', function(e) {
            console.log(e.keyCode);
            if (e.keyCode === 83) {
                ipt.focus(); //别忘记加小括号
            }
        })
    </script>
</body>
2. Imitate the case of JD Express tracking number query
    <style>
        * {
            margin: 0;
            padding: 0;
        }

        .search {
            position: relative;
            width: 178px;
            margin: 100px;
        }

        .con {
            display: none;
            position: absolute;
            top: -40px;
            width: 171px;
            border: 1px solid rgba(0, 0, 0, .2);
            box-shadow: 0 2px 4px rgba(0, 0, 0, .2);
            padding: 5px 0;
            font-size: 18px;
            line-height: 20px;
            color: #333;
        }

        .con::before {
            content: '';
            width: 0;
            height: 0;
            position: absolute;
            top: 28px;
            left: 18px;
            border: 8px solid #000;
            border-style: solid dashed dashed;
            border-color: #fff transparent transparent;
        }
    </style>
</head>

<body>
    <div class="search">
        <div class="con">123</div>
        <input type="text" placeholder="请输入您的快递单号" class="jd">
    </div>
    <script>
        // 快递单号输入内容时, 上面的大号字体盒子(con)显示(这里面的字号更大)
        // 表单检测用户输入: 给表单添加键盘事件
        // 同时把快递单号里面的值(value)获取过来赋值给 con盒子(innerText)做为内容
        // 如果快递单号里面内容为空,则隐藏大号字体盒子(con)盒子
        // 注意着里为什么不能用到keydown和keypress 因为他俩在文本框的特点:他们俩个事件触发的时候。文字还没有落入文本框中。就先执行代码了,而keyup 是把文字落入文本框中再去执行的代码
        var con = document.querySelector('.con');
        var jd_input = document.querySelector('.jd');
        jd_input.addEventListener('keyup', function() {
                if (jd_input.value == '') {
                    con.style.display = 'none'
                } else {
                    con.innerHTML = jd_input.value
                    con.style.display = 'block'

                }
            })
            // 当我们失去焦点 ,就隐藏这个con盒子
        jd_input.addEventListener('blur', function() {
                con.style.display = 'none'
            })
            // 当我们获得焦点,就显示这个con盒子
        jd_input.addEventListener('focus', function() {
            // con.style.display = 'block'
            if (this.value !== '') {
                con.style.display = 'block'

            }
        })
    </script>
</body>