The routing configuration in react is an important function in the react project. Through the configured routing, we can realize the switching of different components, and then realize the single-page application.
1. Writing components:
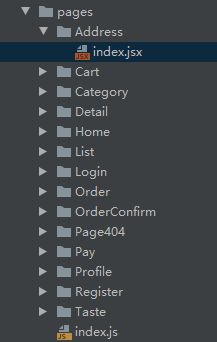
Before configuring routing, we must first write some required page-level components. We can create a pages folder in the src directory of the project, in the folder, create a new folder for each component, create a new index.jsx file in the folder, the name of the component folder uses Pascal nomenclature (initial letter Uppercase), jsx objects are all named with index. And the component name in the jsx object is the same as the component folder name. As shown below:

2. Component export:
Then, write an index.js file under the pages folder to import and export the components automatically. In order to be able to achieve simple import and export, we used a little trick when naming the component and the component folder above, which can use regular expressions to easily obtain the required data.
// 自动化导出与导出所有页面级组件
let files =  require.context('../pages', true, /index.jsx$/);// 批量导入导出,webpack自带方法
let Pages = {};

files.keys().forEach(filePath => {
        let key = filePath.match(/.*\/(.*)\/index.jsx$/)[1];
        Pages[key] = files(filePath).default;
});

export default Pages;
3. Realize routing jump:
Import all components in the root component App.jsx. And realize the route jump in the return of the render() function.
First, we need to open the project folder, right-click in the folder, open a command window, and install a package:
yarn add react-router-domimport React, {Component} from 'react';
import './App.css'; // 导入样式文件
import { Switch, Route, Redirect } from 'react-router-dom';
import Pages from './pages';
class App extends Component{
render(){
return (
<Switch>
<Route path="/" exact><Redirect to="/home" /></Route>
{/* 简写 */}
{Object.keys(Pages).map(key => (
<Route key={ key } path={ `/${ key.toLowerCase()}` }
component={ Pages[key] }></Route>
))}
<Route path="*" component={ Pages.Page404 } />
</Switch>
);
}
}
export default App;The abbreviated part in the above code is equivalent to the following code:
<Route path='/address' component={ Pages.Address }></Route>In order to be abbreviated, so we have a little skill when naming the path, the component name using the toLowerCase() function is the path content. So in the above code, we don't need to write Route multiple times, we only need to iterate and concatenate strings.
4. Reference in the root instance:
In the root instance, import the required packages. Do the following:
import React from 'react';
import ReactDOM from 'react-dom';
import App from './App.jsx';
import { HashRouter } from 'react-router-dom';    // 用到的包

ReactDOM.render(
        <HashRouter>
                <App />
        </HashRouter>,
        document.getElementById('root')
);
Through the above operation, we can realize the jump according to the path path written in the follower component. You can run the project and enter the path on the page to verify that the routing is effective.