(This article is based on Spring's 5.1.6.RELEASE version)
Spring's startup process can be summarized into three steps:
- 1. Initialize the Spring container and register the BeanDefinition of the built-in BeanPostProcessor to the container
- 2. Register the BeanDefinition of the configuration class to the container
- 3. Call the refresh() method to refresh the container
Because it is based on java-config technology to analyze the source code, the entry here is AnnotationConfigApplicationContext. If xml analysis is used, the entry is ClassPathXmlApplicationContext. The common feature of both of them is that they inherit the AbstractApplicationContext class, and the famous refresh() is Defined in this class. We then analyze the AnnotationConfigApplicationContext class, the source code is as follows:
// 初始化容器
public AnnotationConfigApplicationContext(Class<?>... annotatedClasses) {
    // 注册 Spring 内置后置处理器的 BeanDefinition 到容器
    this();
    // 注册配置类 BeanDefinition 到容器
    register(annotatedClasses);
    // 加载或者刷新容器中的Bean
    refresh();
}
Therefore, the startup process of the entire Spring container can be drawn as the following flowchart:
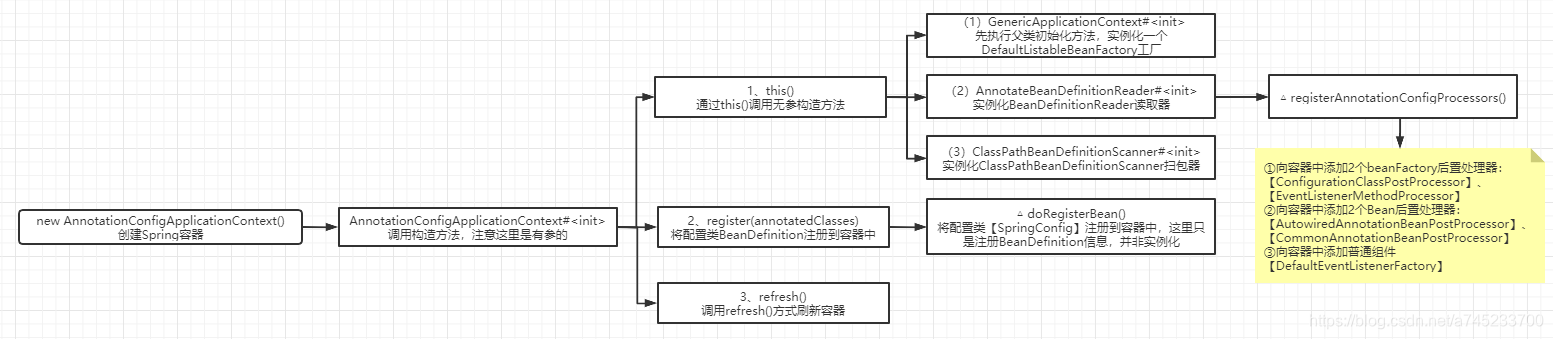
Then we mainly analyze Spring's startup process in detail from these three entrances:
1. Initialization process:
1. When the spring container is initialized, the parameterless constructor is called through this(), and the following three things are mainly done:
- (1) Instantiate the BeanFactory [DefaultListableBeanFactory] factory to generate Bean objects
- (2) Instantiate the BeanDefinitionReader annotation configuration reader, used to read specific annotations (such as @Service, @Repository) classes into BeanDefinition objects, (BeanDefinition is an extremely important concept in Spring, it stores the bean All feature information of the object, such as whether it is singleton, lazy loading, factoryBeanName, etc.)
- (3) Instantiate the ClassPathBeanDefinitionScanner path scanner, used to scan the specified package directory to find bean objects
2. Analysis of core code:
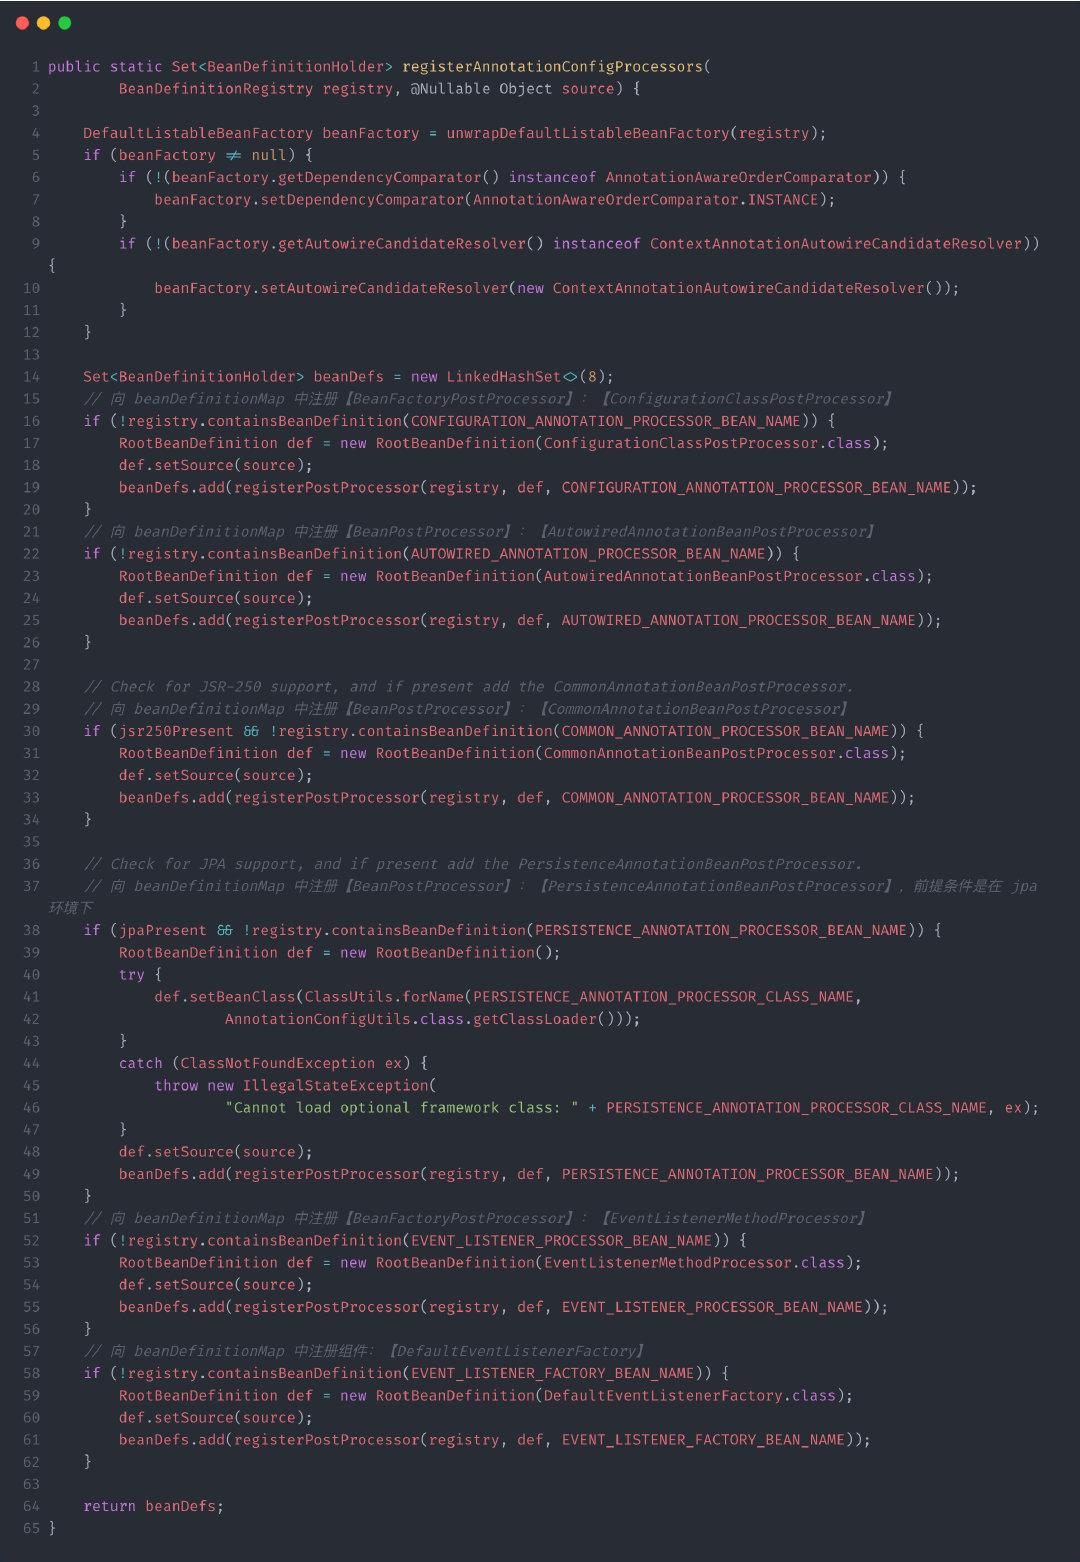
(1) Add built-in components to the container: org.springframework.context.annotation.AnnotationConfigUtils#registerAnnotationConfigProcessors:
According to the analysis in the above figure, when the code runs here, the Spring container has been constructed, then you can add some built-in components to the container. The most important components are ConfigurationClassPostProcessor and AutowiredAnnotationBeanPostProcessor. The former is a beanFactory post processor for Complete bean scanning and injection work. The latter is a bean post processor used to complete @AutoWired automatic injection.
2. Register the SpringConfig configuration class to the container:
1. Register SpringConfig to the container: org.springframework.context.annotation.AnnotatedBeanDefinitionReader#doRegisterBean:
This step is mainly used to parse the Spring configuration class passed in by the user, parse it into a BeanDefinition and then register it in the container. The main source code is as follows:
<T> void doRegisterBean(Class<T> annotatedClass, @Nullable Supplier<T> instanceSupplier, @Nullable String name,
		@Nullable Class<? extends Annotation>[] qualifiers, BeanDefinitionCustomizer... definitionCustomizers) {
	// 解析传入的配置类,实际上这个方法既可以解析配置类,也可以解析 Spring bean 对象
	AnnotatedGenericBeanDefinition abd = new AnnotatedGenericBeanDefinition(annotatedClass);
	// 判断是否需要跳过,判断依据是此类上有没有 @Conditional 注解
	if (this.conditionEvaluator.shouldSkip(abd.getMetadata())) {
		return;
	}

	abd.setInstanceSupplier(instanceSupplier);
	ScopeMetadata scopeMetadata = this.scopeMetadataResolver.resolveScopeMetadata(abd);
	abd.setScope(scopeMetadata.getScopeName());
	String beanName = (name != null ? name : this.beanNameGenerator.generateBeanName(abd, this.registry));
	// 处理类上的通用注解
	AnnotationConfigUtils.processCommonDefinitionAnnotations(abd);
	if (qualifiers != null) {
		for (Class<? extends Annotation> qualifier : qualifiers) {
			if (Primary.class == qualifier) {
				abd.setPrimary(true);
			}
			else if (Lazy.class == qualifier) {
				abd.setLazyInit(true);
			}
			else {
				abd.addQualifier(new AutowireCandidateQualifier(qualifier));
			}
		}
	}
	// 封装成一个 BeanDefinitionHolder
	for (BeanDefinitionCustomizer customizer : definitionCustomizers) {
		customizer.customize(abd);
	}
	BeanDefinitionHolder definitionHolder = new BeanDefinitionHolder(abd, beanName);
	// 处理 scopedProxyMode
	definitionHolder = AnnotationConfigUtils.applyScopedProxyMode(scopeMetadata, definitionHolder, this.registry);

	// 把 BeanDefinitionHolder 注册到 registry
	BeanDefinitionReaderUtils.registerBeanDefinition(definitionHolder, this.registry);
}
Three, refresh () container refresh process:
refresh() is mainly used to refresh the container. Each container in Spring will call the refresh() method to refresh, whether it is the parent-child container of Spring or the feign isolation container in Spring Cloud Feign, each container will call this method to complete initialization. refresh() can be divided into 12 steps, of which the more important steps will be described in detail below.
1. Source code of refresh() method: org.springframework.context.support.AbstractApplicationContext#refresh:
public void refresh() throws BeansException, IllegalStateException {
	synchronized (this.startupShutdownMonitor) {
		// 1. 刷新前的预处理
		prepareRefresh();

		// 2. 获取 beanFactory,即前面创建的【DefaultListableBeanFactory】
		ConfigurableListableBeanFactory beanFactory = obtainFreshBeanFactory();

		// 3. 预处理 beanFactory,向容器中添加一些组件
		prepareBeanFactory(beanFactory);

		try {
			// 4. 子类通过重写这个方法可以在 BeanFactory 创建并与准备完成以后做进一步的设置
			postProcessBeanFactory(beanFactory);

			// 5. 执行 BeanFactoryPostProcessor 方法,beanFactory 后置处理器
			invokeBeanFactoryPostProcessors(beanFactory);

			// 6. 注册 BeanPostProcessors,bean 后置处理器
			registerBeanPostProcessors(beanFactory);

			// 7. 初始化 MessageSource 组件(做国际化功能;消息绑定,消息解析)
			initMessageSource();

			// 8. 初始化事件派发器,在注册监听器时会用到
			initApplicationEventMulticaster();

			// 9. 留给子容器(子类),子类重写这个方法,在容器刷新的时候可以自定义逻辑,web 场景下会使用
			onRefresh();

			// 10. 注册监听器,派发之前步骤产生的一些事件(可能没有)
			registerListeners();

			// 11. 初始化所有的非单实例 bean
			finishBeanFactoryInitialization(beanFactory);

			// 12. 发布容器刷新完成事件
			finishRefresh();
		}
		...
	}
}
First, we summarize the main functions of each step of the refresh() method: then we will do a specific analysis of the source code of each step.
1. PrepareRefresh() pre-processing before refreshing:
- (1) initPropertySources(): Initialize some property settings, subclasses customize personalized property setting methods;
- (2) getEnvironment().validateRequiredProperties(): verify the legality of attributes
- (3) earlyApplicationEvents = new LinkedHashSet<ApplicationEvent>(): save some early events in the container;
2. ObtainFreshBeanFactory(): Obtain the BeanFactory created when the container is initialized:
- (1) refreshBeanFactory(): refresh the BeanFactory and set the serialization ID;
- (2) getBeanFactory(): returns the BeanFactory object created by the GenericApplicationContext in the initialization, that is, [DefaultListableBeanFactory] type
3. prepareBeanFactory (beanFactory): The preprocessing of BeanFactory, adding some components to the container:
- (1) Set the class loader of BeanFactory, set the expression parser, etc.
- (2)添加BeanPostProcessor【ApplicationContextAwareProcessor】
- (3) Set the interface to ignore automatic assembly: EnvironmentAware, EmbeddedValueResolverAware, ResourceLoaderAware, ApplicationEventPublisherAware, MessageSourceAware, ApplicationContextAware;
- (4) Register auto-assembly classes that can be resolved, that is, they can be automatically injected through annotations in any component: BeanFactory, ResourceLoader, ApplicationEventPublisher, ApplicationContext
- (5)添加BeanPostProcessor【ApplicationListenerDetector】
- (6) Add AspectJ at compile time;
- (7) Three components registered in BeanFactory: environment[ConfigurableEnvironment], systemProperties[Map<String, Object>], systemEnvironment[Map<String, Object>]
4. postProcessBeanFactory(beanFactory): Subclass overrides this method, which can realize further settings after the BeanFactory is created and preprocessed
5. InvokeBeanFactoryPostProcessors(beanFactory): The method of executing BeanFactoryPostProcessor after BeanFactory standard initialization, that is, the post processor of BeanFactory:
(1)先执行BeanDefinitionRegistryPostProcessor: postProcessor.postProcessBeanDefinitionRegistry(registry)
- ① Get all the collections that implement the BeanDefinitionRegistryPostProcessor interface type
- ② First execute the BeanDefinitionRegistryPostProcessor that implements the PriorityOrdered priority interface
- ③ Re-execute the BeanDefinitionRegistryPostProcessor that implements the Ordered order interface
- ④ Finally execute BeanDefinitionRegistryPostProcessors that do not implement any priority or sequential interface
(2) Re-execute the method of BeanFactoryPostProcessor: postProcessor.postProcessBeanFactory(beanFactory)
- ① Get all the collections that implement the BeanFactoryPostProcessor interface type
- ② First execute the BeanFactoryPostProcessor that implements the PriorityOrdered priority interface
- ③ Re-execute the BeanFactoryPostProcessor that implements the Ordered interface
- ④ Finally execute the BeanFactoryPostProcessor that does not implement any priority or sequential interface
6, registerBeanPostProcessors (beanFactory): Register the BeanPostProcessor of the Bean in the container. Its main function is to intervene in the process of Spring initiating the bean, so as to complete the functions of proxy, automatic injection, circular dependency, etc.
- (1) Get all the collections that implement the BeanPostProcessor interface type:
- (2) First register the BeanPostProcessor that implements the PriorityOrdered priority interface;
- (3) Re-register the BeanPostProcessor that implements the Ordered priority interface;
- (4) Finally register the BeanPostProcessor that does not implement any priority interface;
- (5) The most refresh can be divided into 12 steps, of which the more important steps will be explained in detail below. Every container in Spring will call the refresh() method to refresh, whether it is Spring's parent-child container or the feign isolation container in Spring Cloud Feign, each container will call this method to complete the initialization. Finally register a BeanPostProcessor of type MergedBeanDefinitionPostProcessor: beanFactory.addBeanPostProcessor(postProcessor);
- (6) Register an ApplicationListenerDetector for the container: it is used to check whether it is an ApplicationListener after the Bean is created. If it is, put the Bean in the container and save it: applicationContext.addApplicationListener((ApplicationListener<?>) bean);
At this time, there are 6 default BeanProcessors in the container by default (in no proxy mode): [ApplicationContextAwareProcessor], [ConfigurationClassPostProcessorsAwareBeanPostProcessor], [PostProcessorRegistrationDelegate], [CommonAnnotationBeanPostProcessor], [AutowiredAnnotationBeanPostProcessor], [ApplicationListenerDetector]
7. initMessageSource(): Initialize the MessageSource component, which is mainly used for internationalization functions, message binding and message parsing:
- (1) See if there is a component with an id of messageSource and a type of MessageSource in the BeanFactory container: if so, assign it directly to the messageSource; if not, create a DelegatingMessageSource;
- (2) Register the created MessageSource in the container, and automatically inject the MessageSource when obtaining the value of the internationalization configuration file in the future;
8. initApplicationEventMulticaster(): Initialize the event dispatcher, which will be used when registering the listener:
- (1) See if there is a custom ApplicationEventMulticaster in the BeanFactory container: if so, get it directly from the container; if not, create a SimpleApplicationEventMulticaster
- (2) Add the created ApplicationEventMulticaster to the BeanFactory, and other components can be injected directly and automatically in the future
9. onRefresh(): This method is left to sub-containers and sub-classes to override this method, and the logic can be customized when the container is refreshed
10. registerListeners(): Register listeners: register all ApplicationListeners in the container to the event dispatcher, and dispatch the events generated by the previous steps:
- (1) Get all ApplicationListeners from the container
- (2) Add each listener to the event dispatcher: getApplicationEventMulticaster().addApplicationListenerBean(listenerBeanName);
- (3) Distribute the event applicationEvents generated in the previous step: getApplicationEventMulticaster().multicastEvent(earlyEvent);
11. finishBeanFactoryInitialization(beanFactory): initialize all remaining single-instance beans, the core method is preInstantiateSingletons(), which will call getBean() method to create the object;
- (1) Get all beanDefinitionName in the container, initialize and create objects in turn
- (2) Get the definition information RootBeanDefinition of the Bean, which represents the combined object of its own BeanDefinition and the BeanDefinition that may exist in the parent class
- (3) If the Bean meets these three conditions: non-abstract, single-instance, and non-lazy loading, then execute the singleton Bean creation process:
- (4) After all Beans are created using getBean(), check whether all Beans are of SmartInitializingSingleton interface, if so; execute afterSingletonsInstantiated();
12. finishRefresh(): Publish the refresh completion event of the BeanFactory container:
- (1) initLifecycleProcessor(): Initialize the post processor related to the life cycle: by default, find whether there is a lifecycleProcessor component [LifecycleProcessor] from the container, if not, create a DefaultLifecycleProcessor() and add it to the container;
- (2) getLifecycleProcessor().onRefresh(): Get the onRefresh() method of the lifecycle processor (LifecycleProcessor) defined earlier
- (3) publishEvent(new ContextRefreshedEvent(this)): publish the container refresh completion event;
- (4)liveBeansView.registerApplicationContext(this);
2. The third step: BeanFactory preprocessing: org.springframework.context.support.AbstractApplicationContext#prepareBeanFactory:
This step mainly adds some built-in components to the beanFactory factory
protected void prepareBeanFactory(ConfigurableListableBeanFactory beanFactory) {
	// 设置 classLoader
	beanFactory.setBeanClassLoader(getClassLoader());
	//设置 bean 表达式解析器
	beanFactory.setBeanExpressionResolver(new StandardBeanExpressionResolver(beanFactory.getBeanClassLoader()));
	beanFactory.addPropertyEditorRegistrar(new ResourceEditorRegistrar(this, getEnvironment()));

	// 添加一个 BeanPostProcessor【ApplicationContextAwareProcessor】
	beanFactory.addBeanPostProcessor(new ApplicationContextAwareProcessor(this));

	// 设置忽略自动装配的接口,即不能通过注解自动注入
	beanFactory.ignoreDependencyInterface(EnvironmentAware.class);
	beanFactory.ignoreDependencyInterface(EmbeddedValueResolverAware.class);
	beanFactory.ignoreDependencyInterface(ResourceLoaderAware.class);
	beanFactory.ignoreDependencyInterface(ApplicationEventPublisherAware.class);
	beanFactory.ignoreDependencyInterface(MessageSourceAware.class);
	beanFactory.ignoreDependencyInterface(ApplicationContextAware.class);

	// 注册可以解析的自动装配类,即可以在任意组件中通过注解自动注入
	beanFactory.registerResolvableDependency(BeanFactory.class, beanFactory);
	beanFactory.registerResolvableDependency(ResourceLoader.class, this);
	beanFactory.registerResolvableDependency(ApplicationEventPublisher.class, this);
	beanFactory.registerResolvableDependency(ApplicationContext.class, this);

	// 添加一个 BeanPostProcessor【ApplicationListenerDetector】
	beanFactory.addBeanPostProcessor(new ApplicationListenerDetector(this));

	// 添加编译时的 AspectJ
	if (beanFactory.containsBean(LOAD_TIME_WEAVER_BEAN_NAME)) {
		beanFactory.addBeanPostProcessor(new LoadTimeWeaverAwareProcessor(beanFactory));
		// Set a temporary ClassLoader for type matching.
		beanFactory.setTempClassLoader(new ContextTypeMatchClassLoader(beanFactory.getBeanClassLoader()));
	}

	// 注册 environment 组件,类型是【ConfigurableEnvironment】
	if (!beanFactory.containsLocalBean(ENVIRONMENT_BEAN_NAME)) {
		beanFactory.registerSingleton(ENVIRONMENT_BEAN_NAME, getEnvironment());
	}
	// 注册 systemProperties 组件,类型是【Map<String, Object>】
	if (!beanFactory.containsLocalBean(SYSTEM_PROPERTIES_BEAN_NAME)) {
		beanFactory.registerSingleton(SYSTEM_PROPERTIES_BEAN_NAME, getEnvironment().getSystemProperties());
	}
	// 注册 systemEnvironment 组件,类型是【Map<String, Object>】
	if (!beanFactory.containsLocalBean(SYSTEM_ENVIRONMENT_BEAN_NAME)) {
		beanFactory.registerSingleton(SYSTEM_ENVIRONMENT_BEAN_NAME, getEnvironment().getSystemEnvironment());
	}
}
Summary of the execution process:
- (1) Set the class loader of BeanFactory, set the expression parser, etc.
- (2)添加BeanPostProcessor【ApplicationContextAwareProcessor】
- (3) Set the interface to ignore automatic assembly: EnvironmentAware, EmbeddedValueResolverAware, ResourceLoaderAware, ApplicationEventPublisherAware, MessageSourceAware, ApplicationContextAware;
- (4) Register auto-assembly classes that can be resolved, that is, they can be automatically injected through annotations in any component: BeanFactory, ResourceLoader, ApplicationEventPublisher, ApplicationContext
- (5)添加BeanPostProcessor【ApplicationListenerDetector】
- (6) Add AspectJ at compile time;
- (7) Three components registered in BeanFactory: environment[ConfigurableEnvironment], systemProperties[Map<String, Object>], systemEnvironment[Map<String, Object>]
3. Step 5: Execute the post processor of BeanFactory: org.springframework.context.support.PostProcessorRegistrationDelegate#invokeBeanFactoryPostProcessors:
When Spring scans all beans and converts them into BeanDefinition, it allows us to do some custom operations, thanks to the BeanFactoryPostProcessor interface Spring provides us.
Among them, BeanFactoryPostProcessor has a sub-interface BeanDefinitionRegistryPostProcessor. The former will expose the ConfigurableListableBeanFactory to us, and the latter will expose the BeanDefinitionRegistry register to us. Once the register is obtained, we can inject it on demand.
At the same time, Spring allows us to control the order of components of the same type, such as the @Order annotation commonly used in AOP. Of course, the BeanFactoryPostProcessor interface here also provides the order. The first to be executed is the implementation class that implements the PriorityOrdered interface, and then to The implementation class that implements the Ordered interface, and finally the rest of the regular BeanFactoryPostProcessor class.
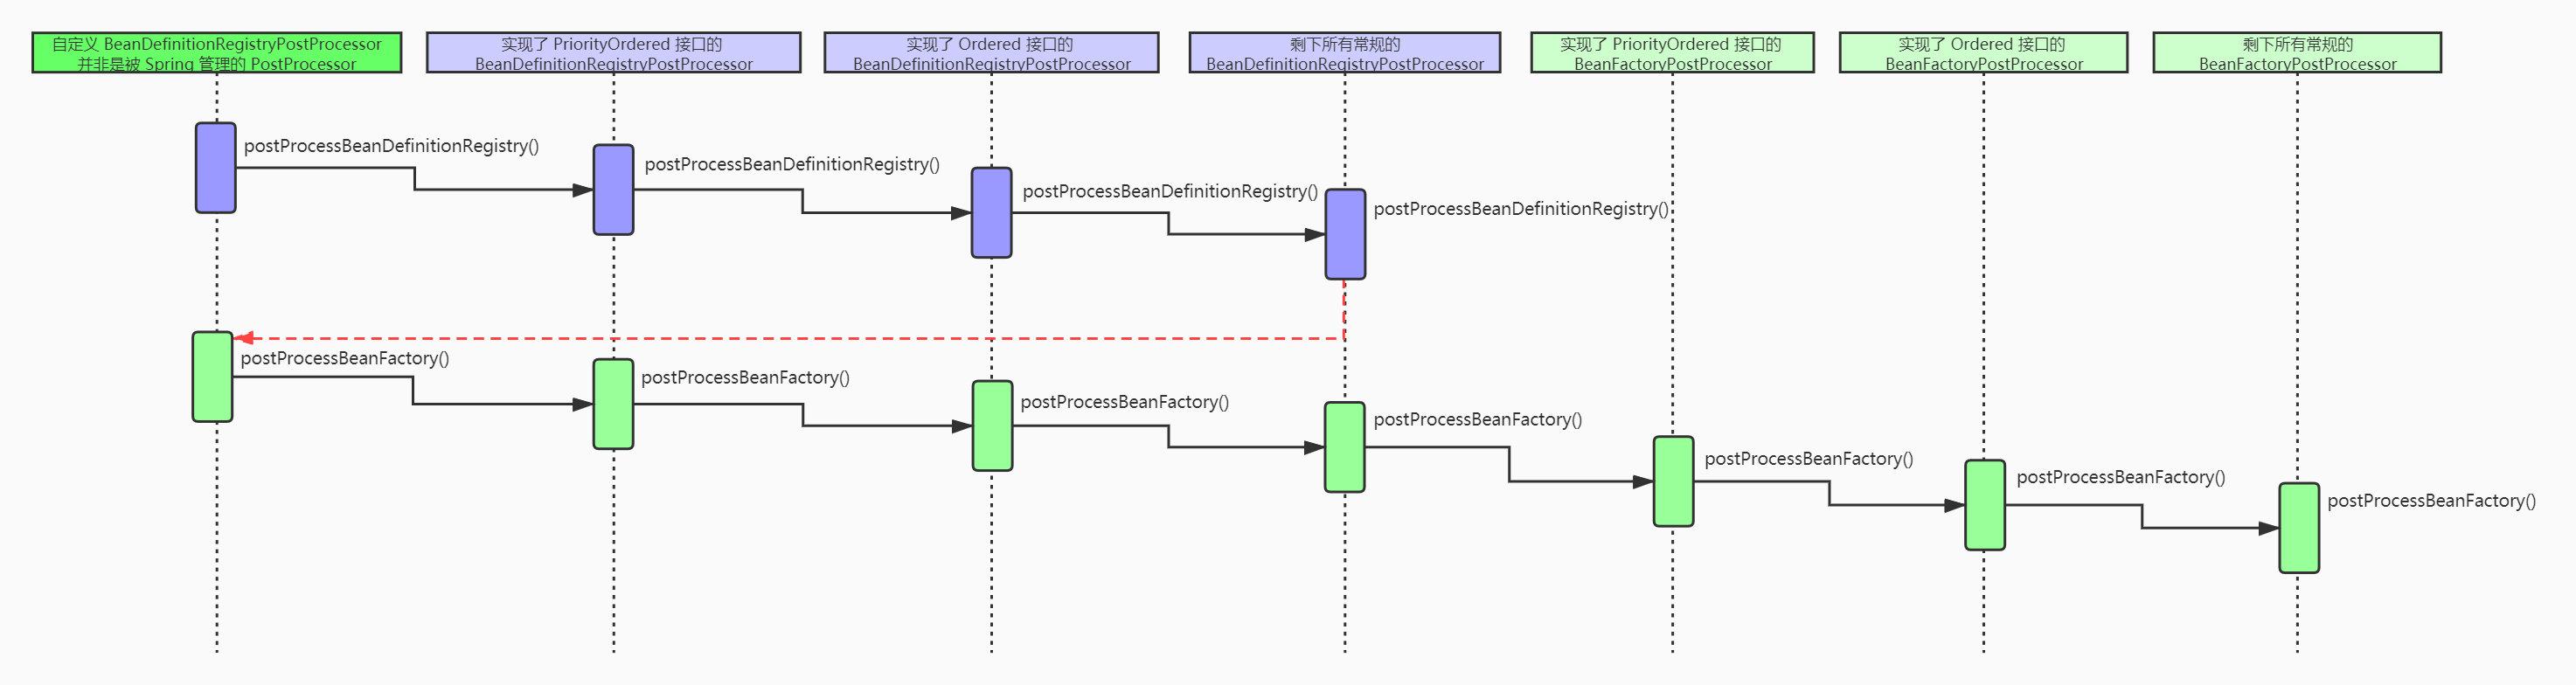
At this point, look at the above picture again, is it found that drinking water is generally simple, first call back the postProcessBeanDefinitionRegistry() method, then call back the postProcessBeanFactory() method, and finally pay attention to the order. Let’s take a look at the specific code implementation.
public static void invokeBeanFactoryPostProcessors(
		ConfigurableListableBeanFactory beanFactory, List<BeanFactoryPostProcessor> beanFactoryPostProcessors) {
	// beanFactoryPostProcessors 这个参数是指用户通过 AnnotationConfigApplicationContext.addBeanFactoryPostProcessor() 方法手动传入的 BeanFactoryPostProcessor,没有交给 spring 管理
	// Invoke BeanDefinitionRegistryPostProcessors first, if any.
	// 代表执行过的 BeanDefinitionRegistryPostProcessor
	Set<String> processedBeans = new HashSet<>();

	if (beanFactory instanceof BeanDefinitionRegistry) {
		BeanDefinitionRegistry registry = (BeanDefinitionRegistry) beanFactory;
		// 常规后置处理器集合,即实现了 BeanFactoryPostProcessor 接口
		List<BeanFactoryPostProcessor> regularPostProcessors = new ArrayList<>();
		// 注册后置处理器集合,即实现了 BeanDefinitionRegistryPostProcessor 接口
		List<BeanDefinitionRegistryPostProcessor> registryProcessors = new ArrayList<>();
		// 处理自定义的 beanFactoryPostProcessors(指调用 context.addBeanFactoryPostProcessor() 方法),一般这里都没有
		for (BeanFactoryPostProcessor postProcessor : beanFactoryPostProcessors) {
			if (postProcessor instanceof BeanDefinitionRegistryPostProcessor) {
				BeanDefinitionRegistryPostProcessor registryProcessor =
						(BeanDefinitionRegistryPostProcessor) postProcessor;
				// 调用 postProcessBeanDefinitionRegistry 方法
				registryProcessor.postProcessBeanDefinitionRegistry(registry);
				registryProcessors.add(registryProcessor);
			}
			else {
				regularPostProcessors.add(postProcessor);
			}
		}

		// Do not initialize FactoryBeans here: We need to leave all regular beans
		// uninitialized to let the bean factory post-processors apply to them!
		// Separate between BeanDefinitionRegistryPostProcessors that implement
		// PriorityOrdered, Ordered, and the rest.
		// 定义一个变量 currentRegistryProcessors,表示当前要处理的 BeanFactoryPostProcessors
		List<BeanDefinitionRegistryPostProcessor> currentRegistryProcessors = new ArrayList<>();

		// First, invoke the BeanDefinitionRegistryPostProcessors that implement PriorityOrdered.
		// 首先,从容器中查找实现了 PriorityOrdered 接口的 BeanDefinitionRegistryPostProcessor 类型,这里只会查找出一个【ConfigurationClassPostProcessor】
		String[] postProcessorNames =
				beanFactory.getBeanNamesForType(BeanDefinitionRegistryPostProcessor.class, true, false);
		for (String ppName : postProcessorNames) {
			// 判断是否实现了 PriorityOrdered 接口
			if (beanFactory.isTypeMatch(ppName, PriorityOrdered.class)) {
				// 添加到 currentRegistryProcessors
				currentRegistryProcessors.add(beanFactory.getBean(ppName, BeanDefinitionRegistryPostProcessor.class));
				// 添加到 processedBeans,表示已经处理过这个类了
				processedBeans.add(ppName);
			}
		}
		// 设置排列顺序
		sortPostProcessors(currentRegistryProcessors, beanFactory);
		// 添加到 registry 中
		registryProcessors.addAll(currentRegistryProcessors);
		// 执行 [postProcessBeanDefinitionRegistry] 回调方法
		invokeBeanDefinitionRegistryPostProcessors(currentRegistryProcessors, registry);
		// 将 currentRegistryProcessors 变量清空,下面会继续用到
		currentRegistryProcessors.clear();

		// Next, invoke the BeanDefinitionRegistryPostProcessors that implement Ordered.
		// 接下来,从容器中查找实现了 Ordered 接口的 BeanDefinitionRegistryPostProcessors 类型,这里可能会查找出多个
		// 因为【ConfigurationClassPostProcessor】已经完成了 postProcessBeanDefinitionRegistry() 方法,已经向容器中完成扫描工作,所以容器会有很多个组件
		postProcessorNames = beanFactory.getBeanNamesForType(BeanDefinitionRegistryPostProcessor.class, true, false);
		for (String ppName : postProcessorNames) {
			// 判断 processedBeans 是否处理过这个类,且是否实现 Ordered 接口
			if (!processedBeans.contains(ppName) && beanFactory.isTypeMatch(ppName, Ordered.class)) {
				currentRegistryProcessors.add(beanFactory.getBean(ppName, BeanDefinitionRegistryPostProcessor.class));
				processedBeans.add(ppName);
			}
		}
		// 设置排列顺序
		sortPostProcessors(currentRegistryProcessors, beanFactory);
		// 添加到 registry 中
		registryProcessors.addAll(currentRegistryProcessors);
		// 执行 [postProcessBeanDefinitionRegistry] 回调方法
		invokeBeanDefinitionRegistryPostProcessors(currentRegistryProcessors, registry);
		// 将 currentRegistryProcessors 变量清空,下面会继续用到
		currentRegistryProcessors.clear();

		// Finally, invoke all other BeanDefinitionRegistryPostProcessors until no further ones appear.
		// 最后,从容器中查找剩余所有常规的 BeanDefinitionRegistryPostProcessors 类型
		boolean reiterate = true;
		while (reiterate) {
			reiterate = false;
			// 根据类型从容器中查找
			postProcessorNames = beanFactory.getBeanNamesForType(BeanDefinitionRegistryPostProcessor.class, true, false);
			for (String ppName : postProcessorNames) {
				// 判断 processedBeans 是否处理过这个类
				if (!processedBeans.contains(ppName)) {
					// 添加到 currentRegistryProcessors
					currentRegistryProcessors.add(beanFactory.getBean(ppName, BeanDefinitionRegistryPostProcessor.class));
					// 添加到 processedBeans,表示已经处理过这个类了
					processedBeans.add(ppName);
					// 将标识设置为 true,继续循环查找,可能随时因为防止下面调用了 invokeBeanDefinitionRegistryPostProcessors() 方法引入新的后置处理器
					reiterate = true;
				}
			}
			// 设置排列顺序
			sortPostProcessors(currentRegistryProcessors, beanFactory);
			// 添加到 registry 中
			registryProcessors.addAll(currentRegistryProcessors);
			// 执行 [postProcessBeanDefinitionRegistry] 回调方法
			invokeBeanDefinitionRegistryPostProcessors(currentRegistryProcessors, registry);
			// 将 currentRegistryProcessors 变量清空,因为下一次循环可能会用到
			currentRegistryProcessors.clear();
		}

		// Now, invoke the postProcessBeanFactory callback of all processors handled so far.
		// 现在执行 registryProcessors 的 [postProcessBeanFactory] 回调方法
		invokeBeanFactoryPostProcessors(registryProcessors, beanFactory);
		// 执行 regularPostProcessors 的 [postProcessBeanFactory] 回调方法,也包含用户手动调用 addBeanFactoryPostProcessor() 方法添加的 BeanFactoryPostProcessor
		invokeBeanFactoryPostProcessors(regularPostProcessors, beanFactory);
	}

	else {
		// Invoke factory processors registered with the context instance.
		invokeBeanFactoryPostProcessors(beanFactoryPostProcessors, beanFactory);
	}

	// Do not initialize FactoryBeans here: We need to leave all regular beans
	// uninitialized to let the bean factory post-processors apply to them!
	// 从容器中查找实现了 BeanFactoryPostProcessor 接口的类
	String[] postProcessorNames =
			beanFactory.getBeanNamesForType(BeanFactoryPostProcessor.class, true, false);

	// Separate between BeanFactoryPostProcessors that implement PriorityOrdered,
	// Ordered, and the rest.
	// 表示实现了 PriorityOrdered 接口的 BeanFactoryPostProcessor
	List<BeanFactoryPostProcessor> priorityOrderedPostProcessors = new ArrayList<>();
	// 表示实现了 Ordered 接口的 BeanFactoryPostProcessor
	List<String> orderedPostProcessorNames = new ArrayList<>();
	// 表示剩下来的常规的 BeanFactoryPostProcessors
	List<String> nonOrderedPostProcessorNames = new ArrayList<>();
	for (String ppName : postProcessorNames) {
		// 判断是否已经处理过,因为 postProcessorNames 其实包含了上面步骤处理过的 BeanDefinitionRegistry 类型
		if (processedBeans.contains(ppName)) {
			// skip - already processed in first phase above
		}
		// 判断是否实现了 PriorityOrdered 接口
		else if (beanFactory.isTypeMatch(ppName, PriorityOrdered.class)) {
			priorityOrderedPostProcessors.add(beanFactory.getBean(ppName, BeanFactoryPostProcessor.class));
		}
		// 判断是否实现了 Ordered 接口
		else if (beanFactory.isTypeMatch(ppName, Ordered.class)) {
			orderedPostProcessorNames.add(ppName);
		}
		// 剩下所有常规的
		else {
			nonOrderedPostProcessorNames.add(ppName);
		}
	}

	// First, invoke the BeanFactoryPostProcessors that implement PriorityOrdered.
	// 先将 priorityOrderedPostProcessors 集合排序
	sortPostProcessors(priorityOrderedPostProcessors, beanFactory);
	// 执行 priorityOrderedPostProcessors 的 [postProcessBeanFactory] 回调方法
	invokeBeanFactoryPostProcessors(priorityOrderedPostProcessors, beanFactory);

	// Next, invoke the BeanFactoryPostProcessors that implement Ordered.
	// 接下来,把 orderedPostProcessorNames 转成 orderedPostProcessors 集合
	List<BeanFactoryPostProcessor> orderedPostProcessors = new ArrayList<>();
	for (String postProcessorName : orderedPostProcessorNames) {
		orderedPostProcessors.add(beanFactory.getBean(postProcessorName, BeanFactoryPostProcessor.class));
	}
	// 将 orderedPostProcessors 集合排序
	sortPostProcessors(orderedPostProcessors, beanFactory);
	// 执行 orderedPostProcessors 的 [postProcessBeanFactory] 回调方法
	invokeBeanFactoryPostProcessors(orderedPostProcessors, beanFactory);

	// Finally, invoke all other BeanFactoryPostProcessors.
	// 最后把 nonOrderedPostProcessorNames 转成 nonOrderedPostProcessors 集合,这里只有一个,myBeanFactoryPostProcessor
	List<BeanFactoryPostProcessor> nonOrderedPostProcessors = new ArrayList<>();
	for (String postProcessorName : nonOrderedPostProcessorNames) {
		nonOrderedPostProcessors.add(beanFactory.getBean(postProcessorName, BeanFactoryPostProcessor.class));
	}
	// 执行 nonOrderedPostProcessors 的 [postProcessBeanFactory] 回调方法
	invokeBeanFactoryPostProcessors(nonOrderedPostProcessors, beanFactory);

	// Clear cached merged bean definitions since the post-processors might have
	// modified the original metadata, e.g. replacing placeholders in values...
	// 清除缓存
	beanFactory.clearMetadataCache();
}
Summary of the execution process:
(1)先执行BeanDefinitionRegistryPostProcessor: postProcessor.postProcessBeanDefinitionRegistry(registry)
- ① Get all the collections that implement the BeanDefinitionRegistryPostProcessor interface type
- ② First execute the BeanDefinitionRegistryPostProcessor that implements the PriorityOrdered priority interface
- ③ Re-execute the BeanDefinitionRegistryPostProcessor that implements the Ordered order interface
- ④ Finally execute BeanDefinitionRegistryPostProcessors that do not implement any priority or sequential interface
(2) Re-execute the method of BeanFactoryPostProcessor: postProcessor.postProcessBeanFactory(beanFactory)
- ① Get all the collections that implement the BeanFactoryPostProcessor interface type
- ② First execute the BeanFactoryPostProcessor that implements the PriorityOrdered priority interface
- ③ Re-execute the BeanFactoryPostProcessor that implements the Ordered interface
- ④ Finally execute the BeanFactoryPostProcessor that does not implement any priority or sequential interface
4. Step 6: Register Bean's post processor: org.springframework.context.support.PostProcessorRegistrationDelegate#registerBeanPostProcessors:
This step is to inject the BeanPostProcessor post processor into the container. Note that this is only injecting into the container and not using it. Regarding the BeanPostProcessor, its main role is to intervene in the process of Spring initializing beans, thereby completing various functions such as proxying, automatic injection, and circular dependencies.
public static void registerBeanPostProcessors(
		ConfigurableListableBeanFactory beanFactory, AbstractApplicationContext applicationContext) {

	// 从容器中获取 BeanPostProcessor 类型
	String[] postProcessorNames = beanFactory.getBeanNamesForType(BeanPostProcessor.class, true, false);

	// Register BeanPostProcessorChecker that logs an info message when
	// a bean is created during BeanPostProcessor instantiation, i.e. when
	// a bean is not eligible for getting processed by all BeanPostProcessors.
	int beanProcessorTargetCount = beanFactory.getBeanPostProcessorCount() + 1 + postProcessorNames.length;
	// 向容器中添加【BeanPostProcessorChecker】,主要是用来检查是不是有 bean 已经初始化完成了,
	// 如果没有执行所有的 beanPostProcessor(用数量来判断),如果有就会打印一行 info 日志
	beanFactory.addBeanPostProcessor(new BeanPostProcessorChecker(beanFactory, beanProcessorTargetCount));

	// Separate between BeanPostProcessors that implement PriorityOrdered,
	// Ordered, and the rest.
	// 存放实现了 PriorityOrdered 接口的 BeanPostProcessor
	List<BeanPostProcessor> priorityOrderedPostProcessors = new ArrayList<>();
	// 存放 MergedBeanDefinitionPostProcessor 类型的 BeanPostProcessor
	List<BeanPostProcessor> internalPostProcessors = new ArrayList<>();
	// 存放实现了 Ordered 接口的 BeanPostProcessor 的 name
	List<String> orderedPostProcessorNames = new ArrayList<>();
	// 存放剩下来普通的 BeanPostProcessor 的 name
	List<String> nonOrderedPostProcessorNames = new ArrayList<>();
	// 从 beanFactory 中查找 postProcessorNames 里的 bean,然后放到对应的集合中
	for (String ppName : postProcessorNames) {
		// 判断有无实现 PriorityOrdered 接口
		if (beanFactory.isTypeMatch(ppName, PriorityOrdered.class)) {
			BeanPostProcessor pp = beanFactory.getBean(ppName, BeanPostProcessor.class);
			priorityOrderedPostProcessors.add(pp);
			// 如果实现了 PriorityOrdered 接口,且属于 MergedBeanDefinitionPostProcessor
			if (pp instanceof MergedBeanDefinitionPostProcessor) {
				// 把 MergedBeanDefinitionPostProcessor 类型的添加到 internalPostProcessors 集合中
				internalPostProcessors.add(pp);
			}
		}
		else if (beanFactory.isTypeMatch(ppName, Ordered.class)) {
			orderedPostProcessorNames.add(ppName);
		}
		else {
			nonOrderedPostProcessorNames.add(ppName);
		}
	}

	// First, register the BeanPostProcessors that implement PriorityOrdered.
	// 给 priorityOrderedPostProcessors 排序
	sortPostProcessors(priorityOrderedPostProcessors, beanFactory);
	// 先注册实现了 PriorityOrdered 接口的 beanPostProcessor
	registerBeanPostProcessors(beanFactory, priorityOrderedPostProcessors);

	// Next, register the BeanPostProcessors that implement Ordered.
	// 从 beanFactory 中查找 orderedPostProcessorNames 里的 bean,然后放到对应的集合中
	List<BeanPostProcessor> orderedPostProcessors = new ArrayList<>();
	for (String ppName : orderedPostProcessorNames) {
		BeanPostProcessor pp = beanFactory.getBean(ppName, BeanPostProcessor.class);
		orderedPostProcessors.add(pp);
		if (pp instanceof MergedBeanDefinitionPostProcessor) {
			internalPostProcessors.add(pp);
		}
	}
	// 给 orderedPostProcessors 排序
	sortPostProcessors(orderedPostProcessors, beanFactory);
	// 再注册实现了 Ordered 接口的 beanPostProcessor
	registerBeanPostProcessors(beanFactory, orderedPostProcessors);

	// Now, register all regular BeanPostProcessors.
	List<BeanPostProcessor> nonOrderedPostProcessors = new ArrayList<>();
	for (String ppName : nonOrderedPostProcessorNames) {
		BeanPostProcessor pp = beanFactory.getBean(ppName, BeanPostProcessor.class);
		nonOrderedPostProcessors.add(pp);
		if (pp instanceof MergedBeanDefinitionPostProcessor) {
			internalPostProcessors.add(pp);
		}
	}
	// 再注册常规的 beanPostProcessor
	registerBeanPostProcessors(beanFactory, nonOrderedPostProcessors);

	// Finally, re-register all internal BeanPostProcessors.
	// 排序 MergedBeanDefinitionPostProcessor 这种类型的 beanPostProcessor
	sortPostProcessors(internalPostProcessors, beanFactory);
	// 最后注册 MergedBeanDefinitionPostProcessor 类型的 beanPostProcessor
	registerBeanPostProcessors(beanFactory, internalPostProcessors);

	// Re-register post-processor for detecting inner beans as ApplicationListeners,
	// moving it to the end of the processor chain (for picking up proxies etc).
	// 给容器中添加【ApplicationListenerDetector】 beanPostProcessor,判断是不是监听器,如果是就把 bean 放到容器中保存起来
	// 此时容器中默认会有 6 个内置的 beanPostProcessor
		// 0 = {ApplicationContextAwareProcessor@1632}
		//	1 = {ConfigurationClassPostProcessor$ImportAwareBeanPostProcessor@1633}
		//	2 = {PostProcessorRegistrationDelegate$BeanPostProcessorChecker@1634}
		//	3 = {CommonAnnotationBeanPostProcessor@1635}
		//	4 = {AutowiredAnnotationBeanPostProcessor@1636}
		//	5 = {ApplicationListenerDetector@1637}
	beanFactory.addBeanPostProcessor(new ApplicationListenerDetector(applicationContext));
}
Summary of the execution process:
- (1) Get all the collections that implement the BeanPostProcessor interface type:
- (2) First register the BeanPostProcessor that implements the PriorityOrdered priority interface;
- (3) Re-register the BeanPostProcessor that implements the Ordered priority interface;
- (4) Finally register the BeanPostProcessor that does not implement any priority interface;
- (5) Finally register a BeanPostProcessor of type MergedBeanDefinitionPostProcessor;
- (6) Register an ApplicationListenerDetector for the container: it is used to check whether it is an ApplicationListener after the Bean is created. If it is, put the Bean in the container and save it: applicationContext.addApplicationListener((ApplicationListener<?>) bean);
5. Step 8: Initialize the event dispatcher: org.springframework.context.support.AbstractApplicationContext#initApplicationEventMulticaster:
As we mentioned earlier, during the entire container creation process, Spring will publish many container events, such as container startup, refresh, shutdown, etc. The realization of this function benefits from the ApplicationEventMulticaster broadcaster component here, through which event notifications are dispatched.
protected void initApplicationEventMulticaster() {
	// 获取 beanFactory
	ConfigurableListableBeanFactory beanFactory = getBeanFactory();
	// 看看容器中是否有自定义的 applicationEventMulticaster
	if (beanFactory.containsLocalBean(APPLICATION_EVENT_MULTICASTER_BEAN_NAME)) {
		// 有就从容器中获取赋值
		this.applicationEventMulticaster =
				beanFactory.getBean(APPLICATION_EVENT_MULTICASTER_BEAN_NAME, ApplicationEventMulticaster.class);
		if (logger.isTraceEnabled()) {
			logger.trace("Using ApplicationEventMulticaster [" + this.applicationEventMulticaster + "]");
		}
	}
	else {
		// 没有,就创建一个 SimpleApplicationEventMulticaster
		this.applicationEventMulticaster = new SimpleApplicationEventMulticaster(beanFactory);
		// 将创建的 ApplicationEventMulticaster 添加到 BeanFactory 中, 其他组件就可以自动注入了
		beanFactory.registerSingleton(APPLICATION_EVENT_MULTICASTER_BEAN_NAME, this.applicationEventMulticaster);
		if (logger.isTraceEnabled()) {
			logger.trace("No '" + APPLICATION_EVENT_MULTICASTER_BEAN_NAME + "' bean, using " +
					"[" + this.applicationEventMulticaster.getClass().getSimpleName() + "]");
		}
	}
}
Summary of the execution process:
- (1) See if there is a custom ApplicationEventMulticaster in the BeanFactory container: if so, get it directly from the container; if not, create a SimpleApplicationEventMulticaster
- (2) Add the created ApplicationEventMulticaster to the BeanFactory, and other components can be injected directly and automatically in the future
6. Step 10: Register ApplicationListener: org.springframework.context.support.AbstractApplicationContext#registerListeners:
This step is mainly to register all ApplicationListeners in the container to the event dispatcher and dispatch the events generated in the previous step.
protected void registerListeners() {
	// Register statically specified listeners first.
	// 获取之前步骤中保存的 ApplicationListener
	for (ApplicationListener<?> listener : getApplicationListeners()) {
		// getApplicationEventMulticaster() 就是获取之前步骤初始化的 applicationEventMulticaster
		getApplicationEventMulticaster().addApplicationListener(listener);
	}

	// Do not initialize FactoryBeans here: We need to leave all regular beans
	// uninitialized to let post-processors apply to them!
	// 从容器中获取所有的 ApplicationListener
	String[] listenerBeanNames = getBeanNamesForType(ApplicationListener.class, true, false);
	for (String listenerBeanName : listenerBeanNames) {
		getApplicationEventMulticaster().addApplicationListenerBean(listenerBeanName);
	}

	// Publish early application events now that we finally have a multicaster...
	// 派发之前步骤产生的 application events
	Set<ApplicationEvent> earlyEventsToProcess = this.earlyApplicationEvents;
	this.earlyApplicationEvents = null;
	if (earlyEventsToProcess != null) {
		for (ApplicationEvent earlyEvent : earlyEventsToProcess) {
			getApplicationEventMulticaster().multicastEvent(earlyEvent);
		}
	}
}
Summary of the execution process:
- (1) Get all ApplicationListeners from the container
- (2) Add each listener to the event dispatcher: getApplicationEventMulticaster().addApplicationListenerBean(listenerBeanName);
- (3) Distribute the event applicationEvents generated in the previous step: getApplicationEventMulticaster().multicastEvent(earlyEvent);
7. Step 11: Initialize all singleton beans: org.springframework.beans.factory.support.DefaultListableBeanFactory#preInstantiateSingletons:
In the previous steps, most of Spring's components have been initialized. The remaining step is to initialize all the remaining single-instance beans. Spring mainly initializes all the beans in the container through the preInstantiateSingletons() method. Here we will not elaborate on the creation process of Bean.
public void preInstantiateSingletons() throws BeansException {
	if (logger.isTraceEnabled()) {
		logger.trace("Pre-instantiating singletons in " + this);
	}

	// Iterate over a copy to allow for init methods which in turn register new bean definitions.
	// While this may not be part of the regular factory bootstrap, it does otherwise work fine.
	// 获取容器中的所有 beanDefinitionName
	List<String> beanNames = new ArrayList<>(this.beanDefinitionNames);

	// Trigger initialization of all non-lazy singleton beans...
	// 循环进行初始化和创建对象
	for (String beanName : beanNames) {
		// 获取 RootBeanDefinition,它表示自己的 BeanDefinition 和可能存在父类的 BeanDefinition 合并后的对象
		RootBeanDefinition bd = getMergedLocalBeanDefinition(beanName);
		// 如果是非抽象的,且单实例,非懒加载
		if (!bd.isAbstract() && bd.isSingleton() && !bd.isLazyInit()) {
			// 如果是 factoryBean,利用下面这种方法创建对象
			if (isFactoryBean(beanName)) {
				// 如果是 factoryBean,则 加上 &,先创建工厂 bean
				Object bean = getBean(FACTORY_BEAN_PREFIX + beanName);
				if (bean instanceof FactoryBean) {
					final FactoryBean<?> factory = (FactoryBean<?>) bean;
					boolean isEagerInit;
					if (System.getSecurityManager() != null && factory instanceof SmartFactoryBean) {
						isEagerInit = AccessController.doPrivileged((PrivilegedAction<Boolean>)
										((SmartFactoryBean<?>) factory)::isEagerInit,
								getAccessControlContext());
					}
					else {
						isEagerInit = (factory instanceof SmartFactoryBean &&
								((SmartFactoryBean<?>) factory).isEagerInit());
					}
					if (isEagerInit) {
						getBean(beanName);
					}
				}
			}
			else {
				// 不是工厂 bean,用这种方法创建对象
				getBean(beanName);
			}
		}
	}

	// Trigger post-initialization callback for all applicable beans...
	for (String beanName : beanNames) {
		Object singletonInstance = getSingleton(beanName);
		// 检查所有的 bean 是否是 SmartInitializingSingleton 接口
		if (singletonInstance instanceof SmartInitializingSingleton) {
			final SmartInitializingSingleton smartSingleton = (SmartInitializingSingleton) singletonInstance;
			if (System.getSecurityManager() != null) {
				AccessController.doPrivileged((PrivilegedAction<Object>) () -> {
					smartSingleton.afterSingletonsInstantiated();
					return null;
				}, getAccessControlContext());
			}
			else {
				// 回调 afterSingletonsInstantiated() 方法,可以在回调中做一些事情
				smartSingleton.afterSingletonsInstantiated();
			}
		}
	}
}
Summary of the execution process:
- (1) Get all beanDefinitionName in the container, initialize and create objects in turn
- (2) Get the definition information RootBeanDefinition of the Bean, which represents the combined object of its own BeanDefinition and the BeanDefinition that may exist in the parent class
- (3) If the Bean meets these three conditions: non-abstract, single-instance, and non-lazy loading, then execute the singleton Bean creation process:
- (4) After all Beans are created using getBean(), check whether all Beans are of SmartInitializingSingleton interface, if so; execute afterSingletonsInstantiated();
8. The twelfth step: publish the BeanFactory container refresh completion event: org.springframework.context.support.AbstractApplicationContext#finishRefresh:
After the entire container is initialized, some finishing work will be done here, such as cleaning up the cache, initializing the life cycle processor, publishing container refresh events, etc.
protected void finishRefresh() {
	// Clear context-level resource caches (such as ASM metadata from scanning).
	// 清理缓存
	clearResourceCaches();

	// Initialize lifecycle processor for this context.
	// 初始化和生命周期有关的后置处理器
	initLifecycleProcessor();

	// Propagate refresh to lifecycle processor first.
	// 拿到前面定义的生命周期处理器【LifecycleProcessor】回调 onRefresh() 方法
	getLifecycleProcessor().onRefresh();

	// Publish the final event.
	// 发布容器刷新完成事件
	publishEvent(new ContextRefreshedEvent(this));

	// Participate in LiveBeansView MBean, if active.
	LiveBeansView.registerApplicationContext(this);
}
Summary of the execution process:
- (1) initLifecycleProcessor(): Initialize the post processor related to the life cycle: by default, find whether there is a lifecycleProcessor component [LifecycleProcessor] from the container, if not, create a DefaultLifecycleProcessor() and add it to the container;
- (2) getLifecycleProcessor().onRefresh(): Get the onRefresh() method of the lifecycle processor (LifecycleProcessor) defined earlier
- (3) publishEvent(new ContextRefreshedEvent(this)): publish the container refresh completion event;
- (4)liveBeansView.registerApplicationContext(this);
The article is summarized from: https://juejin.cn/post/6906637797080170510#comment