System security and JR and NMAP applications
Basic account security measures
System account cleanup
- Set the shell of the non-login user to /sbin/nologin
- usemod -s /sbin.nologin username
- Lock accounts that have not been used for a long time
- usermod -L username (locked)
- usermod -U username (unlocked)
- passwd -l username (locked)
- passwd -u username (unlock)
- passwd -S user name (check user status, whether it is locked)
- Delete useless accounts
- userdel [-r] Username-
r: delete even the home directory
- userdel [-r] Username-
- Lock account files passw, shadow
- chattr +i /etc/passwd /etc/shadow
lock file - lsattr /etc/passwd /etc/shadow
view file status - chattr -i /etc/passwd /etc/shadow
unlock file
- chattr +i /etc/passwd /etc/shadow
Password security control
- Set password validity period
- Require users to change their password the next time they log in
- Steps
- vi /etc/login.defs
Use vi editor to modify the password configuration file, suitable for new users - PASS_MAX_DAYS 30
configuration files to be modified - chage -M 30 zhangsan is
suitable for existing users - After
the three fields in the chage -d 0 zhangsan shadow file are modified to 0, the user will be forced to change the password the next time they log in
- vi /etc/login.defs
Command history cleaning and automatic logout
- Command history limit
- Reduce the number of commands (1000 by default)
- vi /etc/profile
Use the vi editor to modify the system environment variable configuration file - export HISTSIZE=20
limits the number of command history to 20 - source /etc/profile to
make /etc/profile effective
- vi /etc/profile
- Automatically clear the command history when logging in
- vi ~/.bashrc
Use the vi editor to edit the ~/.bashrc file - echo ""> ~/.bash_history
overwrites the information in ~/.bash_history with a null value
- vi ~/.bashrc
- Reduce the number of commands (1000 by default)
- Terminal automatic logout
- Automatically log out after 300 seconds of inactivity
- vi /etc/profile
Use the vi editor to modify the system environment variable configuration file - export TMOUT=300
Modify the idle automatic logout command to 300, the default unit is second - source /etc/profile to
make /etc/profile effective
- vi /etc/profile
- Automatically log out after 300 seconds of inactivity
User switching and privilege escalation
Use su command to switch users
-
Purpose: Substitute User, switch user
-
Format: su-target user
with "-" not only switches the user, but also switches the target's shell environment -
Password validation
- root→any user, no password verification
- Ordinary user → other users, verify the password of the target user
- whoami: view current user
-
Restrict users who use the su command
- Add users allowed to use the su command to the wheel group
- Enable pam_wheel authentication module
- gpasswd -a qz wheel
adds user qz to the wheel group - vi /etc/pam.d/su
- auth required pam_wheel.so use_uid
delete the "#" in front of this line, that is, uncomment - After pam_wheel authentication is started, other users who have not joined the wheel group will not be able to use the su command
- gpasswd -a qz wheel
-
View su operation record
- Security log file: /var/log/secure
-
vim /etc/pam.d/su
auth sufficient pam_rootok.so (second line)
# auth required pam_wheel.so use_uid (sixth line)- 1. The above two lines are in the default state (that is, open the first line and comment the second line). In this state, all users are allowed to use the su command to switch.
- 2. If both lines are commented, all users can use the su command, but using su under root to switch to other ordinary users need to enter a password; if the first line is not commented, root uses su to switch Shantong users without entering the password
pam_rootok The main function of the .so module is to enable users whose uid is 0, that is, the root user can directly pass the authentication without entering a password - 3. If you open the second line, it means that only the root user and users in the wheel group can use the su command.
- 4. If you comment the first line and open the second line, it means that only users in the wheel group can use the su command, and the root user is also forbidden to use the su command.
-
The hidden dangers of su command
- By default, any user is allowed to use the su command, and has the opportunity to repeatedly try other users (such as root) to log in, which brings security risks
- In order to strengthen the use of null values for the su command, the PAM authentication module can be used to allow only a very small number of users to use the su command to switch
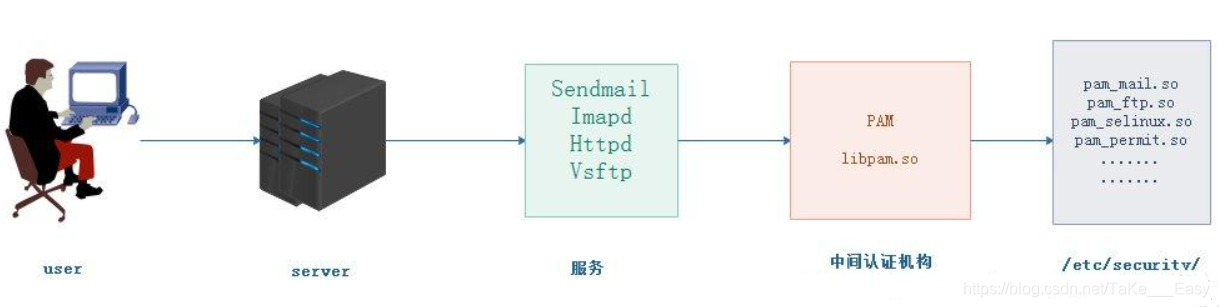
PAM Security Authentication in Linux
-
PAM (Pluggable Authentication Modules) pluggable authentication module
-
PAM is an efficient, flexible and convenient user-level authentication method
-
PAM is also a commonly used authentication method for current Linux servers
-
Linux-PAM is a Linux plug-in authentication module, a set of customizable and dynamically loadable shared libraries, so that the local system administrator can choose the authentication method of the program at will.
-
PAM uses the configuration file under /etc/pam.d/ to manage the authentication method of the program. The application calls the corresponding PAM configuration file to call the local authentication module. The module is placed under /lib64/security to perform authentication in the form of loading a dynamic library. For example, when using the su command, the system will prompt to enter the password of the root user, which is achieved by the su command by calling the PAM module.
-
Each line in the PAM configuration file is an independent authentication process, which is called by the PAM module in order from top to bottom
-
Principles of PAM authentication
- 1. PAM authentication generally follows the order: service (service) → PAM (configuration file) → pam_*.so
- 2. PAM authentication must first determine which application service, then load the corresponding PAM configuration file (located under /etc/pam. d), and finally call the authentication module (located under /lib64/security/) for security authentication.
- 3. When the user accesses the server, a certain service program of the server sends the user's request to the PAM module for authentication. The PAM modules corresponding to different applications are also different. If you want to check whether a program supports PAM authentication, you can use the ls command to check /etc/pam.d/
-
The composition of PAM certification
- To check whether a program supports PAM authentication, you can use the ls command
- ls /etc/pam.d | grep su
- View the PAM configuration file of su: cat /etc/pam.d/su
- Each line is an independent certification process
- Each row can be divided into three fields
- Type of certification
- Control type
- PAM module and its parameters
- To check whether a program supports PAM authentication, you can use the ls command
-
The first column represents the type of PAM authentication module
| name | Description |
|---|---|
| auth | Identify the user's identity, if prompted to enter a password, determine whether it is root |
| account | Check the various attributes of the account, such as whether it is allowed to log in to the system, whether the account has expired, whether it has reached the maximum number of users, etc. |
| password | Use user information to update data, such as changing user passwords |
| session | Define the session operation management before login and after logout, such as login connection information, opening and closing of user data, mounting file system |
- The second column represents the PAM control flag
| name | Description |
|---|---|
| required the necessary conditions |
Indicates that a success value needs to be returned. If the return fails, the failure result will not be returned immediately, but the next verification of the same type will continue. After all modules of this type are executed, the failure will be returned. |
| requisite | Similar to required, but if this module returns a failure, it will immediately return failure and indicate that this type of failure |
| sufficient condition |
If this module returns success, it will return success directly to the program, indicating that this type of success, if it fails, it will not affect the return value of this type |
| optional | Do not return the success or failure, generally not used for verification, just display the letter (usually used for session type) |
| include | Indicates that other PAM configuration files are called during the verification process. For example, many applications implement authentication by completely calling /etc/pam.d/ systen-auth (mainly responsible for the authentication of the user login system) without the need to rewrite the configuration items one by one. |
-
The third column represents the PAM module. The default is in the /lib64/security/ directory. If it is not in the default path, fill in the absolute path.
Note: The same module can appear in different module types, and the operations it performs in different types are different. This is because each module has different execution functions for different module types. -
The fourth column represents the parameters of the PAM module. This needs to be added
to the parameters passed to the module according to the module used . There can be multiple parameters, separated by spaces -
Supplementary description of control marks
| name | Description |
|---|---|
| required | It means that the success of the line and the modules involved is the [necessary condition] for the user to pass the authentication. It can also be understood that the program can pass the authentication only after all modules with the required mark corresponding to the application program are all successful. At the same time, if any module with the required mark has an error, PAM does not immediately return the error message to the application, but returns the error message to the program that called it after all modules of this type have been called. To put it bluntly, it is necessary Execute all modules of this type once, if any one of the modules fails to verify, the verification will continue, and the error message will be returned after the execution is complete. The purpose of this is to prevent users from knowing which module they are rejected, and to protect system services in a hidden way. Just like when setting up firewall rules, all deny rules are set to drop, so that users cannot accurately determine whether they are denied or the target network is unreachable when accessing the network is unsuccessful. |
| requisite | Similar to required, only after the module with this mark returns successfully, the user can pass the authentication. The difference is that once it fails, other modules will not be executed, and the authentication process is over, and an error message will be returned immediately. Compared with required, it seems to be more open and fair |
| sufficient | It means that the successful verification of the line and the module involved is the [sufficient condition] for the user to pass the authentication. That is to say, as long as the module marked as sufficient is verified successfully, PAM will immediately return a successful result to the application without having to try any other modules. It is the same even if the requisite or required control flags are used in the following modules. When the module marked as sufficient fails, the sufficient module will be treated as an optional. Therefore, the configuration item with sufficient flag will not cause the entire verification to fail when the verification is performed incorrectly, but the door is opened when the verification is successful. Therefore, the use of the control bit must be cautious |
| optional | 表示即便该行所涉及的模块验证失败,用户仍能通过认证。在PAM体系中,带有该标记的模块失败后将继续处理下一模块。也就是说即使本行指定的模块验证失败,也允许用户享受应用程序提供的服务。使用该标志,PAM框架会忽略这个模块产生的验证错误,继续顺序执行下一个层叠模块 |
- PAM安全认证流程
- 控制类型也称做Control Flags,用于PAM验证类型的返回结果
- 1.required验证失败时仍然继续,但返回Fail
- 2.requisite验证失败则立即结束整个验证过程,返回Fail
- 3.sufficient验证成功则立即返回,不再继续,否则忽略结果并继续
- 4.optional不用于验证,只显示信息
用于session类型

使用sudo机制提升权限
- 用途:以其他用户身份(如root)执行授权的命令
- 用法:sudo 授权命令
- 例如:sudo /sbin/ifconfig ens33:0 21.11.11.11/24
- sudo -l(查看当前用户获得哪些sudo授权)
- 初次使用sudo需要验证当前用户的密码,默认超时时长为5分钟,在此期间不再重复验证密码
- 配置sudo授权
- visudo或者vi /etc/sudoers
此文件默认权限为440,保存退出时必须执行":wq!"命令来强制操作 - 记录格式: 用户 主机名=命令程序列表
记录格式: 用户 主机名=(用户) 命令程序列表
多个命令时用逗号相间隔,且“=”两边无空格
- visudo或者vi /etc/sudoers
- 用户:直接授权指定的用户名,或采用"%组名”的形式(授权一个组的所有用户)
- 主机名:使用此规则的主机名。
没配置过主机名时可用localhost,有配过主机名则用实际的主机名,ALL则代表所有主机 - (用户):用户能够以何种身份来执行命令。
此项可省略,默认时以root用广的身份来运行命令 - 命令程序列表:允许授权的用户通过sudo方式执行的特权命令。
需填写命令程序的完整路径,多个命令之间以逗号","进行分隔。ALL则代表系统中的所有命令
| 命令 | 说明 |
|---|---|
| QZ ALL= /sbin/ifconfig | QZ用户可在所有主机上执行/sbin/ifconfig 命令 |
| Q localhost=/sbin/* , ! / sbin/reboot, ! / sbin/poweroff | Q用户可在本机中执行/sbin/目录的所有命令,除去/sbin/reboot和/sbin/poweroff 通配符"*“代表所有,取反符号”!"代表除去 |
| %wheel ALL=NOPASSWD: ALL | 表示wheel组成员无需验证密码即可使用sudo执行任何命令 |
| Z ALL= (root ) NOPASSWD: /bin/kill, /usr/bin/killall | 表示Z以ROOT用户可以不使用密码的情况下执行/bin/kill和/usr/bin/killall |
| User_Alias USERS=QZ, Q,Z Host_Alias HOSTS=localhost,bogon cmnd_Alias CMNDS=/sbin/ifconfig,/usr/sbin/useradd,/usr/sbin/userdel USERS HOSTS=CMNDS |
使用关键字User_Alias、Host_Alias、Cmnd_Alias来进行设置别名 别名必须为大写 |
- 启用sudo操作日志
- visudo
- Defaults logfile="/var/log/sudo"
- 需启用Defaults logfile配置,启用以后,sudo操作过程才会被记录
- 默认日志文件:/var/log/sudo
开关机安全控制
BIOS引导设置
- 调整BIOS引导设置
- 将第一引导设备设为当前系统所在硬盘
- 禁止从其他设备(光盘、U盘、网络)引导系统
- 将安全级别设为setup,并设置管理员密码
GRUB菜单设置密码
- GRUB限制
- 使用grub2-mkpasswd-pbkdf2生成密钥
pbkdf2是一种密码加密模式 - 修改/etc/grub.d/00_header文件,添加密码记录
- 生成新的grub.cfg配置文件
- 使用grub2-mkpasswd-pbkdf2生成密钥
- 因为通常情况下在系统开机进入GRUB菜单时,按“e”键可以查看并修改GRUB引导参数,这对服务器是一个极大的威胁。所以可以为GRUB菜单设置一个密码,只有提供正确的密码才会被允许修改引导参数
| 配置 | 说明 |
|---|---|
| grub2-mkpasswd-pbkdf2 | 根据提示设置GRUB 菜单的密码 |
| PBKDF2 hash of your password is grub.pbkdf2… | 省略部分内容为经过加密生成的密码字符串 |
| cp /boot/grub2/grub.cfg / boot/grub2l grub.cfg.bak cp /etc/grub.d/00_header /etc/grub.d/ 00_header.bak |
将此文件进行复制、备份,防止改错 |
| vim /etc/ grub.d/ 00_header | 使用vim编辑器修改"00_header"文件 |
| cat << EOF | EOF:提示符,这里表示开始。<<:重并项输入 |
| set superusers=“root” | 设置用户名为root |
| password_ pbkdf2 root grub.pbkdf2… | 设置密码,省略部分内容为经过加密生成的密码字符串 |
| EOF | EOF:提示符,这里表示结束。 |
| grub2-mkconfig -o /boot/grub2/grub.cfg | 生成新的 grub.cfg 文件 |
- 重启系统进入GRUB菜单时,按e键将需要输入账号密码才能修改引导参数
终端控制
终端登录安全控制
-
限制root用户只在安全终端登录
- 在linux系统中,login程序会读取/etc/securetty 文件,以决定允许root用户从哪些终端(安全终端)登录系统
- 安全终端配置:/etc/securetty
-
限制普通用户登录
- 建立/etc/nologin 文件
- 删除nologin文件或重启后即恢复正常
- touch /etc/nologin
禁止普通用户登录 - rm -rf /etc/nologin
取消上述登录限制
John the Ripper工具
-
JR是一款开源的密码破解工具,可使用密码字典(包含各种密码组合的列表文件)来进行暴力破解
-
通过对shadow文件的口令分析,可以检测密码强度
-
安装JR工具
- 安装方法 make clean 系统类型
- 主程序文件为 john
-
检测弱口令账号
- 获得Linux/Unix服务器的shadow文件
- 执行john程序,将shadow文件作为参数
-
密码文件的暴力破解
- 准备好密码字典文件,默认为password.lst
- 执行john程序,结合–wordlist=字典文件
| 步骤 | 说明 |
|---|---|
| cd /opt | 切换目录 |
| tar zxf john-1.8.0.tar-gz | 解压工具包 |
| yum install -y gcc gcc-c++make | 安装软件编译工具 |
| cd /opt/john-1.8.0/src | 切换到src子目录 |
| make clean linux-x86-64 | 进行编i译安装 |
| cp /etc/shadow /opt/shadow.txt | 准备待破解的密码文件 |
| cd /opt/john-1.8.0/run ./john /opt/shadow.txt |
执行暴力破解 |
| ./john --show /opt/shadow .txt | 查看已破解出的账户列表 |
| > john.pot(清空已破解出的账户列表,以便重新分析) ./john - -wordlist=./password.lst /opt/shadow.txt(使用指定的字典文件进行破解) |
使用密码字典文件 |
网络扫描-NMAP
-
nmap是一个强大的端口扫描类安全评测工具,支持ping扫描,多端口检测等多种技术
-
CentOS 7.3光盘中安装包:nmap-6.40-7.el7.x86_64.rpm
-
nmap [扫描类型] [选项] <扫描目标…>
-
rpm -qa | grep nmap
查看nmap是否安装 -
yum install -y nmap
使用yum进行nmap安装 -
nmap命令常用的选项和扫描类型
| 选项 | 说明 |
|---|---|
| -P | 指定扫描端口 |
| -n | 禁用反向 DNS 解析(以加快扫描速度) 反向DNS:把IP解析成域名 |
| -sS | TCP的SYN扫描(半开半扫描),只向目标发出SYN数据包,如果收到SYN/ACK响应包就认为目标端口正在监听,并立即断开连接,否则认为目标端口并未开放 |
| -sT | TCP连接扫描,这是完整的TCP扫描方式(namp默认扫描类型),用来建立一个TCP连接,如果成功则认为目标端口正在监听服务,否则认为目标端口并未开放 |
| -sF | TCP的FIN扫描,开放的端口会忽略这种数据包,关闭的端口会回应RST数据包。许多防火墙只对SYN数据包进行简单过滤,而忽略了其他形式的TCP攻击包。这种类型的扫描可间接检测防火墙的健壮性。 |
| -sU | UDP扫描,探测目标主机提供哪些UDP服务,UDP扫描的速度会比较慢。 |
| -sP | ICMP扫描,类似于 ping检测,快速判断目标主机是否存活,不做其他扫描。 |
| -P0 | Skip ping detection. This method considers that all target hosts are alive. When the other party does not respond to ICMP requests, this method can avoid abandoning scanning due to failure to ping. |
- netstat -natp (View the status information of the running network using the TCP protocol)
- netstat -naup (view the network status information of the running UDP protocol)
-a: display all active network connection information in the host (including monitoring and non-monitoring service ports)
n: display the relevant host address in numerical form , Port and other information
-t: view TCP-related information
-u: display UDP protocol-related information
-p: display the process number and process name information associated with the network connection (this option requires root privileges)
-l: show that it is listening Status of network connection and port information
-r: Display routing table information - For example: check the TCP port and UDP port developed by this machine respectively
nmap -sT 127.0.0.1
nmap -sU 127.0.0.1 - For example: to detect which hosts on the 192.168.4.0/24 network segment provide HTTP services
nmap -p 80 192.168.4.0/24 - For example: to detect which live hosts are on the 192.168.4.0/24 network segment
nmap -n -sP 192.168.4.0/24