table of Contents
- 1. About Nginx
- Two, compile and install Nginx service
- 3. Know the main configuration file nginx.conf of Nginx service
- Four, access status statistics configuration
- Five, authorization-based access control
- Six, client-based access control
- Seven, Nginx virtual host based on domain name
- 8. IP-based Nginx virtual host
- Nine, port-based Nginx virtual host
1. About Nginx
A high-performance, lightweight web service software,
high stability, low
system resource consumption, high
processing capacity for HTTP concurrent connections, a
single physical server can support 30,000 to 50,000 concurrent requests
Two, compile and install Nginx service
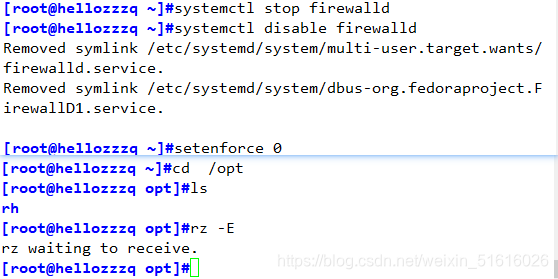
1. Turn off the firewall and put the software packages required by nginx to the /opt directory
systemctl stop firewalld
systemctl disable firewalld
setenforce 0

nginx-1.12.0.tar.gz

2. Install dependent packages
yum -y install pcre-devel zlib-devel gcc gcc-c++ make

3. Create running users and groups
(Nginx service program runs as nobody by default, it is recommended to create a special user account for it to control its access permissions more accurately)
useradd -M -s /sbin/nologin nginx

4. Compile and install Nginx
cd /opt
tar zxvf nginx-1.12.0.tar.gz -C /opt/

cd nginx-1.12.0/
./configure \
--prefix=/usr/local/nginx \				      #指定nginx的安装路径
--user=nginx \										#指定用户名
--group=nginx \										#指定组名
--with-http_stub_status_module						#启用 http_stub_status_module 模块以支持状态统计

make && make install

ln -s /usr/local/nginx/sbin/nginx /usr/local/sbin/		#让系统识别nginx的操作命令
./configure \
> --prefix=/usr/local/nginx \
> --user=nginx \
> --group=nginx \
> --with-http_stub_status_module


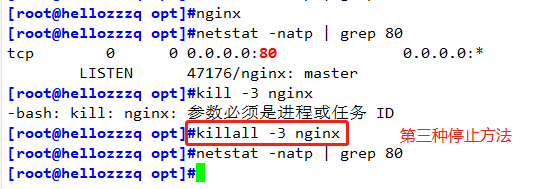
5. Check, start, restart, and stop the nginx service
nginx -t								#检查配置文件是否配置正确
nginx							#启动
cat /usr/local/nginx/logs/nginx.pid		#先查看nginx的PID号
kill -3 <PID号>
kill -s QUIT PID号>				#停止
killall -3 nginx
killall -s QUIT nginx

kill -1 <PID号>					#重载
kill -s HUP <PID号>
killall -1 nginx
killall -s HUP nginx
#日志分隔,重新打开日志文件
kill -USR1 <PID号>
#平滑升级
kill -USR2 <PID号>


6. Add Nginx system service
method one:
vim /etc/init.d/nginx
#!/bin/bash
#chkconfig: - 99 20
#description:Nginx Service Control Script
COM="/usr/local/nginx/sbin/nginx"
PID="/usr/local/nginx/logs/nginx.pid"
case "$1" in
start)
  $COM
;;

stop)
  kill -s QUIT $(cat $PID)
;;

restart)
  $0 stop
  $0 start
;;

reload)
  kill -s HUP $(cat $PID)
;;

*)
echo "Usage: $0 {start|stop|restart|reload}"
exit 1

esac
exit 0


#为脚本文件添加执行权限
chmod +x /etc/init.d/nginx
#添加为系统服务
chkconfig --add nginx
#重启服务
systemctl stop nginx
systemctl start nginx
#systemctl restart nginx
Method Two:
vim /lib/systemd/system/nginx.service
[Unit]
Description=nginx
After=network.target
[Service]
Type=forking
PIDFile=/usr/local/nginx/logs/nginx.pid
ExecStart=/usr/local/nginx/sbin/nginx
ExecrReload=/bin/kill -s HUP $MAINPID
ExecrStop=/bin/kill -s QUIT $MAINPID
PrivateTmp=true
[Install]
WantedBy=multi-user.target

chmod 754 /lib/systemd/system/nginx.service
systemctl start nginx.service
systemctl enable nginx.service


3. Know the main configuration file nginx.conf of Nginx service
1. Edit the main configuration file
vim /usr/local/nginx/conf/nginx.conf
Global configuration
#2-9行左右
#运行用户,若编译时未指定则默认为 nobody
#user nobody;
#工作进程数量,可配置成服务器内核数 * 2
worker_processes 1;
#错误日志文件的位置
#error_log logs/error.log;
#PID 文件的位置
#pid logs/nginx.pid;

I/O event configuration
#12-15行左右
events {
    #使用 epoll 模型,2.6及以上版本的系统内核,建议使用epoll模型以提高性能
    use epoll;
    #每个进程处理 1024 个连接
    worker_connections 1024;
}
#如提高每个进程的连接数还需执行“ulimit -n 65535”命令临时修改本地每个进程可以同时打开的最大文件数。
#在Linux平台上,在进行高并发TCP连接处理时,最高的并发数量都要受到系统对用户单一进程同时可打开文件数量的限制(这是因为系统为每个TCP连接都要创建一个socket句柄,每个socket句柄同时也是一个文件句柄)。
#可使用ulimit -a命令查看系统允许当前用户进程打开的文件数限制.

uname -r 查看内核版本


Even if the main configuration file is modified greater than 1024, it will be restricted. You need to enter ulimit -n <number> on the command line to modify the limit on the number of open files

HTTP configuration
http {
	##文件扩展名与文件类型映射表
    include       mime.types;

	##默认文件类型
    default_type  application/octet-stream;

	##日志格式设定
    #log_format  main  '$remote_addr - $remote_user [$time_local] "$request" '
    #                  '$status $body_bytes_sent "$http_referer" '
    #                  '"$http_user_agent" "$http_x_forwarded_for"';

	##访问日志位置
    #access_log  logs/access.log  main;

	##支持文件发送(下载)
    sendfile        on;
 	##此选项允许或禁止使用socke的TCP_CORK的选项(发送数据包前先缓存数据),此选项仅在使用sendfile的时候使用
    #tcp_nopush     on;

	##连接保持超时时间,单位是秒
    #keepalive_timeout  0;
    keepalive_timeout  65;

	##gzip模块设置,设置是否开启gzip压缩输出
    #gzip  on;

##Web 服务的监听配置
server {
	##监听地址及端口
	listen 80;
	##站点域名,可以有多个,用空格隔开
	server_name www.kgc.com;

	##网页的默认字符集
	charset utf-8;

	##根目录配置
	location / {

		##网站根目录的位置/usr/local/nginx/html
		root html;

		##默认首页文件名
		index index.html index.htm;
	}

	##内部错误的反馈页面
	error_page 500 502 503 504 /50x.html;
	##错误页面配置
	location = /50x.html {
		root html;
	}
}
}

2. Verify access to the web page
systemctl restart nginx.service
echo "192.168.109.3 www.kgc.com" >> /etc/hosts
#使用浏览器访问
http://www.kgc.com/
http://192.168.109.3/


3. Log format setting
$remote_addr与$http_x_forwarded_for用以记录客户端的ip地址;
$remote_user:用来记录客户端用户名称;
$time_local: 用来记录访问时间与时区;
$request: 用来记录请求的url与http协议;
$status: 用来记录请求状态;成功是200,
$body_bytes_sent :记录发送给客户端文件主体内容大小;
$http_referer:用来记录从那个页面链接访问过来的;
$http_user_agent:记录客户浏览器的相关信息;

通常web服务器放在反向代理的后面,这样就不能获取到客户的IP地址了,通过$remote_add拿到的IP地址是反向代理服务器的iP地址。反向代理服务器在转发请求的http头信息中,可以增加x_forwarded_for信息,用以记录原有客户端的IP地址和原来客户端的请求的服务器地址。

location常见配置指令,root、alias、proxy_pass
root(根路径配置)
请求www.kgc.com/test,会返回文件/usr/local/nginx/html/test/index.html
alias(别名配置)
请求www.kgc.com/test,会返回文件/usr/local/nginx/html/index.html

proxypass (反向代理配置)
#转发请求到http://127.0.0.1:8080/1.jpg
proxy_pass http://127.0.0.1:8080/;
#转发请求到http://127.0.0.1:8080/test/1.jpg
proxy_pass http://127.0.0.1:8080;
The difference between root and alias
root (root path configuration)


alias (alias configuration)


Four, access status statistics configuration
1. First check whether the HTTP_STUB_STATUS module is included in the Nginx service
/usr/local/nginx/sbin/nginx -V

2. Modify the nginx.conf configuration file, specify the access location and add the stub_status configuration
cd /usr/local/nginx/conf
cp nginx.conf nginx.conf.bak
vim /usr/local/nginx/conf/nginx.conf
......
http {
......
  server {
    listen 80;
    server_name www.kgc.com;
    charset utf-8;
    location / {
      root html;
      index index.html index.php;
    }
    #添加stub_status配置
    location /status {
      stub_status on;
      access_log off;
    }
  }
}


3. Restart the service and access the test
systemctl restart nginx

浏览器访问 http://192.168.109.3/status
Active connections :表示当前的活动连接数;
server accepts handled requests :表示已经处理的连接信息,三个数字依次表示已处理的连接数、成功的TCP握手次数、 已处理的请求数。


Five, authorization-based access control
1. Generate user password authentication file
yum install -y httpd-tools
htpasswd -c /usr/local/nginx/passwd.db lisi
chown nginx /usr/local/nginx/passwd.db
chmod 400 /usr/local/nginx/passwd.db


2. Modify the corresponding directory of the main configuration file and add authentication configuration items
vim /usr/local/nginx/conf/nginx.conf
......
	server {
		location / {
		 ......
	      #添加认证配置
          auth_basic "secret";
          auth_basic_user_file /usr/local/nginx/passwd.db;
		}
	}


3. Restart the service and access the test
nginx -t
systemctl restart nginx

浏览器访问 http://192.168.109.3或www.kgc.com


Six, client-based access control
The access control rules are as follows:
deny IP/IP segment: deny client access of a certain IP or IP segment.
allow IP/IP segment: Allow client access of a certain IP or IP segment.
The rule is executed from the top to the bottom, if it matches, it stops and no longer matches from the bottom.
vim /usr/local/nginx/conf/nginx.conf
......
  server {
    location / {
    ......
    #添加控制规则
    #拒绝访问的客户端 IP
    deny 192.168.109.12;
    #允许其它IP客户端访问
    allow all;
    }
  }

systemctl restart nginx
Seven, Nginx virtual host based on domain name
1. Provide domain name resolution for virtual hosts
echo "192.168.109.3 www.test1.com www.test2.com" >> /etc/hosts

2. Prepare web documents for virtual hosts
mkdir -p /var/www/html/test1
mkdir -p /var/www/html/test2
echo "<h1>www.test1.com</h1>" > /var/www/html/test1/index.html
echo "<h1>www.test2.com</h1>" > /var/www/html/test2/index.html

3. Modify the Nginx configuration file
vim /usr/local/nginx/conf/nginx.conf
......
http {
......
    server {
        listen 80;
        server_name  www.test1.com;
        charset utf-8;
        access_log logs/www.test1.access.log;

        location / {
            root   /var/www/html/test1;
            index  index.html index.php;
        }

        error_page   500 502 503 504  /50x.html;
        location = /50x.html {
            root   html;
        }
	}

     server {
         listen 80;
         server_name www.test2.com;
         charset utf-8;
         access_log logs/www.test2.access.log;

         location / {
              root /var/www/html/test2;
              index index.html index.php;
         }

         error_page 500 502 503 504 /50x.html;
               location = 50x.html{
               root html;
               }
         }
}

4. Restart the service and access the test
#检查语法
nginx -t
systemctl restart nginx

#浏览器访问
http://www.test1.com/
http://www.test2.com/


8. IP-based Nginx virtual host
1. Add network card and add domain name resolution
ifconfig ens33:0 192.168.109.5 netmask 255.255.255.0

echo "192.168.109.3 www.test1.com" >> /etc/hosts
echo "192.168.109.5 www.test2.com" >> /etc/hosts


2. Modify the Nginx configuration file
vim /usr/local/nginx/conf/nginx.conf
......
http {
......
  server {
    listen 192.168.109.3:80;
    server_name  www.test1.com;
    charset utf-8;
    access_log logs/www.test1.access.log;
    location / {
      root   /var/www/html/test1;
      index  index.html index.php;
    }

    error_page   500 502 503 504  /50x.html;
    location = /50x.html {
      root   html;
    }
  }
  server {
    listen 192.168.109.5:80;
    server_name www.test2.com;
    charset utf-8;
    access_log logs/www.test2.access.log;
    location / {
      root /var/www/html/test2;
      index index.html index.php;
    }
    error_page 500 502 503 504 /50x.html;
    location = 50x.html{
      root html;
    }
  }
}

3. Restart the service and access the test
systemctl restart nginx
#浏览器访问
http://192.168.109.3/
http://192.168.109.5/

Nine, port-based Nginx virtual host
vim /usr/local/nginx/conf/nginx.conf
......
http {
......
  server {
    listen 192.168.109.3:80;
    server_name  www.test1.com;
    charset utf-8;
    access_log logs/www.test1.access.log;
    location / {
      root   /var/www/html/test1;
      index  index.html index.php;
    }
    error_page   500 502 503 504  /50x.html;
    location = /50x.html {
      root   html;
    }
  }
  server {
    listen 192.168.109.3:8080;
    server_name www.test2.com;
    charset utf-8;
    access_log logs/www.test2.access.log;
    location / {
      root /var/www/html/test2;
      index index.html index.php;
    }
    error_page 500 502 503 504 /50x.html;
    location = 50x.html{
      root html;
    }
  }
}

systemctl restart nginx
浏览器访问
http://192.168.109.3
http://192.168.109.3:8080

