Next, talk about the realization of the main interface. Most of the main interface is implemented by referring to the source code of the UnityConnect app (github address https://github.com/UnityTech/ConnectAppCN ), you can download it yourself if you need it.
In a common app, the first interface after most applications are entered is actually the main interface. If the list of the main interface requires login permission, before loading the list of the main interface, determine whether there is already a cookie for user information, and if there is no cookie, jump back to the login interface.

The judgment of this piece can be executed directly in the initState method. The stateful component of flutter has its own life cycle like the class of unity. The basic ones are initState-initialization, build-drawing component, and dispose-component destruction. For other methods such as deactivate and didUpdateWidget, you can refer to the instructions in the official flutter documentation. The first time I entered the main interface, I used the initState method to obtain the PlayerPrefs operation. Because of the Unity’s PlayerPrefs feature, it can be saved as long as it is written once, and the last written data can be obtained after exiting the application and opening it again. The implementation code is as follows:
            if ("" == PlayerPrefs.GetString("account_session"))
            {
                Router.navigator.popAndPushNamed(MainNavigatorRoutes.UserLogin);
                return;
            }
This account_session is my user cache data, which will be written in every time I log in.
Of course, cookie data is time-sensitive. You only need to make a judgment when you initiate a data request. If the server returns that the acquisition timed out or has no permission, it will forcibly jump to the login interface.
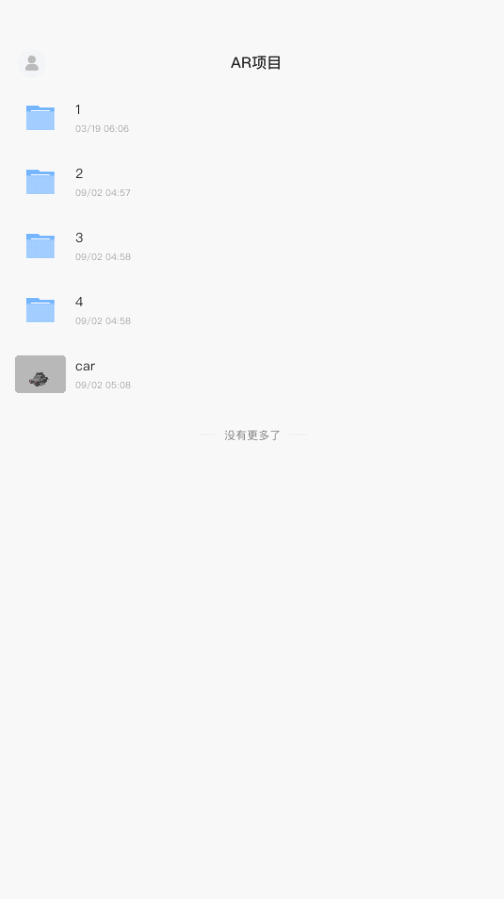
The main interface list I made is relatively simple, there is only one list, pull down to release the automatic refresh interface, the list has folders and files, the folder can be clicked in to view the sub-elements, swipe right or click the return button to return to the previous level, click on the file You can view the model details.
The list of the main interface can be implemented directly with ListView. The main implementation code is as follows:
                    return new Expanded(
                        flex: 1,
                        child: new Container(
                            color: Color.fromARGB(255, 248, 248, 248),
                        //width:Screen.width,
                        height: MediaQuery.of(context).size.height,
                                  child: new CustomListView(//CustomListView是自定义的一个ListView组件
                                      controller: _refreshController,//刷新监听控制器
                                      enablePullDown: true,
                                      enablePullUp: false,
                                      onRefresh: GetProjectDataByCondition,
                                      itemCount: projectDatas.Count,//当前列表的item数目
                                      hasBottomMargin: true,
                                      itemBuilder:
                                        ((Context, index) =>
                                        {
                                            //封装每个item的操作
                                            return GetSceneItems(context, index);
                                        }),
                                      // headerWidget: CustomListViewConstant.defaultHeaderWidget,
                                      footerWidget: new EndView(hasBottomMargin: true)
                                      )

                            ));
The default list interface can be regarded as a parent folder with subfolders and files under it. When you click on a subfolder, the grandchildren folders and files under the subfolder will be displayed. So the logic of opening a folder can actually be implemented with a class. Every time you click on the folder, you can directly push a sub-interface on the parent folder interface. In this way, you can directly call navigator.pop when you return to the previous page. () to destroy the current page. Return to the previous page can be triggered by clicking on the interface, or by swiping left, and returning to the previous page with left swiping is implemented by referring to UnityConnect, so I won’t go into details here.
When clicking on a folder to create a PageRoute to push a sub-interface, note that each sub-interface needs to use new MaterialApp() as the root node of the interface, otherwise if you use Scaffold or Container, the elements of the interface will display dislocation or trigger A series of strange display bugs. The implementation code of the jump interface is as follows
            if (model.is_dir == "1")//文件夹
            {
                StaticData.isInit = false;
                var callBack = Router.navigator.push(new CustomPageRoute(
                    builder:buildContext=>
                        new MaterialApp(//根节点一定是MaterialApp
                        home: new Scaffold(
                            backgroundColor: Color.fromARGB(255, 248, 248, 248),
                            body:new MainListPage(model)))//MainListPage是主界面类,这里直接用来创建子文件夹界面

                ));

                //callBack.Then((ob)=> { models = (ProjectListModels)ob; });
            }
The logic of the main interface is relatively simple, that's probably it :)