File directory creation
If you have your own views on creating file directories, you can skip this section and look directly at the routing section. This part of me is just to give some suggestions to students who have not enough work experience.
- The first two chapters have already built the basic vue scaffolding part, now let's start the project file directory creation part, how to clearly configure each file directory part. In the newly created project, we open the src folder, and you can see the following files:
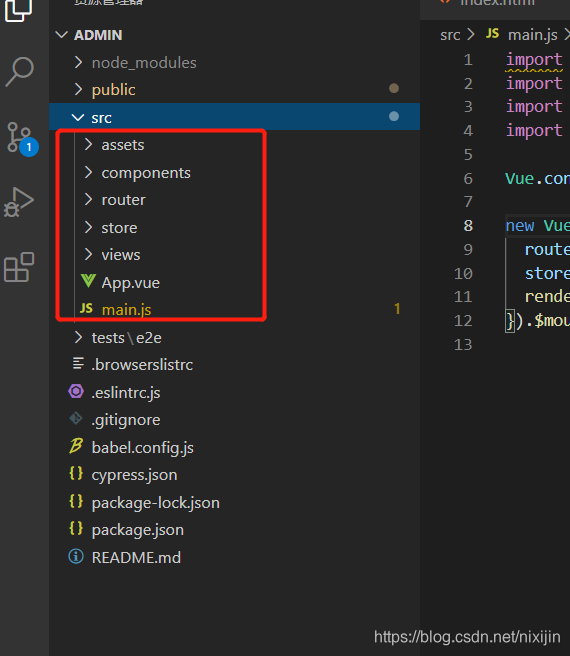
Of course, these files will definitely not meet the needs of our project, so prepare to continue creating it yourself.
(1) First, we create a static resource file static. The static resources stored in this folder will not be packaged and processed by webpack, so we usually put pictures, imported css or JS and other things, remember , This static folder will not be packaged .
(2) Then we enter the src and see the assets folder , which will be packaged by webpack , so if we need some css for the project, we can put it in it.
(3) The components folder is used to place the component part, and the components you encapsulate can be stored in this folder (PS: component naming needs to be standardized, such as English names such as bullet boxes, tables, multi-level linkage, etc., followed by After the component is partially encapsulated, there must be code examples, each parameter configuration, and the comments must be clear, otherwise, you may forget how to use your component after a while, and you can only revisit it. I also did this at the beginning... .Too lazy to write comments...)
(4) router folder: this folder is dedicated to storing routing, all page components can be found through this file. (I will focus on it later)
(5) Store folder: generally store shared data, that is, vuex. But because vuex is global, it's not necessary for small projects if they don't need it. Almost all cache and component communication can be completed.
(6) View folder: This folder is the folder where all page components are stored, and all pages you write are placed in this folder.
Well, the above is the scaffolding that has been created, and below, we have to create the required files ourselves.
(7) For example, our project must have a request , so if you create a new https folder, you can see at a glance that this folder is for the request.
(8) In addition, there may be many repeated methods in one of our projects. These methods cannot be written on every page. Therefore, we need a folder to store public methods , named publicMthods
(9) in one In the project, the most common ones should be some drop-down boxes, single selection, multiple selection and the like, but the options in the drop-down boxes may be returned to you by the backend, and a large part of them may be static, but These products are definitely not sure that they will not be changed. However, if we have that drop-down box on every page, but now the product lets us change the demand, will you now look dazed, or silently greet the product . . . This is not the product. We can create a configs folder to store some configuration items with uncertain factors. Then you can encapsulate a method that can get the key value in the publicMethods file, so that whether you edit or display it (because the backend usually returns the value to you, the value is a number, but you have to display the name), you will be very relaxed . [According to the method of obtaining name by value, write it today if you have time, and add it later if you are not free. I suggest you read while writing, do not copy directly, or you will become a copy engineer]
(10) Because I also said, I will add multiple languages to the project here, so I must create a new langs folder, this file The folder is specifically configured for multiple languages, and the language must not be confused with other files. Generally, the plug-ins of the international languages we use are i18n, and each country’s language corresponds to a separate JS file. As for how to write internally, that's something later, let's get the routing part first.
(11) Also, now we are only the static part of the front-end. If the back-end does not have an interface, we definitely need to simulate the data ourselves, so we can use mock.js (under Baidu, who has never heard of it, this plugin can simulate Data.), create a new folder separately. (Generally, the progress of the back-end in the company is about a week faster than the front-end, but some companies are not ruled out... The situation that the back-end has not started, the front-end has already started, so our simulation data will definitely not fall, and you only need to talk to the back-end Negotiate the required data structure)
There are almost so many file directories and functions. Of course, there may be missing places, but these file directories can already meet general project requirements. Now we can start our main show!
Routing articles (routing configuration part)
Before starting our routing, we need to know a few points!
1: Routing controls page components, and the path of each route corresponds to a page (that is, the HTTP address you see).
2: Routing can control permissions, for example, certain pages can only be viewed after logging in.
3: Routing can transfer parameters by page jump.
4: Routing provides a method before and after the jump.
Well, start designing the routing part.
Open the router folder, we see that there is only one index.js file, of course, we can actually write a complete route in this file, but there is a shortcoming. If you have too many pages, your pages will be very long , There are your routing components in the routing, routing methods, etc. will appear to be messy, so we can deal with it separately, using index.js as the routing main entry file, create a new view.js, this JS file only stores the routing configuration of the page component.
We delete the routing part of const = routes in the original router/index, and then add it in view.js, as shown in the following figure:
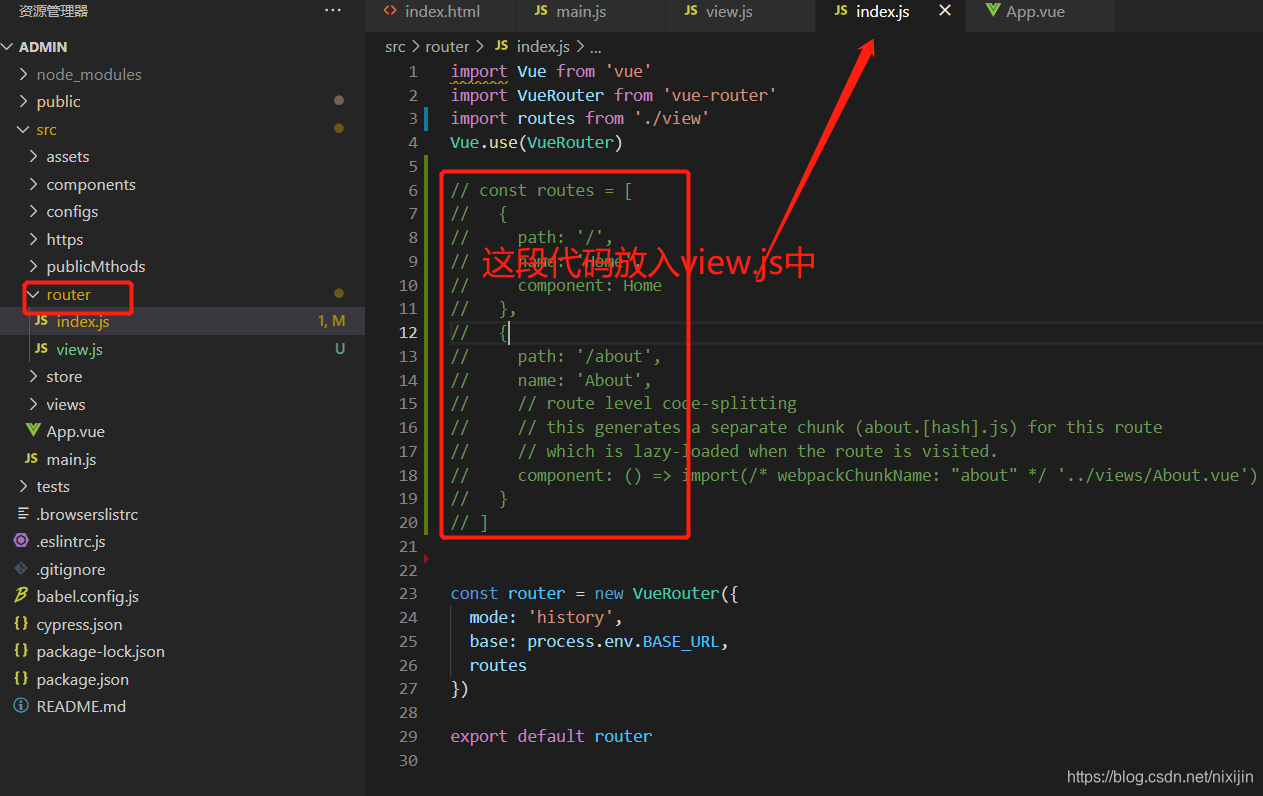
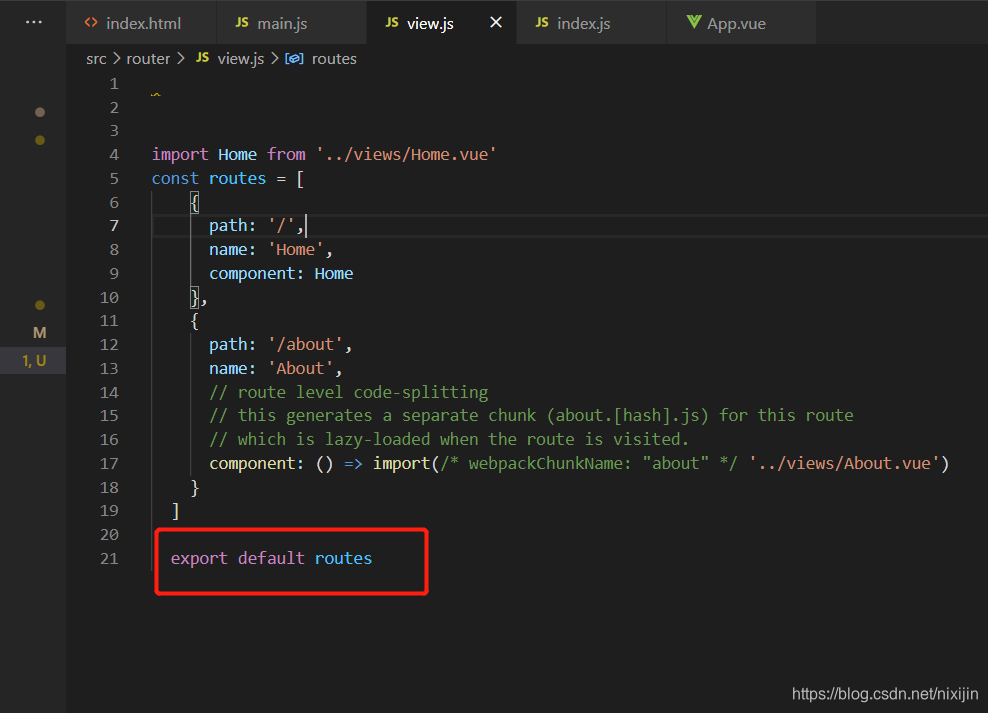
Note that in Figure 2, this const variable must be exported, and then imported into index.js. Use (import import, export export, you can refer to ES6 grammar for details, not much explanation.) Then the imported parameter can be placed in the vuerouter instance as an input parameter.
We can see that the variable whose instance is router is also exported in Figure 1. This variable is also an input parameter in our main.js, but it is just an input parameter of the vue instance. If you don’t remember, please look back at the main.js part. .
 Let's briefly describe the input parameters in the router.
1: mode: This is to select the routing mode. There are two parameters, history and hash. The difference between the two is that the path of the routing is normal, but the back-end is required to cooperate with the configuration, otherwise it will cause a 404 when the page is redirected. For hash, it just adds a # sign to the path,
2: Base: Just add a path after the page path request. For example, your request was originally http://localhost:8080, and if you configure a /aaa/ in base, the path will become http://localhost :8080/aaa/, you can try it yourself. Some backends may require you to add this configuration to the routing, so don't forget the function of this parameter.
3: routes: This parameter is your page route.
Take a look at the roughly used parameters, as shown in the figure below: 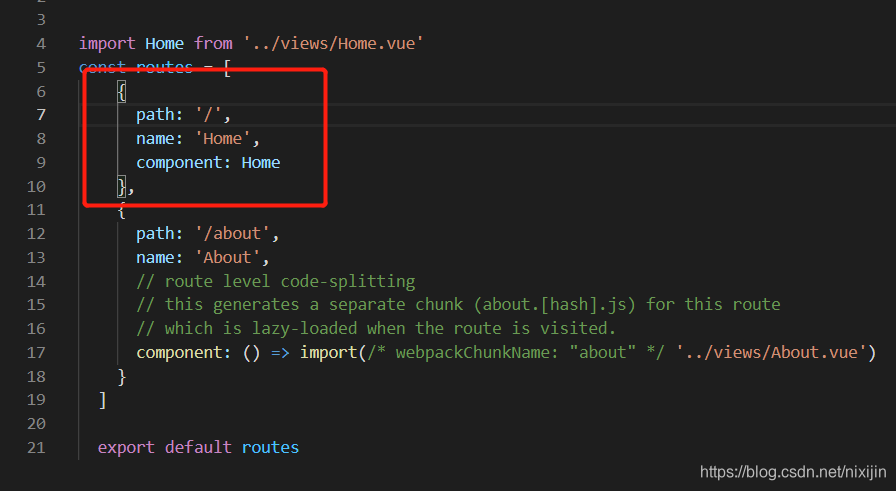 1: path: This is the page path address, but this path is combined with the request address + base configuration + path path to form a complete http path.
For example, your request address: http:localhost:8080 and
your base configuration is: /admin/
Your path is /login,
then the address you enter in the URL bar is: http:localhost:8080/admin/login
This path is You can access the page (that is, component) that you currently configure.
2: name: In fact, this is not very meaningful. If you need to get this name, you can configure it accordingly. (At present, I have not encountered the situation of obtaining this name, so I usually write the name of the page)
3: component: This is your page component. Look at the picture above and 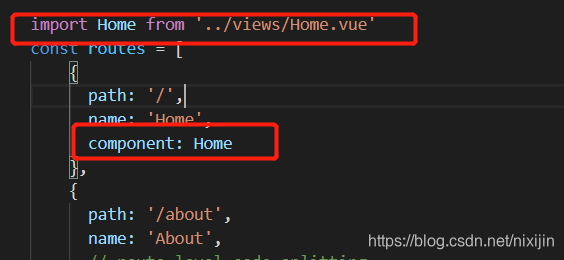 introduce a home component page ( This is where you normally draw the page), and then the value of component is this component page.
4: You can also add a meta object, in which you can add title or auth permissions, as follows:
const routes = [
	{


      path: '/',
      name: 'about',
      component: about,
      meta: {


      	auth: true, // 路由权限控制,true为有权限,false为不需要权限
      	title: '专门设置的页面标题'
      }
    }
]
That's it for simple routing.
Of course, if you write like this, it is estimated that your page will keep turning when it is opened. Why? Because this is a single page application, you can understand that there is only one page, composed of many small parts, but these parts are relatively large, so how to solve it? It can be said that routing is lazy loading, which is implemented by webpack and vue asynchronous components .
For example, when you need to introduce an about component, you can do the following:
If .../views/about is your relative path
const about= () => import('../views/about')
Then you can import it in your routes as follows:
const routes = [
    {


      path: '/views/about',
      name: 'about',
      component: about
    }
  ]
In this way, you can complete your routing!
Routing articles (route transfer parameters, jump)
1. Let's talk about the way of routing parameters. The parameters of our general pages only need to be spliced on the url, but how to transmit our single page?
Vue-router provided in several mass participation in the following manner:
(1) If we are at the time the page jump (click to jump or jump completed an operation like) can occur following transmission parameters:
first Step: We need to find the jump page in the route of view.js and add the parameters as follows:
 In the second step, we pass in the required parameters when jumping, as follows:
let id = 110
this.$router.push({


  path: `/about/${

      id}`, // 跳转进about页面之后url会变成 /about/110
})
Step 3: Now that we jumped to the about page and passed an ID, how do we get it? We can get the following directly on the about page:
let getId = this.$route.params.id
As for the page jump, you can jump in the same way as above, of course, you can also use tags:
<router-link to="/about">Home</router-link> |
It's very convenient to jump in this way, depending on your needs.
Alright, this completes the page jump and parameter transfer. Of course, parameter transfer is one or two of them. You can also go to the official website to see other jump methods and parameter transfer methods, but too many Repeatedly.
Okay, let’s do so for today. You can try it yourself. As for the routing interception part (including permissions), due to the large amount of content, we will not put it together for the time being, lest the content becomes too much to be digested. I will explain one more separately here.
(PS: My example here is the establishment of back-end management, because the back-end system is quite comprehensive, if you like, you can pay attention to the complete project construction, thank you for your support, if you find an error, you can contact the blogger. Originality is not easy ,Thank you!)