
table of Contents
1 Project introduction-what is lane departure warning?
2 Project implementation framework
3 Specific steps for project implementation
1 Project introduction-what is lane departure warning?
In Toulouse, France, a smart car race was once held. Participants needed to write a program to make a self-made car run laps. Usually we think of identifying the lane line and then using logic to control the car to stay online. This method is feasible at normal speeds, but when the vehicle accelerates, if it only turns at a big turn, it will deviate from the lane because the speed is too fast .
Can we make sure that the vehicle does not "derail" by turning in advance? The answer is yes, then how to control the timing of the car turning? ———— Machine Learning!
2 Project implementation framework
In this project, we need to go through three stages, namely video processing, data processing and model training. We will collect the pictures taken when the car is turning and executing, and train a linear regression model based on these picture data, and predict the turning time of the car in the complete car lap.

3 Specific steps for project implementation
3.1 Get video stream
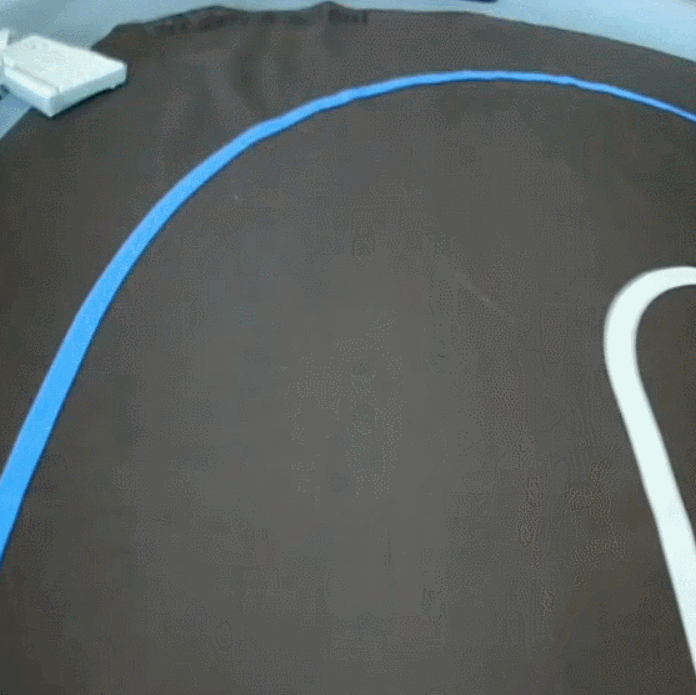
In order to simulate the scene of a sports car, this project has provided in advance two intercepted videos of the smart car running laps, which are the video clips of the car walking in a straight line at high speed and the video clips of the car turning in advance at high speed.
In the first stage, the preprocessing of these two videos will be completed, and the yellow lane line in the video will be taken as the focus.
We will use OpenCV as a video reading tool. OpenCV is a cross-platform computer vision library released under the BSD license (open source). It is lightweight and efficient. The attached operator can help us solve the problem of image preprocessing.
Use OpenCV's VideoCapture function to read the video stream
straightLaneVideo = cv.VideoCapture('data/StraightLane.mp4')
turnRightVideo = cv.VideoCapture('data/TurnRightLane.mp4')
Use the IPython plug-in ipywidgets to display video test pictures and video streams, and define the video stream display function imshow
maxWidth = 640
maxHeight = 480
windowsObj = {}

def imshow(name, img):
    if(not name in windowsObj):
        windowsObj[name] = widgets.Image(format='jpg', height=maxHeight, width=maxWidth)
        display(windowsObj[name])

windowsObj[name].value = cv.imencode('.jpg', img)[1].tobytes()
Define a variable named currentTime and initialize it to the current time
currentTime = time.time()while 1:
if(time.time() - currentTime > 0.033):
currentTime = time.time()
ret, frame = straightLaneVideo.read()
if(ret):
imshow('straightLaneFrame1', frame)
rgbImg = cv.cvtColor(frame, cv.COLOR_BGR2RGB)
imshow('straightLaneFrame2', rgbImg)
else:
print('视频已播放完毕')
Break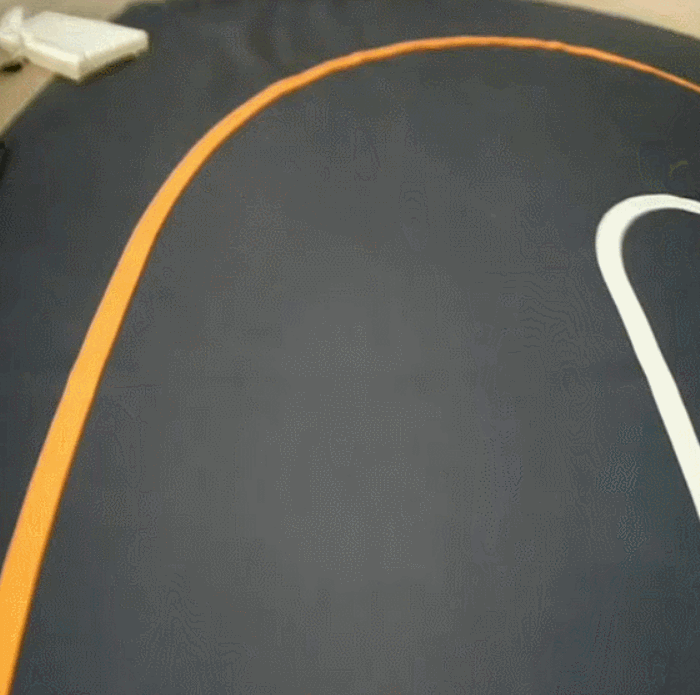
3.2 Color recognition
According to the characteristics of the lane line and the focus of this project, first perform a yellow recognition.
But yellow does not have a stable law in the RGB three channels, so it cannot be used for color screening directly.
So choose the HSV three-channel image for color screening. In the HSV three-channel image, H represents hue, that is, main hue, S represents saturation, that is color depth, and V represents contrast, that is brightness.
The HSV intervals of different colors are as follows:

Code design ideas:
① Use OpenCV's cvtColor function for image channel conversion. This function can convert RGB three-channel images to HSV three-channels almost losslessly through built-in formulas.
② Define the high ground threshold according to the yellow HSV space table.
③Call the colorDetector function to perform color filtering after each image frame is acquired, and use the imshow function to view the filtering results.
def colorDetector(image, lowerThreshold, upperThreshold):
    hsvImg = cv.cvtColor(image, cv.COLOR_RGB2HSV)
    maskImg = cv.inRange(hsvImg, lowerThreshold, upperThreshold)
    return maskImg

while 1:

    if(time.time() - currentTime > 0.033):
        # 保留前面的程序
        if(ret):
            # 保留前面的程序
            lowerThreshold = np.array([11, 80, 90])
            upperThreshold = np.array([35, 255, 255])
            maskImg = colorDetector(rgbImg, lowerThreshold, upperThreshold)
            imshow('straightLaneMask', maskImg)
        else:
            # 保留后面的程序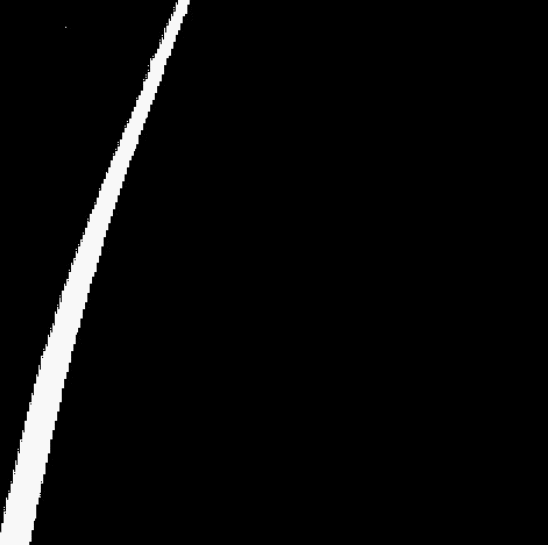
3.3 Image denoising
Noise can be ignored in the subsequent contour recognition of straight line fitting, but in order to improve the recognition speed, it needs to be removed in advance.
There are two most basic image morphological transformations in image processing: erosion and expansion . The principle of these two methods is to perform a convolution operation on the original image . As the name suggests, corrosion is to find a local minimum. When the image value of the convolution kernel area is too small, the value of the pixel in the output area is 0. Noise in the form of small white dots can be removed in this way.
The corrosion operation is for the entire image, so the pixels in the target area will also be corroded, which may result in the subsequent failure to recognize the contour, so an expansion operation is required after the image is corroded. Image expansion and erosion are the opposite, that is, to find the local maximum value, the maximum value is assigned to the specified pixel.
Usually we will use the operation of first corrosion and then expansion, this method is called opening operation .
To perform image morphological transformation, you need to pass in an additional parameter as the convolution kernel. Define the size of the convolution kernel before return maskImg. The image size used in this project is 640*480. Usually the size of the convolution kernel is 5*5 , and use 1 Fill it .
After solving the small white noise, a new problem appeared immediately. The color of the carpet outside the lane line in the video also approaches yellow, which is not filtered out during the screening, and cannot be removed by the open operation.
By observing the video, it can be found that no carpet appears in the lower half of the video. Therefore, if only the yellow recognition is performed on the lower half of the video, it can be ensured that the recognized mask only contains the lane area.
def colorDetector(image, lowerThreshold, upperThreshold):

    hsvImg = cv.cvtColor(image, cv.COLOR_RGB2HSV)
    maskImg = cv.inRange(hsvImg, lowerThreshold, upperThreshold)
    kernel = np.ones((5,5), np.uint8)
    maskImg = cv.morphologyEx(maskImg, cv.MORPH_OPEN, kernel

    roiPoints = np.array([[0, maxHeight],
                          [maxWidth, maxHeight],
                          [maxWidth, maxHeight / 2],
                          [0, maxHeight / 2]], np.int32)

    roiMask = np.zeros((maxHeight, maxWidth), np.uint8)
    cv.fillPoly(roiMask, [roiPoints], (255))
    maskImg = cv.bitwise_and(maskImg, roiMask)
    maskImg = cv.medianBlur(maskImg,5)

    return maskImg
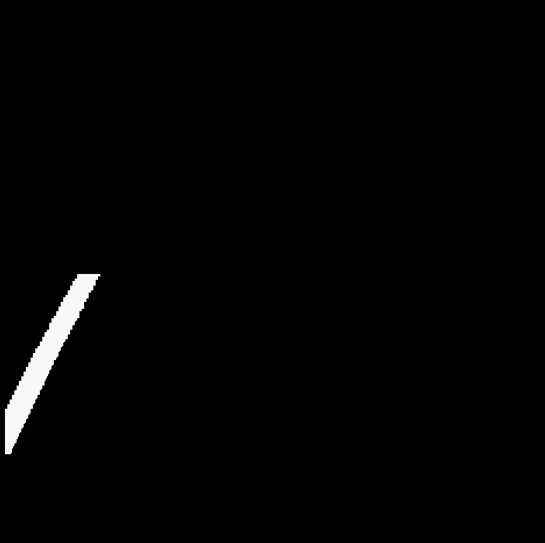
3.4 Fitting a straight line
The returned image of color filtering cannot be directly used as the input of the model. A point and slope can determine a straight line. We hope to use the slope of the yellow lane line and the abscissa of the intersection point with the left end of the screen as input values (ie W and b values) . Therefore, in the second stage, the preprocessing of the data set will be completed.
Code design ideas:
① Use OpenCV's Canny function to detect the contour of the lane line. This function will detect the points with large changes in gray value in the image and connect these points to form the contour.
②We take the geometric center of the lane contour map as the center point of the lane line.
③Use OpenCV's moments function to calculate the characteristic moments of the polygon, and obtain the coordinates of the center point and the final fitted line W and b values.
def fitLine(maskImg):
    lineEdgesImg = cv.Canny(maskImg, 20, 60)
    lineContours, _ = cv.findContours(lineEdgesImg, cv.RETR_TREE, cv.CHAIN_APPROX_SIMPLE)
    W = 0
    b = -999

    if(len(lineContours) > 0):
        mID = 0
        mA = 0
        for i in range(len(lineContours)):
            tmp = cv.contourArea(lineContours[i])
            if(tmp > mA):
                mA = tmp
                mID = i
        M = cv.moments(lineContours[mID])
        if(M['m00']!=0):
            cX = int(M['m10']/M['m00'])
            cY = int(M['m01']/M['m00'])

            rect = cv.minAreaRect(lineContours[mID])
            box = cv.boxPoints(rect)

            def calDist(p1, p2):
                return math.sqrt((p1[0]-p2[0])*(p1[0]-p2[0])+(p1[1]-p2[1])*(p1[1]-p2[1]))

            if(calDist(box[0],box[1]) > calDist(box[1], box[2]) and box[1][0] - box[0][0] != 0):
                W = (box[1][1] - box[0][1]) / (box[1][0] - box[0][0])
            elif(box[2][0] - box[1][0] != 0):
                W = (box[2][1] - box[1][1]) / (box[2][0] - box[1][0])
            b = cY - W * cX

    return W,b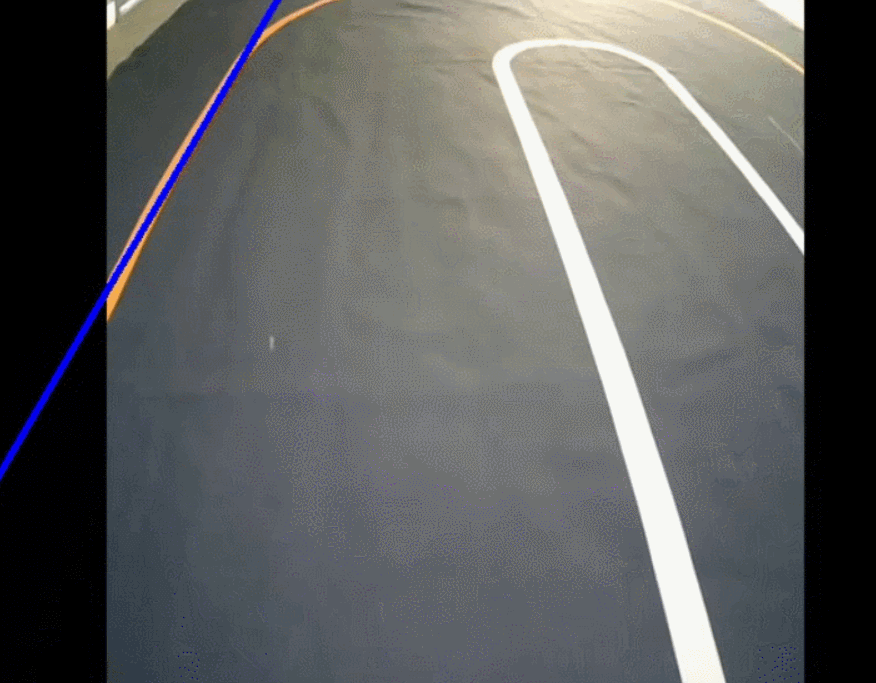
3.5 Data annotation
Collect the acquired lane line expressions and label them with data. Create a new code block before the while 1 code block to define the data set.
Each set of data contains the slope and weight value of the lane line, and each set of data corresponds to a label to indicate whether it is currently driving straight or turning.
while 1:
    if(time.time() - currentTime > 0.033):
        currentTime = time.time()
        ret, frame = turnRightVideo.read()

        if(ret):
            imshow('turnRightLaneFrame', frame)
            rgbImg = cv.cvtColor(frame, cv.COLOR_BGR2RGB)
            lowerThreshold = np.array([11, 80, 90])
            upperThreshold = np.array([35, 255, 255])
            maskImg = colorDetector(rgbImg, lowerThreshold, upperThreshold)
            imshow('turnRightLaneMask', maskImg)

 W,b = fitLine(maskImg)
            if(W != 0 and b != -999):
                y1 = 0
                x1 = int((y1 - b) / W)
                y2 = maxHeight
                x2 = int((y2 - b) / W)
                cv.line(frame, (x1,y1), (x2,y2), (255), 3)
                imshow('turnRightLane', frame)
                cnt2 += 1
                data = np.concatenate((data, np.array([[W, b]])), axis=0)
        else:
            print('视频已播放完毕')
            break

if(cnt2 > 0):
    label = np.full(cnt2, 1)
    labels = np.append(labels, label)
turnRightVideo.release()
3.6 Training model
The model consists of 2 fully connected layers : the
first layer has 16 neurons, which will change the input data into 16 weight values; the
last layer has 1 neuron, and the first 16 neurons will be calculated once. Calculate an accuracy rate (probability value, generally 0.5 as the threshold for classification) to determine whether to turn or go straight.

Code design ideas:
The data set is distributed according to the law of straights first and then curves, which will be misleading for training, so the data set and the corresponding labels are scrambled . First generate a random array of numbers from 1 to 2334, and then shuffle the data set and corresponding labels according to this random array.
Next, according to the practice of 80% training set and 20% test set , the data set is divided into training set and test set.
permutation = np.random.permutation(data.shape[0])
data = data[permutation, :]
labels = labels[permutation]
vfoldSize = int(data.shape[0]/100*20)

xTrain = data[vfoldSize:data.shape[0], :]
yTrain = labels[vfoldSize:labels.shape[0]]

xTest = data[0:vfoldSize, :]
yTest = labels[0:vfoldSize]

Define an empty model as the model frame.
model = keras.Sequential()Call the add function of TensorFlow Keras to add a layer to the model. The Dense function used in this function usually needs to pass in two values, which are the number of neurons unit and the activation function activation .
Usually when using Dense Layer, relu is used as the activation function before the last classification, and softmax or sigmoid is used as the activation function in the last classification . The activation function is the operation that needs to be performed before the value of the upper node is input to the input of the lower node. If the activation function is not specified, it will be directly passed down. For the two-class model, sigmoid is generally used .
model.add(keras.layers.Dense(16, input_shape =(2,), activation=tf.nn.relu))
model.add(keras.layers.Dense(1, activation=tf.nn.sigmoid))
After the model is built, in order to train the model, we need to define an optimizer . The optimizer is to update the weight value contained in each neuron in the model after each step of training to make the classification more accurate after the next data comes in.
adam = keras.optimizers.Adam()Use the compile function of Sequential Model to compile the model . This function needs to pass in 3 parameters, namely the loss function loss, optimizer optimizer and evaluation function metrics .
The loss function is a method of comparing the real label with the output result at each prediction. The smaller the value of the loss function output, the better the training effect of the model. In this project, we use binary_crossentropy as the loss function. The loss function can be used to obtain the loss value by calculating the cross entropy of the two classification in the two classification problem.
The evaluation function is a method for evaluating the running results of the model and the actual results. The evaluation method does not affect the training of the model and is only used when evaluating the model. In this project, we use accuracy as the evaluation function , that is, directly judge the recognition accuracy.
model.compile(loss='binary_crossentropy',
               optimizer=adam,
               metrics=['accuracy'])
Over-fitting is prone to occur during model training , that is, model training causes the loss of the model to increase instead of decreasing, but when over-fitting occurs is unknown before model training, so in order to better monitor the training process of the model, we Use Tensorboard as a model training monitor .
Use the TensorBoard function of TensorFlow Keras to define Tensorboard variables. The function needs to pass in 3 values, which are the storage path of intermediate results, whether to visualize the image write_graph, and whether to calculate the activation and weight histogram histogram_freq of the model layer.
tensorBoard = keras.callbacks.TensorBoard(log_dir='kerasLog',
                                          write_images=1,
                                          histogram_freq=1)
Use the fit function of Sequential Model to perform model training . This function needs to pass in 7 values, which are the feature data xTrain in the model training set, the label value yTrain in the training set, the size of each batch batch_size, the validation_data of the test set, the number of epochs for training epochs, callbacks and verbose output mode during training.


3.7 Use inference models
The model built in this project is a two-category model. The output shape of the model is (None, 1). The actual meaning of the value is a probability. If the probability value is less than 0.5, the conclusion is classification 0 (straight ahead). If the probability value is greater than If it is equal to 0.5, the conclusion is category 1 (emergency turn).
import tensorflow as tf
import tensorflow.keras as keras
import numpy as np
import math

import cv2 as cv
import time

import ipywidgets as widgets
from IPython.display import display
Read data the lane.mp4 files in the directory .
laneVideo = cv.VideoCapture('data/lane.mp4')
Copy general programs and processing functions to the inference model file.
currentTime = time.time()

maxWidth = 640
maxHeight = 480
windowsObj = {}
def imshow(name, img):
    if(not name in windowsObj):
        windowsObj[name] = widgets.Image(format='jpg', height=maxHeight, width=maxWidth)
        display(windowsObj[name])

    windowsObj[name].value = cv.imencode('.jpg', img)[1].tobytes()

def colorDetector(image, lowerThreshold, upperThreshold):
    hsvImg = cv.cvtColor(image, cv.COLOR_RGB2HSV)

    maskImg = cv.inRange(hsvImg, lowerThreshold, upperThreshold)

    kernel = np.ones((5,5), np.uint8)
    maskImg = cv.morphologyEx(maskImg, cv.MORPH_OPEN, kernel)

    roiPoints = np.array([[0, maxHeight],
                              [maxWidth, maxHeight],
                              [maxWidth, maxHeight / 2],
                              [0, maxHeight / 2]], np.int32)

    roiMask = np.zeros((maxHeight, maxWidth), np.uint8)
    cv.fillPoly(roiMask, [roiPoints], (255))

    maskImg = cv.bitwise_and(maskImg, roiMask)

    return maskImg

def fitLine(maskImg):
    lineEdgesImg = cv.Canny(maskImg, 20, 60)

    lineContours, _ = cv.findContours(lineEdgesImg, cv.RETR_TREE, cv.CHAIN_APPROX_SIMPLE)
    W = 0
    b = -999
    if(len(lineContours) > 0):
        mID = 0
        mA = 0
        for i in range(len(lineContours)):
            tmp = cv.contourArea(lineContours[i])
            if(tmp > mA):
                mA = tmp
                mID = i

        M = cv.moments(lineContours[mID])
        if(M['m00']!=0):
            cX = int(M['m10']/M['m00'])
            cY = int(M['m01']/M['m00'])

            rect = cv.minAreaRect(lineContours[mID])
            box = cv.boxPoints(rect)

            def calDist(p1, p2):
                return math.sqrt((p1[0]-p2[0])*(p1[0]-p2[0])+(p1[1]-p2[1])*(p1[1]-p2[1]))

            if(calDist(box[0],box[1]) > calDist(box[1], box[2]) and box[1][0] - box[0][0] != 0):
                W = (box[1][1] - box[0][1]) / (box[1][0] - box[0][0])
            elif(box[2][0] - box[1][0] != 0):
                W = (box[2][1] - box[1][1]) / (box[2][0] - box[1][0])

            b = cY - W * cX

    return W,b
TensorFlow Keras The load_model function used is imported into the model trained in the previous step. This function needs to pass in the model variable of the path return Sequential Modeltype of the path function of the local model model.
model = keras.models.load_model('model.h5')
Obtain the video stream and perform lane line recognition, and calculate the expression of the fitting straight line.
while 1:
    if(time.time() - currentTime > 0.033):
        currentTime = time.time()

        ret, frame = laneVideo.read()

        if(ret):
            imshow('laneFrame', frame)

            rgbImg = cv.cvtColor(frame, cv.COLOR_BGR2RGB)

            lowerThreshold = np.array([11, 80, 90])
            upperThreshold = np.array([35, 255, 255])

            maskImg = colorDetector(rgbImg, lowerThreshold, upperThreshold)
            imshow('laneMask', maskImg)

            W,b = fitLine(maskImg)

            if(W != 0 and b != -999):
According to the definition of the model, the data input shape is [batch, 2]used to Numpy define the data for prediction. Among them batch is the number of data groups in the data set at each forecast.
while 1:
    if(time.time() - currentTime > 0.033):
        # 保留前面的程序

        if(ret):
            # 保留前面的程序

            if(W != 0 and b != -999):
                data = np.array([W, b])
Prediction is usually only prediction every prediction set of data, can be used directly Numpy in expand_dims a function expansion shape. This function needs to pass 2 in parameters, which are the expanded Numpy array data and the expanded dimension axis. The Codelab first dimension needs to be expanded in this book , so the axis value is 0.
while 1:
    if(time.time() - currentTime > 0.033):
        # 保留前面的程序

        if(ret):
            # 保留前面的程序

            if(W != 0 and b != -999):
                # 保留前面的程序

                data = np.expand_dims(data, axis = 0)
Call Sequential Model the predict function performs reasoning, this function needs to meet the incoming data model input data, the input model must be trained shape the same.
while 1:
    if(time.time() - currentTime > 0.033):
        # 保留前面的程序

        if(ret):
            # 保留前面的程序

            if(W != 0 and b != -999):
                # 保留前面的程序

                result = model.predict(data)
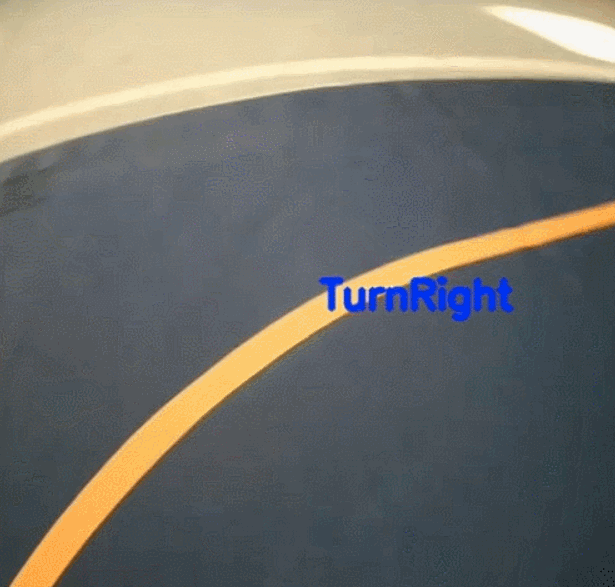
The model built in this project is a two-category model. The output shape of the model is (None, 1)that the actual meaning of the value is a probability. If the probability value is less than 0.5 the conclusion is classified 0(go straight ), if the probability value is greater than or equal to 0.5 the conclusion, the conclusion is classified 1( emergency turn ).
OpenCV The putText function used to draw the recognition result. The function needs to pass 8 in parameters, which are the image to be drawn frame, the text to textbe drawn, the coordinates pointdrawn on the drawing , the font fontto be drawn, the size sizeof the drawn character, the color colorof the drawn character, and the character of the drawn character. Line width thickness and line style of the word lineType.
while 1:
    if(time.time() - currentTime > 0.033):
        # 保留前面的程序

        if(ret):
            # 保留前面的程序

            pX = int(maxWidth/2 + 10)
            pY = int(maxHeight/2 + 10)
            if(W != 0 and b != -999):
                # 保留前面的程序

                pX = int(maxWidth/2 + 10)
                pY = int(maxHeight/2 + 10)
                if(result[0] < 0.5):
                    cv.putText(frame, 'Straight',(pX,pY), cv.FONT_HERSHEY_SIMPLEX, 1, (255,0,0), 4, cv.LINE_AA)
                else:
                    cv.putText(frame, 'TurnRight',(pX,pY), cv.FONT_HERSHEY_SIMPLEX, 1, (255,0,0), 4, cv.LINE_AA)

                imshow('resultImg', frame)
        else:
            print('视频已播放完毕')
            break
By executing the above procedure, the recognition result can be viewed in the output image, and the recognition result is indicated in blue font.
Welcome to leave a message, learn and communicate together~
Thanks for reading