I have been working on a web project these few days. I haven’t touched a servlet for almost a year. Today I deployed a 404 for more than two hours. Then I was crazy about Baidu and configured crazy. It was a bit like the first time I deployed Tomcat. , Hhh~~ The deployment was successful in the end, so I will write a blog to record my mistakes and summarize my experience by the way.
The first step is to create a new Java web project.

Then we need to create two new folders, one is classes and the other is lib . Lib is used to store jar packages, and classes are used to access servlets. Note that they must be placed in web/WEB-INF

After that, we can import the package . After the
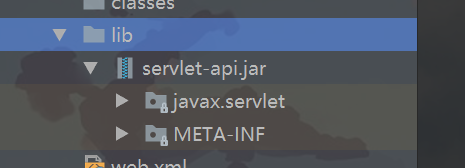
blue, we will create a new servlet and configuration xml file.
Configuration file:
<?xml version="1.0" encoding="UTF-8"?>
<web-app xmlns="http://xmlns.jcp.org/xml/ns/javaee"
         xmlns:xsi="http://www.w3.org/2001/XMLSchema-instance"
         xsi:schemaLocation="http://xmlns.jcp.org/xml/ns/javaee http://xmlns.jcp.org/xml/ns/javaee/web-app_4_0.xsd"
         version="4.0">

    <servlet>
        <servlet-name>HelloServlet</servlet-name>
        <servlet-class>control.HelloServlet</servlet-class>
    </servlet>

    <servlet-mapping>
        <servlet-name>HelloServlet</servlet-name>
        <url-pattern>/hello</url-pattern>
    </servlet-mapping>
</web-app>
servlet class
public class HelloServlet extends HttpServlet {


    @Override
    protected void doGet(HttpServletRequest req, HttpServletResponse resp) throws ServletException, IOException {


        resp.getWriter().println("<h1>Hello Servlet</h1>");
        resp.getWriter().println(new Date());
    }
}
Then we start to deploy tomcat, click this,
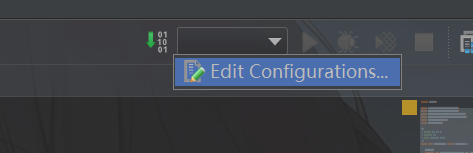
and then click local. Local means local.

Here, change the name and other defaults.

Mainly the second page

. If you want to visit the index and also want to visit the official website of tomcat, you must add tomcat Put ROOT in the installation directory of
Finally apply and then start tomcat.
The result is shown in the figure.


Basically configure tomcat and access servlet like this. Then let's go to the sauce, come on, code farmers~