Preface
In computer programming, unit testing is a software testing method by which you can test whether each unit function of the source code is suitable for use. Writing unit tests for code has many benefits, including early detection of code errors, facilitating changes, simplifying integration, facilitating code refactoring, and many other features. Friends who use the Java language should have used or heard that Junit is used for unit testing, so why do we need Mockito testing framework? Imagine a common scenario like this. When the current class to be tested depends on some other class objects, if you use Junit for unit testing, we must manually create these dependent objects. This is actually a cumbersome task. At this point, you can use the Mockito testing framework to simulate the dependent classes. These simulated objects act as virtual objects or clones of real objects in the test, and Mockito also provides convenient test behavior verification. This allows us to pay more attention to the logic of the current test class, rather than the objects it depends on.
1
Method of generating mock objects
To use Mockito, we first need to introduce the Mockito test framework dependency in our project. The following dependencies can be introduced in the project based on Maven:
<dependency>
    <groupId>org.mockito</groupId>
    <artifactId>mockito-core</artifactId>
    <version>3.3.3</version>
    <scope>test</scope>
</dependency>
If it is a project built on Gradle, the following dependencies are introduced:
testCompile group: 'org.mockito', name: 'mockito-core', version: '3.3.3'There are two common ways to create Mock objects using Mockito.
1.1
Use Mockito.mock(clazz) method
Create a Mock object through the static method mock of the Mockito class. For example, the following creates a Mock object of type List:
List<String> mockList = Mockito.mock(ArrayList.class);
Since the mock method is a static method, it is usually written as a static import method, that is, ListmockList = mock(ArrayList.class).
1.2
Use @Mock annotation method
The second way is to use the @Mock annotation method to create Mock objects. In this way, you need to pay attention to using MockitoAnnotations.initMocks(this) or adding @ExtendWith(MockitoExtension.class) to the unit test class before running the test method. Annotation, the following code creates a Mock object of type List (PS: @BeforeEach is an annotation of Junit 5, and its function is similar to @Before annotation of Junit 4.):
/**
 * @author mghio
 * @date: 2020-05-30
 * @version: 1.0
 * @description:
 * @since JDK 1.8
 */
//@ExtendWith(MockitoExtension.class)
public class MockitoTest {

  @Mock
  private List<String> mockList;

  @BeforeEach
  public void beforeEach() {
    MockitoAnnotations.initMocks(this);
  }
}
2
Confirmatory test
The Mockito.verify static method is provided in the Mockito test framework so that we can conveniently perform verification tests, such as method call verification, method call times verification, method call sequence verification, etc. Let's take a look at the specific code.
2.1
Verification method single call
If the verification method is called for a single time, you can directly add the verify method and the calling method to be verified. The function of the following code is to verify that the size method of the mockList object is called once.
/**
 * @author mghio
 * @date: 2020-05-28
 * @version: 1.0
 * @description:
 * @since JDK 1.8
 */
@ExtendWith(MockitoExtension.class)
public class MockitoVerifyTest {

  @Mock
  List<String> mockList;

  @Test
  void verify_SimpleInvocationOnMock() {
    mockList.size();
    verify(mockList).size();
  }
}
2.2
Verification method calls the specified number of times
In addition to verifying a single call, we sometimes need to verify that some methods are called multiple times or a specified number of times, then you can use the verify + times method to verify the specified number of method calls, and you can also combine the atLeast + atMost method to provide The range of the number of calls, and methods such as never verify that the method is not called.
/**
 * @author mghio
 * @date: 2020-05-28
 * @version: 1.0
 * @description:
 * @since JDK 1.8
 */
@ExtendWith(MockitoExtension.class)
public class MockitoVerifyTest {

  @Mock
  List<String> mockList;

  @Test
  void verify_NumberOfInteractionsWithMock() {
    mockList.size();
    mockList.size();

    verify(mockList, times(2)).size();
    verify(mockList, atLeast(1)).size();
    verify(mockList, atMost(10)).size();
  }
}
2.3
Verification method call sequence
At the same time, you can use the inOrder method to verify the calling sequence of the methods. The following example verifies the calling sequence of the size, add, and clear methods of the mockList object.
/**
 * @author mghio
 * @date: 2020-05-28
 * @version: 1.0
 * @description:
 * @since JDK 1.8
 */
@ExtendWith(MockitoExtension.class)
public class MockitoVerifyTest {

  @Mock
  List<String> mockList;

  @Test
  void verify_OrderedInvocationsOnMock() {
    mockList.size();
    mockList.add("add a parameter");
    mockList.clear();

    InOrder inOrder = inOrder(mockList);

    inOrder.verify(mockList).size();
    inOrder.verify(mockList).add("add a parameter");
    inOrder.verify(mockList).clear();
  }
}
The above is just a list of some simple verification tests. There are also verification test method call timeouts and more verification tests can be explored and learned through relevant official documents.
3
Verification method is abnormal
For exception testing, we need to use some call behavior definitions provided by the Mockito framework. Mockito provides when(...).thenXXX(...) to let us define method call behaviors. The following code defines when the get method of mockMap is called regardless of whether it is passed Any parameter input will throw a NullPointerException exception, and then use Assertions.assertThrows to verify the call result.
/**
 * @author mghio
 * @date: 2020-05-30
 * @version: 1.0
 * @description:
 * @since JDK 1.8
 */
@ExtendWith(MockitoExtension.class)
public class MockitoExceptionTest {

  @Mock
  public Map<String, Integer> mockMap;

  @Test
  public void whenConfigNonVoidReturnMethodToThrowEx_thenExIsThrown() {
    when(mockMap.get(anyString())).thenThrow(NullPointerException.class);

    assertThrows(NullPointerException.class, () -> mockMap.get("mghio"));
  }
}
At the same time when(...).thenXXX(...) can not only define the method call to throw an exception, but also define the return result after the method is called, such as when(mockMap.get("mghio")).thenReturn(21) ; Defines that when we call the get method of mockMap and pass in the parameter mghio, the return result is 21. One thing to note here is that using the mock object test defined in this way does not actually affect the internal state of the object, as shown in the following figure:
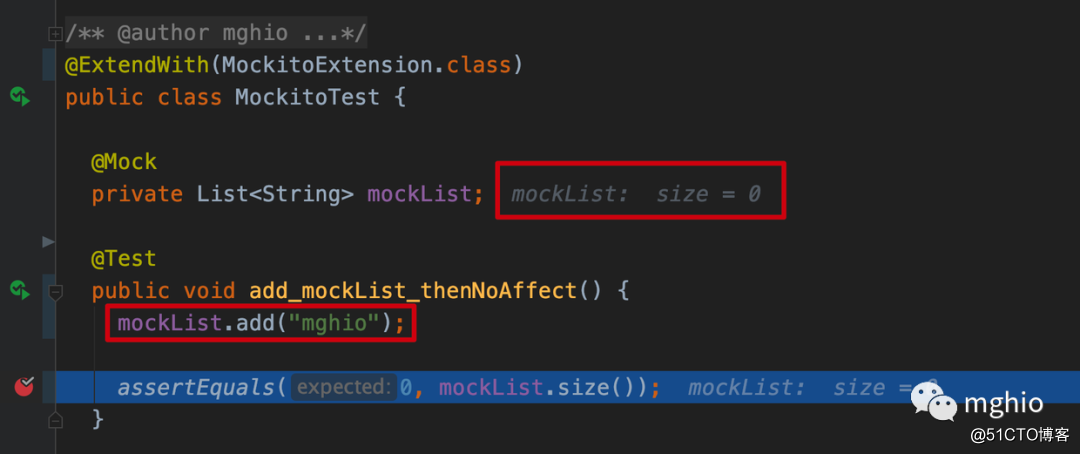
Although we have called the add method on the mockList object, in fact the mockList collection does not add mghio. If you need to affect the mock object at this time, you need to use the spy method to generate the mock object.
public class MockitoTest {

  private List<String> mockList = spy(ArrayList.class);

  @Test
  public void add_spyMockList_thenAffect() {
    mockList.add("mghio");

    assertEquals(0, mockList.size());
  }
}
After the breakpoint, it can be found that when the mock object created by the spy method calls the add method, mghio is successfully added to the mockList collection.
4
Integration with Spring framework
The Mockito framework provides @MockBean annotations to inject mock objects into the Spring container. This object will replace any existing beans of the same type in the container. This annotation is very useful in test scenarios that need to simulate specific beans (such as external services). it works. If you are using Spring Boot 2.0+ and there are beans of the same type in the current container, you need to set spring.main.allow-bean-definition-overriding to true (default is false) to allow bean definition overriding. The following assumes that you want to test the user's information query through the user code, there is a UserRepository of the database operation layer, that is, the object we want to mock next, defined as follows:
/**
 * @author mghio
 * @date: 2020-05-30
 * @version: 1.0
 * @description:
 * @since JDK 1.8
 */
@Repository
public interface UserRepository {

  User findUserById(Long id);

}
There is also the UserService class related to user operations, which is defined as follows:
/**
 * @author mghio
 * @date: 2020-05-30
 * @version: 1.0
 * @description:
 * @since JDK 1.8
 */
@Service
public class UserService {

  private UserRepository userRepository;

  public UserService(UserRepository userRepository) {
    this.userRepository = userRepository;
  }

  public User findUserById(Long id) {
    return userRepository.findUserById(id);
  }
}
Use @MockBean to annotate the UserRepository property in the test class to indicate that this type of bean uses mock objects, and use the @Autowired annotation to indicate that the UserService property uses objects in the Spring container, and then use @SpringBootTest to enable the Spring environment.
/**
 * @author mghio
 * @date: 2020-05-30
 * @version: 1.0
 * @description:
 * @since JDK 1.8
 */
@SpringBootTest
public class UserServiceUnitTest {

  @Autowired
  private UserService userService;

  @MockBean
  private UserRepository userRepository;

  @Test
  public void whenUserIdIsProvided_thenRetrievedNameIsCorrect() {
    User expectedUser = new User(9527L, "mghio", "18288888880");
    when(userRepository.findUserById(9527L)).thenReturn(expectedUser);
    User actualUser = userService.findUserById(9527L);
    assertEquals(expectedUser, actualUser);
  }
}
5
How the Mockito framework works
Through the above introduction, we can find that Mockito is very easy to use and can easily verify the behavior of some methods. I believe you have already seen it. The steps to use are to first create an object that needs mock. The object is as follows:
public class Target {

  public String foo(String name) {
    return String.format("Hello, %s", name);
  }

}
Then we directly use the Mockito.mock method and when(...).thenReturn(...) to generate the mock object and specify the behavior when the method is called. The code is as follows:
@Test
public void test_foo() {
  String expectedResult = "Mocked mghio";
  when(mockTarget.foo("mghio")).thenReturn(expectedResult);
  String actualResult = mockTarget.foo("mghio");
  assertEquals(expectedResult, actualResult);
}
Carefully observe the above when(mockTarget.foo("mghio")).thenReturn(expectedResult) line of code. I also find it strange to use it for the first time. The input parameter of the when method turns out to be the return value of the method mockTarget.foo("mghio") , I think the correct code should be when(mockTarget).foo("mghio"), but this way of writing actually cannot be compiled. Since the return value of the Target.foo method is of type String, can the following methods be used?
Mockito.when("Hello, I am mghio").thenReturn("Mocked mghio");
The result is that the compilation passes, but an error is reported at runtime:
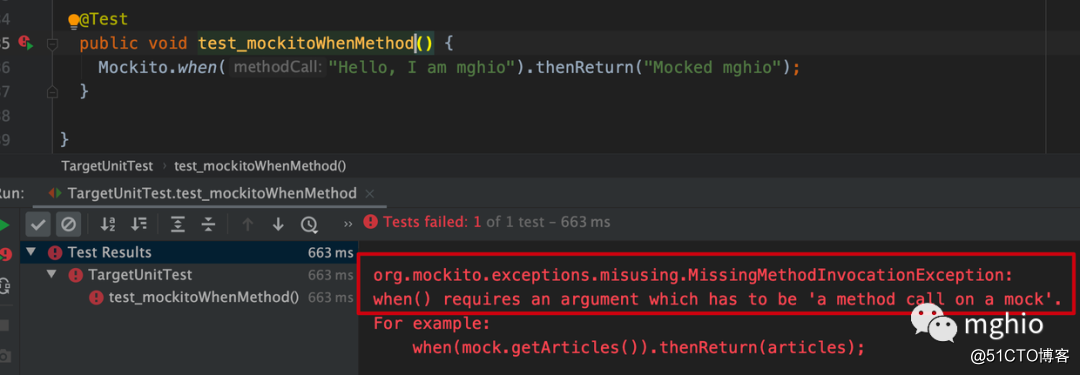
It can be seen from the error message that the when method requires a method call parameter. In fact, it only needs the more object method call before the when method. Let’s take a look at the following test code:
@Test
public void test_mockitoWhenMethod() {
  String expectedResult = "Mocked mghio";
  mockTarget.foo("mghio");
  when("Hello, I am mghio").thenReturn(expectedResult);
  String actualResult = mockTarget.foo("mghio");
  assertEquals(expectedResult, actualResult);
}
The above code can be tested normally, and the results are as follows:
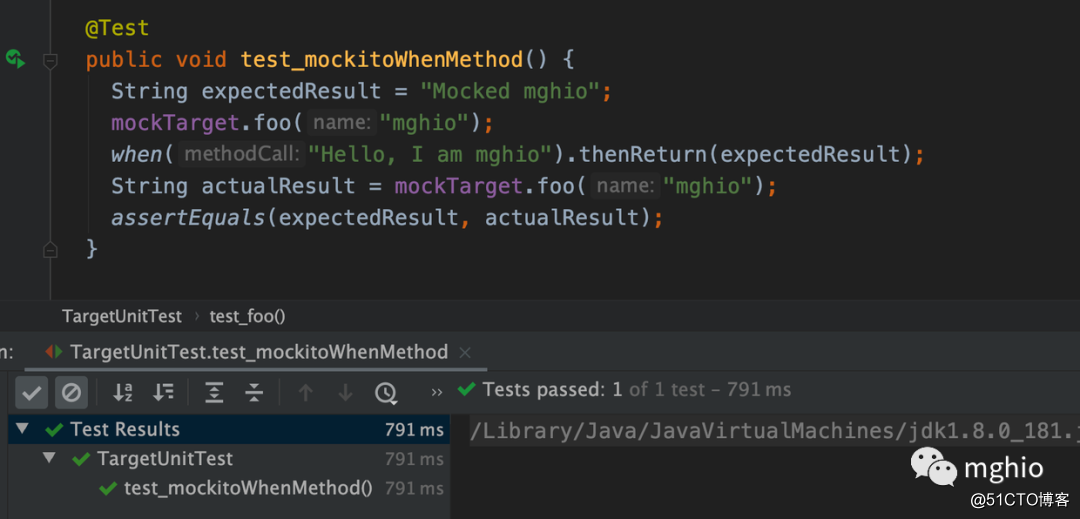
Why can the test pass normally? It is because when we call the foo method of the mock object, Mockito will intercept the method call and save the detailed information of the method call in the context of the mock object. When the Mockito.when method is called, it is actually obtained from the context The last registered method is called, and then the parameter of thenReturn is saved as its return value. Then when we call the method of the mock object again, the previously recorded method behavior will be played back again, which triggers the interceptor to call again and Return the return value we specified in the thenReturn method. The following is the source code of the Mockito.when method:

This method directly uses the MockitoCore.when method, continue to follow up, the method source code is as follows:
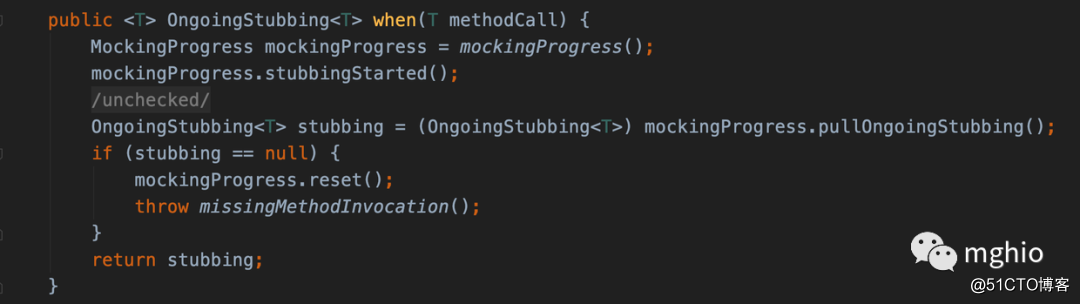
A closer look reveals that the methodCall parameter is not used in the source code, but the OngoingStubbing object is obtained from the MockingProgress instance. This OngoingStubbing object is the context object mentioned above. Personally, I feel that in order to provide a concise and easy-to-use API, Mockito creates the "phantom" of when method calls. In short, the Mockito framework works by storing and retrieving method call details in the context by method interception.
6
How to implement a micro Mock framework***
After knowing the operating principle of Mockito, let’s take a look at how to implement a mock framework with similar functions by yourself. I believe you already know how to intercept the method. In fact, this is AOP, but by reading its source code, I found Mockito In fact, we did not use the familiar Spring AOP or AspectJ method to intercept, but generated and initialized mock objects through the runtime enhancement library Byte Buddy and the reflection tool library Objenesis. Now, through the above analysis and source code reading, a simple version of the mock framework can be defined, and the custom mock framework is named imock. One thing to note here is that Mockito has the advantage that it does not need to be initialized, and it can be used immediately through the static methods it provides. Here we also use the static method of the same name, through the Mockito source code: 
It is easy to see that the Mockito class is ultimately delegated to MockitoCore to implement the functions, and it only provides some static methods that are easy to use for users. Here we It also defines a proxy object IMockCore. This class needs a method mock to create a mock object and a thenReturn method to set the return value of the method. At the same time, this class holds a list of method call details InvocationDetail collection. This class is used To record the detailed information of the method invocation, then the when method only returns the last InvocationDetail in the list. The list here can directly use the commonly used ArrayList in Java. The ArrayList collection list here implements the OngoingStubbing function in Mockito. According to the three elements of the method, the method name, method parameters and method return value, it is easy to write the code of the InvocationDetail class. In order to distinguish the case where the method has the same name in different classes, you also need to add the full name field of the class and override the class The equals and hashCode methods (to judge whether to call the method set list need to be judged according to this method), the code is as follows:
/**
 * @author mghio
 * @date: 2020-05-30
 * @version: 1.0
 * @description:
 * @since JDK 1.8
 */
public class InvocationDetail<T> {

  private String attachedClassName;

  private String methodName;

  private Object[] arguments;

  private T result;

  public InvocationDetail(String attachedClassName, String methodName, Object[] arguments) {
    this.attachedClassName = attachedClassName;
    this.methodName = methodName;
    this.arguments = arguments;
  }

  public void thenReturn(T t) {
    this.result = t;
  }

  public T getResult() {
    return result;
  }

  @Override
  public boolean equals(Object o) {
    if (this == o) return true;
    if (o == null || getClass() != o.getClass()) return false;
    InvocationDetail<?> behaviour = (InvocationDetail<?>) o;
    return Objects.equals(attachedClassName, behaviour.attachedClassName) &&
        Objects.equals(methodName, behaviour.methodName) &&
        Arrays.equals(arguments, behaviour.arguments);
  }

  @Override
  public int hashCode() {
    int result = Objects.hash(attachedClassName, methodName);
    result = 31 * result + Arrays.hashCode(arguments);
    return result;
  }
}
The next step is how to create our mock object. Here we also use Byte Buddy and Objenesis libraries to create mock objects. The IMockCreator interface is defined as follows:
/**
 * @author mghio
 * @date: 2020-05-30
 * @version: 1.0
 * @description:
 * @since JDK 1.8
 */
public interface IMockCreator {

  <T> T createMock(Class<T> mockTargetClass, List<InvocationDetail> behaviorList);

}
The implementation class ByteBuddyIMockCreator uses the Byte Buddy library to dynamically generate mock object code at runtime and then uses Objenesis to instantiate the object. code show as below:
/**
 * @author mghio
 * @date: 2020-05-30
 * @version: 1.0
 * @description:
 * @since JDK 1.8
 */
public class ByteBuddyIMockCreator implements IMockCreator {

  private final ObjenesisStd objenesisStd = new ObjenesisStd();

  @Override
  public <T> T createMock(Class<T> mockTargetClass, List<InvocationDetail> behaviorList) {
    ByteBuddy byteBuddy = new ByteBuddy();

    Class<? extends T> classWithInterceptor = byteBuddy.subclass(mockTargetClass)
        .method(ElementMatchers.any())
        .intercept(MethodDelegation.to(InterceptorDelegate.class))
        .defineField("interceptor", IMockInterceptor.class, Modifier.PRIVATE)
        .implement(IMockIntercepable.class)
        .intercept(FieldAccessor.ofBeanProperty())
        .make()
        .load(getClass().getClassLoader(), Default.WRAPPER).getLoaded();

    T mockTargetInstance = objenesisStd.newInstance(classWithInterceptor);
    ((IMockIntercepable) mockTargetInstance).setInterceptor(new IMockInterceptor(behaviorList));

    return mockTargetInstance;
  }
}
Based on the above analysis, we can easily write the code of IMockCore class that creates mock objects as follows:
/**
 * @author mghio
 * @date: 2020-05-30
 * @version: 1.0
 * @description:
 * @since JDK 1.8
 */
public class IMockCore {

  private final List<InvocationDetail> invocationDetailList = new ArrayList<>(8);

  private final IMockCreator mockCreator = new ByteBuddyIMockCreator();

  public <T> T mock(Class<T> mockTargetClass) {
    T result = mockCreator.createMock(mockTargetClass, invocationDetailList);
    return result;
  }

  @SuppressWarnings("unchecked")
  public <T> InvocationDetail<T> when(T methodCall) {
    int currentSize = invocationDetailList.size();
    return (InvocationDetail<T>) invocationDetailList.get(currentSize - 1);
  }
}
The IMock class provided to users is just a simple call to IMockCore. The code is as follows:
/**
 * @author mghio
 * @date: 2020-05-30
 * @version: 1.0
 * @description:
 * @since JDK 1.8
 */
public class IMock {

  private static final IMockCore IMOCK_CORE = new IMockCore();

  public static <T> T mock(Class<T> clazz) {
    return IMOCK_CORE.mock(clazz);
  }

  public static <T> InvocationDetail when(T methodCall) {
    return IMOCK_CORE.when(methodCall);
  }
}
Through the above steps, we have implemented a miniature mock framework. Let's test it with a practical example. First, create a Target object:
/**
 * @author mghio
 * @date: 2020-05-30
 * @version: 1.0
 * @description:
 * @since JDK 1.8
 */
public class Target {

  public String foo(String name) {
    return String.format("Hello, %s", name);
  }

}
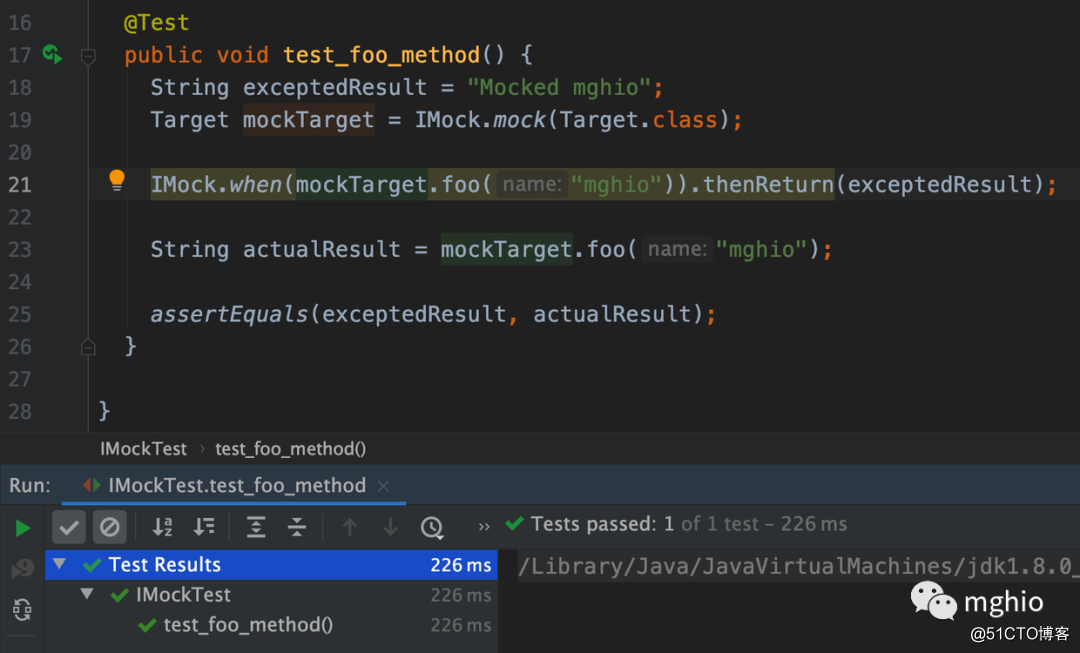
Then write its corresponding test class IMockTest class as follows:
/**
 * @author mghio
 * @date: 2020-05-30
 * @version: 1.0
 * @description:
 * @since JDK 1.8
 */
public class IMockTest {

  @Test
  public void test_foo_method() {
    String exceptedResult = "Mocked mghio";
    Target mockTarget = IMock.mock(Target.class);

    IMock.when(mockTarget.foo("mghio")).thenReturn(exceptedResult);

    String actualResult = mockTarget.foo("mghio");

    assertEquals(exceptedResult, actualResult);
  }

}
The above test can run normally, achieving the same effect as the Mockito test framework. The running results are as follows:
The above is just a list of the source code of some key classes. All the codes for customizing the IMock framework have been uploaded to the Github repository imock, and interested friends can check it out.
7
to sum up
This article only introduces some methods of using Mockito. This is only the most basic function provided by the framework. For more advanced usage, you can go to the official website to read related documents, and then introduce the when(...).thenReturn(... ) Define the implementation of the behavior method and implement a simplified version of imock with the same function according to the source code idea. Although there are many advantages to unit testing, unit testing cannot be done blindly. In most cases, we only need to do a good job of unit testing for the core business modules that are more complex and difficult to understand in the project and the modules that are publicly dependent in the project That's it.