I recently participated in the development of settings. Because the code is still relatively new, Android7.0 has refactored Settings. Compared with 5.0 and 6.0, Settings of 7.0 are very different, so I will take some of the bits and pieces in the opening process. Record it. This article mainly introduces you to the basics of Settings: code path, path of related databases and files in the phone, etc.
Code related path:
android\frameworks\base\packages\SettingsLib 7.0 refactored Settings after refactoring the part
android\frameworks\base\packages\SettingsProvider settings database related
android\packages\apps\Settings Settings related
android\frameworks\base\core\java\android \provider settings Database field definition related
android\packages\providers\MediaProvider ringtone related
android\packages\screensavers screen saver related
android\packages\inputmethods input method related
After the source code is compiled, the apk generation directory:
android\out\target\product\****\system\priv-app\Settings\Settings.apk
android\out\target\product\****\system\priv-app\MediaProvider\MediaProvider.apk
android\out\target\product\****\system\priv-app\SettingsProvider\SettingsProvider.apk
cmd下,adb shell
system/priv-app/Settings/Settings.apk
system/priv-app/MediaProvider/MediaProvider.apk
system/priv-app/SettingsProvider/SettingsProvider.apk
Settings database
Android L (5.1) and previous versions of Settings related databases are in
/data/data/com.android.providers.settings/databases/settings.db, there are three tables global, system, secure.
View the database:
(1) Under cmd (do not confirm whether sqlite3 environment variables need to be configured, if sqlite3 command cannot be used, please Baidu)
adb shell sqlite3 data/data/com.android.providers.settings/databases/settings.db "select * from system"
(2) Or
adb pull data/data/com.android.providers.settings/databases/settings.db D:\xx to the local, then open it with SQLite Expert Professional softwareAfter Android M (6.0), Google refactored the SettingsProvider, so the path of the Settings database has changed. The
data is stored in the form of xml under the mobile directory /data/system/users/0. There are settings_global.xml, settings_system In .xml, settings_secure.xml
, the databases of different users are placed in different user paths. If no new users are created, they will be under /data/system/users/0.
Modify the fields in the database using the command
adb shell settings get global captive_portal_server
adb shell settings put global captive_portal_server 0Note: Although the database storage in the mobile phone directory is in the form of xml, the operation in the code is still the database. The system will first generate the Settings.db database, then save the content in the xml file, and finally delete the Settings.db database (the function of SettingsProvider, which will be discussed later).
The reason why the database is first generated and then deleted is mainly for compatibility with the previous version.
Why save the fields in the form of xml: save resources, simple and safe (the path saved in xml is relatively safer than the previous database path, probably considering multiple users)
Directory Structure
The division of labor between the SettingsLib and Settings structure directories is relatively clear. The directories can generally be known by their names. If you understand, you can know the general functions in the code by looking at the English directory names. I hope everyone will develop good habits. The directory functions are clearly divided. .
1. Settings directory structure
android\packages\apps\Settings
-src
--com.android.settings Settings Java file used by the whole application
--com.android.settings.accessibility Accessibility related
--com.android.settings.accounts Account related
--com. android.settings.application Application management related
--com.android.settings.backup Backup related
--com.android.settings.bluetooth Bluetooth related
--com.android.settings.dashboard Settings Main interface related
--com.android.settings .datausage data traffic related
- - com.android.settings.deletionhelper
- - com.android.settings.deviceinfo on mobile phone related
- - com.android.settings.display displays
- - com.android.settings.drawable menu pictures
- -com.android.settings.fingerprint fingerprint related
--com.android.settings.fuelgauge
--com.android.settings.gestures gesture related
--com.android.settings.inputmethod input method related
--com.android.settings.localepicker language related
--com.android.settings.location location
related--com.android .settings.nfc nfc related
- - com.android.settings.notification notify relevant
- - com.android.settings.overlay
- - com.android.settings.password password-related
- - com.android.settings.print related to printing
- - com.android.settings.qstile
- - com.android.settings.search quick search related
- - com.android.settings.sim SIM card related
- - com.android.settings.support
- - com.android.settings.tts tts broadcast related
--com.android.settings.users user related
--com.android.settings.utils tools
--com.android.settings.voice
--com.android.settings.vpn2
--com.android.settings.wfd
--com.android.settings.widget widget related
--com.android.settings.wifi wifi related
-AndroidManifest.xml manifest file
2. SettingsLib directory structure
android\frameworks\base\packages\SettingsLib\src\com\android\settingslib
-src
--com.android.settingslib.accessibility Accessibility related
--com.android.settingslib.accounts Account related
--com.android.settingslib. animation animation-related
- - com.android.settingslib.application application management-related
- - com.android.settingslib.bluetooth Bluetooth-related
- - com.android.settingslib.datetime date related
- - com.android.settingslib.deviceinfo on mobile phone related
- -com.android.settingslib.display display related
--com.android.settingslib.drawable menu picture related
--com.android.settingslib.drawer sliding menu related
--com.android.settings.dream sleep related
--com. android.settings.graph
--com.android.settings.location location related
--com.android.settings.net network related
--com.android.settings.users user related
--com.android.settings.widget widget related
--com.android.settings.wifi wifi related
-AndroidManifest.xml list file
The following is the FAQ, from MTK:
how to modify the maximum connections of hotspot from frameworks?
[DESCRIPTION]
In general,hotspot's maximam connection is limited by hardware,so if you want to modify the number,must to make sure the performance of hardware is enough;
[SOLUTION]
To change the number to 10 as an example:
/packages/apps/Settings/res_ext/values/mtk_arrays.xml
<string-array name="wifi_ap_max_connection_entries">
73 <item>1 user</item>
74 <item>2 users</item>
75 <item>3 users</item>
76 <item>4 users</item>
77 <item>5 users</item>
78 <item>6 users</item>
79 <item>7 users</item>
80 <item>8 users</item>
//add to ten
<item>9 users</item>
<item>10 users</item>
//add
81 </string-array>
so you can choose "10 users " when you setup hotspot;
============================================================
How to preset a WIFI hotspot
will describe the following issues in this document: How to preset a WIFI hotspot — A hotspot is added to the WIFI Setting interface by default.
[SOLUTION]
JB version:
Please add
networ={} to the file alps/external/wpa_supplicant_8/mtk-wpa_supplicant.conf .
The meaning of the fields required by the network can be viewed
in the description after the comment " network block fields:" in the wpa_supplicant_8/wpa_supplicant.conf file .
KK&L version:
Please add networ={} in the /hardware/mediatek/wlan/config/mtk-wpa_supplicant-overlay.conf file.
M version path
/vendor/mediatek/proprietary/hardware/connectivity/wlan/config/mtk-wpa_supplicantoverlay.
conf,
as in the following example, preset an OPEN and WPA2-PSK network:
ctrl_interface=/data/misc/wpa_supplicant
update_config=1
device_name=rk30sdk
manufacturer=rockchip
model_name=ONE TOUCH EVO8HD
model_number=ONE TOUCH EVO8HD
serial_number=0123456789
device_type=10-0050F204-5
config_methods=physical_display virtual_push_button keypad
network={
ssid="aaaa"
scan_ssid=1
key_mgmt=NONE
}
network={
ssid="bbbbb"
scan_ssid=1
psk="12345678"
key_mgmt=WPA-PSK
}
====================================================================
how to set max bandwidth in 2G and 5G
[DESCRIPTION]
customer want to limit the bandwidth in different band as below: Maximum bandwidth : 40MHz for 2.4G, 20MHz for 5G
[SOLUTION]
1. find out the flie(wlan_lib.c)
2. find out the function (wlanInitFeatureOption)
3. modify codes and set those as you needs:
example:
prWifiVar->ucSta2gBandwidth = (UINT_8) wlanCfgGetUint32(prAdapter, "Sta2gBw",
MAX_BW_20MHZ);
prWifiVar->ucSta5gBandwidth = (UINT_8) wlanCfgGetUint32(prAdapter, "Sta5gBw",
MAX_BW_80MHZ);
prWifiVar->ucAp2gBandwidth = (UINT_8) wlanCfgGetUint32(prAdapter, "Ap2gBw",
MAX_BW_20MHZ);
prWifiVar->ucAp5gBandwidth = (UINT_8) wlanCfgGetUint32(prAdapter, "Ap5gBw",
MAX_BW_40MHZ);
prWifiVar->ucP2p2gBandwidth = (UINT_8) wlanCfgGetUint32(prAdapter, "P2p2gBw",
MAX_BW_20MHZ);
prWifiVar->ucP2p5gBandwidth = (UINT_8) wlanCfgGetUint32(prAdapter, "P2p5gBw",
MAX_BW_40MHZ);
typedef enum _ENUM_MAX_BANDWIDTH_SETTING_T {
MAX_BW_20MHZ = 0,
MAX_BW_40MHZ,
MAX_BW_80MHZ,
MAX_BW_160MHZ,
MAX_BW_80_80_MHZ
}
=========================================================
MTK wifi Roaming conditions
[Question]
Customer want to know machanism of roam between same SSID and different SSID
[Answer]
if the RCPI of signal lower than -70dbm. wifi will choice the best one(scores higher and better) from Condidates.
and thescores of AP is decided by elements as those(u2ScoreBandwidth + u2ScoreChnlInfo + u2ScoreDeauth + u2ScoreProbeRsp+u2ScoreScanMiss + u2ScoreSnrRssi + u2ScoreStaCnt + u2ScoreSTBC + u2ScoreBand + u2BlackListScore) and the additional sroces will
be added by 5G band or Current connected AP.
============================================================
Every time you connect to the network, it will prompt "Connected and unable to access the Internet" and disappear after a few seconds.
[DESCRIPTION]
Every time you connect to the network, it will prompt "Connected and unable to access the Internet" and disappear after a few seconds.
[SOLUTION]
M version starts to connect to WIFI AP , suggesting that "connected, no network", it was about about 5s cut "connected"
more than a NetworkMonitor module in the L version, in charge when connected to Wi-Fi after checking whether the AP has a captive portal capabilities
- if Yes, remind the user to enter username/password in the browser (like mtkguest)-if
not, there are two cases, the AP has Internet or the AP does not (meaning validated = true/false) and the
M version has more networkCapability The NET_CAPABILITY_VALIDATED field brings the L version of the validated result into the capability, making it easier for other modules to know whether this network supports the Internet. The
process
Wifi connects to WifiNetworkAgent's NetworkMonitor. Try to connect to connectivitycheck.gstatic.com. If it gets 200, it means Internet capability
ConnectivityService WifiNetworkAgent.networkCapability adds the NET_CAPABILITY_VALIDATED field. If the response is not received, or the response is delayed (commonly encountered in mainland China), add the NET_CAPABILITY_VALIDATED field after delaying networkCapability
===============================================================================
为什么add network 时点击security不显示密码输入框
[DESCRIPTION]
how to reproduce the problem?
wifisettings -->add network--->choose different security ,but the password did not show;
[SOLUTION]
change code as follow:
/packages/apps/Settings/src/com/android/settings/wifi/WifiConfigController.java
public void onItemSelected(AdapterView<?> parent, View view, int position,long id)
if (parent == mSecuritySpinner)
change to
if (parent == mSecuritySpinner || parent.getId() == R.id.wpa_security) reason: the cause of this problemis the id of "mSecuritySpinner" will be set to
"R.id.wpa_security" when the software did not support WAPI ;
int viewId = R.id.security;
if (FeatureOption.MTK_WAPI_SUPPORT) {
String type = SystemProperties.get(WLAN_PROP_KEY, DEFAULT_WLAN_PROP);
if (type.equals(WIFI_WAPI)) {
if (AccessPointExt.isWFATestSupported()) {
viewId = R.id.security_wfa; // WIFI + WAPI, support // separate WPA2 PSK security
} else {
viewId = R.id.security; // WIFI + WAPI
}
} else if (type.equals(WIFI)) {
if (AccessPointExt.isWFATestSupported()) {
viewId = R.id.wpa_security_wfa; // WIFI only, support
// separate WPA2 PSK // security
} else {
viewId = R.id.wpa_security; // WIFI only
}
} else if (type.equals(WAPI)) {
viewId = R.id.wapi_security; // WAPI only
}
} else {
if (AccessPointExt.isWFATestSupported()) {
viewId = R.id.wpa_security_wfa; // WIFI only, support
// separate WPA and WPA2 PSK // security
} else {
viewId = R.id.wpa_security; // WIFI only
}
}
switchWlanSecuritySpinner((Spinner) mView.findViewById(viewId));
=-==============================================================================
How to customize the background color of ActionBar?
[DESCRIPTION]
How can the application customize the background color of the ActionBar?
[SOLUTION] The
default background color of ActionBar is taken from Style Widget.AppCompat.ActionBar. If you need to customize the background color of ActionBar of your own application, you can customize a Style file and set Widget.AppCompat.ActionBar
to Parent, then Then set the item background to the required value. The reference example is as follows:
<?xml version="1.0" encoding="utf-8"?>
<resources>
<!-- the theme applied to the application or activity -->
<style name="CustomActionBarTheme" parent="@ style/Theme.AppCompat.Light">
<item name="android:actionBarStyle">@style/MyActionBar</item>
<item name="android:actionBarTabTextStyle">@style/TabTextStyle</item>
<
<!-- Support library compatibility -->
<item name="actionBarStyle">@style/MyActionBar</item>
<item name="actionBarTabTextStyle">@style/TabTextStyle</item>
<item name="actionMenuTextColor">@color/actionbar_text</item>
</style>
<!-- general styles for the action bar -->
<style name="MyActionBar" parent="@style/Widget.AppCompat.ActionBar">
<item name="android:titleTextStyle">@style/TitleTextStyle</item>
<item name="android:background">@drawable/actionbar_background</item>
<item name="android:backgroundStacked">@drawable/actionbar_background</item>
<item name="android:backgroundSplit">@drawable/actionbar_background</item>
<!-- Support library compatibility -->
<item name="titleTextStyle">@style/TitleTextStyle</item>
<item name="background">@drawable/actionbar_background</item>
<item name="backgroundStacked">@drawable/actionbar_background</item>
<item name="backgroundSplit">@drawable/actionbar_background</item>
</style>
<!-- action bar title text -->
<style name="TitleTextStyle" parent="@style/TextAppearance.AppCompat.Widget.ActionBar.Title">
<item name="android:textColor">@color/actionbar_text</item>
</style>
<!-- action bar tab text -->
<style name="TabTextStyle" parent="@style/Widget.AppCompat.ActionBar.TabText">
<item name="android:textColor">@color/actionbar_text</item>
</style>
</resources>
In your app manifest file, you can let the entire app use a customized Theme <application android:theme="@style/CustomActionBarTheme" ... />
or let the activity use a customized Theme<activity android:theme=" @style/CustomActionBarTheme" ... /> To
modify other properties of ActionBar, you can also refer to this method. For details, refer to the instructions on Android developer.
http://developer.android.com/guide/topics/ui/actionbar.html#Style
==================================================================================
How to set an app as a persistent app without being
closed by low memory kill
[Description]
How to set an app as a permanent app without being closed by low memory kill
[Keyword]
app persistent persistent
[Solution]
1. Set the app's manifest.xml Add the attribute
android:persistent="true" to the application in
2. Use the platform signature for this APP
3. Place it under system/app
Note: After an app is set as persistent, it will be difficult to kill by low memory kill ( oom_adj=-
12), please carefully confirm whether it is necessary before setting, otherwise the memory will be wasted.
=========================================================================
How to set process/thread scheduling mode
(sched policy), priority (priority)
[Title]
How to set process/thread scheduling mode, priority
[Description]
How to adjust, increase, or decrease the priority of the process; how to set Process scheduling mode, such as real-time process (real-time round-robin RR, real-time FIFO)
scheduling modes in linux are: SCHED_OTHER, SCHED_IDLE, SCHED_BATCH and SCHED_FIFO, SCHED_RR; the first
three are CFS scheduling mode, the latter two are real-time scheduling mode
[Keyword ]
Process priority process scheduling real-time process real-time thread rt thread process setpriority sched_setscheduler
SCHED_FIFO SCHED_RR
[Solution]
Java API:
In the java layer,
set the thread priority:
* Use java default Thread.setPriority(int priority); The value of priority is [ 1,10], that is, this priority
is defined by java spec, please refer to Thread.java
java property: 1 2 3 4 5 6 7 8 9 10
linux nice: 19 16 13 10 0 -2 -4 -5 -6 -8
* Use android.os.Process API:
public static final native void setThreadPriority(int tid, int priority);
public static final native void setThreadPriority(int priority) Priority in the
two APIs is the standard linux nice value [-20,19]
* @param tid The identifier of the thread/process to change.
* @param priority A Linux priority level, from -20 for highest scheduling
Set thread scheduling mode:
* There is no direct API available in the standard java Spec. In android, android.os.Process provides API:
public static final native void setThreadScheduler(int tid, int policy, int priority)
throws IllegalArgumentException;
The three parameters corresponding to it are:
* @param tid The identifier of the thread/process to change.
* @param policy A Linux scheduling policy such as SCHED_OTHER etc.
* @param priority A Linux priority level in a range appropriate for the given policy.
At the native level:
set thread priority:
* setprority(int which, int who, int niceval);
@which is PRIO_PROCESS, PRIO_PGRP, PRIO_USER; default is normal Using PRIO_PROCESS means that only a single
thread is set . If it is PRIO_PGRP, it means the entire process, as it is PRIO_USER, then all USER is the process of this process USER.
@who is the corresponding thread, if it is 0, the current thread
@niceval is the corresponding nice value [-20,19]
Set the thread scheduling mode:
#include <sched.h>
struct sched_param { ... int sched_priority; ... }; int sched_setscheduler(pid_t pid, int policy, const struct sched_param *param); @pid is the corresponding thread, if it is 0, that is, the current thread @policy is one of SCHED_OTHER, SCHED_IDLE, SCHED_BATCH and SCHED_FIFO, SCHED_RR
@param The only thing that needs to be set at present is the sched_priority in this param, which is the real-time process priority [1,99]
If it is SCHED_OTHER, SCHED_IDLE, SCHED_BATCH, then sched_priority must be 0. For
specific related constraints, please refer to linux man: such as: http://man7.org/linux/manpages/
man2/sched_setscheduler.2.html
========================================================================================
How to modify the xlog option when compiling
[DESCRIPTION]
When you want to filter some logs, you can modify the xlog option when compiling.
[SOLUTION]
Modify mediatek/external/xlog/tools/tag-setting.xlog or tag -default.xlog. The setting of /tag-setting.xlog will
be given priority
.
(ICS/ICS2 version, here: mediatek/source/external/xlog/tools/tagsetting.
xlog)
available level:
verbose debug
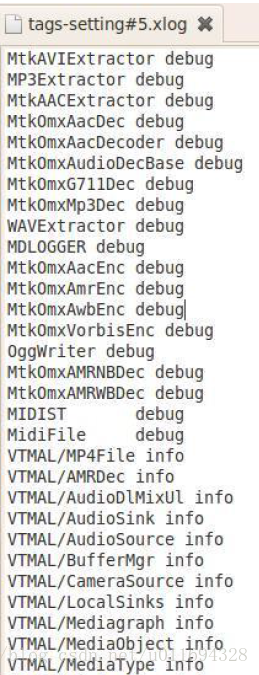
available level:
verbose debug info warn error assert on off
For example: if you need to turn off all logs, do as follows:
modify merge-xlog-filter-tags.py
default_level =None => default_level = "off"
====================================================================
How to confirm whether the system partition of the malfunctioning machine is
damaged or flashing
[DESCRIPTION]
When the malfunctioning machine is randomly killed (NE or KE), the focus of the troubleshooting is whether the files in the system partition of the phone have been
flashed or damaged. Therefore, you need to use Flash Tool to readback system.img from the faulty machine, and use
ext2explore to unlock it, and then use the tool (Beyond Compare) to compare whether any files in the system partition have been brushed or
damaged.
[KEY WORDS]
system partition readback flashing
[SOLUTION]
Step 1: Readback and unlock the system.img file from the faulty machine and the normal machine respectively. For this step, please refer to the following FAQ:
"FAQ10664 How to unlock the ext image returned by readback under windows"
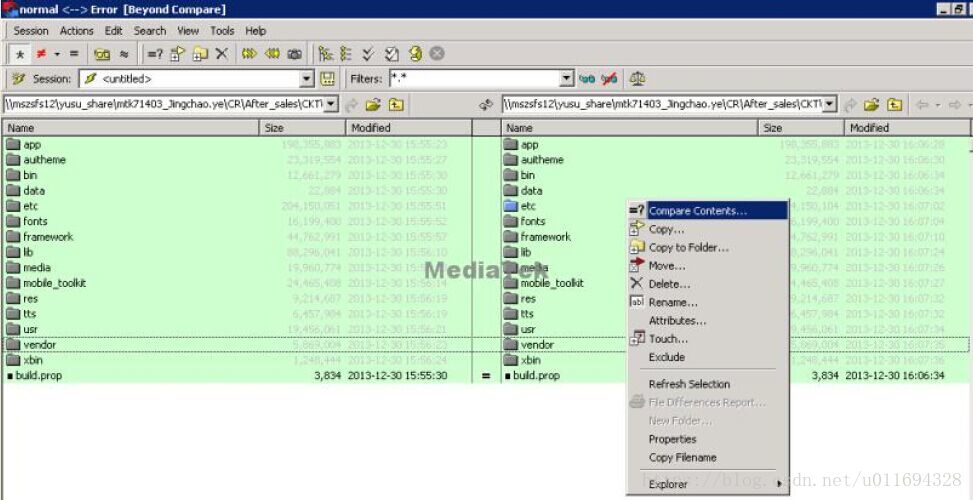
Step 2: Use Beyond Compare to open the system partition files of the normal machine and the faulty machine.
Step 3: Select the wait on the Beyond Compare graphical interface Compare all folders/files, then click the right mouse button and
select Compare Contents from the pop-up options. The steps are shown in the figure below:
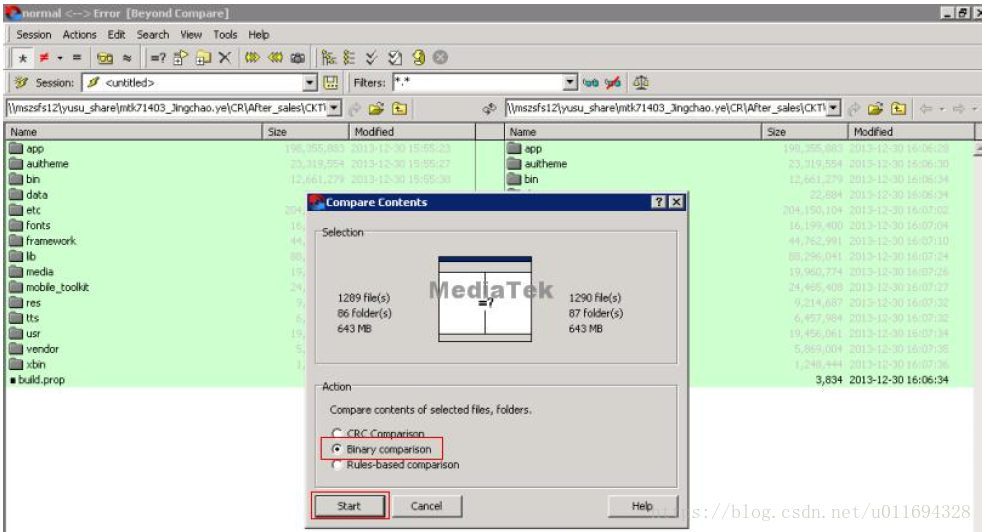
Step 4: Select Binary Comparison and click Start to execute the compare action. The steps are shown in the figure below:
If the contents of all files are exactly the same, it means that the system partition has not been damaged or brushed. Refer to the following figure:
