LAMP architecture installation
Configure LAMP architecture
Configure Apache environment
[root@client1 ~]# history
    1  ping www.baidu/com
    2  ifconfig
    3  vi /etc/resolv.conf
    4  ping www.baidu/com
    5  ping www.baidu.com
    6  vi /etc/resolv.conf
    7  ping www.baidu.com
    8  tar jxvf httpd-2.4.29.tar.bz2
    9  tar zxvf apr-1.6.2.tar.gz
   10  tar zxvf apr-util-1.6.0.tar.gz
   11  mv apr-1.6.2 httpd-2.4.29/srclib/apr
   12  mv apr-util-1.6.0 httpd-2.4.29/srclib/apr-util
   13  yum -y install gcc gcc-c++ make pcre-devel expat-devel perl
   14  cd httpd-2.4.29
   15  ./configure --prefix=/usr/local/httpd --enable-so --enable-rewrite --enable-charset-lite --enable-cgi
   16  make && make install
   17  cd
   18  cp /usr/local/httpd/bin/apachectl /etc/init.d/httpd
   19  vi /etc/init.d/httpd
   20  chkconfig --add httpd
   21  systemctl start httpd
   22  systemctl status httpd
   23  ls -s /usr/local/httpd/conf/httpd.conf /etc/
   24  ln -s /usr/local/httpd/conf/httpd.conf /etc/
   25  vi /etc/httpd.conf
   26  vi /etc/hosts
   27  systemctl restart httpd
   28  http -t
   29  httpd -t
   30  ln -s /usr/local/httpd/bin/* /usr/bin/
   31  httpd -t
   32  netstat -anpt | grep httpd
   33  netstat -anpt | grep 80
   34  apachectl -t
Configure MYSQL database
1、创建一个不可登录用户(供程序用户使用):
useradd -s /sbin/nologin mysql
2.安装yum源
yum -y install ncurses ncurses-devel bison cmake
3、解压缩,配置cmake
tar zxvf mysql-boost-5.7.20.tar.gz

cmake \
-DCMAKE_INSTALL_PREFIX=/usr/local/mysql \
-DMYSQL_UNIX_ADDR=/usr/local/mysql/mysql.sock \
-DSYSCONFDIR=/etc \
-DSYSTEMD_PID_DIR=/usr/local/mysql \
-DDEFAULT_CHARSET=utf8 \
-DDEFAULT_COLLATION=utf8_general_ci \
-DWITH_INNOBASE_STORAGE_ENGINE=1 \
-DWITH_ARCHIVE_STORAGE_ENGINE=1 \
-DWITH_BLACKHOLE_STORAGE_ENGINE=1 \
-DWITH_PERFSCHEMA_STORAGE_ENGINE=1 \
-DMYSQL_DATADIR=/usr/local/mysql/data \
-DWITH_BOOST=boost \
-DWITH_SYSTEMD=1
Compile and install
make && make install(此过程有点长请耐心等待)Set owner
chown -R mysql:mysql /usr/local/mysql/ Set configuration parameters
vi /etc/my.cnf
[client]
port = 3306
default-character-set = utf8
socket = /usr/local/mysql/mysql.sock
[mysql]
port = 3306
default-character-set = utf8
socket = /usr/local/mysql/mysql.sock
[mysqld]
user = mysql
basedir = /usr/local/mysql
datadir = /usr/local/mysql/data
port = 3306
character_set_server = utf8
pid-file = /usr/local/mysql/mysqld.pid
socket = /usr/local/mysql/mysql.sock
server-id = 1

sql_mode=NO_ENGINE_SUBSTITUTION,STRICT_TRANS_TABLES,NO_AUTO_CREATE_USER,NO_AUTO_VALUE_ON_ZERO,NO_ZERO_IN_DATE,NO_ZERO_DATE,ERROR_FOR_DIVISION_BY_ZERO,PIPES_AS_CONCAT,ANSI_QUOTES
Set owner
chown mysql.mysql /etc/my.cnfecho 'PATH=/usr/local/mysql/bin:/usr/local/mysql/mysql/lib:$PATH' >> /etc/profile
echo 'export PATH' >> /etc/profile
source /etc/profile
echo $PATH
 cp usr/lib/systemd/system/mysqld.service /usr/lib/systemd/system
systemctl daemon-reload  //守护进程重新加载
systemctl start mysqld
netstat -anpt | grep 3306
systemctl enable mysqld
Login to mysql
There is no password when you first log in, you need to set a password by yourself
mysqladmin -u root -p password'abc123' to
log in to mysql
mysql -uroot -pabc123
There are three ways to modify the password
Method 1:
mysql> set password=password ('123');
Method 2 :
Enter the interface (log in to mysql), use mysqladmin
mysqladmin-u username -p old password password new password
Example: mysqladmin -uroot -p123456 password 123
Method 3:
Enter the interface (log in to mysql), use UPDATE to directly edit the user table
mysql> use mysql;
mysql> update mysql.user set authentication_string = password('abcabc') where user='root' and host='localhost';
mysql> flush privileges;
PHP installation
先解压缩包
tar jxvf php-7.1.10.tar.bz2
在yun安装
yum -y install
libjpeg
libjpeg-devel
libpng libpng-devel
freetype freetype-devel
libxml2
libxml2-devel
zlib zlib-devel
curl curl-devel
openssl openssl-devel
在配置编译安装
cd php-7.1.10
./configure
–prefix=/usr/local/php
–with-apxs2=/usr/local/httpd/bin/apxs
–with-mysql-sock=/usr/local/mysql/mysql.sock
–with-mysqli
–with-zlib
–with-curl
–with-gd
–with-jpeg-dir
–with-png-dir
–with-freetype-dir
–with-openssl
–enable-mbstring
–enable-xml
–enable-session
–enable-ftp
–enable-pdo
–enable-tokenizer
–enable-zip
make && make install
cp php.ini-development /usr/local/php/lib/php.ini
modify the parameter
vi /usr/local/php/lib/php.ini
after searching /mysqli.default, add
mysqli.default_socket = /usr/local/
After searching /date.time in mysql/mysql.sock , remove ";" and add
date.timezone = Asia/Shanghai
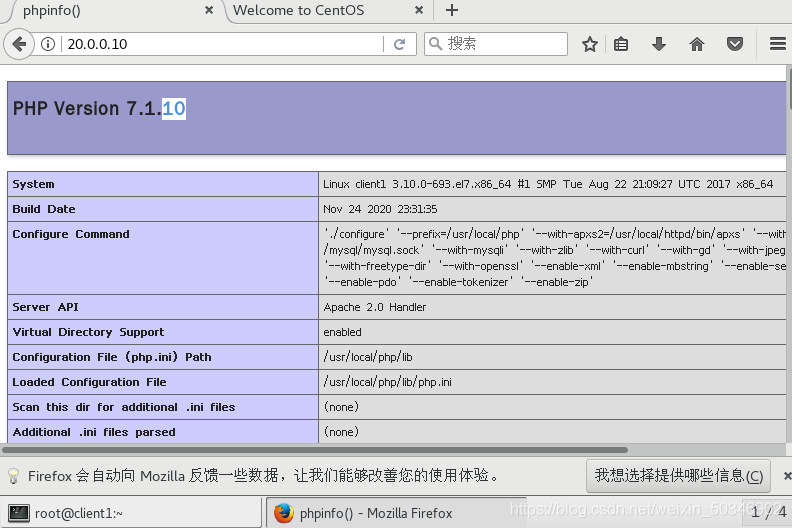
Verify that PHP is installed successfully
usr/local/php/bin/php -m
Link Apache and PHP
First enter the configuration file and then modify the parameters
vi /etc/httpd.conf
search /AddType and add
AddType application/x-httpd-php .php
AddType application/x-httpd-php-source.phps
search /DirectoryIndex and add "index.php" before "index.php" "
DirectoryIndex index.php index.html
Modify the last displayed result in the configuration file
vi /usr/local/httpd/htdocs/index.php
?php
link = mysqliconnect (′ 20.0.0.1 1 ′, ′ myadm ′, ′ 12345 6 ′); // Use php to access the database if (link=mysqli_connect('20.0.0.11','myadm','123456'); //Use php to access the database if(link=mysqliconnect(′20.0.0.11′,′m y a d m′,′123456′);/ / Using the p- H the p- visit and asked several data library i f ( Link) echo "Success!
”;
else echo “Fail!”;
?>
Install phpMyadmin
unzip phpMyAdmin-4.7.6-all-languages.zip
mv phpMyAdmin-4.7.6-all-languages /usr/local/httpd/htdocs/myadm
cd /usr/local/httpd/htdocs/myadm
cp config.sample.inc.php config.inc.php
vi config.inc.php
c f g [ ′ S e r v e r s ′ ] [ cfg['Servers'][ cfg[′Servers′ ][I]['host'] = '20.0.0.11';//Change localhost to IP 31.
Visit http://20.0.0.11/myadm to
log in to the management system using root and the password previously configured for root. You can perform management operations on the database.
Prompt access error: "client1" does not have permission to
enter the database
mysql -uroot -p123456
grant all privileges on.To'root'@'www.aa.com' identified tified by '123456';
flush privileges ;
Visit http://20.0.0.11/myadm, success!
