In the last post Vim configuration of the introductory chapter , the only high-level overview of the basic configuration of Vim and several common use plug-in, but found that the configuration of Vim is not very good, especially in later minibuffer use, taglist , Fileexplore directly conflicts, and its plug-in management is also troublesome. This blog post is mainly to solve these two problems and try some plug-ins that are more suitable for code farmers.
Introduction
The original intention of using Vim before was on the one hand the power of its plug-ins, and the more important aspect was its suitability for installation. However, as I learned more about Vim, I discovered that Vim is powerful. It is enough to see from the following evaluation:
- There are only three editors in the world, EMACS, VIM and others
- VIM is the God of editors, EMACS is God’s editor
- EMACS is actually an OS which pretends to be an editor
According to the configuration problems in the previous blog post in daily use, here is a solution. For conflicts between plug-ins, use tagbar instead of taglist, and plug-in management uses bundle plug-ins. There are indeed many useful and convenient plug-ins in Vim.
Efficient plugin
There are many plugins for vim, and the functions are very powerful and very powerful. The plug-in address of the official website is here .
horizontal
Vundle is a plug-in used to manage vim plug-ins. It makes efficient use of git, so that the installation, update and uninstallation of vim plug-ins are managed by vundle, thereby freeing users from vim installation and configuration.
-
Install vundle
git clone https://github.com/gmarik/vundle.git ~/.vim/bundle/vundle -
Use vundle to manage Vim plugins
-
Choose the plug-in you want to use in Vim Script
-
Add in Vim configuration file .vimrc
Plugin plugin_name -
Execute the vundle initialization command
:PluginInstall, the plug-in is installed -
Common commands
# 更新插件 :PluginInstall! # 清除不再使用的插件 :PluginClean # 列出所有插件 :PluginList # 查找插件 :PluginSearch -
Vundle configuration in .vimrc
" 文件类型检测关闭[必须](/usr/share/vim/vim74/filetype.vim)
filetype off
" 设置runtime path包含Vundle的路径并且初始化
set rtp+=~/.vim/bundle/Vundle.vim
" 设置plugins安装地址
call vundle#begin('~/.vim/bundle/')
" 安装Vundle,让其管理插件[必须]
Plugin 'gmarik/Vundle.vim'

""""""""""""""""""""""""""""""""""
" Vundle插件安装样例:
" 插件在github上
" Plugin 'tpope/vim-fugitive'
" 插件来自网页http://vim-scripts.org/vim/scripts.html
" Plugin 'L9'
" Git插件,但插件不在Github上
" Plugin 'git://git.wincent.com/command-t.git'
" 插件在本地机器上 (i.e. when working on your own plugin)
" Plugin 'file:///home/gmarik/path/to/plugin'
" The sparkup vim script is in a subdirectory of this repo called vim.
" Pass the path to set the runtimepath properly.
" Plugin 'rstacruz/sparkup', {'rtp': 'vim/'}
" 使用用户名来避免插件冲突 ie. L9
" Plugin 'user/L9', {'name': 'newL9'}
""""""""""""""""""""""""""""""""""

" 所有插件的添加在end之前[必须]
call vundle#end()
" 文件类型对应的插件[必须](/usr/share/vim/vim74/ftplugin.vim)
filetype plugin on
" 文件类型对应的缩进文件
filetype indent on
-
The-NERD-tree
NERDTree is one of the most commonly used plugins in Vim. It can display the directory and file structure when Vim is running, similar to the file browser on the left side of TextMate, but it is more convenient to operate. You can quickly browse files without leaving the keyboard. , And switch between files and folders. The sample is shown in the following figure:
[The external link image transfer failed, the source site may have an anti-leeching mechanism, it is recommended to save the image and upload it directly (img-7F0iwiGm-1611336352634)(https://blog.haojunyu.com/imgs /the-NERD-tree.gif)]
-
Installation and configuration in vim
call vundle#begin('~/.vim/bundle')
" 在Vim的编辑窗口中树状显示文件目录[The-NERD-tree]
Plugin 'The-NERD-tree'
call vundle#end()

""""""""""""""""""""""""""""""""""
" The-NERD-tree配置
""""""""""""""""""""""""""""""""""
" 不显示缓冲文件,中间文件
let NERDTreeIgnore=[ '.pyc$', '.pyo$', '.obj$', '.o$', '.so$', '.egg$', '^.git$', '^.svn$', '^.hg$' ]
" 只剩一个NERDTree窗口时退出vim
autocmd bufenter * if (winnr("$") == 1 && exists("b:NERDTreeType") &&b:NERDTreeType == "primary") | q | endif
" <F9>打开/关闭文件管理器
nnoremap <silent> <F9> :NERDTreeToggle<CR>
The-NERD-Commenter
This plug-in is also necessary, mainly automatic annotation content. When your xml is naturally xml annotation, when you are java, it is naturally java comment rules. The sample is shown in the following figure:
[The external link image transfer failed, the source site may have an anti-leech chain mechanism, it is recommended to save the image and upload it directly (img-JoGpwKAh-1611336352636)(https://blog.haojunyu.com/imgs /nerdcommenter.gif)]
-
Installation and configuration in Vim
call vundle#begin('~/.vim/bundle/')
" 快速添加/去除注释
Plugin 'The-NERD-Commenter'
call vundle#end()

""""""""""""""""""""""""""""""""""
" The-NERD-Commenter配置
""""""""""""""""""""""""""""""""""
" 注释的时候自动加个空格, 强迫症必配
let g:NERDSpaceDelims=1
" mm智能判断加上/解开注释
map mm <leader>c<space>
ctrlp
This is a file search plug-in. Its function is similar to NERDTree, but there is still a difference. The sample is shown below:
-
Installation and configuration in vim
call vundle#begin('~/.vim/bundle/')
" 文件搜索
Plugin 'kien/ctrlp.vim'
call vundle#end()

""""""""""""""""""""""""""""""""""
" ctrlp配置
""""""""""""""""""""""""""""""""""
" 设置CtrlP的本地工作目录,0代表不设置该功能
let g:ctrlp_working_path_mode=0
" ctrlp窗口在底部
let g:ctrlp_match_window_bottom=1
" ctrlp窗口最大高度为15行
let g:ctrlp_max_height=15
" 窗口
let g:ctrlp_match_window_reversed=0
" 最近打开的文件的个数
let g:ctrlp_mruf_max=500
" 记录但去掉重复的软链接
let g:ctrlp_follow_symlinks=1
" <Ctrl-f>启动文件查找
let g:ctrlp_map = '<c-f>'
" Ctrlp启动文件查找
let g:ctrlp_cmd = 'CtrlP'
" 相当于mru功能,show recently opened files
map <c-p> :CtrlPMRU<CR>
" 忽略以下文件类型
set wildignore+=*/tmp/*,*.so,*.swp,*.zip
" 忽略以下文件目录
let g:ctrlp_custom_ignore = {'dir':  '/].(git|hg|svn|rvm)$','file': '(exe|so|dll|zip|tar|tar.gz)$'}
ctags
ctags can establish the tag index of the source tree (a tag is a place where an identifier is defined, such as a function definition), so that programmers can quickly locate functions, variables, macro definitions, etc. to view the prototype during programming.
-
Install exuberant-ctags tool
sudo apt-get install exuberant-ctags -
Create C++ Code Base Index
-
Download libstdc++ header files, including STL and streams in C++.
-
Unzip to the ~/.vim/tags directory and execute the ctags command
ctags -R --c++-kinds=+p --fields=+iaS --extra=+q --language-force=C++ cpp_src mv tags ~/.vim/tags/cpptag -
Set in .vimrc
set tags+=~/.vim/tags/cpptag
-
-
Create Gcc code base index
-
After the build-essential is installed in ubuntu, there will be C/C++ header files in the /usr/include/c++ directory.
sudo apt-get install build-essential -
Copy the files in /usr/include/c++/4.8 to the ~/.vim/tags/gcc folder and execute the ctags command
cp -R /usr/include/c++/4.8 ~/.vim/tags/gcc ctags -R --c++-kinds=+p --fields=+iaS --extra=+q gcc mv tags ~/.vim/tags/gcctag -
Set in .vimrc
set tags+=~/.vim/tags/gcctag
-
cscope
Cscope, an application program, programmers use it to help program writing and tracking code, mainly used in C language programs. It originated in Bell Laboratories and operated on PDP-11, and it was developed by Joe Steffen.
-
Install cscope tool
sudo apt-get install cscope -
Create GNU C library index
-
Download the glibc file, which is the libc library released by GNU, that is, the C runtime library. glibc is the lowest api in the linux system, almost any other runtime library will depend on glibc.
-
Unzip to the ~/.vim/tags directory and execute the cscope command
cd ~/.vim/tags/glibc-2.22 cscope -Rbq -
Set in .vimrc
""""""""""""""""""""""""""""""""""
" cscope配置
""""""""""""""""""""""""""""""""""
if has("cscope")
    " 设置cscope的命令位置
    set csprg=/usr/local/bin/cscope
    " 设定quickfix来显示cscope的结果
    set cscopequickfix=s-,c-,d-,i-,t-,e-
    " 先搜索tags标签文件,在搜索cscope数据库
    set csto=1
    " 使用cstag查询,也就是同时搜索cscope数据库和tags标签文件
    set cst
    " 不显示添加数据库是否成功
    set nocsverb
    "
    if filereadable("cscope.out")
    " 添加当前目录下的cscope数据库
    cs add cscope.out
    else
    " 添加vim自带的cscope数据库
    " gnu c 数据库
    cs add ~/.vim/tags/glibc-2.22/cscope.out ~/.vim/tags/glibc-2.22
    endif
    " 显示添加数据库成功
    set csverb
endif

" 映射快捷键"<C-_>g的按法是先按"Ctrl+Shift+-", 然后很快再按"g"
" 查找本 C 符号(可以跳过注释)
nmap <C-_>s :cs find s <C-R>=expand("<cword>")<CR><CR>
"查找本定义
nmap <C-_>g :cs find g <C-R>=expand("<cword>")<CR><CR>
"查找调用本函数的函数
nmap <C-_>c :cs find c <C-R>=expand("<cword>")<CR><CR>
"查找本字符串
nmap <C-_>t :cs find t <C-R>=expand("<cword>")<CR><CR>
"查找本 egrep 模式
nmap <C-_>e :cs find e <C-R>=expand("<cword>")<CR><CR>
"查找本文件
nmap <C-_>f :cs find f <C-R>=expand("<cfile>")<CR><CR>
"查找包含本文件的文件
nmap <C-_>i :cs find i ^<C-R>=expand("<cfile>")<CR>$<CR>
"查找本函数调用的函数
nmap <C-_>d :cs find d <C-R>=expand("<cword>")<CR><CR>
-
tagbar
The tagbar plug-in is a plug-in similar to the taglist function, but it is better than the taglist, and can work perfectly with NERDTree.
-
Advantages of tagbar
- Support the display of the function list of header files
Careful readers may find that the tagbar also distinguishes the visibility level of functions, respectively with +-# and coloring to distinguish - Better object-oriented support.
Although taglist will also list the class list, it is still very unintuitive overall. - Automatically rebuild the
taglist according to the file modification time. At this point, the experience is very bad. In fact, it can be achieved by this time stamp.
- Support the display of the function list of header files
-
Installation and configuration in vim
call vundle#begin('~/.vim/bundle/')
" 替换taglist的插件[tagbar]
Plugin 'majutsushi/tagbar'
call vundle#end()

""""""""""""""""""""""""""""""""""
" tagbar配置
""""""""""""""""""""""""""""""""""
" 启动时自动focus
let g:tagbar_autofocus=1
" <F10>打开/关闭Tagbar
nnoremap <silent> <F10> :TagbarToggle<CR>
rainbow
This plug-in is also necessary. The main function of the plug-in is to distinguish the matched (){}[] different colors, which is very convenient to see the scope of the bracket
-
Installation and configuration in Vim
call vundle#begin('~/.vim/bundle/') " 括号显示增强 Plugin 'luochen1990/rainbow' call vundle#end() """""""""""""""""""""""""""""""""" " rainbow配置 """""""""""""""""""""""""""""""""" " rainbow激活 let g:rainbow_active = 1 -
Add automatic start function to rainbow
if (exists('g:rainbow_active') && g:rainbow_active)
    auto syntax * call rainbow#hook()
    auto colorscheme * call rainbow#show()
    " 下面这命令使rainbow在vim启动时被打开
    autocmd VimEnter * nested call rainbow#toggle()
endif
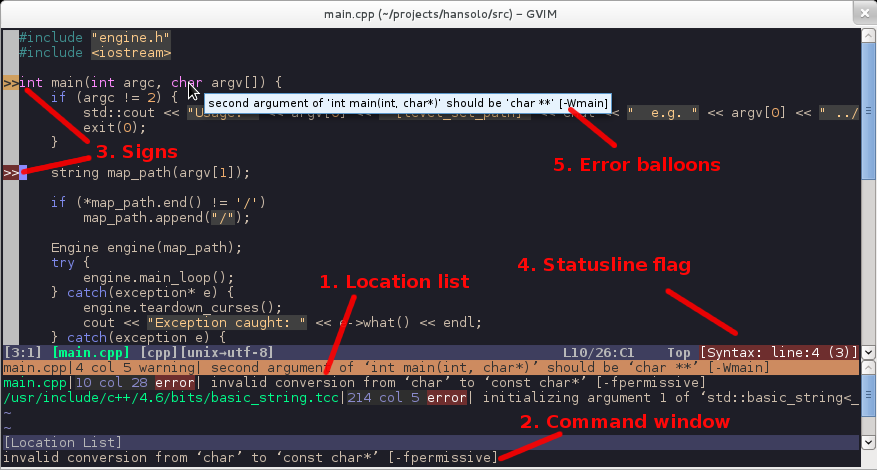
syntastic
This is a very useful plug-in, it can check the grammar and coding style in real time, using it can almost achieve no compilation error after the coding is completed. And it also integrates a static checking tool: lint, which can make your code more perfect. More powerful, it supports nearly a hundred programming languages, like a comprehensive real-time compiler. After an error occurs, it is very convenient to jump to the error. The sample is shown below:
-
Installation and configuration in vim
call vundle#begin('~/.vim/bundle/')
" 语义高亮
Plugin 'scrooloose/syntastic'
call vundle#end()

""""""""""""""""""""""""""""""""""
" syntastic配置
""""""""""""""""""""""""""""""""""
" 首次打开和保存时都要进行语义检查
let g:syntastic_check_on_open = 1
" 设置错误提示符'x'
let g:syntastic_error_symbol = 'x'
" 设置警告提示符'!'
let g:syntastic_warning_symbol = '!'
" 当鼠标放在错误行则显示错误信息
let g:syntastic_enable_balloons = 1
" 保存退出时不用进行语义检测
let g:syntastic_check_on_wq = 0
" 编译有误则错误窗口显示,否在不显示
let g:syntastic_auto_loc_list = 1
" 错误总会填充到错误窗口
let g:syntastic_always_populate_loc_list = 1
YouCompleteMe
YouCompleteMe completes the code completely to the compiler level, and is by no means weaker than Visual Assist. It is based on LLVM/clang, a compiler supported by Apple in order to replace GNU/GCC. It is because YouCompleteMe has compiler support instead of text-based matching like previous plug-ins, so the accuracy rate is this. High. Moreover, it is a C/S architecture, it will create a server side on the machine, use clang to parse the code, and then return the result to the client, so it solves the speed of various completion plug-ins caused by the single thread of VIM It’s too slow. When using it, you can hardly feel any delay, and the experience has reached the level of Visual Assist.
In addition to completion, YouCompleteMe also has a very important role: code jumps can also achieve compiler-level accuracy, comparable to Visual Assist and Source Insight. The sample is shown below:
-
Install prerequisite software
sudo apt-get install clang llvm cmake python python-dev -
Manual compilation
cd ~/.vim/bundle/YouCompleteMe ./install.sh --clang-completer -
Installation and configuration in vim
call vundle#begin('~/.vim/bundle/')
" 自动补全
Plugin 'Valloric/YouCompleteMe'
call vundle#end()

""""""""""""""""""""""""""""""""""
" YouCompleteMe配置
""""""""""""""""""""""""""""""""""
" 设置YCM配置文件的路径
let g:ycm_global_ycm_extra_conf='~/.vim/bundle/YouCompleteMe/third_party/ycmd/cpp/ycm/.ycm_extra_conf.py'
" 开启关键字语法检测
let g:ycm_seed_identifiers_with_syntax = 1
" 自动触发补全
let g:ycm_auto_trigger = 1
" YCM触发的条件
let g:ycm_semantic_triggers = {
\ 'c' : ['->' , '.'],
\ 'cpp,objcpp' : ['->','.','::'],
\ 'java,javascript,python,scala' : ['.'],
\ 'ruby' : ['.','::'],
\}
" 不用每次询问.ycm_extra_conf.py位置
let g:ycm_confirm_extra_conf=0
" YCM也从tags文件中收集标识符
let g:ycm_collect_identifiers_from_tags_files=1
" 当输入注释的时候不用弹出提示
let g:ycm_complete_in_comments=0
" 当输入字符的时候弹出提示
let g:ycm_complete_in_strings=1
TIps: Tab is invalid.
If you see the YouCompleteMe prompt after installing YouCompleteMe, but you cannot use <Tab> for automatic completion, you can only use the up and down arrow keys + Enter to select, you must check whether the .vimrc is open The paste mode is set, that is, set paste is set. This mode will block all mappings and abbreviations. (The same problem for ultisnips)
ultisnips
This plug-in is also necessary. The main function of the plug-in is to quickly enter fixed code blocks, such as the copyright statement at the beginning of the file, #ifndef... #def... #endifsuch macro definitions, and markdown to write the head information of the jekyll blog post. The most important thing is that you can customize the code blocks according to your own habits , so you don't have to train yourself according to the habits of IDEs. The dynamic effects are as follows:
-
Installation and configuration in vim
call vundle#begin('~/.vim/bundle/') " ultisnips Plugin 'SirVer/ultisnips' " Snippets are separated from the engine Plugin 'honza/vim-snippets' call vundle#end() """""""""""""""""""""""""""""""""" " ultisnips配置 """""""""""""""""""""""""""""""""" " 如果使用了Valloric/YouCompleteMe,就别设置为<tab> let g:UltiSnipsExpandTrigger="<c-j>" " 前选片段 let g:UltiSnipsJumpForwardTrigger="<C-f>" " 后选片段 let g:UltiSnipsJumpBackwardTrigger="<C-b>" " 使用:UltiSnipsEdit打开片段定义文件时分屏位置 let g:UltiSnipsEditSplit="vertical" -
Custom code block
We noticed that in the process of installing ultisnips, in addition to installing itself, honza's vim-snippets were also installed, and its major function is to provide a large number (currently 80) program fragments, such as c, python , Markdown, make, sh, sql, etc. And these snippets are in the .vim/bundle/vim-snippets/snippets folder. In addition, we can also customize our own code blocks. It is recommended to put them in the .vim/UltiSnippets directory (the same level as the bundle). On the one hand, the code blocks under .vim/bundle/vim-snippets/snippets are Other people's git projects. On the other hand, the files under .vim/UltiSnippets can overwrite the configuration in vim-snippets, which is more in line with the purpose of DIY. Regarding how to write snippets, there are not many resources found on the Internet. The following suggestions are given:-
View the code in .vim/bundle/vim-snippets/snippets
-
By
:help snippetsviewing ultisnips help documentation -
Bowen customize their own block -like column
## head Jekyll写博文时插入的头文件信息
snippet head "Jekyll post header" b # b代表begin(snippet should be expanded only at the beginning of a line )
---
layout:       default
title:        ${1:blog_name}
category:     [${2:cate1,cate2}]
comments:     true
date:         `!v strftime("%Y-%m-%d %H:%M:%S")`
---
${0}        # 代表tab最终停留的位置

endsnippet
-
tabular
This is a must-have plugin for Virgo or programmers, because when you see code/text messy typesetting-equal signs, colons, tables, etc. cannot be aligned, you should be crazy. The tabular plug-in can solve this problem perfectly. Just like the following illustration, you only need to enter the command :Tabularize /*(* represents the alignment symbol):
[External link image transfer failed, the source site may have anti-theft link mechanism, it is recommended to save the image and upload it directly (img-zXU3zpd4-1611336352641 )(https://blog.haojunyu.com/imgs/vim-tabular.gif)]
-
Installation and configuration in Vim
call vundle#begin('~/.vim/bundle/')
" tab对齐
Plugin 'godlygeek/tabular'
call vundle#end()

""""""""""""""""""""""""""""""""""
" tabular配置
""""""""""""""""""""""""""""""""""
" 目前还尚在摸索中
vim-markdown
vim-markdown is a plugin for semantic highlighting and rule matching of native markdown and extended markdown syntax.
-
Installation and configuration in vim
call vundle#begin('~/.vim/bundle/')
" markdown语义高亮
Plugin 'plasticboy/vim-markdown'
call vundle#end()

""""""""""""""""""""""""""""""""""
" tabular配置
""""""""""""""""""""""""""""""""""
" vim识别md
autocmd BufNewFile,BufReadPost *.md set filetype=markdown
let g:vimmarkdownfoldingdisabled=1 "取消代码折叠
let g:vimmarkdownnodefaultkeymappings=1 "取消默认的键对应
let g:vimmarkdownmath=1 "使用数学符号
let g:vimmarkdownfrontmatter=1 "高亮YMAL frontmatter
[markdown sync preview][markdown-preview]
markdown-preview is a plug-in used to translate the markdown file opened by vim into html and display it in the browser. The highlight of the plug-in is real-time update.
-
Installation and configuration in Vim
call vundle#begin('~/.vim/bundle/')
" markdown同步显示
Plugin 'iamcco/mathjax-support-for-mkdp'
Plugin 'iamcco/markdown-preview.vim'
call vundle#end()

""""""""""""""""""""""""""""""""""
" markdown-preview.vim配置
""""""""""""""""""""""""""""""""""
" 设置启动chrome浏览器的命令
let g:mkdp_path_to_chrome = "open -a Google\\ Chrome"
" 设置为1则打开markdown文件时自动打开浏览器
let g:mkdp_auto_start = 1
" 设置为1则在编辑markdown的时候预览窗口是否打开,未开则自动打开
let g:mkdp_auto_open = 1
" 切换buffer时自动关闭预览窗口,设置为0则在切换buffer时不自动关闭
let g:mkdp_auto_close = 1
" 设置为1则只有在保存文件或退出插入模式时更新预览,默认为0,实时更新预览
let g:mkdp_refresh_slow = 0
" 设置为1则所有文件都使用MarkdownPreview进行预览,默认只有markdown文件可以
let g:mkdp_command_for_global = 0
emmet-vim
Emmet's predecessor is called Zen Coding, it is a front-end plug-in. Many softwares are officially supported, such as Sublime Text, Notepad++, Dreamweaver, Eclipse, Adobe Brackets, etc., and Emmet.vim is not Emmet's own birth, but developed by Yasuhiro Matsumoto in Japan. For front-end developers, it is an artifact that can save a lot of repetitive coding labor. In view of the lack of front-end development, here is just a mark.
references
- Fun vim game
- Vim study guide
- vim plugin
- Vim Script
- Vim configuration and instructions-IDE programming environment
- Efficient vim plugin
- VIM mnemonic diagram
- Vimer's program world
- vimium
- youcompleteme
- syntastic
- python IDE
- ultisnips
- Customize your own code block
- Front-end development artifact Emmet
- Emmet tutorial
- Alignment artifact-tabular
- vim-markdown
If this article has helped you, or if you are interested in technical articles, you can follow the WeChat public account: Technical Tea Party, you can receive related technical articles as soon as possible, thank you!

This article is automatically published by ArtiPub , a multi- posting platform