Use Tkinter to create GUI development tools (48) Use the Tkinter library tix module to adjust the size of the control.
I introduced the use of Tkinter library tix module to adjust the control in the blog "Creating GUI development tools with Tkinter (27) Visual design and code generation" A large and small article, and introduced the Chinese visual Python development tool I am doing.

Many readers have asked how to achieve it. We use the tix module in the Tkinter library, the GUI library that comes with Python, to achieve it. The tix module has its own visual interface. I have made a simple demo code below for readers to learn.
# -*- coding: utf-8 -*-
import tkinter as tk
import tkinter as ttk
import tkinter.tix as Tix
from tkinter.constants import *

def SText_reset(rh, win):
    win.place(x=30, y=50, width=400, height=200)
    win.update()
    rh.attach_widget(win)

def MkSText(w):
    top = Tix.Frame(w, width=400, height=330)
    bot = Tix.Frame(w)

    win = Tix.ScrolledText(top, scrollbar='auto')
    win.text['wrap'] = 'none'
    win.text.insert(Tix.END, '''可以通过下面方式与我交流:
#独狼荷蒲qq:2775205
#通通小白python量化群:524949939
#电话微信:18578755056
#通通小白python量化群:524949939
#tkinter,pyqt,gui,Python学习群:647866213
    '''
)
    win.place(x=30, y=50, width=340, height=200)

    rh = Tix.ResizeHandle(top, bg='black',
                          relief=Tix.RAISED,
                          handlesize=8, gridded=1, minwidth=50, minheight=30)
    btn = Tix.Button(bot, text='Reset', command=lambda w=rh, x=win: SText_reset(w,x))
    top.propagate(0)

    btn.pack(anchor=Tix.CENTER)
    top.pack(expand=1, fill=Tix.BOTH)
    bot.pack(fill=Tix.BOTH)
    win.bind('<Map>', func=lambda arg=0, rh=rh, win=win:
             win.tk.call('tixDoWhenIdle', str(rh), 'attachwidget', str(win)))


if __name__ == '__main__':
    root = Tix.Tk()
    root.title("用Tkinter库tix模块实现调整控件的大小")
    MkSText(root)
    root.mainloop()
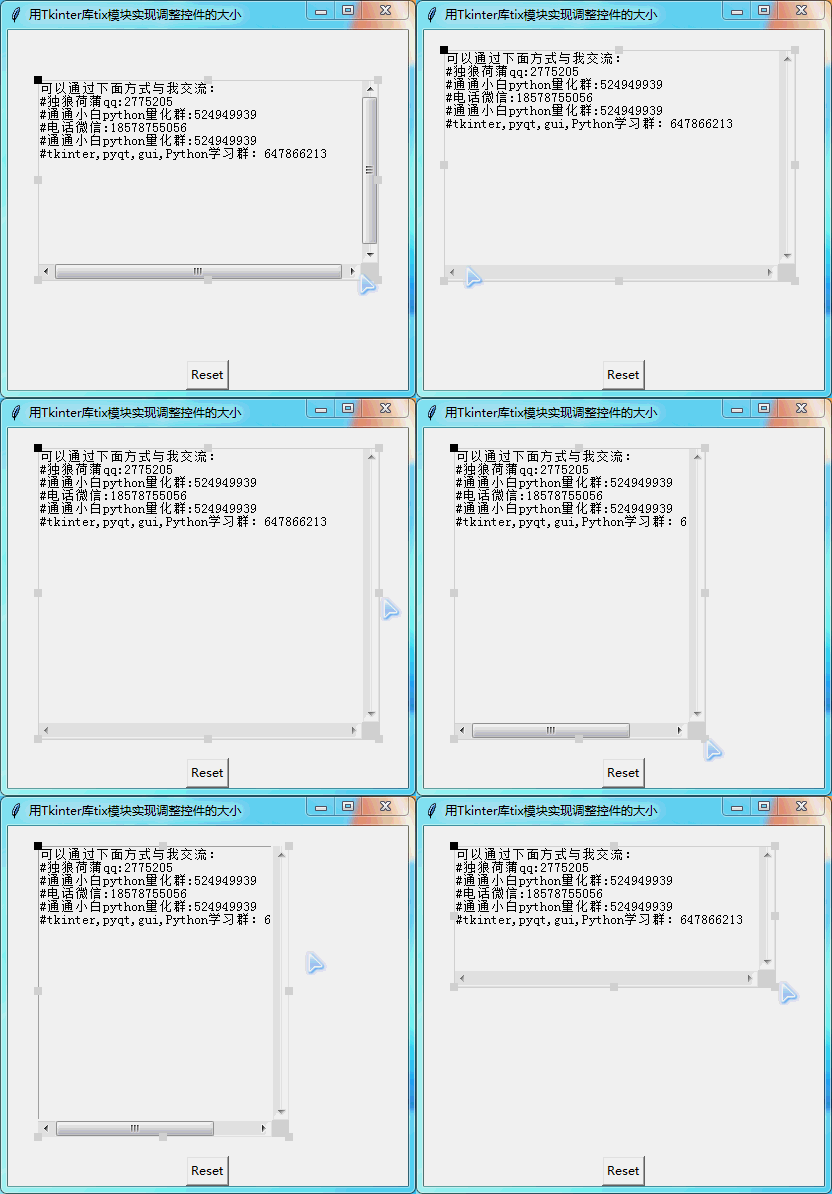
The results of the program are as follows:

The Chinese visualization Python development tool CVP that I developed earlier is realized by using this program principle.

There are two problems in use, which need to be resolved.
1. As shown in the figure above, adjusting the control frame can't perfectly track the movement of the monitor, maybe my program design problem.
2. It is troublesome to use tix on MacOS and Linux.
So I re-designed a control class with Tkinter to achieve similar functions. In this way, in the HP_tk3 module, the tix library will be abandoned.
At present, we plan to use the newly designed adjustable control class to design a visual generation tool that uses program flowcharts to generate Python code, so that it can be perfectly used on various operating system platforms.
import  tkinter  as  tk   #导入Tkinter
import  tkinter.ttk  as  ttk   #导入Tkinter.ttk
import  HP_tk3  as  htk   #导入htk
from PIL import Image, ImageTk, ImageDraw, ImageFont

#小白Python流程图设计器
root=htk.MainWindow(title='小白Python流程图设计器',x=100,y=200,w=800, h=600)
root.iconbitmap('ico/py.ico')  #设置应用程序图标
root.SetCenter()  #移动到屏幕中央

#建立菜单
menus = ['文件','编辑', '显示', '程序','项目','帮助']
items = [['新建','打开','关闭','-','保存','另存为'],\
         ['撤销','重做','-','剪切','复制','粘贴','清除','-','全选'],
         ['编辑','绘图','表格'],\
         ['运行','编译'],\
         ['工程设置','系统设置'],\
         ['关于软件','退出']]
htk.windowMenu2(root,menus,items) #窗口菜单

#建立工具栏
toolsbar=htk.ToolsBar(root,10) #创建工具栏
toolsbar.pack(side=tk.TOP, fill=tk.X)   #把工具栏放到窗口顶部
png1= ImageTk.PhotoImage(Image.open('ico2/POINT13.ico'))
png2= ImageTk.PhotoImage(Image.open('ico2/输入.jpg'))
png3= ImageTk.PhotoImage(Image.open('ico2/赋值.jpg'))
png4= ImageTk.PhotoImage(Image.open('ico2/判断.jpg'))
png5= ImageTk.PhotoImage(Image.open('ico2/左.jpg'))
png6= ImageTk.PhotoImage(Image.open('ico2/右.jpg'))
png7= ImageTk.PhotoImage(Image.open('ico2/上.jpg'))
png8= ImageTk.PhotoImage(Image.open('ico2/下.jpg'))
png9= ImageTk.PhotoImage(Image.open('ico2/箭.jpg'))
png10= ImageTk.PhotoImage(Image.open('ico2/模块.jpg'))


#改变工具栏的图标
toolsbar.config(0,image=png1)
toolsbar.config(1,image=png2)
toolsbar.config(2,image=png3)
toolsbar.config(3,image=png4)
toolsbar.config(4,image=png5)
toolsbar.config(5,image=png6)
toolsbar.config(6,image=png7)
toolsbar.config(7,image=png8)
toolsbar.config(8,image=png9)
toolsbar.config(9,image=png10)

#建立状态栏
status=htk.StatusBar(root)    #建立状态栏
status.pack(side=tk.BOTTOM, fill=tk.X) #把状态栏放到窗口底部
status.clear()
status.text(0,'状态栏') #在状态栏1输出信息
status.text(1,'超越自我!') #在状态栏2输出信息
status.text(2,'超越!是我们的每一步!')
status.text(3,'版权所有')
status.text(4,'侵权必究')
status.text(5,'设计:小白')
status.config(1,color='red') #改变状态栏2信息颜色
status.config(3,color='green') #改变状态栏2信息颜色
status.config(4,color='blue') #改变状态栏2信息颜色
#status.config(5,width=5)   #改变状态栏6的宽度

#建立代码编辑器
top=htk.resizeCanvas(root)


pnga1= ImageTk.PhotoImage(Image.open('ico2/开始.jpg'))
b1=tk.Button(top,image=pnga1)   #创建一个部件
b1.place(x=300, y=20, width=130, height=60)
top.setwidget(b1)  #加入可调部件

pnga2= ImageTk.PhotoImage(Image.open('ico2/结束.png'))
b2=tk.Button(top,image=pnga2)   #创建一个部件
b2.place(x=300, y=400, width=130, height=60)
top.setwidget(b2)  #加入可调部件入可调部件


root.mainloop()  	#进入Tkinter消息循环
The results of the program are as follows:

I just started designing Xiaobai Python flowchart designer, and I can implement it together if I am interested.
You can communicate with me in the following ways:
#独狼荷蒲qq:2775205
#通通小白pythonquantization group:524949939
#电话微信:18578755056
#通通小白pythonquantification group:524949939
#tkinter,pyqt,gui,Python learning group: 647866213
Welcome to continue to follow my blog.
Surpassing myself is every step of me! My progress is your progress!