Introduction to openpyxl
openpyxl is a Python built-in library that can be directly used to read and write xlsx, xlsm, xltx, and xltm files. With it, you can use Python syntax to automate batch operations on local xlsx files
Let me talk about the installation part first. If you use Anaconda as your Python environment, openpyxl can be used directly without installation; if you need to install it, the method is also very simple.
pip install openpyxl
xlsx file attributes
Before processing the Excel table, you need to understand the explanation and structure of several terms in the xlsx file
1. What does Workbook mean?
Workbook is called workbook, which can refer to an xlsx file;
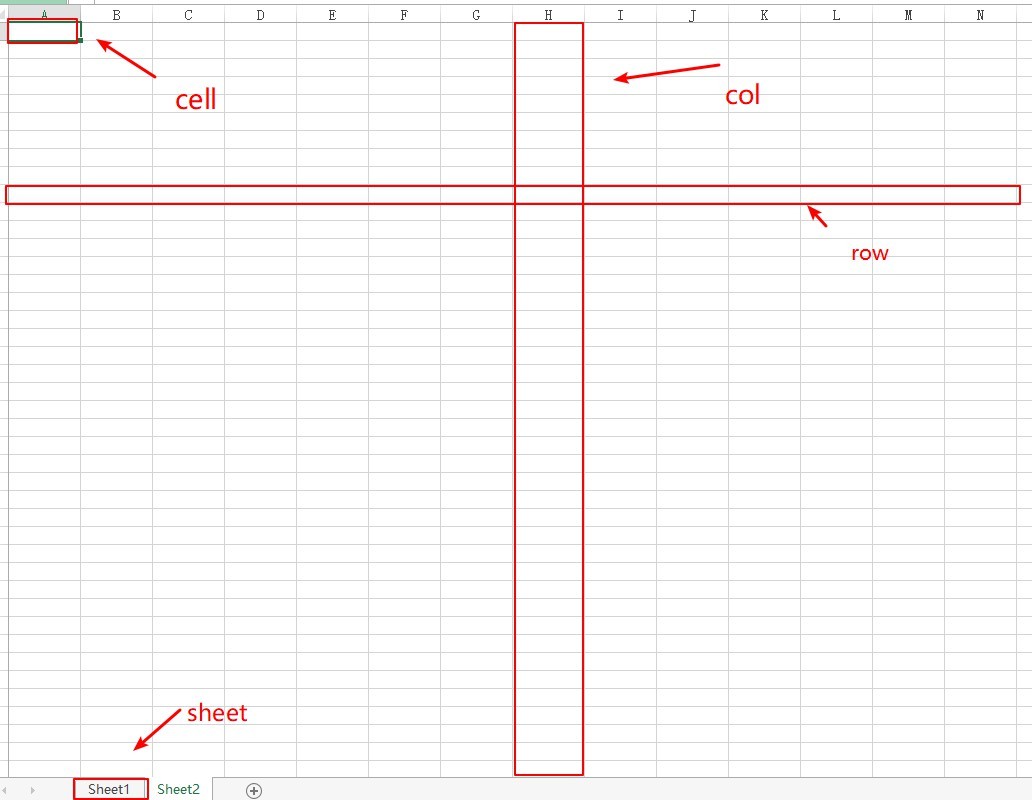
2. What do sheet, cell, row and col respectively refer to?
Regarding question 2, please refer to the figure below (see note)
Openpyxl basic command operation
1. Create an empty workbook
from openpypl import Wrokbook
from openpyxl.utils import get_column_letter

wb = Workbook()
ws1 = wb.active
A default Workbook containing at least a worksheet, the command Workbook.activeto obtain the current first sheet (i.e. a first Sheet);
2. Create a new worksheet
ws1 = wb.create_sheet("Mysheet") # insert at the end (default)

ws2 = wb.create_sheet("Mysheet", 0) # insert at first position
# or
ws3 = wb.create_sheet("Mysheet", -1) # insert at the penultimate position
By create_sheet()creating a new worksheet command, create_sheet default there are two parameters name, index;
- name, defines the name of the sheet;
- index, to set the position to insert the sheet, the default is None, that is, the newly created sheet is inserted to the end; 0 represents the position of the first sheet;
3. Change the name of the sheet
One line of code
ws.title = 'New Title'
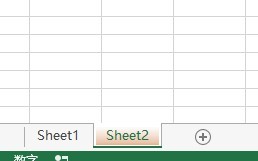
4. Change the background color of the tab on the sheet
ws.sheet_properties.tabColor = "1072BA"
By modifying Wroksheet.sheet_properties.tabColorparameters can, be noted here that only received RRGGBBcolor code;
For those who do not know what the background color of the sheet tab is, please refer to the figure below;
5. Return the names of all sheets in the Workbook
By Workbook.sheetnamecommand to view
>>> print(wb.sheetnames)
['Sheet2', 'New Title', 'Sheet1']

# 或者用迭代方法

>>> for sheet in wb:
...     print(sheet.title)
6. Copy the existing worksheets into the newly created workbook
Can Workbook.copy_worksheet()function method
# 将 source 中的worksheet复制到 target 中去

source = wb.active
target = wb.copy_worksheet(source)
It should be noted that when the workbook is in read-only or write-only mode, it cannot be copied; in addition, only cells (values, styles, hyperlinks, comments) and specific worksheet attributes (dimensions, formats, attributes) can be copied, and other workbooks / worksheet properties cannot be copied (Images Charts etc.)
7. Get the data of a cell
After successfully creating Workbook and Worksheet, you can then modify the cell (the content in the cell, Cells can be obtained through the unique keywords in the worksheet
>>> c = ws['A4'] # 获取第4行列名为A 单元格中的值
Modify it through assignment commands
ws['A4'] = 4
openpyxl has a function Worksheet.cell()to modify the data in the cell, can be targeted to specific rows, columns specific changes,
d = ws.cell(row = 4,columns = 2,value = 10)
- row represents the specified row
- columns indicates the specified column
- value represents the data value to be replaced in the cell; when this parameter is not set, it means that only the memory space is created for the cell without assigning a value
E.g
>>> for x in range(1,101):
...        for y in range(1,101):
...            ws.cell(row=x, column=y)
8. Get multiple cells
8.1, openpyxl can also perform slicing operations to obtain multiple cells
>>> cell_range = ws['A1':'C2']
8.2, the data acquisition method of multiple rows and multiple columns in the worksheet is similar
>>> colC = ws['C']
>>> col_range = ws['C:D']
>>> row10 = ws[10]
>>> row_range = ws[5:10]
8.3, Worksheet.iter_row()to get the row and column range in the sheet, and then use the loop iteration to get the data of each cell
>>> for row in ws.iter_rows(min_row=1, max_col=3, max_row=2):
...    for cell in row:
...        print(cell)
<Cell Sheet1.A1>
<Cell Sheet1.B1>
<Cell Sheet1.C1>
<Cell Sheet1.A2>
<Cell Sheet1.B2>
<Cell Sheet1.C2>
8.4, the Worksheet.iter_cols()same function can also be achieved
>>> for col in ws.iter_cols(min_row=1, max_col=3, max_row=2):
...     for cell in col:
...         print(cell)
<Cell Sheet1.A1>
<Cell Sheet1.A2>
<Cell Sheet1.B1>
<Cell Sheet1.B2>
<Cell Sheet1.C1>
<Cell Sheet1.C2>
Note that in the time read-onlymode, Worksheet,iter_cols()the method can not be used
9, only view the value in the cell
9.1, when only view the worksheet in value, by Worksheet.valuesproperty, which will iterate all the rows in the worksheet, but returns only cell values
for row in ws.values:
   for value in row:
     print(value)
9.2, through Worksheet.iter_rows(), and Worksheet.iter_cols()it can be achieved by adding a parameter in the function values_only = Trueto return the value of cell
>>> for row in ws.iter_rows(min_row=1, max_col=3, max_row=2, values_only=True):
...   print(row)

(None, None, None)
(None, None, None)
10. Read and write file operations
10. Excel file loading
openpyxl.load_workbook() Function to open a xlsx file stored locally
>>> from openpyxl import load_workbook
>>> wb2 = load_workbook('test.xlsx')
>>> print wb2.sheetnames
['Sheet2', 'New Title', 'Sheet1']
10.2, excel file storage
After the workbook is successfully modified and created, it Workbook.save(path)can be saved to the local disk through the command
>>> wb = Workbook()
>>> wb.save('balances.xlsx')
Okay, the above is all the content of this article, and thank you all for reading!