The old rules first look at the renderings
Normal SMS 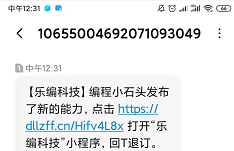
verification code SMS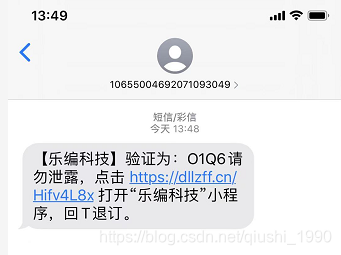
Today, I was informed by the cloud development official that the cloud development supports text messaging, and then I can’t wait to try it out.
Enter the official documentation, the benefits of cloud development to our developers are really not small.
Not only can the SMS function be used very conveniently, but also 1000 free text messages were sent to us. No need for nothing. These 1,000 text messages are enough for us to learn the SMS function of the applet and the SMS verification code function of the applet.
Not much nonsense, let’s just write the code
1. Conditions for developing SMS using cloud
This pre-condition is very important. If the conditions are not met, you cannot use the cloud to develop SMS functions.
Conditions of Use
- 1. It must be an enterprise applet, and personal applets cannot be sent by SMS at present
- 2. The static website function must be activated (it should be gradually released later)
- 3. Cloud development must be activated (this is not to say, what cloud development function do you use if you don’t activate cloud development)
After the above conditions are met, we can happily write the code.
Second, open the static website function
If you do not open a static website and directly call SMS sending, the following error will be reported. 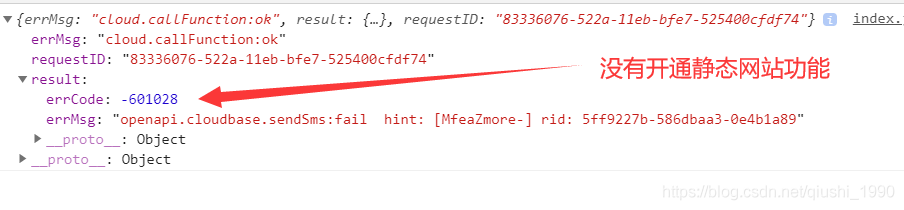
In fact, this error is also given in the official documentation. 
Then we will open the static website function. Before enabling the static website function, you must enable cloud development and configure the cloud development environment. I have talked about these many times in the introduction to cloud development. Students who don’t know can read my previous article or video: https://edu.csdn.net/course/detail/26572
Here we open cloud development with the help of small program developer tools to achieve rapid activation.
2-1, register the applet
I won’t say more here. Only the appid that has registered the mini program can open cloud development. After 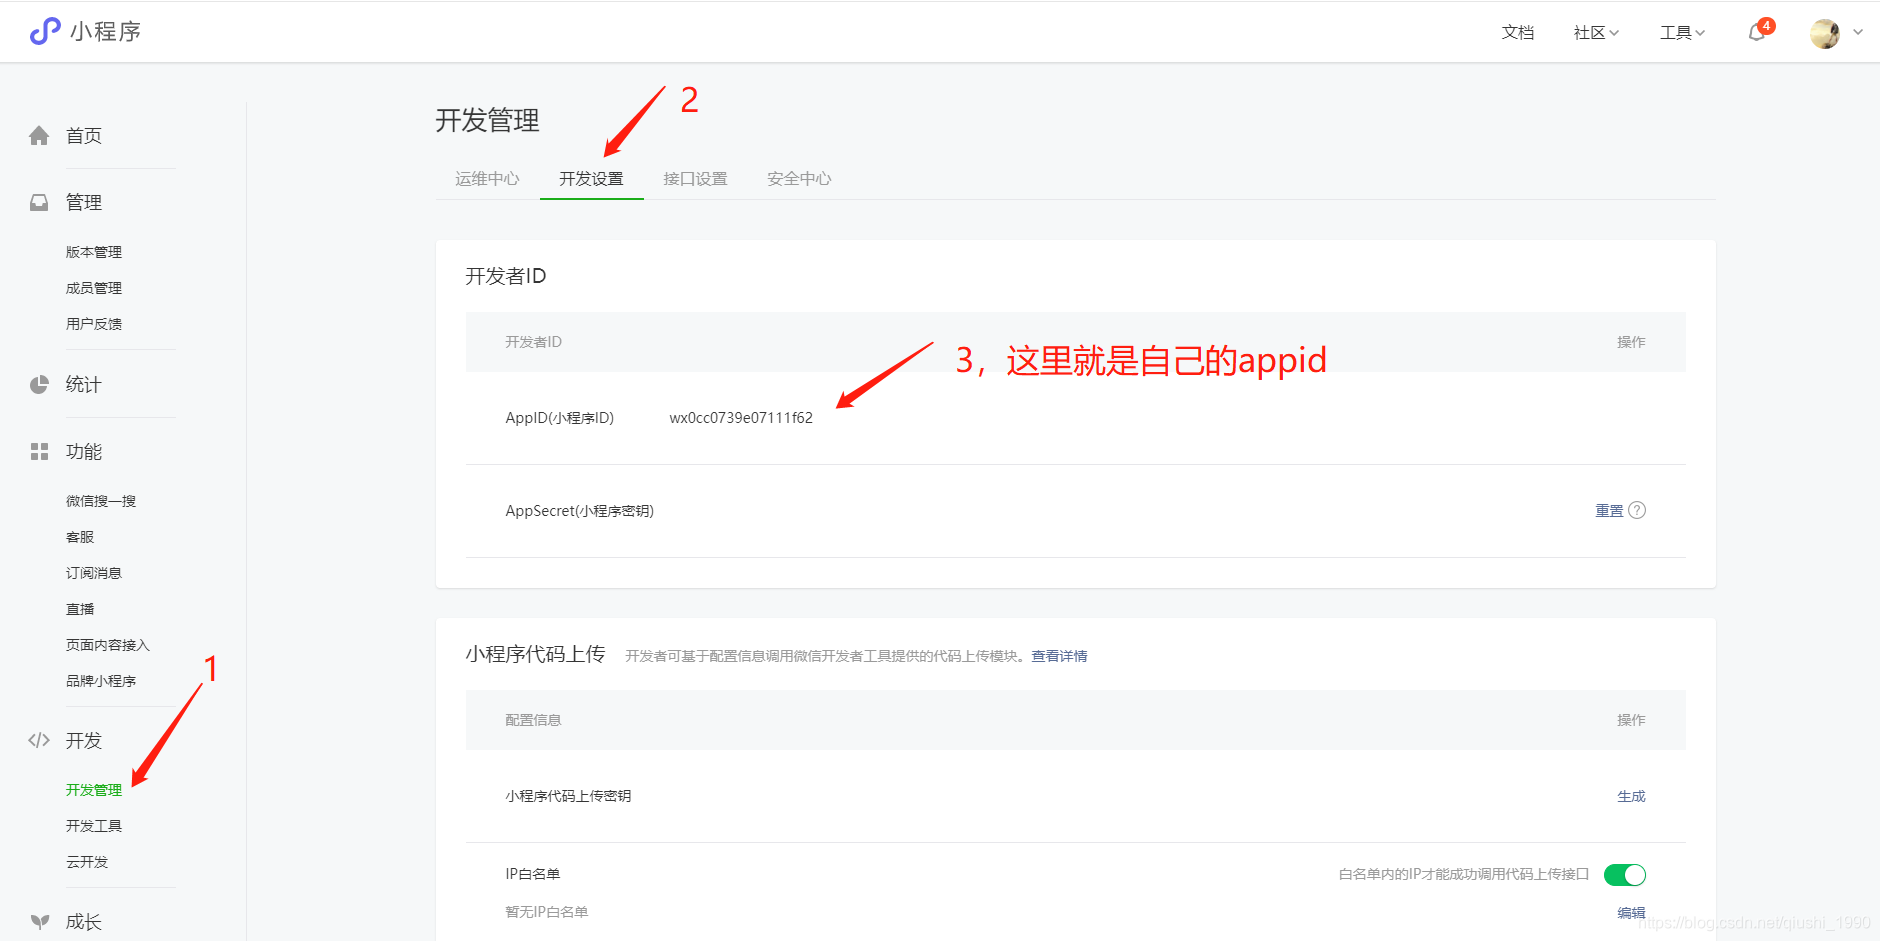
we register the mini program, we can get the appid, as shown in the figure above.
2-2, create a small program project
I won’t say more about the creation of the Mini Program project here. I have talked about it many times in the previous Mini Program Basic Course. "Mini Program Basic Learning"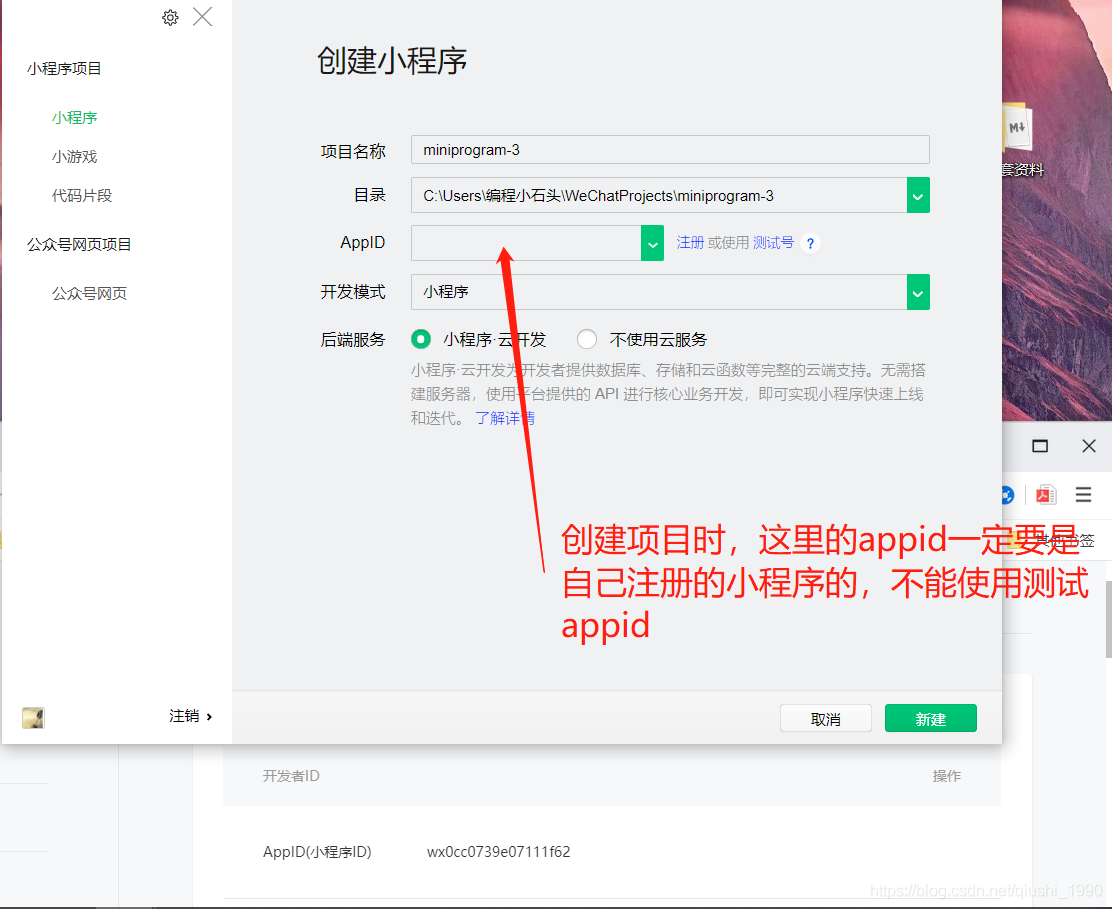
emphasizes one point here, that is, when creating a small program project, we must use our own appid and not a test number. 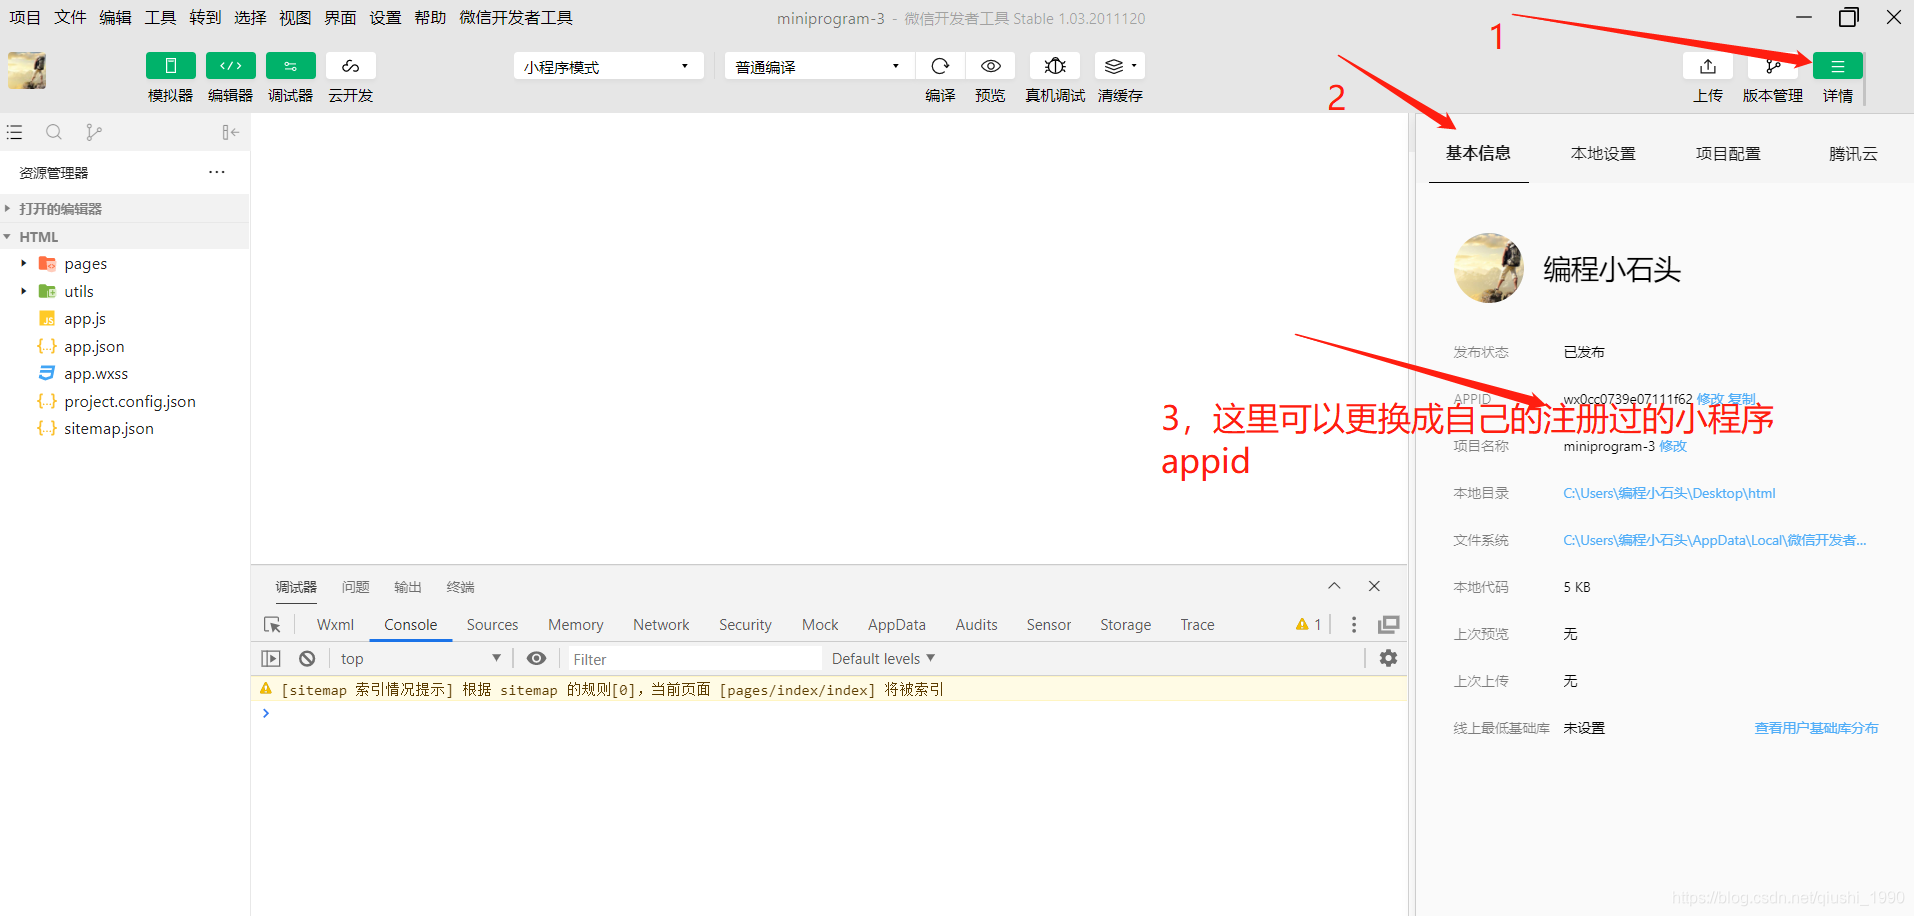
If you created it with a test appid at the beginning, you can also replace it with the appid of your own applet through the method above.
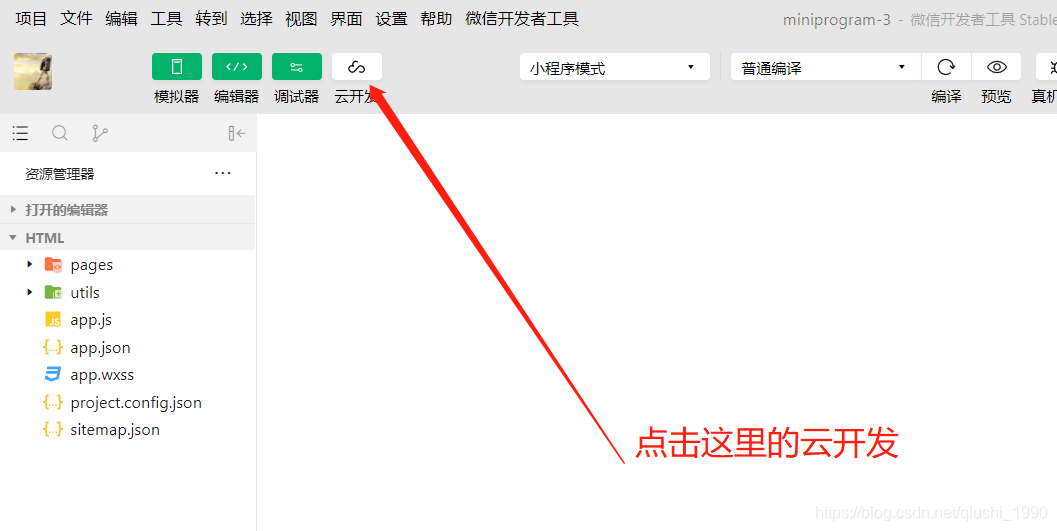
2-3, open cloud development
I won’t explain too much about the opening of cloud development here, and I have covered it many times in my cloud development course. You can go to the next page and 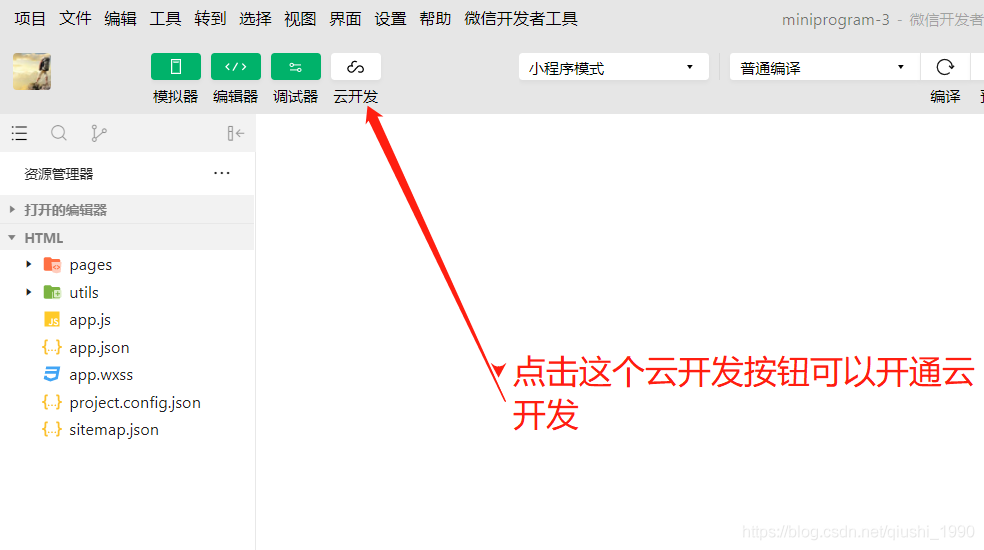
just click the cloud development button in the developer tools, and follow the prompts step by step to quickly start cloud development.
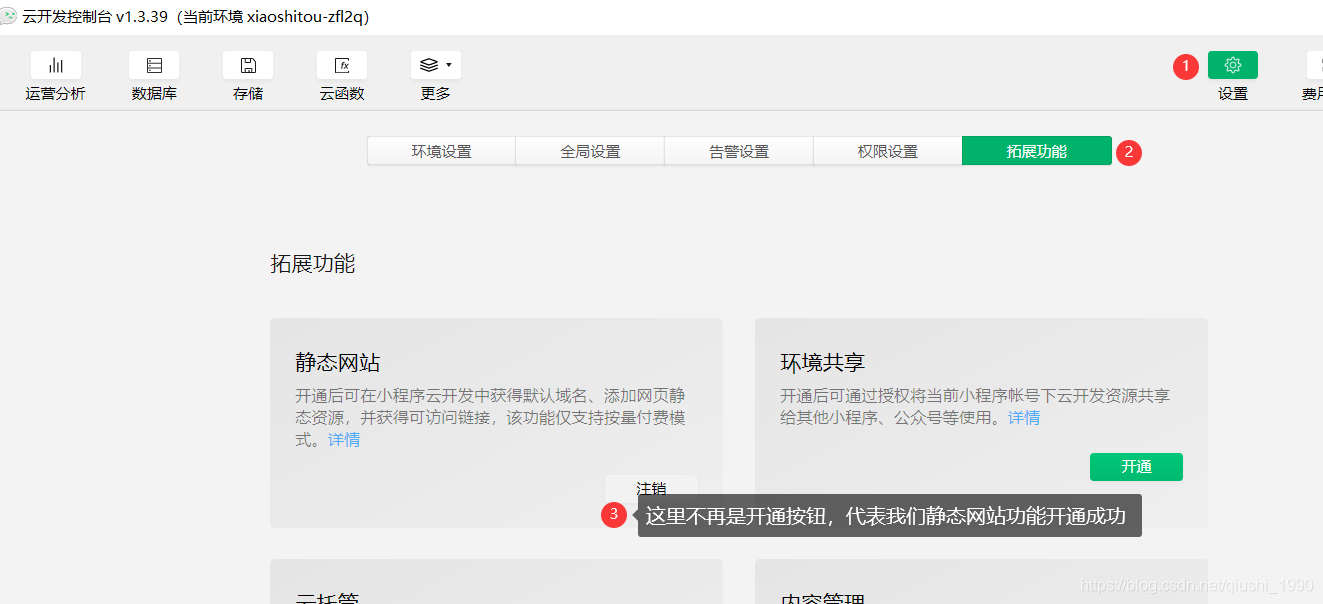
2-4, open static website function
After our cloud development is completed, we can quickly open a static website here. 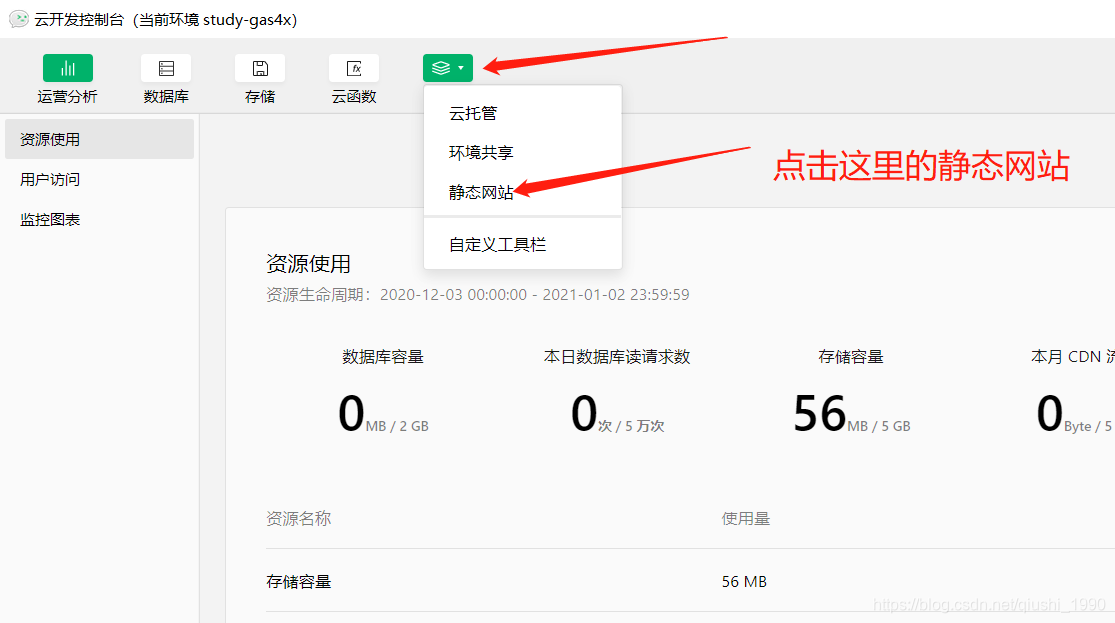
After clicking, you can click Activate directly. At 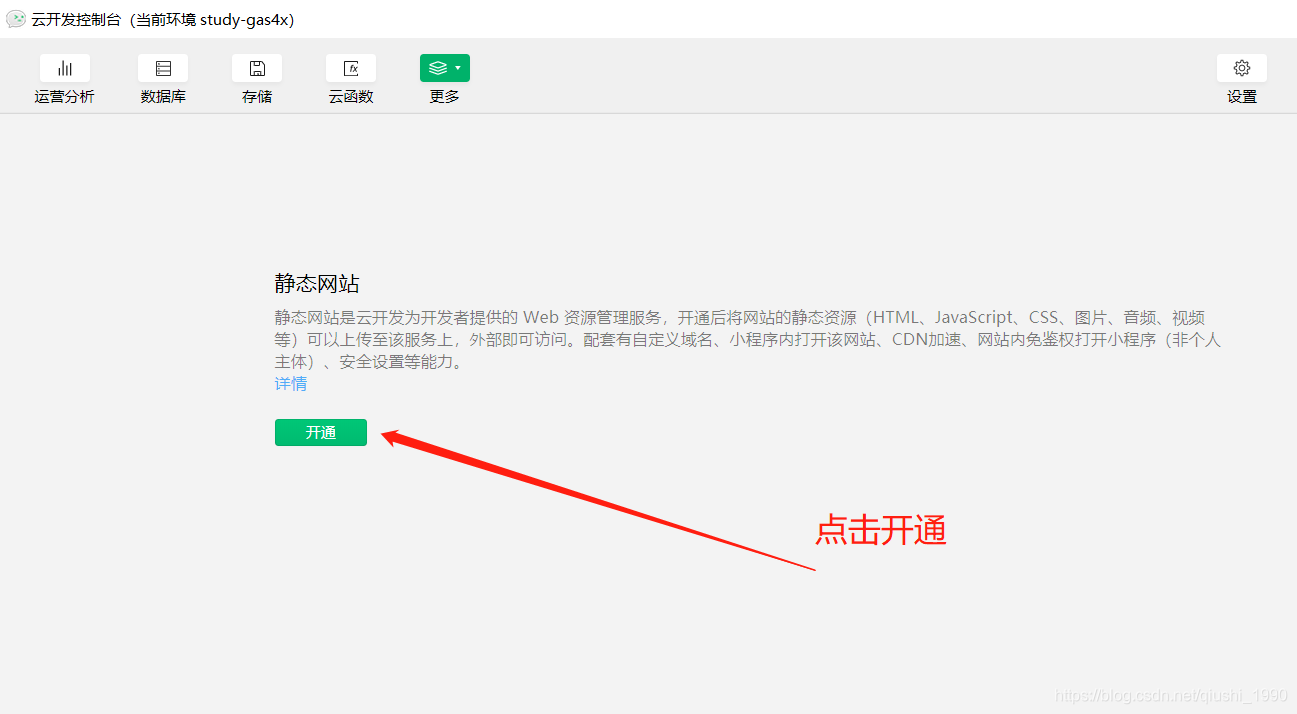
this time, there is a condition that 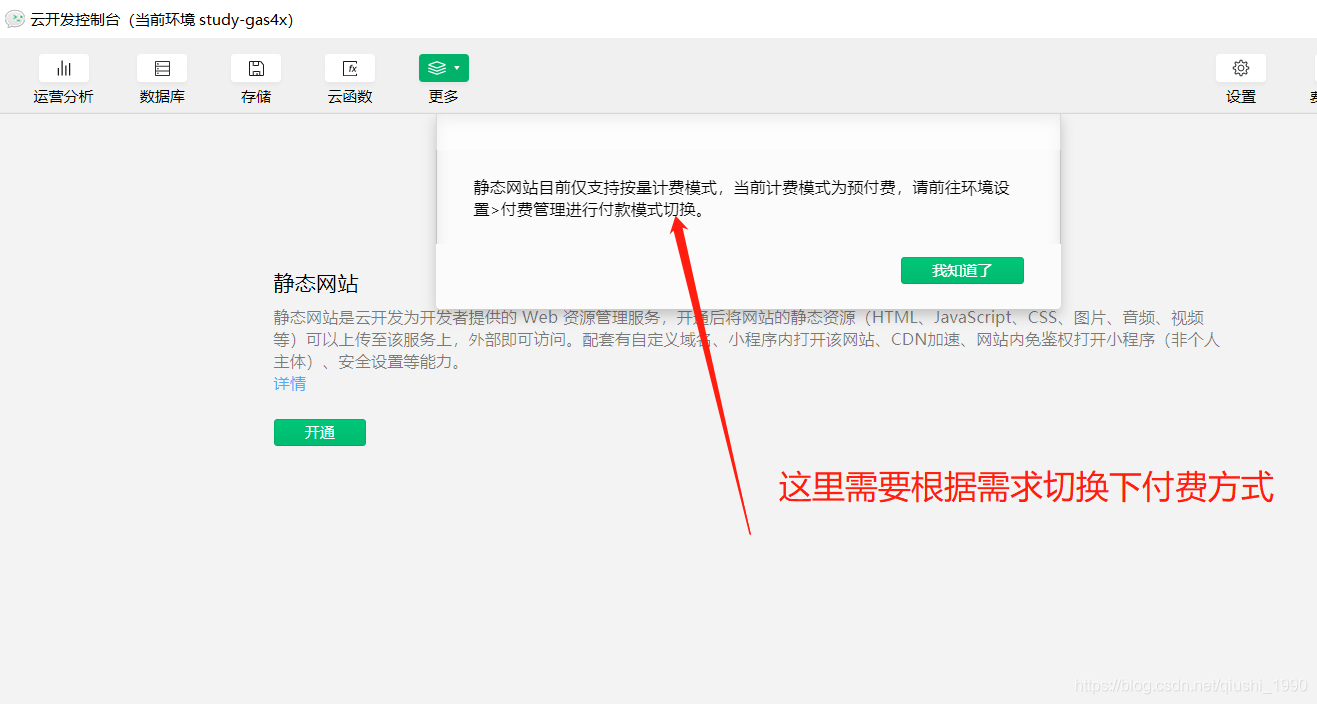
we must change the payment method of our Mini Program as required, and change our payment method to pay by volume. 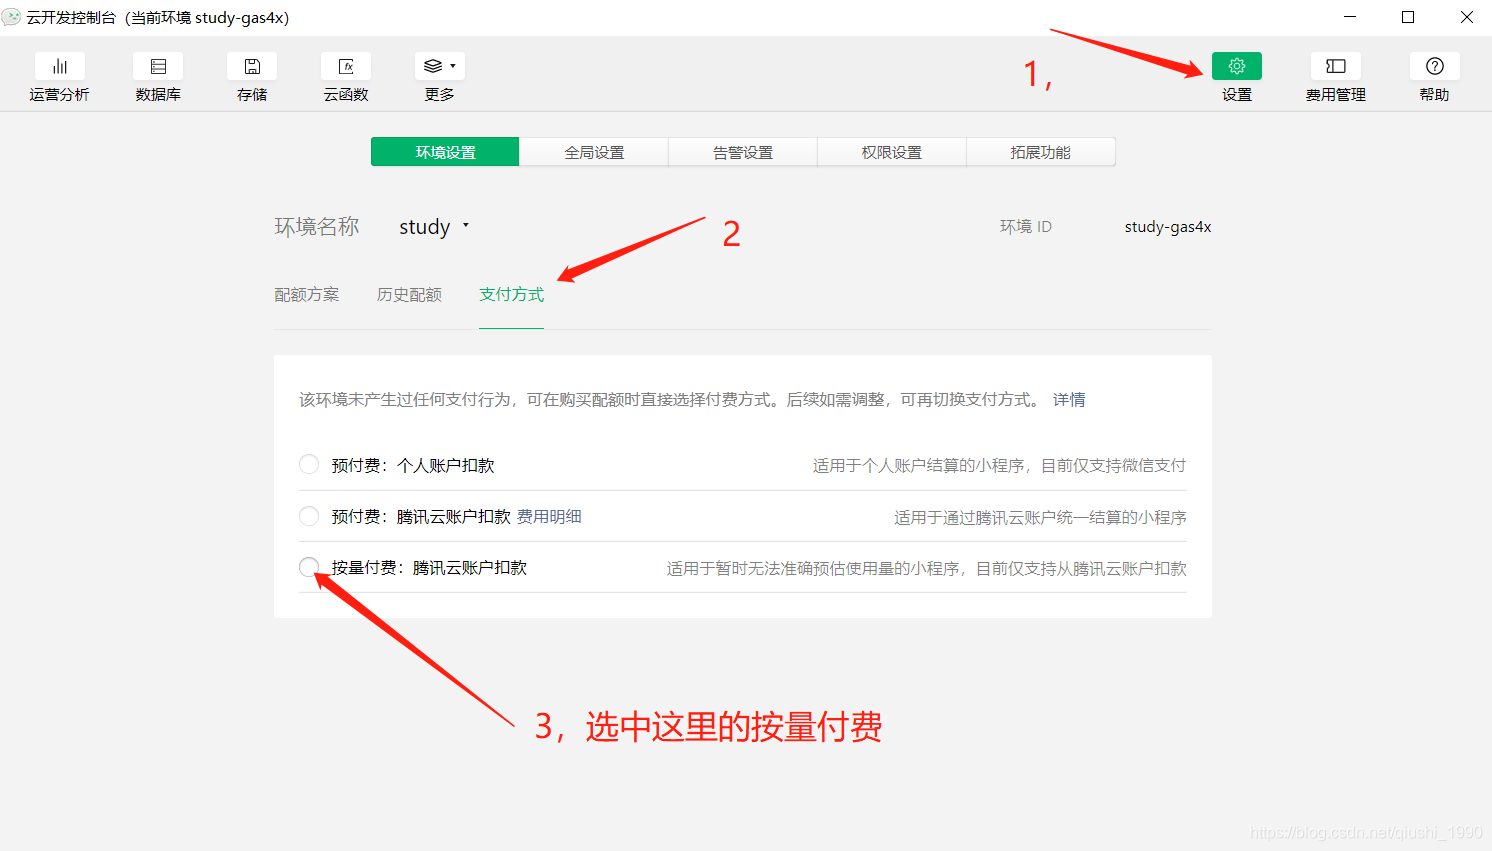
Don't worry here. Pay-as-you-go, and there is a free quota every month. These quotas are basically enough for our development and learning. At 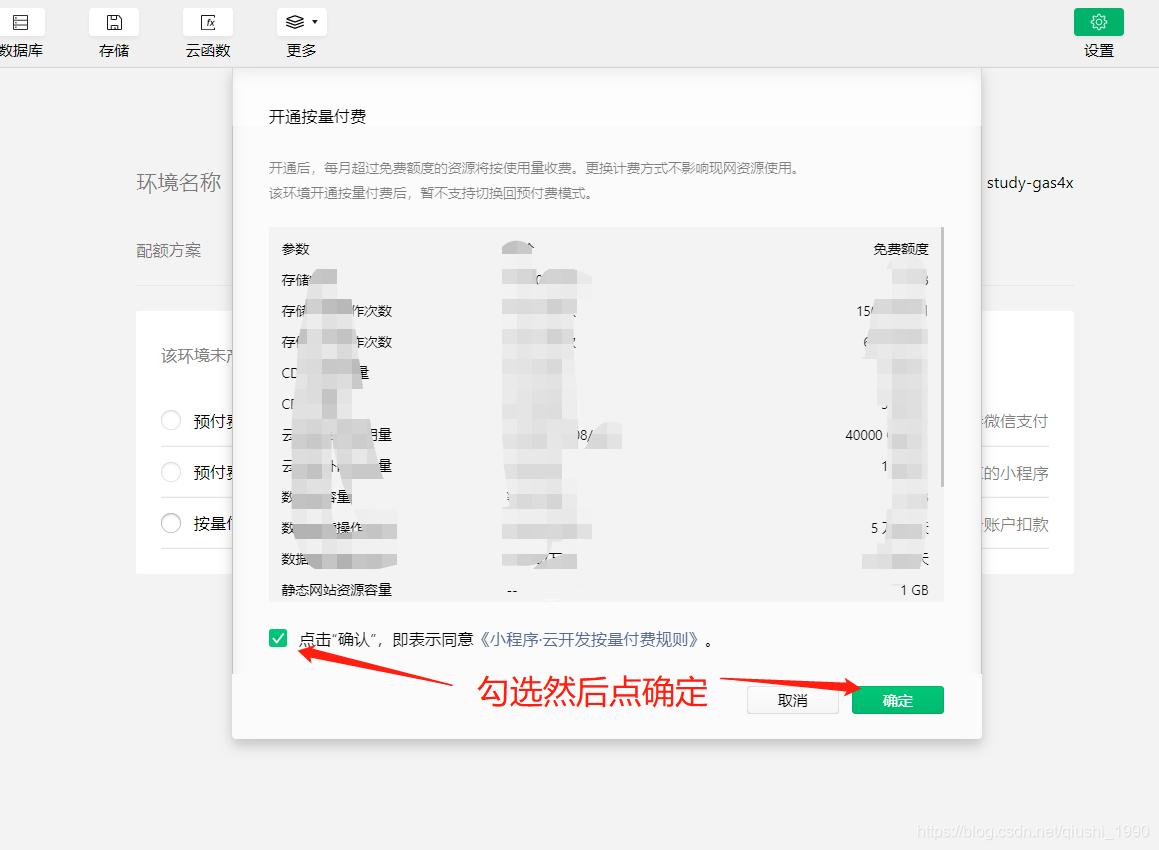
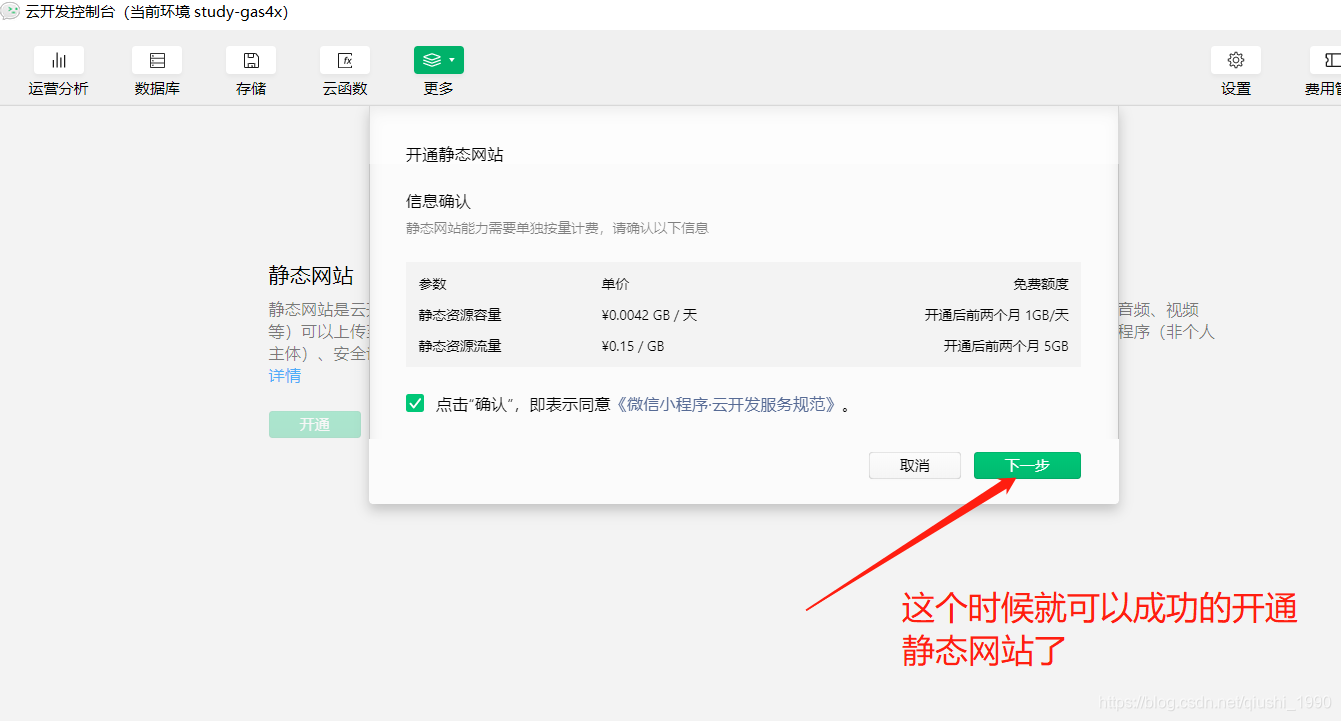
this time, our static website function is successfully activated. 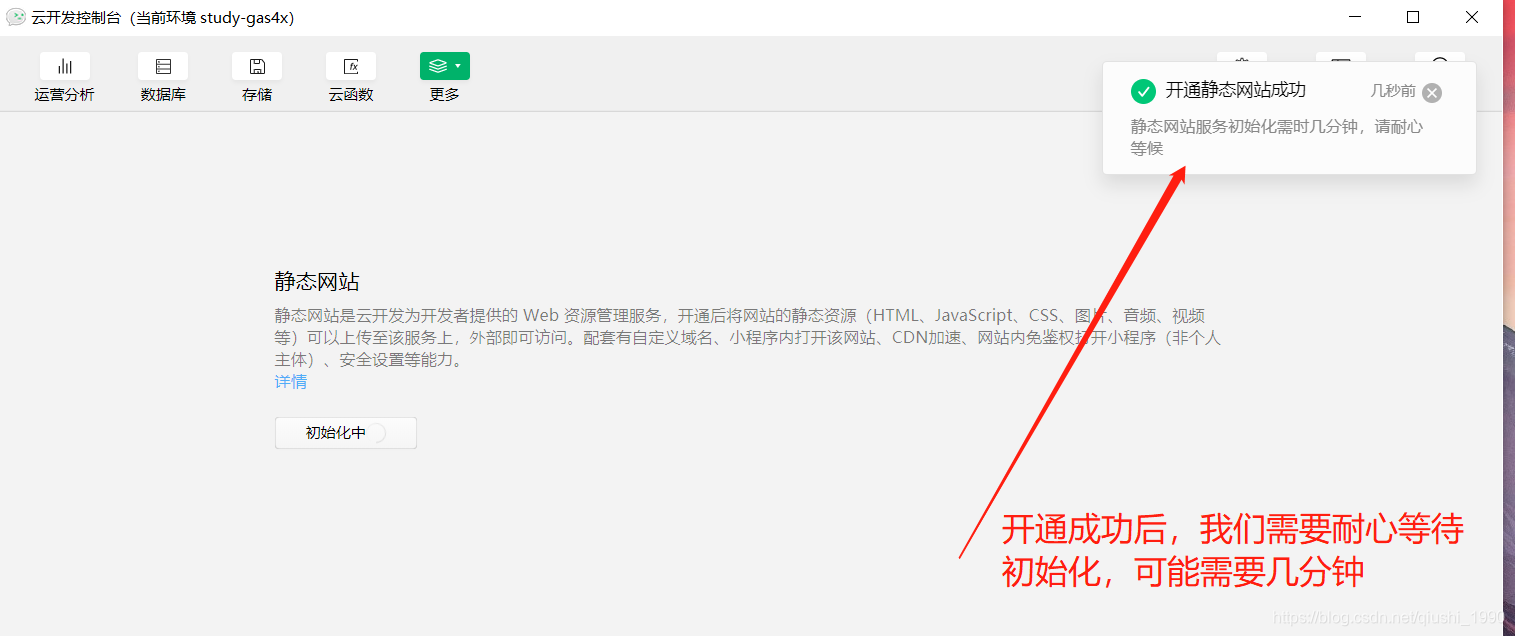
After successful opening, the following picture is shown.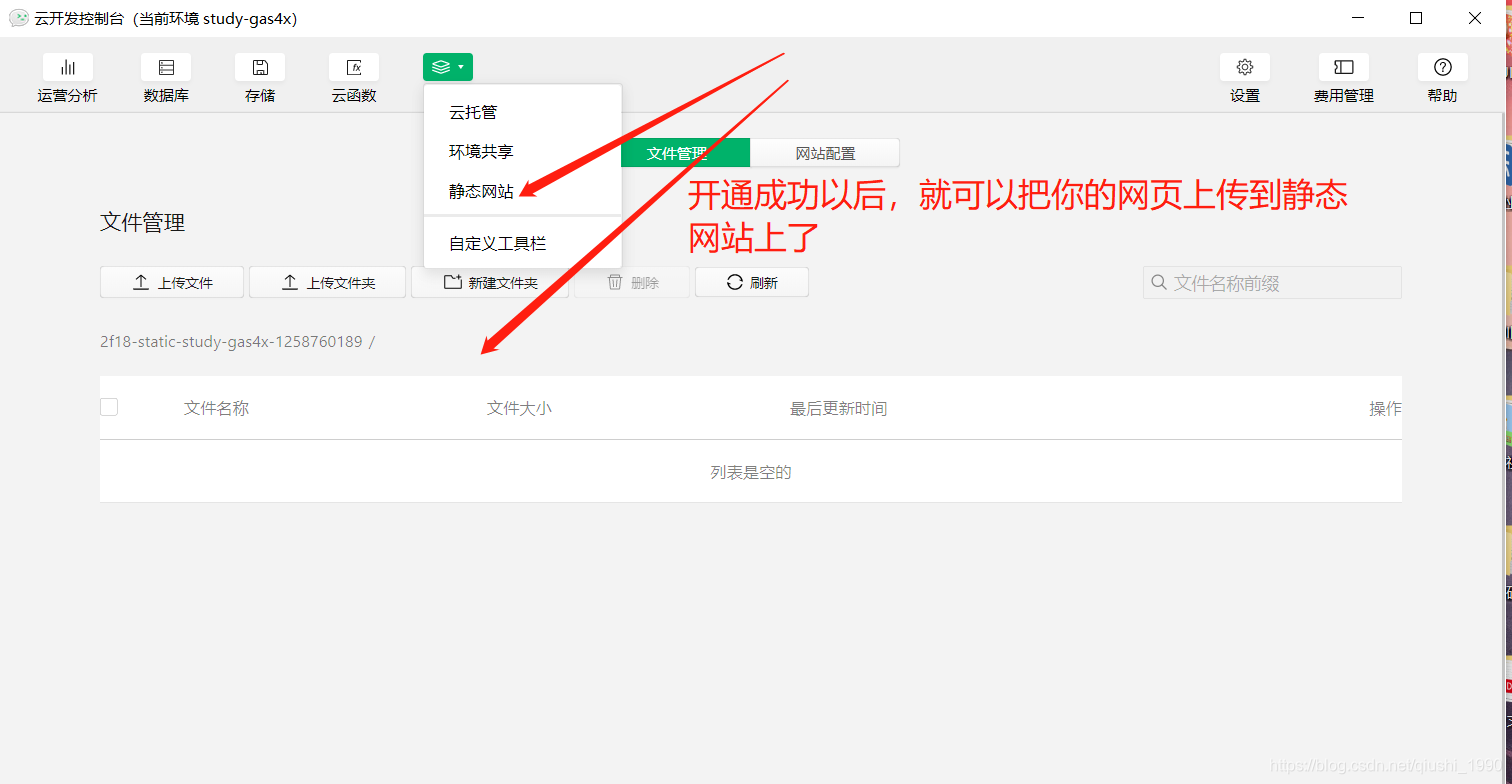
Three, write a cloud function for sending SMS
In fact, after the above static website function is opened, we can directly use the SMS function without uploading website resources.
Let's use the cloud function function developed by the cloud to do the SMS sending function.
The old rules first look at the renderings. 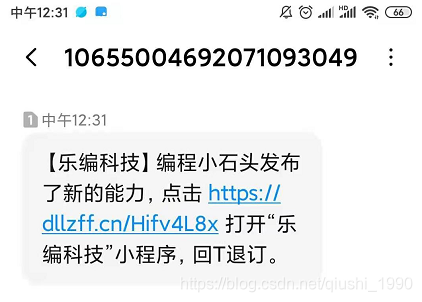
Code writing is also very simple. 
In fact, the code for sending SMS is very simple, just the above lines. Let's teach you how to write this cloud function.
3-1, Initialize the cloud development environment id
Create a new directory cloud at the same level as pages to store cloud functions 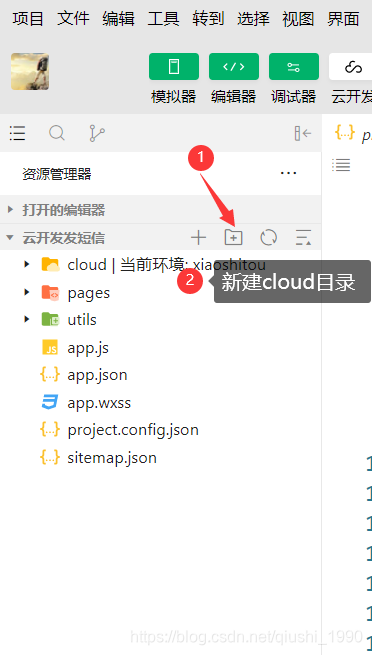
and then add the cloudfunctionRoot option in project.config.json. 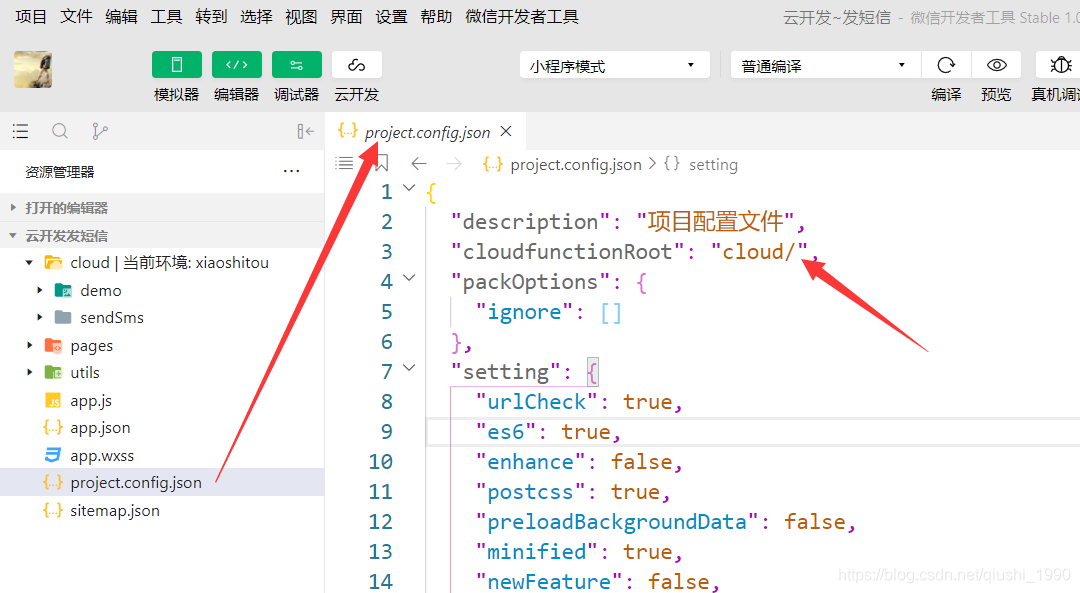
Then select the current environment for cloud 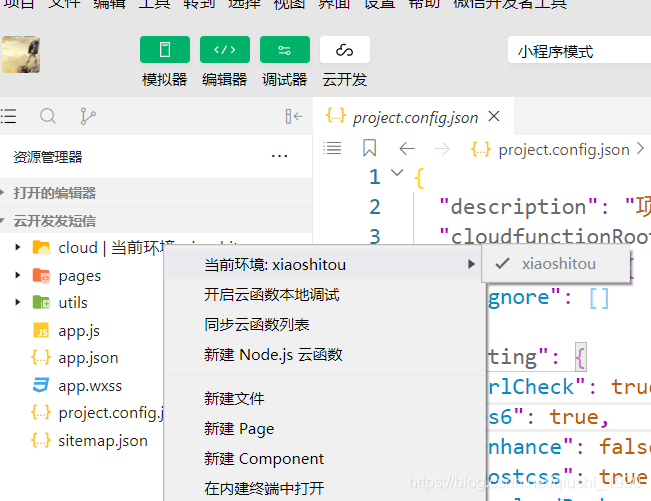
and configure environment variables in app.js. 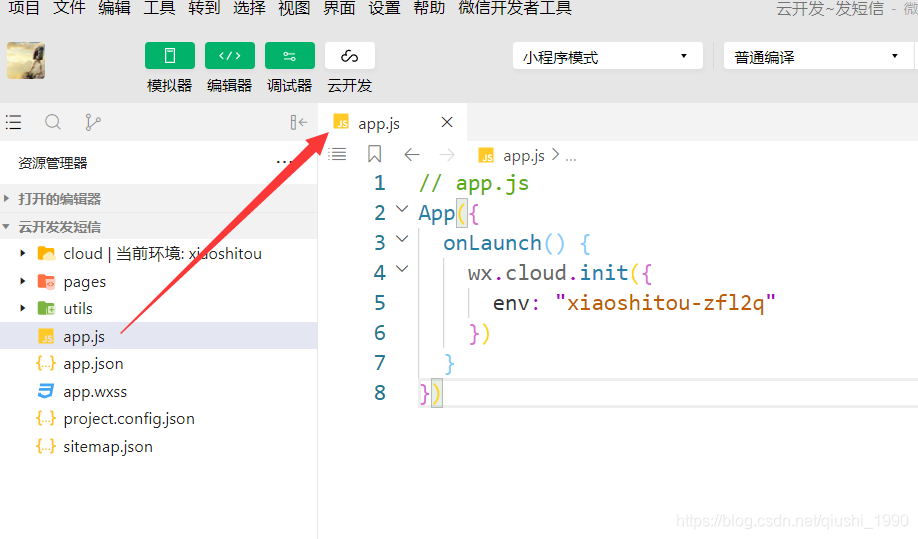
This env environment id needs you to go to the cloud development console to get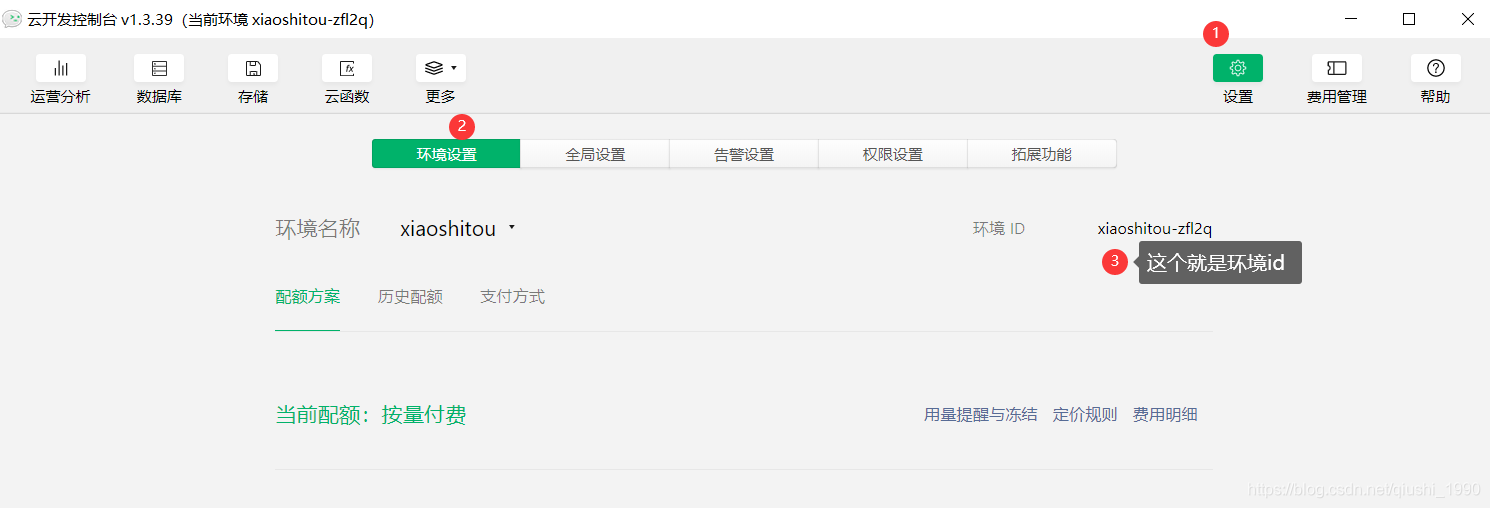
3-2, Create a cloud function
Right-click the cloud directory, create a new Node.js cloud function 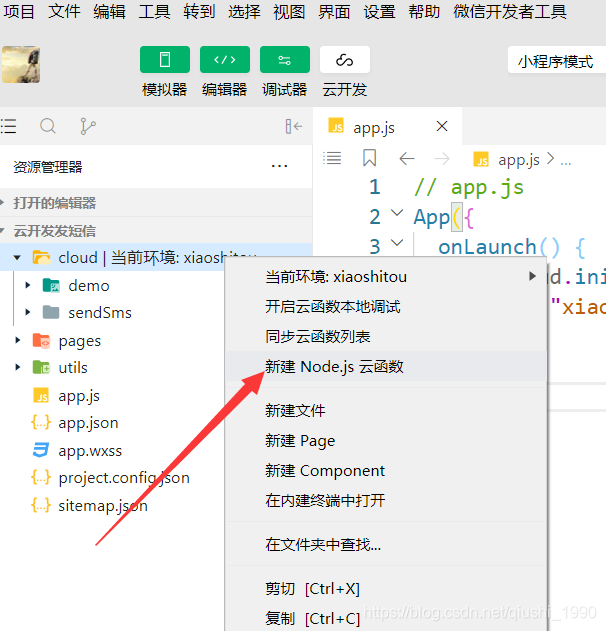
and then create a new cloud function, the name can be customized. I use sendSms here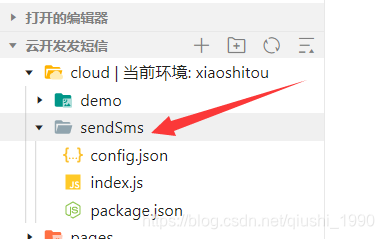
3-3, write cloud functions
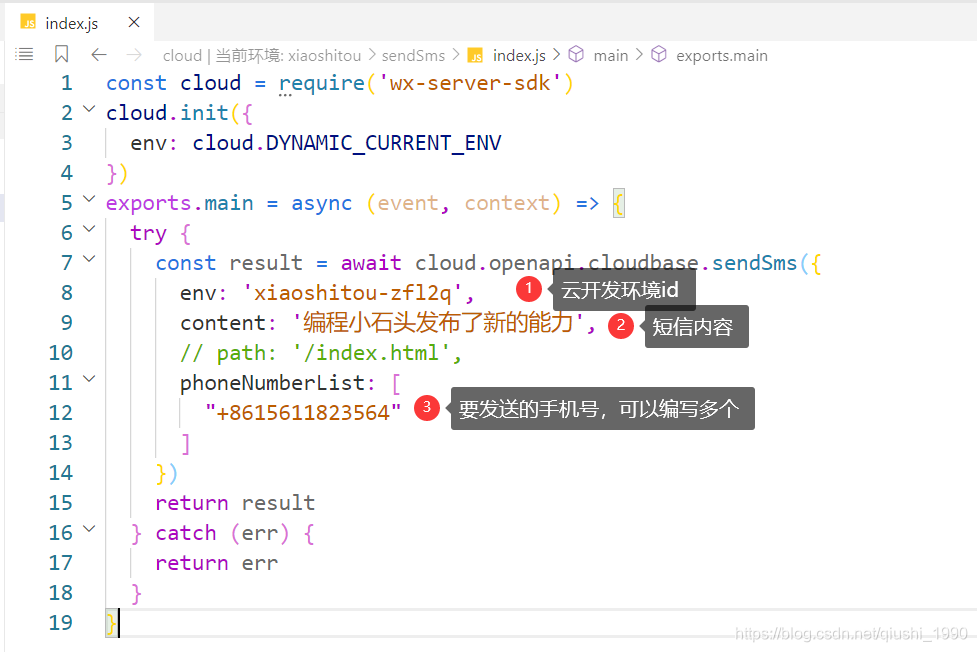
I will post the code here to everyone, remember to change the env and the mobile phone number that receives the SMS to your own.
const cloud = require('wx-server-sdk')
cloud.init({
  env: cloud.DYNAMIC_CURRENT_ENV
})
exports.main = async (event, context) => {
  try {
    const result = await cloud.openapi.cloudbase.sendSms({
      env: 'xiaoshitou-zfl2q',
      content: '编程小石头发布了新的能力',
      phoneNumberList: [
        "+8615611823564"
      ]
    })
    return result
  } catch (err) {
    return err
  }
}
3-4, deploy cloud functions
After the above cloud function is written, you must remember to deploy the next cloud function. Right-click sendSms and click the arrow shown below. 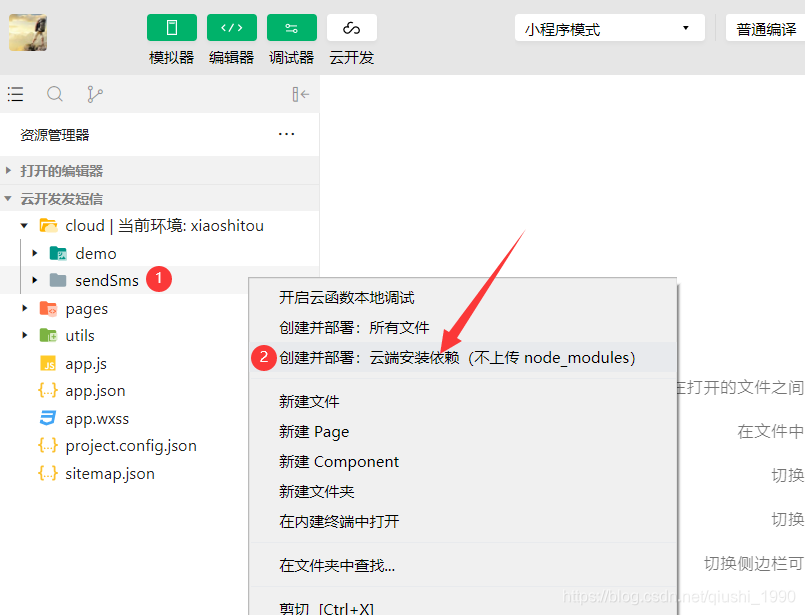
After successful upload and deployment, there will be a prompt like the following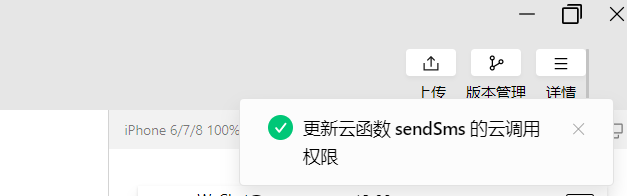
Four, call cloud function to send SMS
After our cloud function is written and deployed successfully, we can call this cloud function and send SMS.
4-1, write wxml file
Write a button button in the wxml file and write a bindtap click event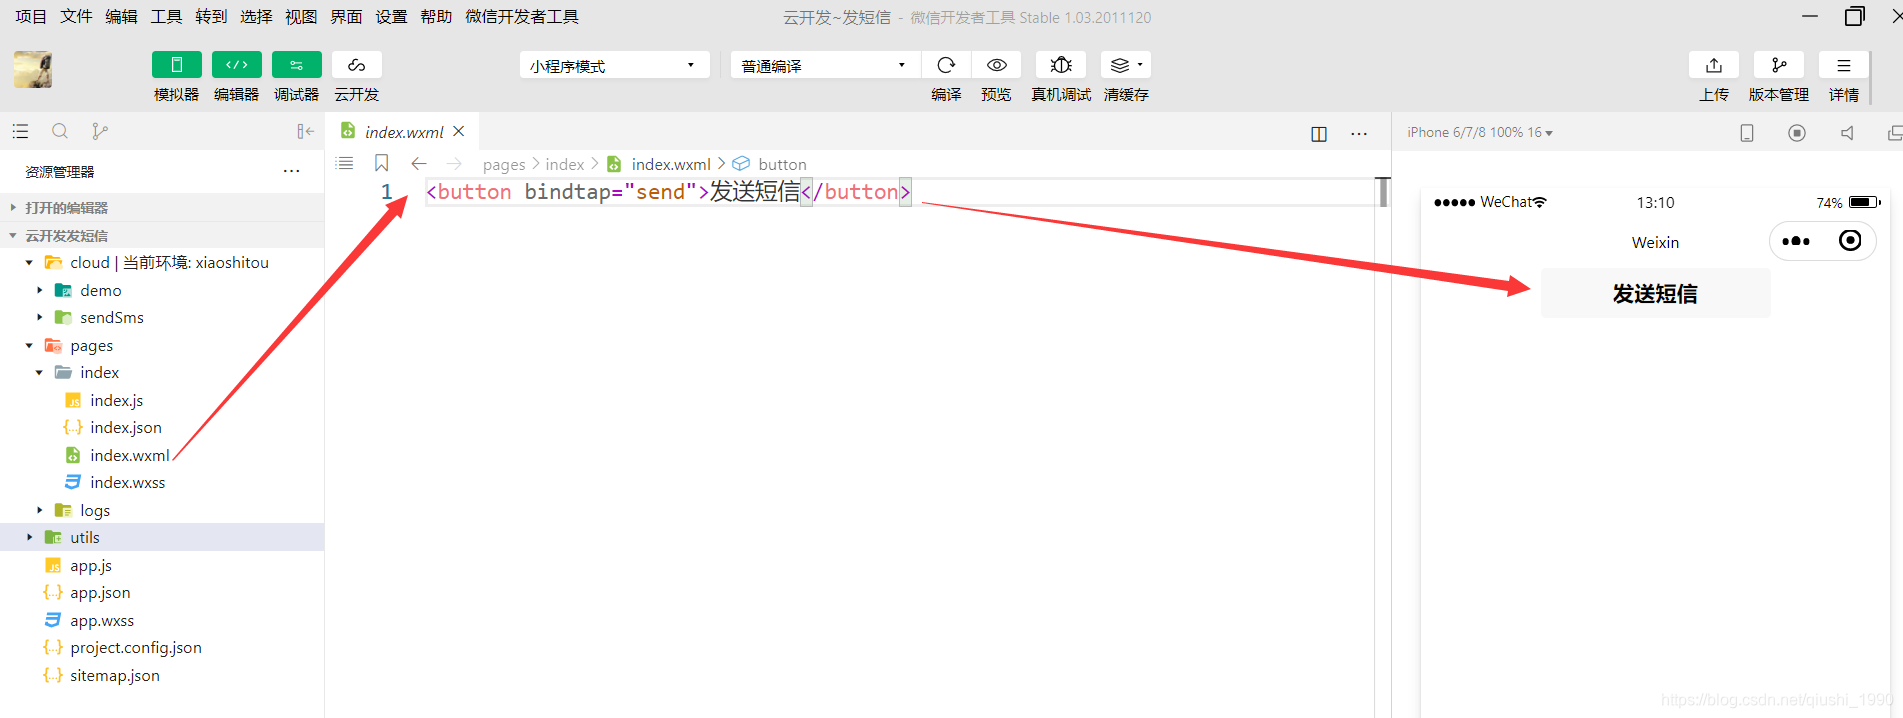
4-2, write js file
When you implement the click event of the above button in the js file, and then call the cloud function to 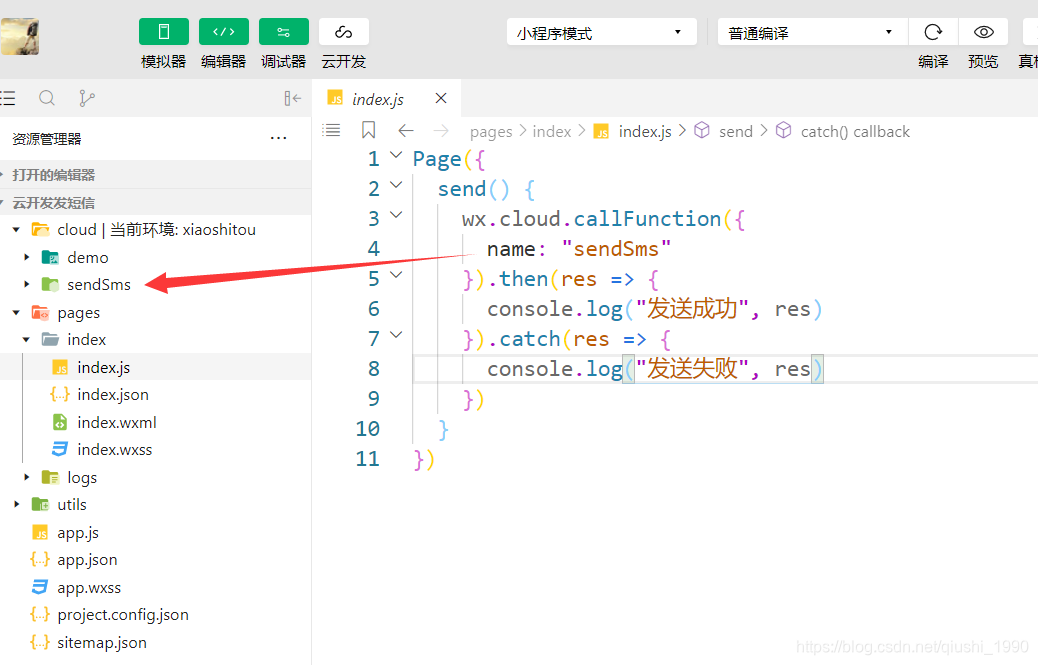
call the cloud function, you must remember that the name here must be exactly the same as your cloud function name.
4-3, click to send SMS
Click Send SMS and 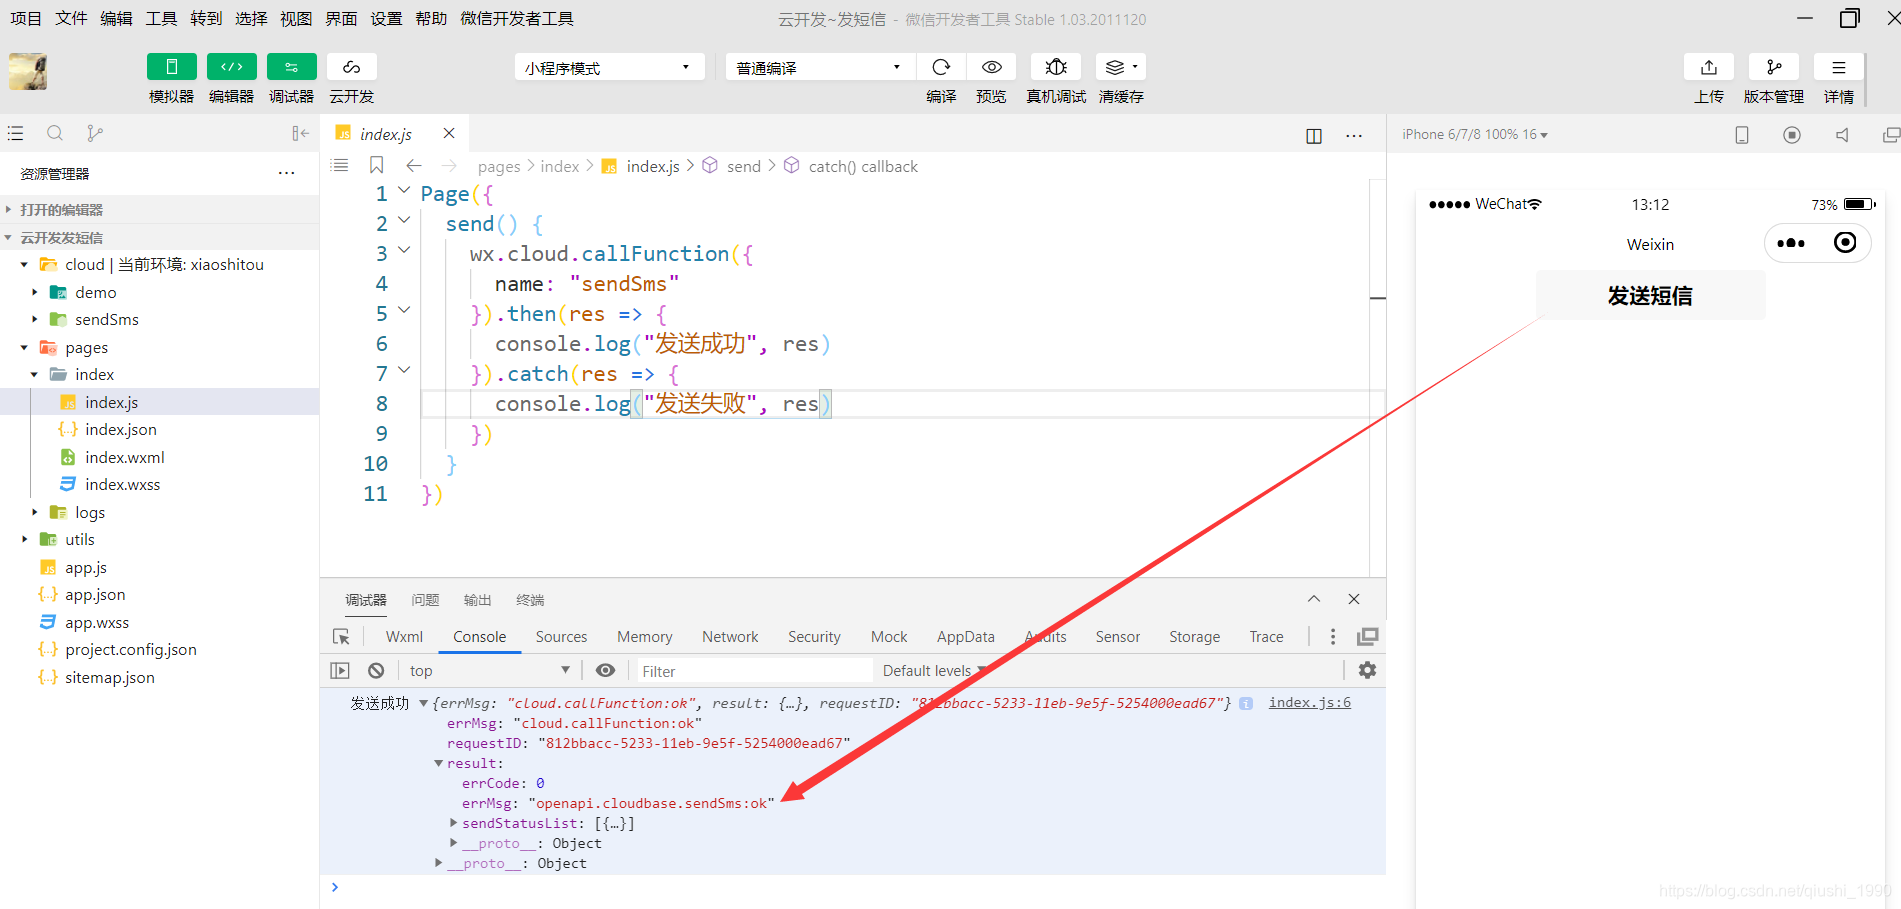
click Send SMS, you can see openapi.cloudbase.sendSms:ok
is printed in the log, which means the sending is successful.
Then I looked at my phone again and received the text message below. 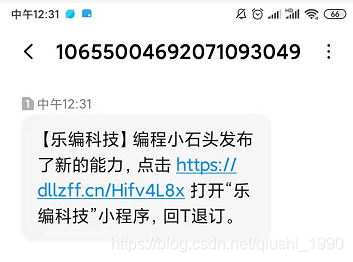
At this point, our SMS sending function is fully realized.
In fact, the functions that should be realized here have already been realized. But we use SMS scenarios more to send verification codes by SMS. So let’s make an example of sending SMS verification code
Practical case~Send verification code SMS
The old rules, first look at the renderings, 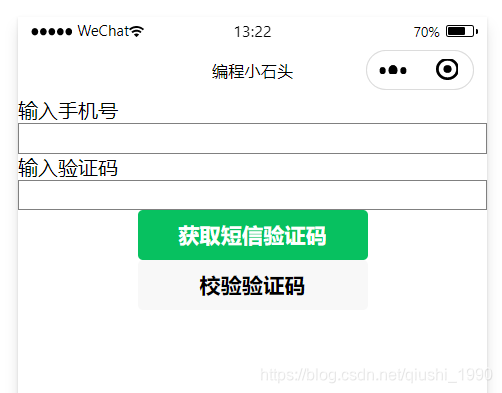
we only need to get the mobile phone number entered by the user, then click to get the verification code, and finally enter the verification code received in the SMS to verify.
1. Write wxml
The page is relatively simple, just two input boxes and two buttons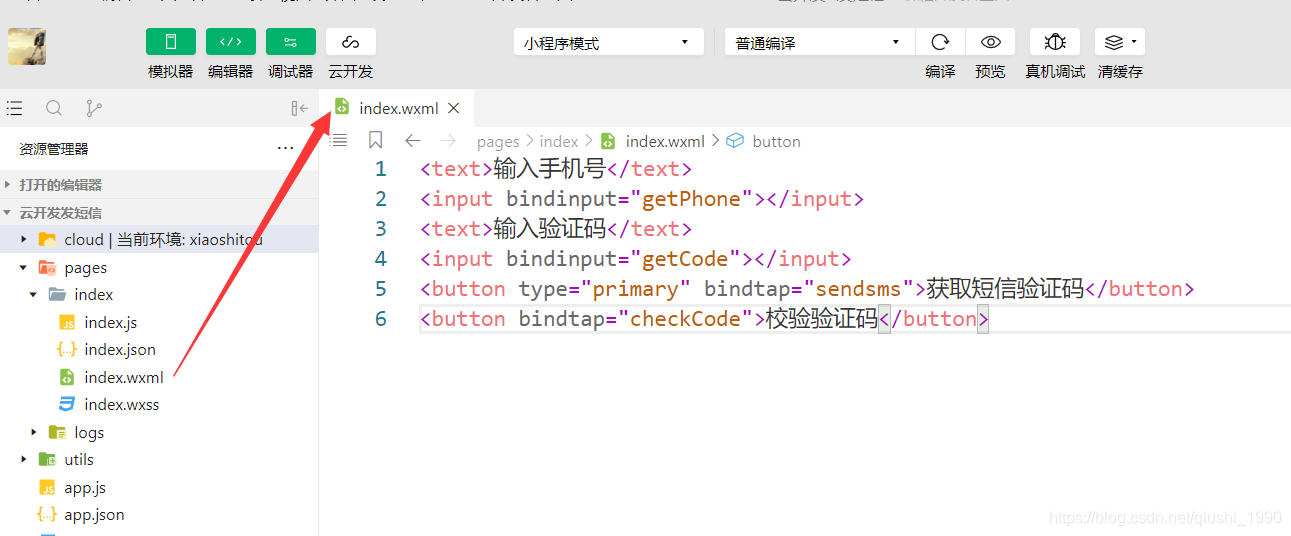
2. Write js
The main purpose of js is to obtain the mobile phone number entered by the user, and then send the verification code, and send the verification code to call the cloud function to realize the SMS verification code sending function. The user can verify after entering the verification code.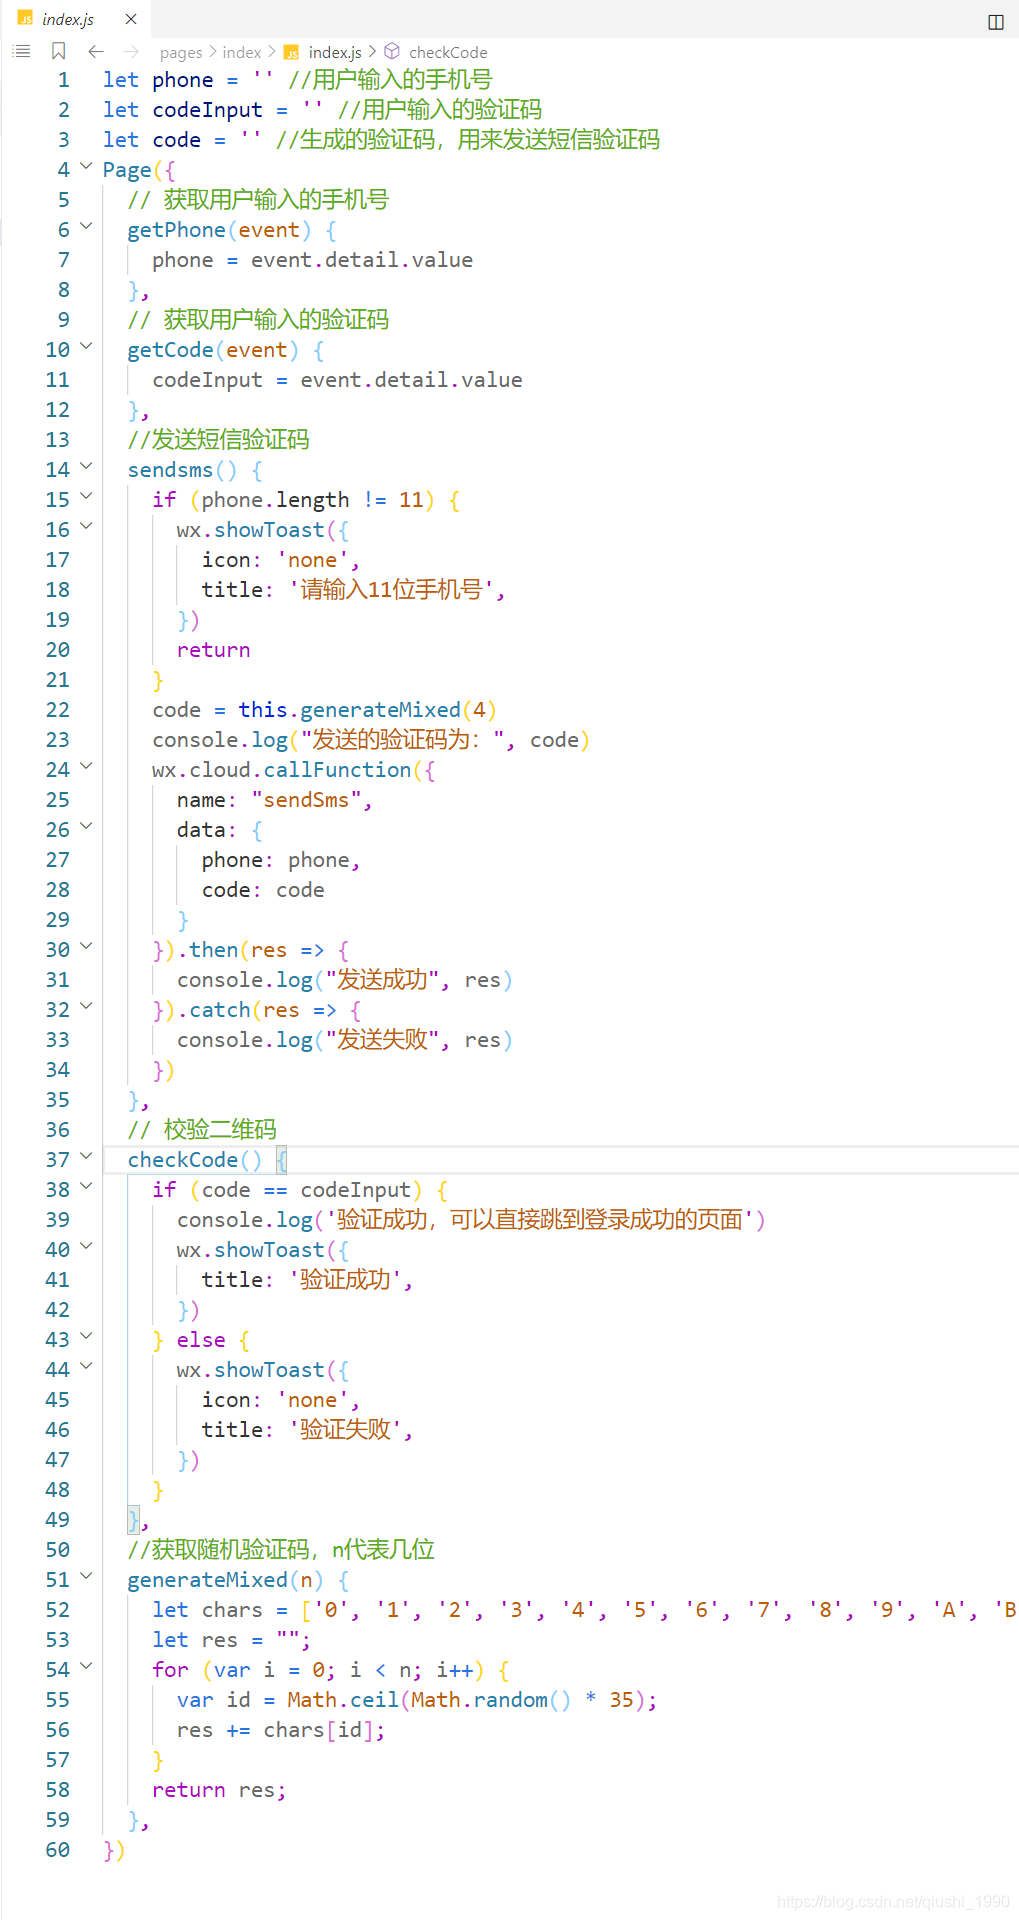
3. Send SMS verification code
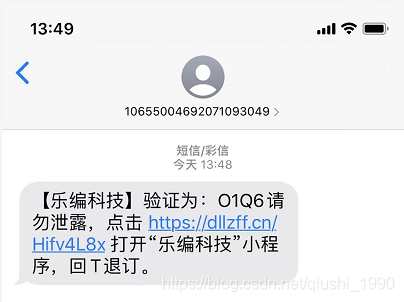
After the user enters the mobile phone number and clicks send, we can see that the following short message has been received on our mobile phone.
Then the user enters the obtained verification code and clicks verify. 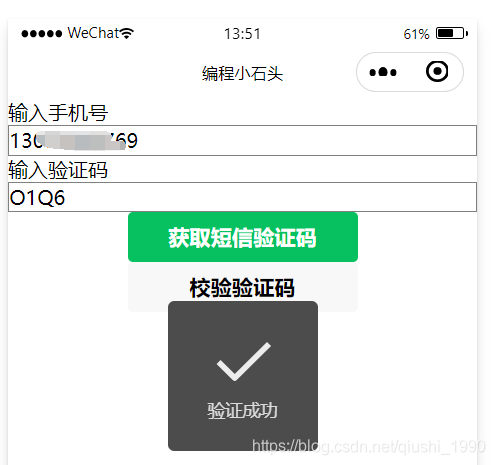
You can see that the verification is successful. After the verification is successful, the subsequent operations can be determined by yourself, such as jumping to the login success page after the verification is successful.
At this point we have realized the verification code sending function.
Method of generating random verification code
Here I will post the method of generating random verification codes to everyone.
  //获取随机验证码,n代表几位
  generateMixed(n) {
    let chars = ['0', '1', '2', '3', '4', '5', '6', '7', '8', '9', 'A', 'B', 'C', 'D', 'E', 'F', 'G', 'H', 'I', 'J', 'K', 'L', 'M', 'N', 'O', 'P', 'Q', 'R', 'S', 'T', 'U', 'V', 'W', 'X', 'Y', 'Z'];
    let res = "";
    for (var i = 0; i < n; i++) {
      var id = Math.ceil(Math.random() * 35);
      res += chars[id];
    }
    return res;
  }
I will record and explain the video later
Official document:
https://developers.weixin.qq.com/miniprogram/dev/api-backend/open-api/cloudbase/cloudbase.sendSms.html
Paid video (including source code and notes) :
https://edu.51cto.com/course/19575.html
Complete free video (remember the three links): https://www.bilibili.com/video/BV1Ca4y1n73j/