As mentioned at the end of the last article "Four Authorization Methods of OAuth2.0" , there will be a wave of actual battles in the follow-up OAuth2.0, and it has been delayed for a few days.
Recently I am working on my own open source project ( fire). The front-end and back-end separation framework of Springboot + vuehas only been built. I just started to do the login function, and I feel that the ordinary account password login is too simple and meaningless. A little higher, decided to add GitHubauthorization and 人脸识别other login methods.
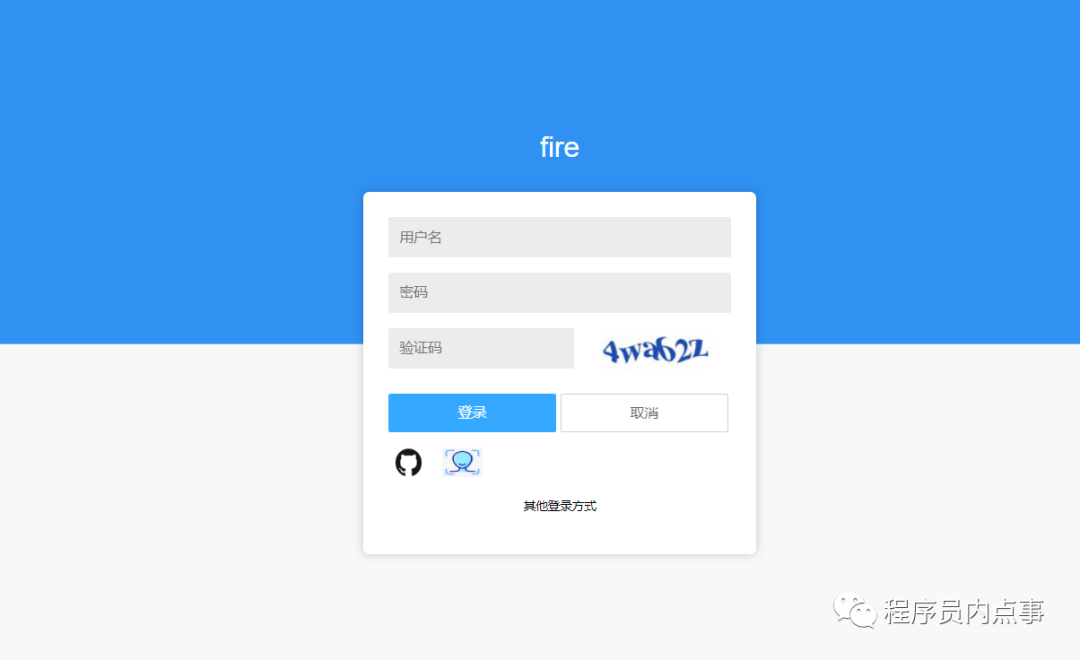 Insert picture description here
The GitHubauthorization login happens to use the OAuth2.0most complicated authorization code mode in the middle, just to take my case to share with you OAuth2.0the authorization process, I have deployed the project to the cloud service, there is a preview address at the end of the article, friends can experience it, follow-up projects Features will continue to be updated.
1. Authorization process
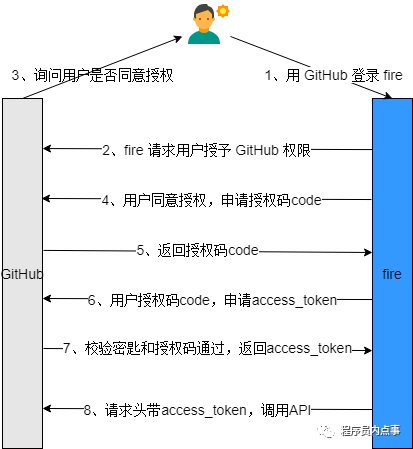
Before the specific GitHubauthorization login, let's briefly review OAuth2.0the authorization process of the authorization code mode. If the fire website allows GitHub login with an account, the process is roughly as follows.
 Insert picture description here
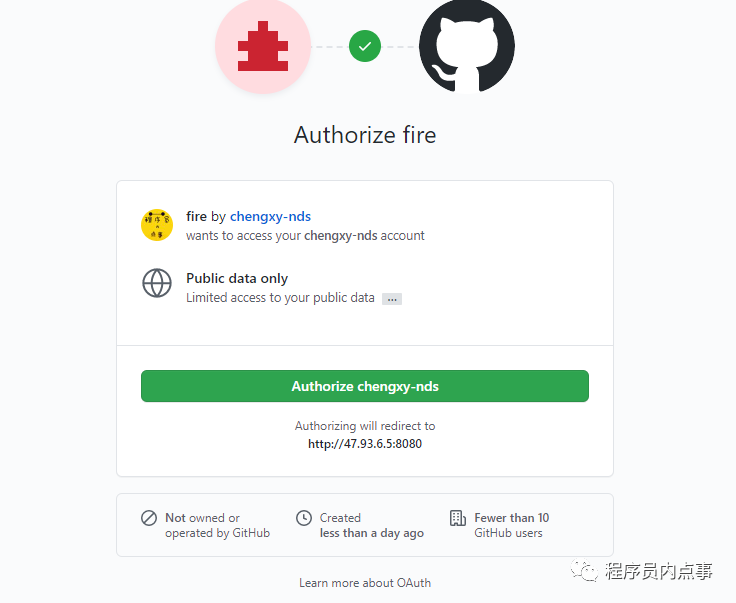
The user wants GitHub to log in to the fire website with an account :
fireThe website first asks the user to jump to theGitHubauthorization, an authorization box will pop up.- After the user agrees, it
GitHubwill beredirect_uriredirected back to thefirewebsite and an authorization code will be returned. fireThe website uses the authorization code and client keyclient_secretto request a token from GitHubtoken, and the verification passes the returned token.- Finally, the
firewebsiteGitHubrequests data, and every call to GitHubAPImust bring a token.
2. Identity registration
After sorting out the authorization logic, we still have some preparations.
To get a site OAuthlicense must go to its Web site identity registration, get the identification number of applications ClientID and ClientSecret.
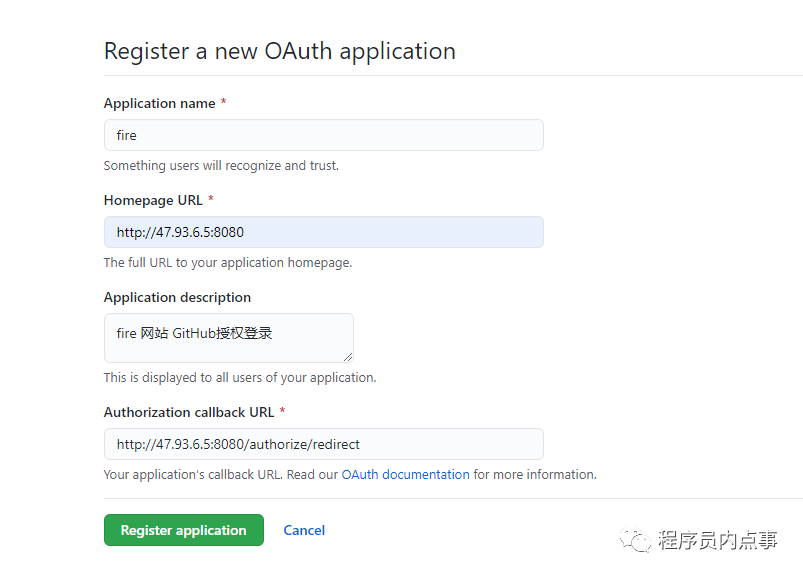
To register a portal https://github.com/settings/applications/1334665, there are several required fields.
Application name: Our application name;Homepage URL: Link to the application homepage;Authorization callback URL: This isgithubthe address of our project to call back to get the authorization code and token.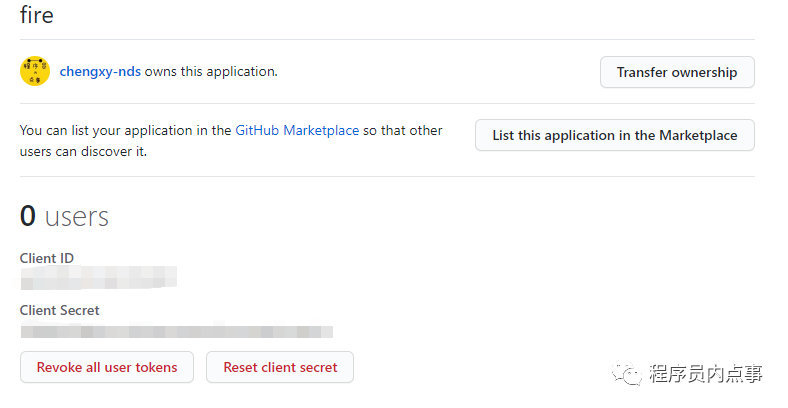
After submitting, you will see the client ClientID and client keys ClientSecret, and our preparations are complete.
 Insert picture description here
Three, authorized development
1. Obtain the authorization code
In order to see the effect better, I handled the authorization code more crudely, and directly JSassembled the authorization link in it, but security issues must be considered in the actual work development.
https://github.com/login/oauth/authorize?
client_id=ad41c05c211421c659db&
redirect_uri=http://47.93.6.5:8080/authorize/redirect
The front-end vue logic is also very simple, just need to window.location.href redirect.
<script>
export default {
  methods: {
    loginByGithub: function () {
      window.location.href = 'https://github.com/login/oauth/authorize?client_id=ad41c05c211421c659db&redirect_uri=http://47.93.6.5:8080/authorize/redirect'
    }
  }
}
</script>
After the request, we will be prompted to authorize. After the authorization is approved, we will be redirected to authorize/redirectand carry the authorization code code; if we have agreed before, we will skip this step and call back directly.
 Insert picture description here
2. Get the token
Immediately after authorization, the fire website interface access_tokenwill be called back, and the request link for obtaining the token will be assembled after the authorization code is obtained . At this time, the client key will be used client_secret.
https://github.com/login/oauth/access_token?
    client_id=${clientID}&
    client_secret=${clientSecret}&
    code=${requestToken}
access_token Will be returned as a request response, the result is a string of characters, we need to intercept it.
access_token=4dc43c2f43b773c327f97acf5dd66b147db9259c&scope=&token_type=bearer
After having the token, start to obtain user information, API which should be brought with you access_token.
https://api.github.com/user?access_token=4dc43c2f43b773c327f97acf5dd66b147db9259c
The returned user information is in the JSON data format. If you want to pass the data to the front end, you can pass url the data as parameters by redirecting to the front end page.
{
    "login": "chengxy-nds",
    "id": 12745094,
    "node_id": "",
    "avatar_url": "https://avatars3.githubusercontent.com/u/12745094?v=4",
    "gravatar_id": "",
    "url": "https://api.github.com/users/chengxy-nds",
    "html_url": "https://github.com/chengxy-nds",
    "followers_url": "https://api.github.com/users/chengxy-nds/followers",
    "following_url": "https://api.github.com/users/chengxy-nds/following{/other_user}",
    "gists_url": "https://api.github.com/users/chengxy-nds/gists{/gist_id}",
    "starred_url": "https://api.github.com/users/chengxy-nds/starred{/owner}{/repo}",
    "subscriptions_url": "https://api.github.com/users/chengxy-nds/subscriptions",
    "organizations_url": "https://api.github.com/users/chengxy-nds/orgs",
    "repos_url": "https://api.github.com/users/chengxy-nds/repos",
    "events_url": "https://api.github.com/users/chengxy-nds/events{/privacy}",
    "received_events_url": "https://api.github.com/users/chengxy-nds/received_events",
    "type": "",
    "site_admin": false,
    "name": "程序员内点事",
    "company": null,
    "blog": "",
    "location": null,
    "email": "",
    "hireable": null,
    "bio": null,
    "twitter_username": null,
    "public_repos": 7,
    "public_gists": 0,
    "followers": 14,
    "following": 0,
    "created_at": "2015-06-04T09:22:44Z",
    "updated_at": "2020-07-13T06:08:57Z"
}
Below is part of the code that calls back the back-end processing process of GitHub our firewebsite. The code is rather rough, so continue to optimize it!
/**
     * @param code
     * @author xiaofu
     * @description 授权回调
     * @date 2020/7/10 15:42
     */
   @RequestMapping("/authorize/redirect")
    public ModelAndView authorize(@NotEmpty String code) {

        log.info("授权码code: {}", code);

        /**
         * 重新到前端主页
         */
        String redirectHome = "http://47.93.6.5/home";

        try {
            /**
             * 1、拼装获取accessToken url
             */
            String accessTokenUrl = gitHubProperties.getAccesstokenUrl()
                    .replace("clientId", gitHubProperties.getClientId())
                    .replace("clientSecret", gitHubProperties.getClientSecret())
                    .replace("authorize_code", code);

            /**
             * 返回结果中直接返回token
             */
            String result = OkHttpClientUtil.sendByGetUrl(accessTokenUrl);
            log.info(" 请求 token 结果:{}", result);

            String accessToken = null;
            Pattern p = Pattern.compile("=(\\w+)&");
            Matcher m = p.matcher(result);
            while (m.find()) {
                accessToken = m.group(1);
                log.info("令牌token:{}", m.group(1));
                break;
            }

            /**
             * 成功获取token后,开始请求用户信息
             */
            String userInfoUrl = gitHubProperties.getUserUrl().replace("accessToken", accessToken);

            String userResult = OkHttpClientUtil.sendByGetUrl(userInfoUrl);

            log.info("用户信息:{}", userResult);

            UserInfo userInfo = JSON.parseObject(userResult, UserInfo.class);

            redirectHome += "?name=" + userInfo.getName();

        } catch (Exception e) {
            log.error("授权回调异常={}", e);
        }
        return new ModelAndView(new RedirectView(redirectHome));
    }
Finally, let's take a look at the overall authorization process with a moving picture. Due to GitHubthe relatively slow access speed, occasional requests may time out.
 Insert picture description here
Online preview address:, http://47.93.6.5/login welcome to experience~
Project GitHub address:https://github.com/chengxy-nds/fire.git
to sum up
From the perspective of the entire GitHubauthorization login process, OAuth2.0the authorization code mode is relatively simple. If you understand one GitHublogin, you will be able to log in by three parties like WeChat and Bib. It is completely similar, and interested students can try it. test.