1. Basic information description
Official website: https://www.postgresql.org/
Download instruction address: https://www.postgresql.org/download/linux/redhat/
Chinese community http://www.postgres.cn/index.php/v2/home
Chinese website https://postgres.fun/
Yibai tutorial https://www.yiibai.com/postgresql
2. System and tool description
1. System version Centos7.4 CentOS-7-x86_64-Minimal-1804
Download link: http://archive.kernel.org/centos-vault/7.4.1708/isos/x86_64/
2. VMware version: VMware Workstation Pro15
The virtual machine installation process can be referred to: https://blog.csdn.net/llwy1428/article/details/89328381
3. Tools: xshell5
Three, installation, deployment
1. Configure the virtual machine network, and each virtual machine is connected to the Internet
reference:
https://blog.csdn.net/llwy1428/article/details/85058028
2. Set static IP
[root@localhost ~]# vi /etc/sysconfig/network-scripts/ifcfg-ens33

Network restart
[root@localhost ~]# service network restart
3. Install basic tools
[root@localhost ~]# yum install -y vim lrzsz tree wget rpm net-tools
[root@localhost ~]# yum update -y
4. Open the browser https://www.postgresql.org/download/linux/redhat/ (Official website tutorial)
As shown below:

5. Install resource rpm, client, server
[root@localhost ~]# yum install -y https://download.postgresql.org/pub/repos/yum/reporpms/EL-7-x86_64/pgdg-redhat-repo-latest.noarch.rpm
[root@localhost ~]# yum install -y postgresql11   (客户端安装)

[root@localhost ~]# yum install -y postgresql11-server (服务端安装)

6. Database initialization (specify directory)
Create directories, add users, and empower users
创建目录
[root@localhost ~]# mkdir /data
[root@localhost ~]# mkdir /data/pgdata
创建用户
[root@localhost ~]# useradd postgres
给创建的目录赋予 postgres 用户权限
[root@localhost ~]# chown postgres:root /data/pgdata/
7. Initialize the database
Switch user
[root@localhost ~]# su - postgres
[postgres@localhost ~]$ /usr/pgsql-11/bin/initdb -D /data/pgdata/
8. View the data directory after initialization
[root@localhost ~]# su - postgres   (切换用户)
[postgres@localhost ~]$ ll /data/pgdata/
9, modify the configuration file
Operate under root user, modify PGDATA in it to the new data directory:
[root@localhost ~]$ vim /usr/lib/systemd/system/postgresql-11.service
10. Switch user postgres to modify the configuration file
[root@localhost ~]# su - postgres   (切换用户)
[postgres@localhost ~]$ vim /data/pgdata/postgresql.conf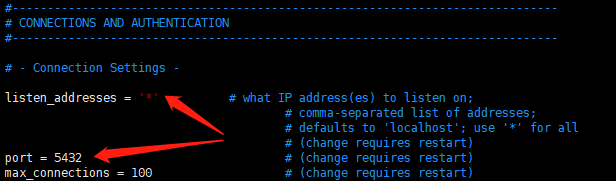


[root@localhost ~]# su - postgres   (切换用户)
[postgres@localhost ~]$ vim /data/pgdata/pg_hba.conf
host all all 0.0.0.0/0 md5Description:
TYPE: pg connection mode, local: local unix socket, host: tcp/ip connection
DATABASE: Specify the database
USER: Specify the database user
ADDRESS: IP address, you can define a certain host or a certain network segment, 32 means to check the entire ip address, which is equivalent to a fixed ip, 24 means to check only the first three digits, and the last digit is any one between 0 and 255
METHOD: Authentication method, commonly used are ident, md5, password, trust, reject.
md5 is a commonly used password authentication method.
The password is sent to the database as a plain text password, and it is not recommended to use it in a production environment.
Trust is to log in as long as you know the database user name. It is not recommended to use it in a production environment.
Reject is to refuse authentication.
11. Under root, the firewall opens the port of the postgresql database service (if conditions permit, you can directly close the firewall)
[root@localhost ~]# firewall-cmd --add-port=5432/tcp --permanent
success
[root@localhost ~]# firewall-cmd --reload
success
Other firewall operations can refer to:
https://blog.csdn.net/llwy1428/article/details/99676257
12. Database server startup, restart and status check
启动服务:
[root@localhost ~]# systemctl start postgresql-11

停止服务:
[root@localhost ~]# systemctl stop postgresql-11

重启服务:
[root@localhost ~]# systemctl restart postgresql-11
13. Check the startup status
[root@localhost ~]# netstat -lntp
14. Set the database password (the password I set here is: 123456)
切换用户
[root@localhost ~]# su - postgres
[postgres@localhost ~]$ psql
psql (11.5)
Type "help" for help.

postgres=# ALTER USER postgres ENCRYPTED PASSWORD '123456';
ALTER ROLE
postgres=# \l
                                  List of databases
   Name    |  Owner   | Encoding |   Collate   |    Ctype    |   Access privileges
-----------+----------+----------+-------------+-------------+-----------------------
 postgres  | postgres | UTF8     | en_US.UTF-8 | en_US.UTF-8 |
 template0 | postgres | UTF8     | en_US.UTF-8 | en_US.UTF-8 | =c/postgres          +
           |          |          |             |             | postgres=CTc/postgres
 template1 | postgres | UTF8     | en_US.UTF-8 | en_US.UTF-8 | =c/postgres          +
           |          |          |             |             | postgres=CTc/postgres
(3 rows)
15. Verify the usage status of the database


Remember a Centos7 installation of PostgreSql database-the specified data storage address operation is complete!
Refer to the installation and configuration of Pgadmin:
https://hunter.blog.csdn.net/article/details/102486511
Extension: Centos7 compile and install PostgreSql 11.4
https://blog.csdn.net/llwy1428/article/details/95444151
PostgreSql basic operation
https://blog.csdn.net/llwy1428/article/details/102598732
Reference: https://blog.csdn.net/llwy1428/article/details/102486414