Foreword:
Maybe before you read this article, your concept of Git and GitHub is still very vague, maybe you thought they are the same thing, but in fact they are not, in fact, the two are completely different things , If we want to step into the door of GitHub, we must first cross the mountain of Git. The author of the two of them is a bold analogy here. Git is like a truck, and GitHub is a warehouse, and Git's identity is to act as a link between various warehouses Transportation. Of course, this analogy is not very appropriate, and the author's literary talent is also very limited. But I believe you should quickly understand what Git and GitHub are after reading the explanations and applications below. I will not sell it here. Let's enter today's topic;
1. The background of Git
-
Git was written by Linus Torvalds, the founder of the Linux system, in 2005. At that time, it was just a rudiment and could not be called Git in the true sense, due to the developer license of the existing version management system used in the development of the Linux kernel. Changes occurred. In order to replace the new version management system, Linus later developed Git on the basis of the previous one. It is well known that the update speed of the Linux kernel is second to none in the world. Therefore, a powerful and high-performance version management system is bound to increase the development speed. In the open source environment at that time, although several version management software have been developed, the functions and performance are not satisfactory. In addition, Git was personally developed by Linus Torvalds, and it can be said that it is impeccable in terms of functionality and performance. The programmers' willingness to accept Git depends to a large extent on this background to benefit from the development.
-
In fact, there are many version control tools on the market, such as CSV (Concurrent Version System), SVN (Subversion), etc.
-
Then why does Git appear, and how is it different from other version control tools. Here are one by one
(1) First of all, the biggest difference between Git and SVN, CSV is: Git is distributed , and the latter two One is not, this is the most essential difference
(2) Git's content integrity is better than SVN: Git's content storage uses the SHA-1 hash algorithm. This can ensure the integrity of the code content and reduce the damage to the repository in the event of disk failures and network problems.
(3) The Git branch is different from the SVN branch: the branch is not special in SVN, in fact it is the repository In another directory in Git, the branch is almost unaware of the user when it comes. You completely feel that there is no connection between the two branches. It seems to be two different environments, which is a bit similar to the one on the current mobile phone. The effect of a mobile phone cloneNote: In fact, there are many differences, not all of them are listed here
-
Earlier, when we talked about the difference between Git and other version control tools, we mentioned a keyword ( distributed ). With the development of big data now, it can be seen everywhere. Then distributed version control tools and ordinary centralized What is the difference between a version control tool and who is better?
-
In fact, this author can say for sure that there is no difference between the two different architectures of version control tools. Which one you use depends entirely on your work needs.
-
Let's take a look at the architecture model of the centralized version control tool :
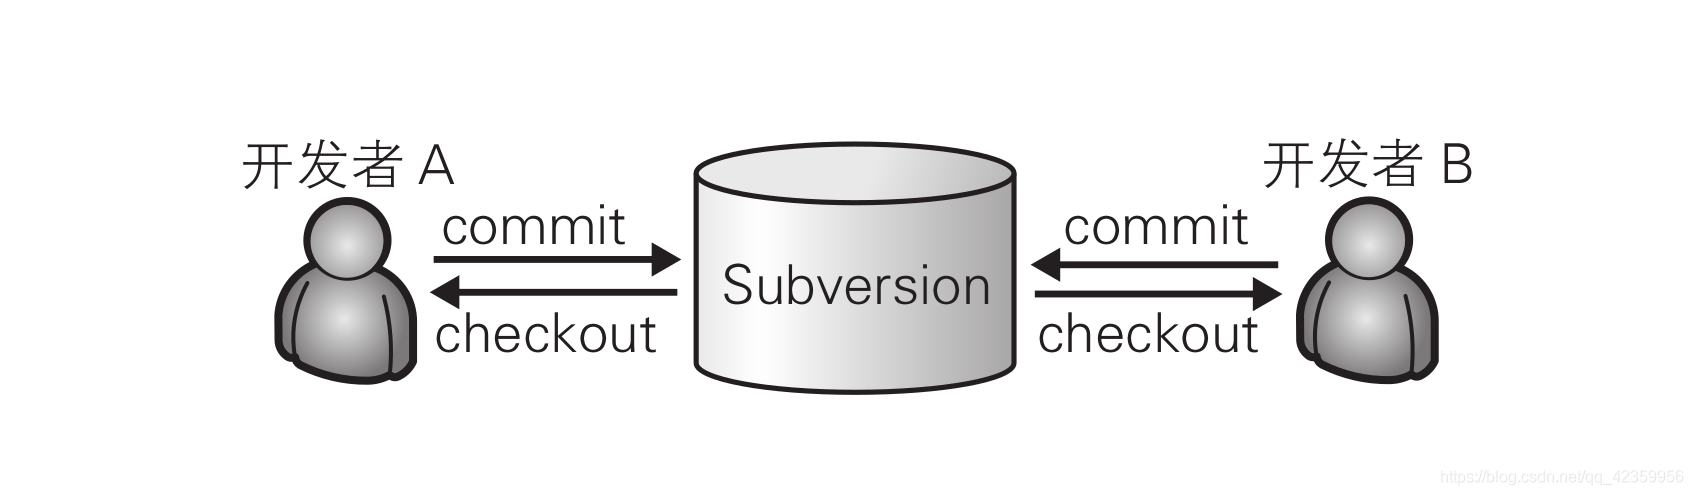 According to the figure above, we can see that the warehouse is stored in the server, so there is only one warehouse. This is why this version management system is called centralized. The centralized type stores all data in the server, which has the advantage of easy management. The disadvantage is that once the developer's environment cannot connect to the server, the latest source code cannot be obtained, and development is almost impossible. The same is true when the server is down, and if the server fails and the data disappears, I am afraid that the developer will never see the latest source code again.
- Let's talk about the architecture model of the distributed version control tool.

You can see in the figure that GitHub is equivalent to a public bridge. Through this bridge and the Git tool, we can communicate with other developers anytime and anywhere. GitHub Provide users with cloud storage warehouses, and can give warehouse forks to every user (note that it is open or authorized). Fork is to copy a specific repository on GitHub to your account. Fork's warehouse and the original warehouse are two different warehouses. Developers can edit on their own warehouses (the warehouses mentioned above are still stored on the server side). In actual development, we generally I will clone my own warehouse on GitHub to the local, and then set the remote (upstream) of the local Git warehouse to the GitHub side. The version control tool of the distributed architecture has multiple warehouses, which is relatively complicated. However, since there is a warehouse in the local development environment, developers can develop without connecting to a remote warehouse. Here are only simple examples in the figure.In fact, under the intricate relationships on the Internet, the actual Git model is far more complicated than the one shown in the figure.
Note: In the previous explanation, many Git model concepts have been mentioned. Maybe you still haven't heard anything, so you might as well take a look at the following applications to deepen your understanding.
2. Initialization settings
-
Installation on a
Linux system is very simple, just one command:# Debian 发行版(Ubuntu,Kali ..): sudo apt install -y git # Red Hat 发行版(CentOS): sudo yum install -y gitOn Windows , because the command line uses the Dos command to interact, you need to go to the official website to download the Windows version
Git for Windows
. I won't mention it here because of space reasons, because it is not the focus of this article. Readers can refer to Google or Baidu. Related installation tutorials.
If you are a beginner, you can also try to use the graphical interface Git to operateMacOs users can use homebrew to install
brew install git -
Configuration After the
installation is complete, we still need to configure Git. After all, this is how we can use it.
(1) Set your name. As an excellent developer, others will be more interested in you after seeing your code. , You have to let others remember you, so setting a name for yourself is very important, and it is also to distinguish the identity record when submitting the code.git config --global user.name "firstname lastname"(2) Just having a name is not enough. In the boundless Internet, there is no one who can guarantee that there is no one who has the same name as you, so we need an identity authentication that can uniquely represent you, so just set up an email address. It is convenient for others to contact you.
git config --global user.email "[email protected]"(3) The code book is boring. Why not decorate this gray world with some colors. It is a good choice to set the highlight.
git config --global color.ui auto(4) What do these few lines of code do, might as well go back to your HOME directory and have a look.
cat .gitconfig
============================= .giticonfig ==========================
[user]
	name = firstname lastname
	email = [email protected]
[color]
	ui = auto
================================= END ===============================
In your HOME directory, there will be an additional name called gitconfig, the content inside is what we just used to configure, you can also directly modify the configuration information in this file to be the same.
Note: Of course, the parameters are far more than these, and there are many more parameters that can be configured. Readers can refer to the official documentation for configuration.
-
Initialize the git working directory
After the installation and configuration is complete, we need to execute a directory as our working directory. Let's create a new directory for Git testing in the HOME directory, and use the Git command to enter this directory. This directory is initialized;mkdir GitTest cd GitTest git initThis is the first git command you learned. Is it simple? Let's take a look at what this command does.
ls -aWe can see that there is an extra hidden directory named .git in the GitTest directory. In fact, it saves the entire Git working tree. It saves the metadata information of the file, historical version, operation log, etc. Wait.
3. Command practice
-
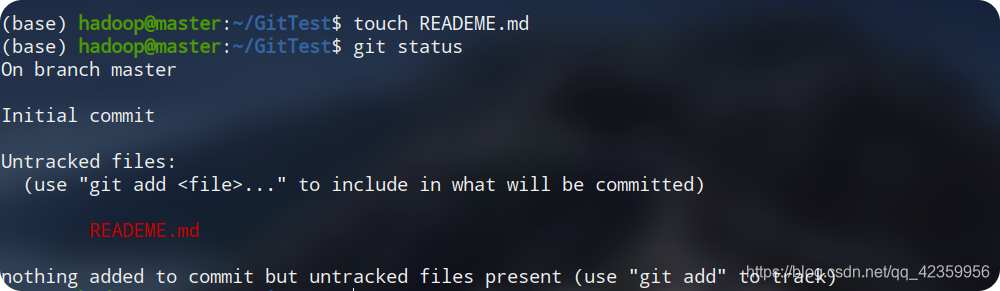
git status
prompt after you should be able to perform housekeeping in the figure below

first line indicates we are in the master branch (after init git automatically creates a master branch that is our main branch, the branch will elaborate on the concept behind)
second The line indicates our status or the initial submission status. The
third line indicates that we currently have no files to submit.Let's take a look at a new file:
The file we created is REDEME.md file. This file uses MarkDown syntax. It is used to introduce the purpose of your code to people who see your code. You can treat it as a normal file. Of course you You can also learn the syntax of MarkDown. It is still very useful. It is also often used in work. From the above picture, you can see that we have an extra line of prompt when we execute the'git status' command, and it is still red (see the comparison Important), its prompt is that this file has not been submitted yet, you can try the command given to submit it -
git add
Here we execute the command according to the prompt given above, and add the newly created file to the file temporary storage area.
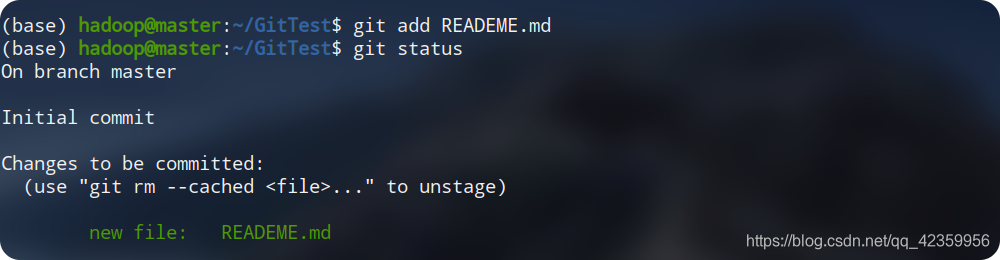
From the execution process in the figure, we can see that we have already added the newly created file to the file temporary storage area. , But note that it has not been submitted yet. -
git commit,
so we need to submit the files stored in the temporary storage area again.
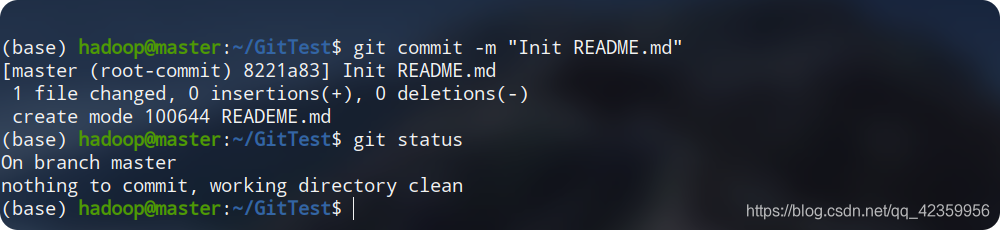
I used the'-m' parameter here, which will directly write the following string (that is, a description of our submission) Enter this submission log, if you do not add this parameter, you will enter a command interactive line interface, and then fill in the relevant information. After the submission is completed, we can use the previous view status command to find that the entire project The state is restored to its original state. -
git log
Sometimes we want to view the historical submission record of the entire project, we can use this command to view it.

According to the above figure, we can see that the log information of the mind is divided into four lines. The
first line represents the Hash code of the submission. This code is in this The item is unique and used to indicate the only operation. The
second line is the submitter's information, name, and email. The
third line is the date and time of submission. The
fourth line is the description information filled in when submitting. -
git diff
Now let's try to add a line of content to the file. Try
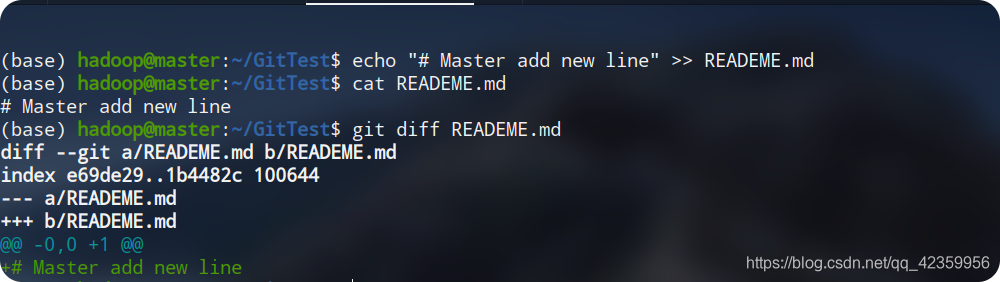
from the figure you can see that we first added a line of content to the file, and then we use the "git diff" command to view the difference between the file and the current state You can see that the output information indicates that the content of our file and the file stored in the branch are different. The current file has added a line of content compared with the original.
Then we still use the previous method to submit this change together :

You can see that the REDEME file is currently no different from the latest version
Well, you have mastered the most basic commands of Git. Of course, there are more advanced operations waiting for you, such as branching, backtracking, modifying submission information, pushing the data of the local warehouse to the remote warehouse, and pulling it from the remote warehouse. , Project cloning, etc., because you don’t care about learning knowledge, but care about understanding, too much contact at one time can not be digested immediately, so the blogger will explain in detail in the article later on this topic. After seeing this, thank you for taking such precious time to read the blogger's blog, and thank you for your attitude of eager knowledge, thank you for the CSDN platform, thank you!