[Foreword]
1. Recently, Anaconda and Tensorflow-GPU need to be installed in class. Anaconda is easy to install, but the installation of Tensorflow-GPU version is more complicated, because some problems with version matching need to be considered, which is prone to problems. It took me more than two days to finally install successfully. It is not easy. Let me share my installation process
. 2. Installation environment
Operating system: 64-bit Win10
GPU: MX130
IDE: VS Code
Others: CUDA10.1, cuDNN7.6.5
[Installation process]
1. Install Anaconda
version: 2020.07
Baidu network disk download link Extract code: k8p0 The
installation is relatively simple, here only a few more important pictures


2. Install CUDA10.1
CUDA is based on the C language, which allows the code to run directly in the control language of the GPU, so the first step is to install CUDA10.1, which contains the NVIDIA driver (you can choose whether to install the driver during custom installation ).
2.1 CUDA official description (if you are interested, please take a look) download link
: click here to
download link from Baidu Netdisk Extraction code: e06o

Choose the version that suits your computer to download, exe is an executable file.
2.2 Install CUDA
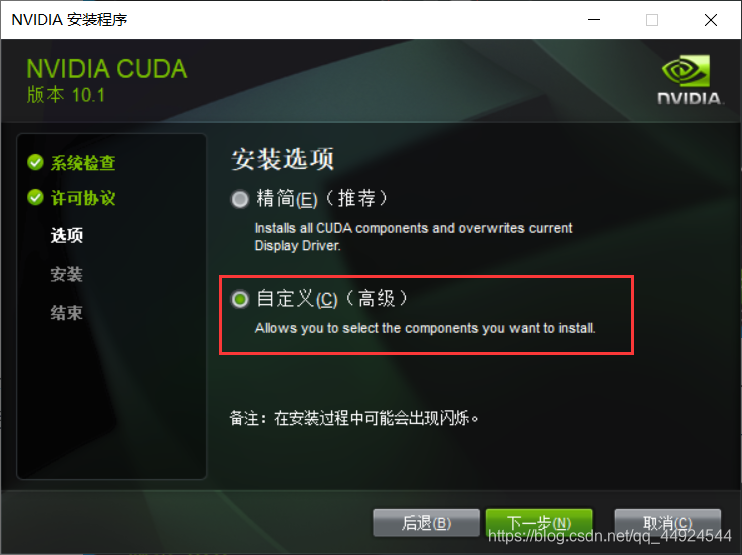
After downloading several files, click one by one to install. The system compatibility will be checked first, and then the installation method will be selected. The default compact mode of the program should be understood as installing everything, including the VS compiler and graphics driver that I don’t use temporarily, so I chose the custom mode.

Next is to choose the installation path. In the installation process of other students, I found that changing the installation path is prone to some problems, so I installed it directly according to the default path, which is also convenient for configuring the environment variables below, all the way to Next until it is completed.

2.3 Configure environment variables
After successful installation, two variables will be automatically added to the system environment variables, as shown in the figure:

But this is not enough, we also need to add a few system variables (add according to the actual installation version and path, the same version and default path can be directly copied and pasted):

CUDA_SDK_PATH = C:\ProgramData\NVIDIA Corporation\CUDA Samples\v10.1

CUDA_LIB_PATH = %CUDA_PATH%\lib\x64

CUDA_BIN_PATH = %CUDA_PATH%\bin

CUDA_SDK_BIN_PATH = %CUDA_SDK_PATH%\bin\win64

CUDA_SDK_LIB_PATH = %CUDA_SDK_PATH%\common\lib\x64
Then, add variables to the system variable Path, double-click Path to add the following variables (also fill in according to the actual path):

%CUDA_LIB_PATH%

%CUDA_BIN_PATH%

%CUDA_SDK_LIB_PATH%

%CUDA_SDK_BIN_PATH%

C:\Program Files\NVIDIA GPU Computing Toolkit\CUDA\v10.1\lib\x64

C:\Program Files\NVIDIA GPU Computing Toolkit\CUDA\v10.1\bin

C:\ProgramData\NVIDIA Corporation\CUDA Samples\v10.1\common\lib\x64

C:\ProgramData\NVIDIA Corporation\CUDA Samples\v10.1\bin\win64
2.4 Check whether the installation is successful.
Open the cmd command window and switch the path (note the actual path)
cd C:\Program Files\NVIDIA GPU Computing Toolkit\CUDA\v10.1\extras\demo_suite
Run the following commands separately
bandwidthTest.exe
deviceQuery.exe
If Result = PASS is displayed respectively, the installation is successful, as shown in the figure:

3. Install cuDNN
cuDNN is a CUDA library, easy to write code. To download from the official website, you need to register an NVIDIA account first.
3.1 Download The
download address of the official website: Click here.
Note that it matches the version requirements in the previous table. Here I downloaded 7.6.5, as shown in the figure:

Baidu SkyDrive download link Extraction code: ea1b
3.2 Decompress the downloaded software
and enter the folder after decompression, and place the files in the corresponding location according to the following requirements:
After decompression, the files with the suffixes of .h, .lib and .dll in the include, lib/x64 and bin folders The files are copied to the include, lib/x64, and bin folders under the corresponding path of cuda.
At this point, CUDA10.0 and its corresponding cuDNN file have been installed, and the difficult journey has been basically completed.
4. Install Tensorflow-gpu
4.1 Create an environment
Open Anaconda Prompt

first use the following command on the command line to view the conda version
conda --version
If the displayed version is 4.6.11, it is recommended to update conda using the following command
conda update conda
Then, enter the following command in the command window to create the environment:
conda create -n tf-gpu python=3.7
Then activate the environment just created
activate tf-gpu
4.2 Installation
View the downloadable version
conda search tensorflow-gpu
The result is shown in the figure:

Then select the version you want to install, here is 2.1.0 as an example
conda install tensorflow-gpu=2.1.0
4.3 Test whether the installation is successful
Open the command prompt, enter the Anaconda3\envs\tf-gpu folder, and enter python
Note: tf-gpu is the name when the environment is created
Then enter the following two test programs (input line by line)
- Procedure 1
import tensorflow as tf
tf.__version__
Output result

- Procedure 2
import tensorflow as tf
tf.test.is_gpu_available()
Output result The

final result is True
If the above test is correct, the installation is successful
5. Import the Tensorflow-gpu environment into VS Code
5.1 Install the Python plugin of VS Code

5.2 Choose Python interpreter
After installing Anaconda and creating tensorflow, both Anaconda and Tensorflow will have a Python interpreter, and you should choose the interpreter under Tensorflow.


At this point you can be done! ! !