Article Directory
- 1. Introduction of suqid
- Two, Squid's proxy type
- Third, the deployment of squid traditional proxy
-
- 3.1. Case introduction
- 3.2 Specific parameter configuration
-
- 1. Decompress the squid installation package
- 2. Modify configuration files and write scripts to optimize service startup items
- 3. Configure squid traditional mode
- 4. Configure the web server
- 5. In the client browser, set the proxy, and access the test
- 6. Check the log to confirm the access source IP
- 4. Squid transparent mode configuration
1. Introduction of suqid
1.1 What is squid?
Squid is a high-performance http proxy server and web caching server, which can well implement caching proxy for HTTP and FTP, DNS query, SSL and other applications.
1. The proxy user requests data from the web server and caches it, which can filter traffic to help network security.
2. It can be used as a link in the proxy server chain, forwarding data to superior agents or directly connecting to the Internet.
3. It can be used in the local area network to enable the users of the local area network to surf the Internet through a proxy.
4. Data can be cached in memory, and the results of DNS queries are also cached. Non-modular DNS queries are also supported, and failed requests can be cached passively.
5. Squid supports SSL and ACL access control.
The working mechanism of the Web proxy
caches web page objects to reduce repeated requests

Introduction to Alibaba Cloud Content Delivery Network (CDN)

1.2 Advantages of Squid
1. Improve client access speed.
2. Conceal the ip address of the internal host.
3. Simple deployment and access control can be achieved.
1.3. The role of squid
1. Proxy Internet access (traditional proxy, transparent proxy)
2. Acceleration of website static page caching (reverse proxy)
Two, Squid's proxy type
1. The traditional proxy is also called the forward proxy, which is suitable for the Internet and the server must be clearly specified.
2. Transparent proxy, the client does not need to specify the address and port of the proxy server, but redirects Web access to the proxy server for processing through the default route and firewall policy
3. Reverse proxy
Third, the deployment of squid traditional proxy
Traditional agency model
The client must specify the server's ip address and the listening port number in its browser to access the Internet through the squid proxy server**.
3.1. Case introduction
Build a Squid proxy server on the WEB server, allowing clients to specify the Squid proxy server as a Web proxy to access the web server, but it is prohibited to download files over 10MB through the proxy, and files over 4MB are not cached.
Environment introduction:
prepare three devices
192.168.100.5 squid cache server
192.168.100.6 web httpd server
win7 and a test client
3.2 Specific parameter configuration
1. Decompress the squid installation package
tar zxvf squid-3.4.6.tar.gz -C /opt/
cd /opt/squid-3.4.6/
#First install the compiled package
yum -y install gcc gcc-c++ make pcre pcre-devel zlib-devel perl
#Configuration compilation
./configure --prefix=/usr/local/squid \     ##自定义安装路径
--sysconfdir=/etc \                                  ##单独将配置文件修改到/etc目录下
--enable-arp-acl \                                   ##可在ACL中设置通过MAC地址进行管理,防止客户端使用IP欺骗
--enable-linux-netfilter \                        ##使用内核过滤
--enable-linux-tproxy \                          ##支持透明模式
--enable-async-io=100 \                       ##异步I/O提升存储性能,值可修改
--enable-err-language ="Simplify_Chinese" \     ##错误信息的提示语言
--enable-underscore \                           ##允许URL中有下划线
--enable-poll \                                       ##使用 poll() 模式,提升性能
--enable-gnuregex                                ##支持GNU正则表达式

make && make install
#Create link file, optimize path
ln -s /usr/local/squid/sbin/* /usr/local/sbin/
#Create program user, group
useradd -M -s /sbin/nologin squid
#Change directory owner
chown -R squid.squid /usr/local/squid/var/
2. Modify configuration files and write scripts to optimize service startup items
vim /etc/squid.conf
//增添下句并注释deny
http_access allow all    //允许索引访问
#http_access deny all

//在端口port下增添两行代码
http_port 3128                              //监听程序端口
cache_effective_user squid      //设置控制程序的组 和用户名
cache_effective_group squid
coredump_dir /usr/local/squid/var/cache/squid   //设置容灾备份目录


squid -k parse      #检查配置文件语法
squid –k rec                       ##重新加载配置文件
squid -z               #初始化缓存目录
squid                  #启动服务
netstat -ntap | grep 3128     #查看服务是否启动
//Write optimization script
cd /etc/init.d/
vim squid

#!/bin/bash
#chkconfig: 2345 90 25
PID="/usr/local/squid/var/run/squid.pid"
CONF="/etc/squid.conf"
CMD="/usr/local/squid/sbin/squid"
case "$1" in
      start)
         netstat -natp | grep squid &> /dev/null
         if [ $? -eq 0 ]
         then
               echo "squid is running"
         else
               echo "正在启动squid. . ."
               $CMD
         fi
        ;;
       stop)
         $CMD -k kill &> /dev/null
         rm -rf $PID &> /dev/null
         ;;
      status)
         [ -f $PID ] &> /dev/null
         if [ $? -eq 0 ]
         then
            netstat -natp | grep squid
         else
            echo "squid is not running"
         fi
	 ;;
      restart)
         $0 stop &> /dev/null
           echo "正在关闭 squid...."
         $0 start &> /dev/null
           echo "正在启动 squid..."
	;;
      reload)
         $CMD -k reconfigure
	;;
      check)
         $CMD -k parse
	;;
        *)
         echo "用法: $0 {start|stop|status|reload|check|restart}"
         ;;
esac
chmod +x squid
chkconfig --add squid
chkconfig --level 35 squid on     #设置为开机自启动

service squid stop
service squid start
netstat -ntap | grep 3128
3. Configure squid traditional mode
vim /etc/squid.conf
http_port 3128
cache_mem 64 MB                   #内存空间大小
reply_body_max_size 10 MB       #允许下载最大文件大小
maximum_object_size 4096 KB   #允许保存缓存的空间最大对象大小
http_access deny all                                    #前面两行需要放在这行之上才生效

iptables -F    #清空防火墙规则
iptables -t nat -F
iptables -I INPUT -p tcp --dport 3218 -j ACCEPT
#-I:插入input链 -p:协议  允许3128端口访问外网的WEB服务器
//重新加载squid服务
service squid reload
netstat -ntap | grep 3128
4. Configure the web server
//关闭防火墙
systemctl stop firewalld
setenforce 0
//安装httpd
yum install httpd -y
systemctl start httpd

//进入目录下,设置测试内容
cd /var/www/html/
dd if=/dev/zero of=test1.tgz bs=1M count=11
dd if=/dev/zero of=test2.tgz bs=1M count=2
5. In the client browser, set the proxy, and access the test
Successful visit

6. Check the log to confirm the access source IP
[root@web ~]# cat /var/log/httpd/access_log

4. Squid transparent mode configuration
1. First set up squid dual network card mode


2. Modify the squid configuration file
开启路由转发
vi /etc/sysctl.conf

Make the configuration effective
[root@squid network-scripts]# sysctl -p
net.ipv4.ip_forward = 1
[root@squid network-scripts]#
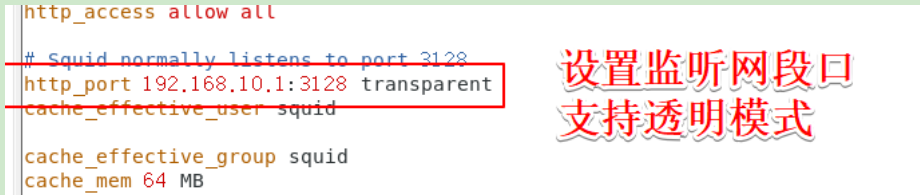
Modify the configuration file
root@squid network-scripts]# vim /etc/squid.conf
[root@squid network-scripts]#
3. Set firewall rules
iptables -F
[root@squid init.d]# iptables -t nat -F
//定义规则入口ens36,80端口重定向到3128
[root@squid network-scripts]# iptables -t nat -I PREROUTING -i ens36 -s 192.168.10.0/24 -p tcp --dport 80 -j REDIRECT --to 3128
[root@squid network-scripts]# iptables -t nat -I PREROUTING -i ens36 -s 192.168.10.0/24 -p tcp --dport 443 -j REDIRECT --to 3128
[root@squid network-scripts]#
//允许3128端口访问
 iptables -I INPUT -p tcp --dport 3128 -j ACCEPT
4. Client browser access test


5. View the access source IP
