This article is refined from a video tutorial for everyone to learn Hongmeng OS application development:
https://blog.csdn.net/dongyu1009/article/details/108685024
If you want to know the details, you can enter the above webpage to enter the video tutorial study!
This document is updated for a long time, I hope you will pay attention. If you have any comments and suggestions, you are welcome to submit, thank you!
1 Hongmeng OS and its architecture
1.1 What is Hongmeng OS?
Hongmeng OS is an open source operating system independently developed by Huawei.
In one sentence: Hongmeng OS is a full-scene distributed operating system based on microkernel .
- Microkernel: Improve security, stability and maintainability.
- Full scenario: It can be applied to a variety of hardware devices, not limited to mobile devices.
- Distributed: For users, multiple devices running Hongmeng OS can form a "super virtual terminal" to share resources, performance and data.
Hongmeng OS applications need to be developed through the Java language, and its development process is highly similar to Android, but its underlying architecture is different from Android.
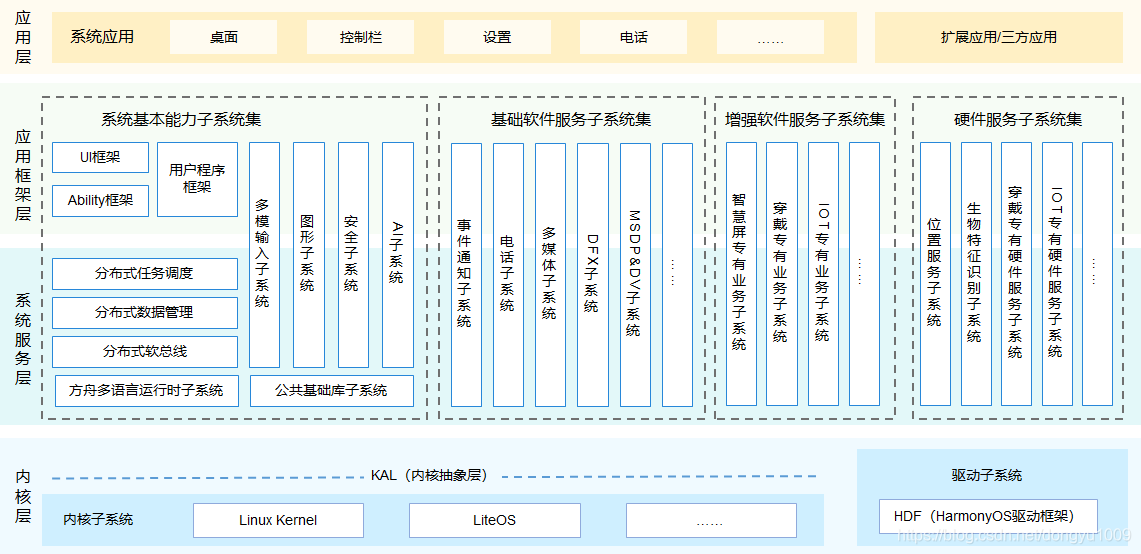
1.2 The architecture of Hongmeng OS
2 DevEco Studio
2.1 What is DevEco Studio
DevEco Studio is an integrated development environment (IDE) built on the open source version of IntelliJ IDEA Community.
- DevEco Studio 1.0 is used for custom development of EMUI.
- DevEco Studio 2.0 is used for the development of HarmonyOS applications
2.2 Features of DevEco Studio
- A unified development environment for multiple devices, including smart screens, wearable devices, etc.
- Support multi-language code development and debugging, including Java, Kotlin, C, C++, JavaScript, etc.
- Support FA and PA rapid development.
- Support multi-device simulator. Currently, the emulator is placed on Huawei's official server and needs to be accessed through a remote connection.
2.3 Installation of DevEco Studio
The download address is: https://developer.harmonyos.com/cn/develop/deveco-studio#download
Developers who need to use JS design interface need to download and install Node.js.
3 Basic concepts and usage of Ability
3.1 Hongmeng OS application package
The suffix of the HarmonyOS Application Package (Application Package) is .app, which includes one to obtain multiple HAPs (HarmonyOS Ability Package).
Two types of HAP: Entry and Feature.
- Entry: The main module of the application. It is equivalent to the exe file in Windows. For the same device type, there must be only one HAP of entry type, which can be installed and run independently.
- Feature: The dynamic feature module of the application. It is equivalent to the dll file in Windows. Can provide UI interface, class library, resources, etc.

For details, please refer to the official instructions:
3.2 Concept and classification of Ability
Ability is the core of Hongmeng OS application development. It is equivalent to Activity in Android, but it is more powerful than Activity. It can not only provide UI interface, but also provide service and data interface.
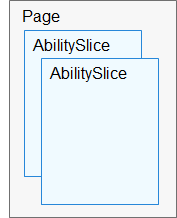
Ability includes two types of FA and PA, and PA includes two types of Service Ability and Data Ability, as shown in the figure below.

Ability contains one or more Ability Slices. AbilitySlice refers to the sum of a single page of the application and its control logic. The business capabilities provided by the AbilitySlice page should be highly relevant.
For details, please refer to the official instructions:
3.3 Ability life cycle
- onStart(): Triggered when the Ability is created, only once.
- onActive(): Triggered when entering the foreground.
- onForeground(): Triggered when visible.
- onBackground(): Triggered when invisible.
- onInActive(): Triggered when the intersection point is lost.
- onStop(): Triggered when Ability is destroyed, only once.

For details, please refer to the official instructions:
3.4 Ability jump
Jump to another Ability code:
Intent secondIntent = new Intent();
Operation operation = new Intent.OperationBuilder()
        .withDeviceId("")
        .withBundleName("com.example.customtimer")
        .withAbilityName("com.example.customtimer.SecondaryAbility")
        .build();
secondIntent.setOperation(operation);
startAbility(secondIntent);
Return to the previous Ability code:
terminateAbility();For details, please refer to the official instructions:
4 Common components and layout
4.1 Common Components-Text
Creation of text:
// 创建文本对象
Text text = new Text(this);
// 设置布局参数设置
text.setLayoutConfig(config);
// 设置文本
text.setText("Hello, HarmonyOS!");
// 设置文字颜色
text.setTextColor(new Color(0xFF000000));
// 设置字体大小
text.setTextSize(50);
// 设置文字的居中方式
text.setTextAlignment(TextAlignment.CENTER);
// 在布局中添加文本框
myLayout.addComponent(text);
4.2 Common Components-Button
Button creation:
// 创建按钮
Button button = new Button(this);
// 设置按钮布局参数
LayoutConfig configButton = new LayoutConfig(LayoutConfig.MATCH_CONTENT, LayoutConfig.MATCH_CONTENT);
configButton.addRule(LayoutConfig.CENTER_IN_PARENT);
button.setLayoutConfig(configButton);
// 设置按钮文本
button.setText("我是一个按钮!");
// 设置按钮文本的字号
button.setTextSize(50);
// 监听按钮的单击事件
button.setClickedListener(new Component.ClickedListener() {
    @Override
    public void onClick(Component component) {
        HiLog.info(lblInformation, "按钮已经被点击了!");
    }
});
// 修改按钮的背景为灰色
ShapeElement shapeElement = new ShapeElement();
shapeElement.setRgbColor(new RgbColor(200, 200, 200));
button.setBackground(shapeElement);
// 在布局中添加按钮
myLayout.addComponent(button);
4.3 Linear Layout-DirectionalLayout
DirectionalLayout can arrange the internal components horizontally (horizontally) or vertically (vertical).

Creation of linear layout:
private DirectionalLayout myLayout = new DirectionalLayout(this);Set the direction of the linear layout:
myLayout.setOrientation(Component.HORIZONTAL);The centering method can be set by the alignment property of the component LayoutConfig, and the proportion of the layout can be set by weight.
4.4 Relative Layout-DependentLayout
With relative layout, each component can specify its position relative to other sibling elements or its parent component.
Relative to the positional relationship of components at the same level:
| Layout position (Java) | Layout position (XML) | description |
| ABOVE | above | Located on the upper side of the same-level components. |
| BELOW | below | Located on the lower side of the same level of components. |
| START_OF | start_of | It is on the start side of the same-level component. |
| END_OF | end_of | It is at the end of the same-level component. |
| LEFT_OF | left_of | It is on the left side of the sibling component. |
| RIGHT_OF | right_of | It is on the right side of the sibling component. |
The positional relationship relative to the parent component:
| Layout position (Java) | Layout position (XML) | description |
| ALIGN_PARENT_LEFT | align_parent_left | It is on the left side of the parent component. |
| ALIGN_PARENT_RIGHT | align_parent_right | It is on the right side of the parent component. |
| ALIGN_PARENT_START | align_parent_start | At the beginning of the parent component. |
| ALIGN_PARENT_END | align_parent_end | On the end side of the parent component. |
| ALIGN_PARENT_TOP | align_parent_top | On the upper side of the parent component. |
| ALIGN_PARENT_BOTTOM | align_parent_bottom | It is under the parent component. |
| CENTER_IN_PARENT | center_in_parent | In the middle of the parent component. |
5 Console output
5.1 HiLog and HiLogLabel
HiLog is used for console output debugging, including debug, info, warn, error, fatal and other methods.
| Debugging method | Description |
| debug(HiLogLabel label, String format, Object... args) | Output debugging information |
| info(HiLogLabel label, String format, Object... args) | Output general information |
| warn(HiLogLabel label, String format, Object... args) | Output warning message |
| error(HiLogLabel label, String format, Object... args) | Output error message |
| fatal(HiLogLabel label, String format, Object... args) | Output serious error message |
The output of HiLog needs the support of HiLogLabel.
The construction method signature of HiLogLabel is public HiLogLabel(int type, int domain, String tag). The meaning of each parameter is as follows:
- Type : HiLogLabel 类型,包括HiLog.DEBUG 、 HiLog.ERROR 、 HiLog.FATAL 、 HiLog.INFO 、 HiLog.LOG_APP 、 HiLog.WARN 。
- domain: Define the service domain (Service Domain), similar output uses similar service domains. The range is from 0x0 to 0xFFFFF. The first three digits are usually the name of the subsystem (SubSystem), and the last two digits are usually the name of the module (Module).
- tag: tag name.
HiLogLabel is usually defined as a static variable. The common methods are as follows:
Definition of HiLogLabel:
static final HiLogLabel lblInformation = new HiLogLabel(HiLog.LOG_APP, 0x00101, "测试");HiLog output method:
HiLog.info(lblInformation, "Hi,Log!");5.2 Formatted output of HiLog
HiLog supports formatted output, but on the basis of the basic java format string, {private} and {public} identifiers are added:
HiLog.warn(label, "Failed to visit %{private}s, reason:%{public}d.", url, errno);- {private} is used to specify private output
- {public} is used to specify as public output
6 Multithreading and UI update
Multi-threading can be used in tasks that need to handle long-waiting, such as network access and database access. In HarmonyOS, the task dispatcher (TaskDispatcher) can be used to distribute different tasks. The priority of the task is divided into HIGH, DEFAULT and LOW.
The types of task dispatcher (TaskDispatcher) are as follows:
- GlobalTaskDispatcher: Global concurrent task dispatcher
- ParallelTaskDispatcher: concurrent task dispatcher
- SerialTaskDispatcher: Serial task dispatcher
- SpecTaskDispatcher: proprietary task dispatcher
The code that enters the UI thread to update the UI through the task dispatcher is as follows:
getUITaskDispatcher().asyncDispatch(new Runnable() {
    @Override
    public void run() {
        // 更新UI界面
    }
});
For details, please refer to the official description: