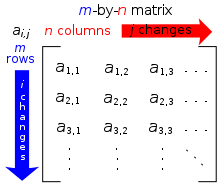
In mathematics, a matrix is a rectangular array of numbers, symbols, or expressions arranged in rows and columns. Any matrix can be multiplied by the scalars of related fields. The main application of the matrix is to express the linear transformation, that is, the generalization of linear functions such as f (x) = 4 x. For example, the rotating carrier is a linear transformation in three-dimensional space, which can be expressed by a rotation matrix: if v is a column vector description (the matrix with only one column), the position of the product in space, Rv is the column vector description The position of this point after rotation. The product of two transformation matrices is a matrix representing two transformations. Another application of matrices is the solution of linear equations. If the matrix is square, you can infer some of its properties by calculating its determinant. For example, if and only if its determinant is not zero, the square matrix has the opposite. You can see the geometric structure (and other information) of the linear transformation from the eigenvalues and eigenvectors of the matrix.
The application of matrices can be found in most scientific fields. Every branch of physics, including classical mechanics, optics, electromagnetics, quantum mechanics, and quantum electrodynamics, has been used to study physical phenomena, such as the motion of rigid bodies. In computer graphics, they are used to manipulate a three-dimensional model and project it onto a two-dimensional screen. In probability theory and statistics, random matrices are used to describe sets of probabilities; for example, they are used in the PageRank algorithm to rank pages in Google search. Matrix calculus summarizes classic analytical concepts such as derivatives and exponentially higher dimensions. The matrix is used to describe the system of economic relations in economics.
First of all, this implementation is really cool. I never knew that the combination of gravitation and repulsion in the molecule can make such a cool effect, and it is still a case where the amount of code is very small. The world should be very widely used, but if it is well utilized, there must be considerable achievements in industry.
http://www.hightopo.com/demo/pipeline/index.htmlNext,

my task is to help you to achieve this effect easily. HT puts the js file of the elastic layout into a separate file. To quote this js file, you need to introduce ht.js first, because we also made a form form, so we also need to introduce the js file of the form form, not all the functions of the HT package need to introduce a special js file, need to introduce The additional js files will be introduced at the top of the manual. Here, the order of the layout of the forcelayout and the js of the form form has no relationship:
<script src="../../guide/lib/core/ht.js"></script>
<script src="../../guide/lib/plugin/ht-forcelayout.js"></script>
<script src="../../guide/lib/plugin/ht-form.js"></script>
First, we define a color array variable to store the colors of each bouncing ball, and also define a random function to generate colors in an array with random numbers:
var colorList = ['#FFAFA4', '#B887C5', '#B9EA9C', '#CFD9E7', '#4590B8', '#FF9C30'],
colorLen = colorList.length;
var randomColor = function() {
    var ran = Math.random() * colorLen;
    return colorList[Math.floor(ran)]; // 随机6种颜色
};
Then create a bouncy ball, simply generate a 3D node, and control the display mode of the node by setting the style property of this node, in which "shape3d" is set to "sphere", the ht.Node hexahedron can be turned into a 3D sphere model, and then Set the "shape3d" attribute to the random color defined above, s3 is also a function of setting the size of the 3D node encapsulated by HT, and finally add this node to the data model dataModel:
var createNode = function(dm) { // 创建 node 节点 圆
    var node = new ht.Node();
    node.s({
        'shape3d': 'sphere',
	'shape3d.color': randomColor()
    });
    node.s3(40, 40, 40);
    dm.add(node);
    return node;
};
Now there is a connection between each bouncy ball on the rendering. This connection is very unusual at first glance. It is also constructed by a node. This node is customized by the setShape3dModel function of the HT for Web Modeling Manual A 3D model of, named it 'custom':
ht.Default.setShape3dModel( // 创建模型 根据 xy 平面的曲线,环绕一周形成 3D 模型。
    'custom', ht.Default.createRingModel( [0.5, 0.5, -0.2, 0, 0.5, -0.5], [1, 3] )
);
HT divides user-defined attributes and HT default attribute call methods into node.a and node.s. This can effectively distinguish the two. We called this method when creating the pipeline:
var updatePipeline = function(edge) { // 重新设置 edge 的样式
    var pipeline = edge.a('pipeline');
    pipeline.s3(1, 1, 1);
    pipeline.p3(0, 0, 0);

    var node1 = edge.getSourceAgent(), // 获取图形上连接的起始节点
    node2 = edge.getTargetAgent();
    pipeline.s('mat', createMatrix(node1.p3(), node2.p3(), 20)); // 3d 整体图形矩阵变化
};
We know that a matrix can describe any linear transformation. Linear transformation preserves straight lines and parallel lines. While linear transformation preserves straight lines, other geometric properties such as length, angle, area, and volume may be changed by the transformation. Simply put, a linear transformation may "stretch" the coordinate system, but it will not "bend" or "fold" the coordinate system. This function is mainly to perform a "change matrix" operation on the connection line that our connection line is dragged after dragging the bouncy ball. The change matrix is also the ht.Default.createMatrix function encapsulated by HT, which can create changes very easily matrix:
var createMatrix = function(p1, p2, width) { // createMatrix(array, matrix) 将一组 JSON 描述的缩放、移动和旋转等操作转换成对应的变化矩阵
    var vec = [p2[0]-p1[0], p2[1]-p1[1], p2[2]-p1[2]],
        dist = ht.Default.getDistance(p1, p2); // 获取两点之间距离,或向量长度
    return ht.Default.createMatrix({
        s3: [width, dist, width],
	r3: [Math.PI/2 - Math.asin(vec[1]/dist), Math.atan2(vec[0], vec[2]), 0],
	rotationMode: 'xyz',
	t3: [(p1[0]+p2[0])/2, (p1[1]+p2[1])/2, (p1[2]+p2[2])/2]
    });
};
The basic accessories are all defined, and then the "shape3d" attribute is set to the custom 3D model "custom", and the "layoutable" attribute is set to "false" to prevent the primitives from participating in the layout, and pass the connection between points edge.a ('pipeline', node) is refreshed and added to the data model dataModel:
var createEdge = function(dm, node1, node2) { // 创建‘custom’模型的 edge
    var node = new ht.Node();
    node.s({
        'shape3d': 'custom',
        'shape3d.color': '#ECE0D4',
        'layoutable': false
    });
    dm.add(node);

    var edge = new ht.Edge(node1, node2);
    edge.a('pipeline', node);
    edge.s('edge.color', 'rgba(0, 0, 0, 0)');
    dm.add(edge);
    return edge;
};
We can also use HeatMap to make articles in the industry, the effect is still very dazzling, the specific address http://hightopo.com/guide/guide/plugin/forcelayout/examples/example_heatmap3d.html
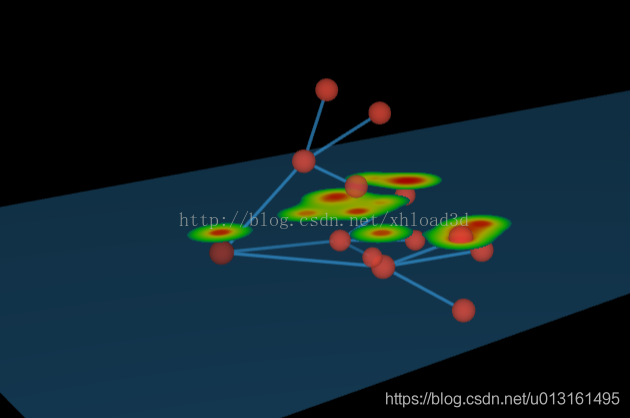
here we still focus on continuing to complete this example.
All the graphics on the interface are drawn, and the rest is only the form form. First, add the form form to the HTML page. The ht.widget.FormPane function encapsulated by HT is used:
var formPane = new ht.widget.FormPane();
formPane.setWidth(230);
formPane.setHeight(125);
formPane.addToDOM();
Remember, form form should set width and height, otherwise it will not display.
form The form adds rows through the addRow function. Let's focus on the following lines, Color, Range, and Intensity. These three names are mainly used to control the "headlight". In HT, directly control the color, range and intensity of the "headlight" through the three functions setHeadlightColor / setHeadlightRange / setHeadlightIntensity, the onValueChanged property, and the event triggered after the property value changes as the name implies:
['Color', 'Range', 'Intensity'].forEach(function(name) {
    var obj = { id: name },
    func = function(oV, nV) {
        g3d['setHeadlight' + name](nV); // === g3d.setHeadlightColor(nV)/g3d.setHeadlightRange(nV)/g3d.setHeadlightIntensity(nV)
    };
    if (name === 'Color')
        obj.colorPicker = { // ht.widget.ColorPicker为颜色选择框
	    instant: true,
	    value: g3d['getHeadlight' + name](), // === g3d.getHeadlightColor()
	    onValueChanged: func
	};
	else
	    obj.slider = { // 滑动条
	        min: 0,
		max: name === 'Range' ? 20000 : 3,
		step: 0.1,
		value: g3d['getHeadlight' + name](),
		onValueChanged: func
	    };
    formPane.addRow([ name, obj ], [ 70, 0.1 ]);
});
Both slider and colorPicker are HT custom sliders and color selectors, please refer to the HT for Web form manual for details .
If you still do n’t understand, please consult me, or go directly to the HT for Web official website to view the manual.
