What is Code Snippet
Code Snippet, instead of calling it a code block, may be more appropriate to translate it into a code template.
Any piece of code can be called a code snippet. What we are going to talk about here is not such a random thing, but a shortcut to quickly generate code, through which we can effectively improve our programming efficiency.
For example, if you type in the C # code editor propfull, and then press two consecutive Tabkeys to complete the code, the following code segment will be automatically generated for you:
private int myVar;

public int MyProperty
{
	get { return myVar; }
	set { myVar = value; }
}
It looks like this in the editor:
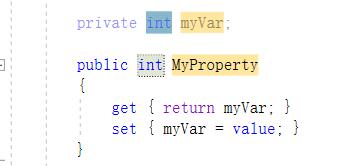
The cursor is in the first intposition, type any other type will be replaced int, and you can Tabskip to the next place a modifiable keys (background color is yellow), the template can be modified to provide a three position int, myVarAs well MyProperty.
When you modify myVar, you can use "Alt + Enter" or "Ctrl +." To quickly replace other references to myVar.
You only need to enter a few characters to complete the creation of a large section of code, saving you a lot of time. Imagine how many encapsulation attributes you have created. This alone can greatly improve your work. effectiveness.
You can also achieve similar effects through other third-party extensions or through "Quick Operation-> Encapsulated Fields".
Microsoft has built a lot of code templates for you in many languages, as shown in the figure below is the Code Snippet built in C #:
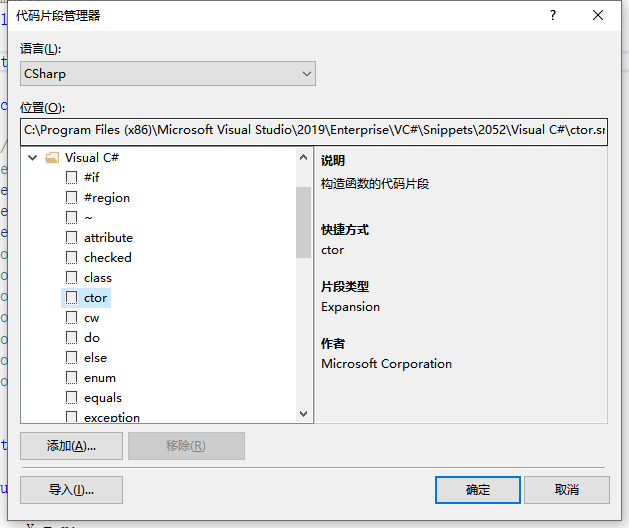
We can find the corresponding code snippets locally by location, all of which are .snippetfiles. We use Notepad to open the propfull.snippetfile. The contents inside are as follows:
<?xml version="1.0" encoding="utf-8"?>
<CodeSnippets xmlns="http://schemas.microsoft.com/VisualStudio/2005/CodeSnippet">
	<CodeSnippet Format="1.0.0">
		<Header>
			<Title>propfull</Title>
			<Shortcut>propfull</Shortcut>
			<Description>属性和支持字段的代码片段</Description>
			<Author>Microsoft Corporation</Author>
			<SnippetTypes>
				<SnippetType>Expansion</SnippetType>
			</SnippetTypes>
		</Header>
		<Snippet>
			<Declarations>
				<Literal>
					<ID>type</ID>
					<ToolTip>属性类型</ToolTip>
					<Default>int</Default>
				</Literal>
				<Literal>
					<ID>property</ID>
					<ToolTip>属性名</ToolTip>
					<Default>MyProperty</Default>
				</Literal>
				<Literal>
					<ID>field</ID>
					<ToolTip>支持此属性的变量</ToolTip>
					<Default>myVar</Default>
				</Literal>
			</Declarations>
			<Code Language="csharp"><![CDATA[private $type$ $field$;

	public $type$ $property$
	{
		get { return $field$;}
		set { $field$ = value;}
	}
	$end$]]>
			</Code>
		</Snippet>
	</CodeSnippet>
</CodeSnippets>
Although you can also modify the code template by directly modifying this xml document, we recommend using a visual extension of Visual Studio called Snippet Designer . It allows you to edit the code template more easily. As for the meaning of each paragraph in the above content, we will introduce them one by one later.
Snippet Designer installation
You can install Snippet Designer in the following ways:
-
In the extension manager of Visual Studio, directly download Snippet Designer through the Internet search, and you need to restart after installation.
-
Download SnippetDesigner.vsix on https://marketplace.visualstudio.com/items?itemName=vs-publisher-2795.SnippetDesigner , double-click to install after the download is completed, please note that there cannot be an open VS instance during installation.
-
You can also download the solution on Github and compile and install it by yourself . The address of the warehouse is: https://github.com/mmanela/SnippetDesigner .
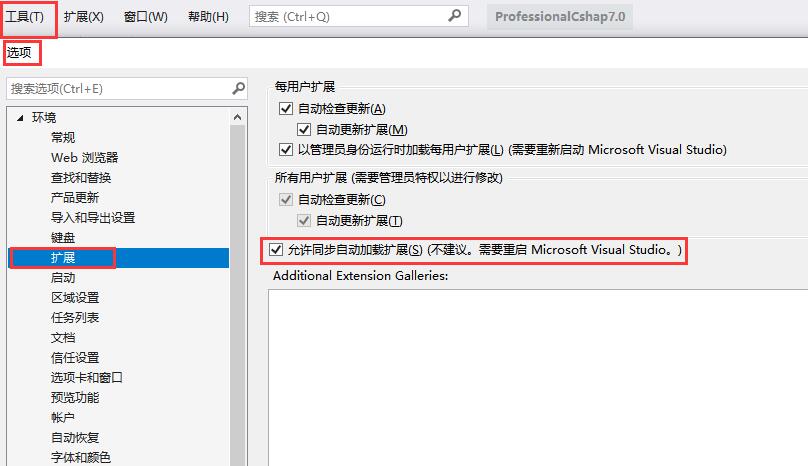
Note that you need to check "Allow synchronous automatic loading of extensions" in "Menu-> Tools-> Options-> Extensions". If you don't check, my VS2019 will not be able to use this extension at all.
Snippet Designer features
According to the introduction document on Github:
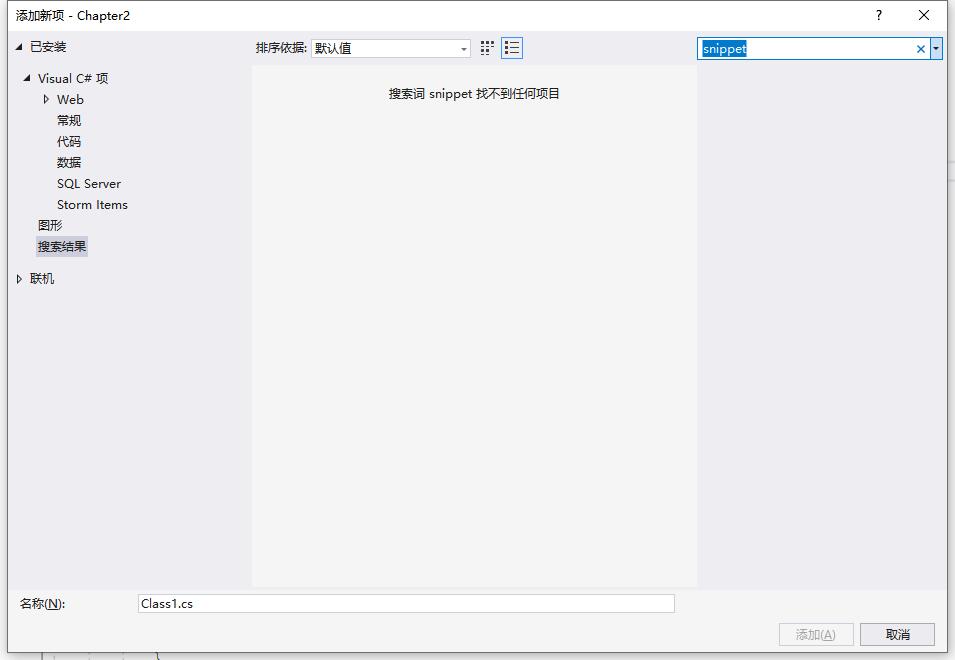
Access it by opening any .snippet file or going to File -> New -> File -> Code Snippet File.
In other words, first of all, you can create a snippet file by creating a new file, which should have been like this:
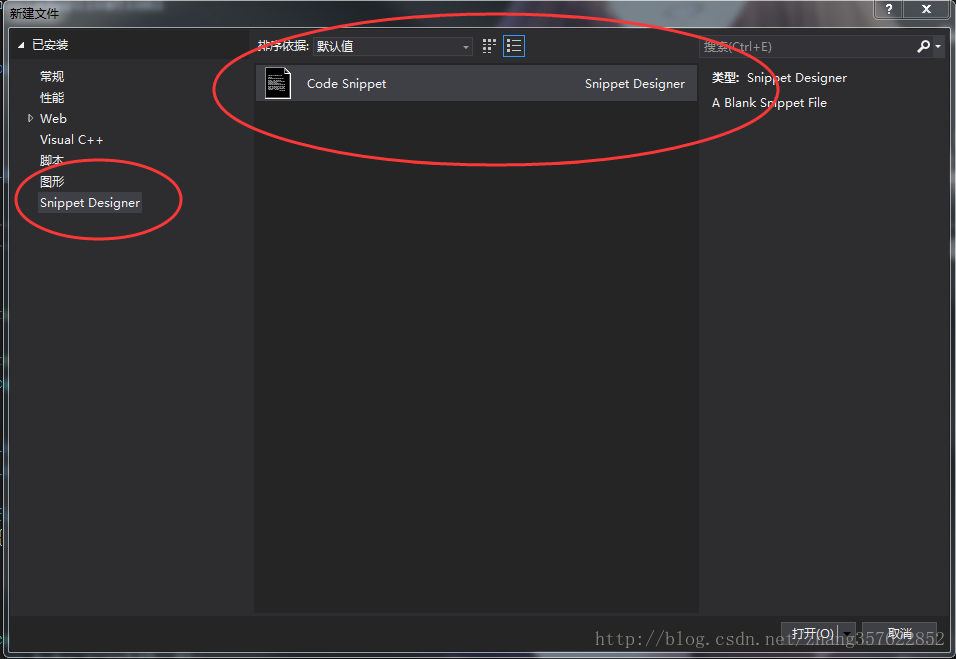
In fact, mine is like this, there is nothing:
It uses the native Visual Studio code editor so that you can write the snippets in the same enviorment you write your code.
Well, this is okay, as you will see later, just write code just like ordinary documents.
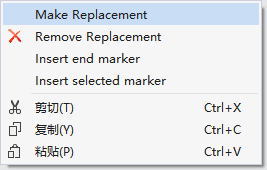
It lets you easily mark replacements by a convenient right click menu.
This is no problem, when editing the template, select a piece of content you want to replace, and there is a Make Replacement option in the right-click menu, as shown below:
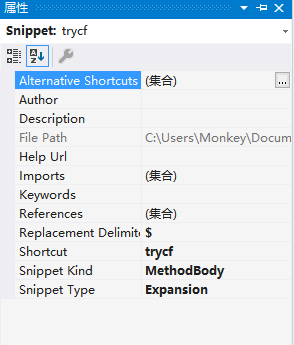
It displays properties of the snippet inside the Visual Studio properties window.
Indeed, a properties window is also provided, as shown below:
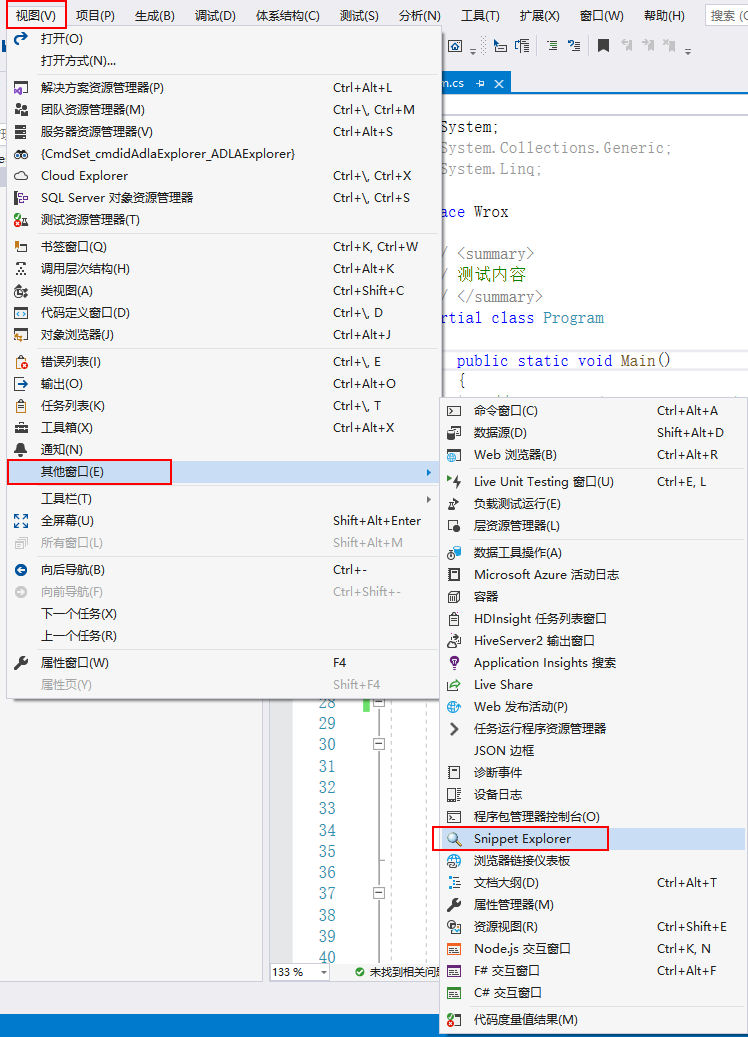
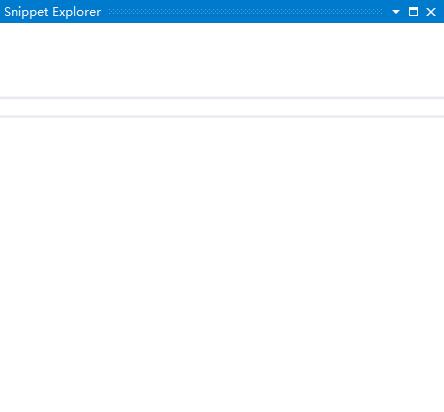
It is located under View -> Other Windows -> Snippet Explorer.
You can open "Menu-> View-> Other Windows-> Snippet Explorer", as shown below:
It should have looked like this:
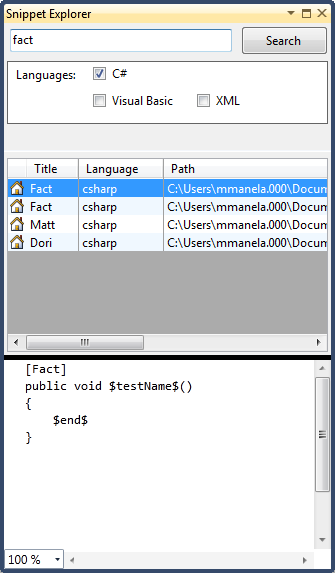
And what I opened under VS2019 is like this, nothing:
This tool window contains a code preview window which lets to peek inside the snippet to see what it is without opening the file.
The "Menu-> Tools-> Code Snippet Manager" window provides a quick preview function, but it has nothing to do with this extension.
Maintains an index of snippets on your computer for quick searching.
All your snippets files have been indexed on your machine for quick access, and I ca n’t tell if this is the case.
Provides a quick way to find a code snippet to use, edit or delete.
It should be said that the "Snippet Explorer" function, anyway, I do not, after the installation is completed, it first prompts "Visual Studio can not load some extensions synchronously", then I manually go to the tool options, check the Allow synchronous loading, and prompt "VS It is not possible to call outdated APIs while loading extensions. "
The Snippet Designer supports Visual Studio 2015, 2017, 2019.
Isn't it good to support VS2019? Do I install the fake VS2019 Enterprise Edition.

Snippet Designer detailed introduction
Although my VS2019 can't use all the features introduced above, it doesn't mean that all the handsome guys and beauties present here can't, or that other versions of VS can be stably supported.
My goal is always to write code templates to speed up my programming efficiency. Why the features he provided are basically unusable in my machine environment, and I will not toss about it. If there is a big guy who solves this problem, please Let me know, I will learn.
But there is a function that is not mentioned that it can definitely be used, and then I will use this function to demonstrate how to create a code template, and I summed up after reviewing the system's built-in template.
You can select a piece of code in any code file, and then select "Export as Snippet" in the right-click menu:
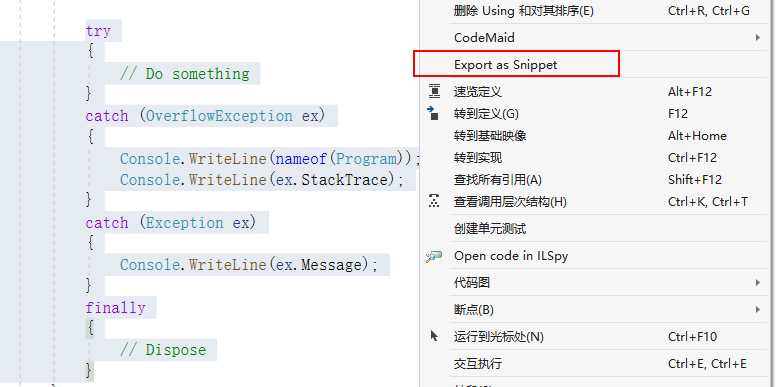
This means that you intend to turn this code into a code template, and then jump to a window like this:
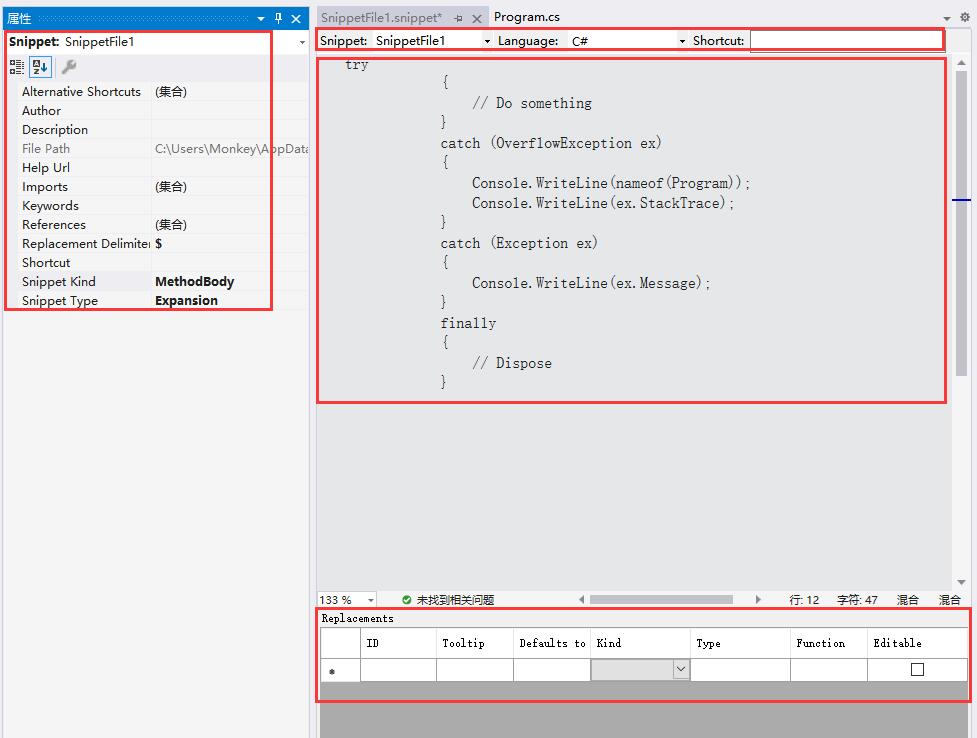
I will make a slight modification first, and then we will explain:
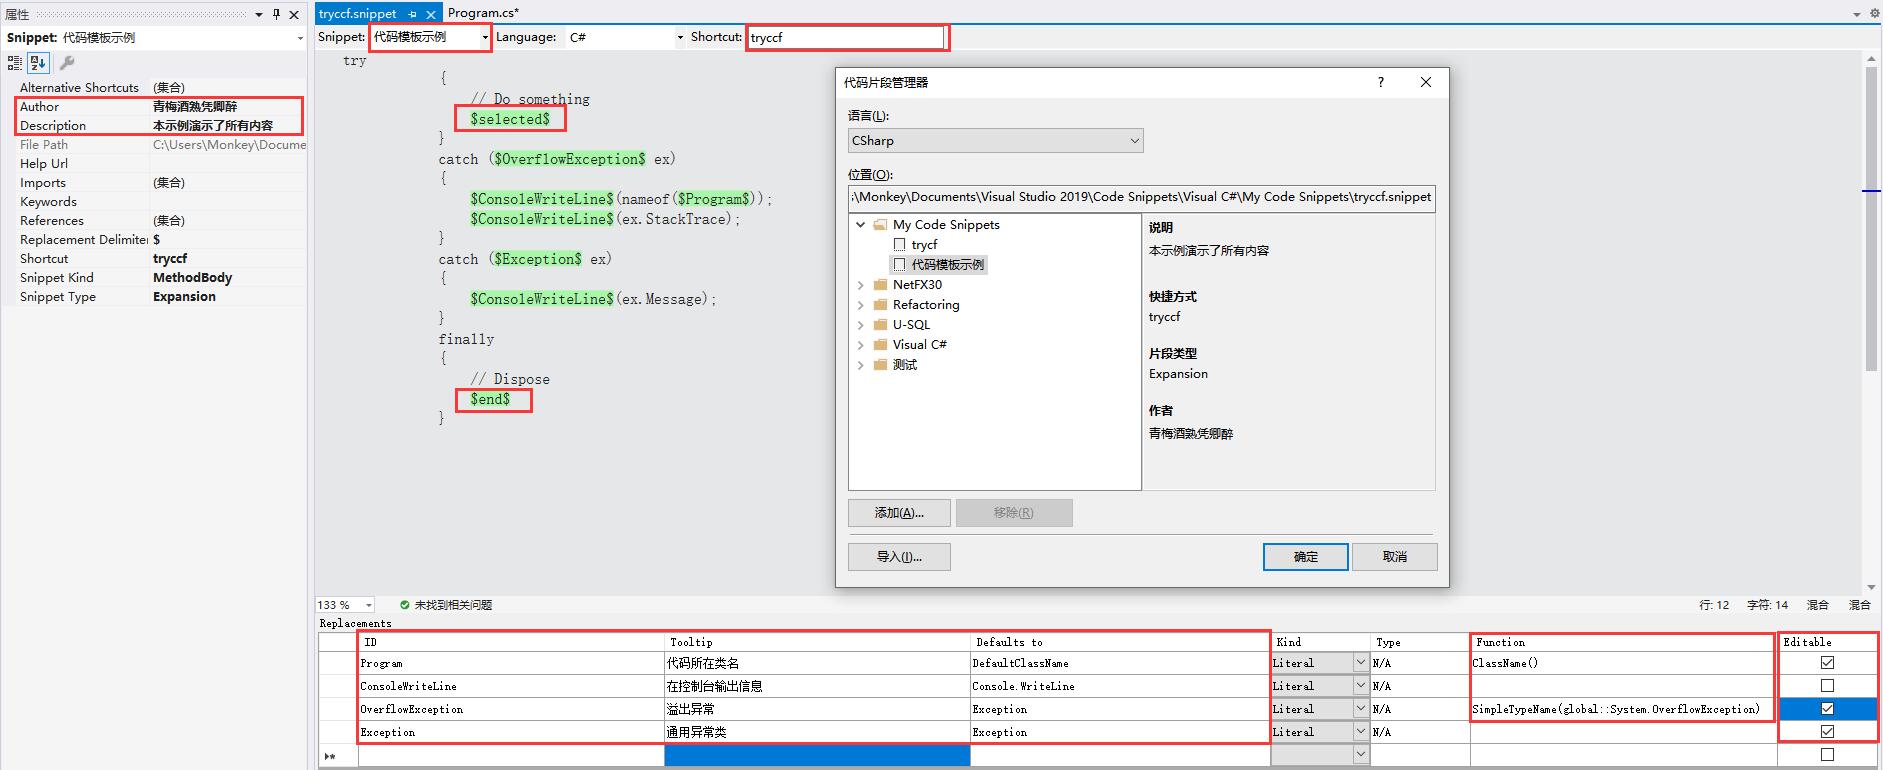
Both the red frame part and the green bottom part have been modified by us. Through the "Code Snippet Manager", you can easily correspond to the corresponding description field. We don't need to explain more, everyone understands, it is worth mentioning Yes, the name of the file where you store Snippet can be any name, but it is recommended to be the same as the shortcut, so it is easy to find. Next we explain the most important part:
- shortcut: Shortcut, here is
tryccf, that is to say, by tapping thistryccfshortcut in the code editor , and thenTabcompleting it twice , you can completely display the same content as above. If the shortcut you defined and other shortcuts are heavy, when you use it in the code editor, a selection box will pop up to let you choose the desired code template. - $ selected $: When you select "Select a section of code-> Right-click menu-> Fragment-> External code-> Select the corresponding code section", the selected code will be wrapped in the
$selected$defined location. - $ end $: If there is no editable area, the cursor will be at this
$end$defined position after the code snippet is generated . - ID: One-to-one correspondence with the placeholders included in the $ in the template, but there is no need to write the $ symbol here.
- Tooltip: specific instructions for the corresponding location.
- Defaults to: If Function is not defined or Function cannot calculate the value, the corresponding placeholder will be replaced with the string here.
- Function: Here I only find two, one is
ClassName()to replace the placeholder with the name of the class where the code is located, and the other isSimplyTypeName(global::完整类名)to replace the placeholder with the corresponding class. For example, here we are usingSimpleTypeName(global::System.OverflowException). - Editable: Check to indicate that the area can be edited. After the code snippet is generated, you can
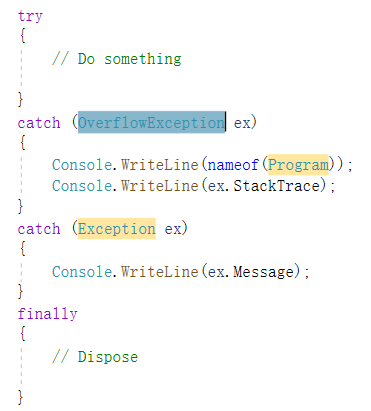
Tabquickly jump to the area of the corresponding placeholder through the key. The background color is yellow. If it is not selected, it means that it is not editable, as shown in the following figure:
- Replacement Delimiter: The default is $, you can also use other symbols, a string of characters wrapped by two of this symbol is considered a placeholder.
After the modification is completed, you can save the Snippet file. Note that it will be saved to the directory corresponding to MyCode Snippets by default. Therefore, the code snippet manager can be directly seen after saving, and the code editor can also be directly through the shortcut you define. use. You can also save it to your favorite directory and add it through the import function.
We can use Notepad to open the new Snippet file we created, the content is as follows:
<?xml version="1.0" encoding="utf-8"?>
<CodeSnippets xmlns="http://schemas.microsoft.com/VisualStudio/2005/CodeSnippet">
  <CodeSnippet Format="1.0.0">
    <Header>
      <Keywords>
        <Keyword>
        </Keyword>
      </Keywords>
      <SnippetTypes>
        <SnippetType>Expansion</SnippetType>
      </SnippetTypes>
      <AlternativeShortcuts>
      </AlternativeShortcuts>
      <Title>代码模板示例</Title>
      <Author>青梅酒熟凭卿醉</Author>
      <Description>本示例演示了所有内容</Description>
      <HelpUrl>
      </HelpUrl>
      <Shortcut>tryccf</Shortcut>
    </Header>
    <Snippet>
      <Declarations>
        <Literal Editable="true">
          <ID>Program</ID>
          <ToolTip>代码所在类名</ToolTip>
          <Default>DefaultClassName</Default>
          <Function>ClassName()</Function>
        </Literal>
        <Literal Editable="false">
          <ID>ConsoleWriteLine</ID>
          <ToolTip>在控制台输出信息</ToolTip>
          <Default>Console.WriteLine</Default>
          <Function>
          </Function>
        </Literal>
        <Literal Editable="true">
          <ID>OverflowException</ID>
          <ToolTip>溢出异常</ToolTip>
          <Default>Exception</Default>
          <Function>SimpleTypeName(global::System.OverflowException)</Function>
        </Literal>
        <Literal Editable="true">
          <ID>Exception</ID>
          <ToolTip>通用异常类</ToolTip>
          <Default>Exception</Default>
          <Function>
          </Function>
        </Literal>
      </Declarations>
      <Code Language="csharp" Delimiter="$" Kind="method body"><![CDATA[try
            {
                // Do something
                $selected$
            }
            catch ($OverflowException$ ex)
            {
                $ConsoleWriteLine$(nameof($Program$));
                $ConsoleWriteLine$(ex.StackTrace);
            }
            catch ($Exception$ ex)
            {
                $ConsoleWriteLine$(ex.Message);
            }
            finally
            {
                // Dispose
                $end$
            }]]></Code>
    </Snippet>
  </CodeSnippet>
</CodeSnippets>