Chapter 2 Java Programming Environment
This chapter mainly introduces how to install the Java Development Kit (JDK) and how to compile and run different types of programs: console programs, graphical applications, and applets. The way to run the JDK tool is to key in commands in the terminal window. However, many programmers prefer to use an integrated development environment. To this end, we will introduce later how to use a free development environment to compile and run Java programs. Although it is easy to learn, the integrated development environment needs to devour a lot of resources, and it is cumbersome to write small programs. Once you have mastered the techniques in this chapter and selected your own development tools, you can study Chapter 3 and start researching the Java programming language:
2.1 Install Java Development Kit
Oracle provides the latest and most complete version of the Java Development Kit (JDK) for Linux, Mac OS X, Solaris and Windows. The versions for many other platforms are still in various development states, but these versions are authorized and distributed by the developers of the corresponding platforms.
2.1.1 Download JDK
To download Java Development 1: Toolkit, you can visit the Oracle website: www.oracle.com/technetwork/java/javase/downloads. Before you can get the software you need, you must figure out a lot of professional terminology. Please see the summary in Table 2-1.

You have seen that JDK is an abbreviation of Java Development Kit. A bit confusing: This toolkit version 1.2 ~ version 1.4 is called Java SDK (Software Development Kit, Software Development Kit) In some cases, you can also see this outdated term. In addition, there is a term is the Java Runtime Environment (JRE), which contains the virtual machine but does not contain the compiler. This is not the environment developers want , But specifically for users who do n’t need a compiler.
Next, Java SE will appear in large numbers. Compared with Java EE (Enterprise Edition) and Java ME (Micro Edition), it is the standard version of Java. The formulation of Java 2 began in 1998. At that time, the sales staff of Sim Company felt that increasing the number after the decimal point and changing the version number did not reflect the major improvement of JDK 1.2. However, since I realized this problem after the release, I decided to continue to use the development toolkit version number 1.2, the next version is 1.3, 1.4 and 5.0, but the Java platform was renamed to Java 2. Therefore, there is version 5.0 of the Java 2 Standard Edition Software Development Kit (J2SE SDK 5.0).
Fortunately, the 2006 version number was simplified. The next version of Java Standard Edition is named Java SE 6, and later there are Java SE 7 and Java SE 8. However, the "-internal" version numbers are 1.6.0, 1.7.0 and 1.8.0, respectively. When Oracle makes some minor version changes to solve some urgent problems, it is called an update. For example: Java SE 8u31 is the 31st update of JavaSE 8, and its internal version number is 1.8.0_31. The update does not need to be installed on the previous version, it will contain the latest version of the entire JDK. In addition, not all updates are publicly released, so if there is no "Update 32" after "Update 31", you don't have to panic.
For Windows or Linux, you need to choose between x86 (32-bit) and x64 (64-bit) versions. You should choose the version that matches your operating system architecture.
For Linux, you can also choose between an RPM file and a .tar.gz file. We recommend using the latter, which can be directly decompressed wherever you want.
Now you have learned how to choose the appropriate JDK. Here is a summary:
- What you need is JDK (Java SE Development Kit), not JRE.
- Windows or Linux: 32-bit select x86, 64-bit select x64c
- Linux: Select the .tar.gz version.
Accept the license agreement and download the file.
Note: Oracle provides a bundle that contains the Java Development Kit (JDK) and NetBeans integrated development environment. It is recommended not to install any bundles at this time, but only to install the Java development kit. If you plan to use NetBeans in the future, you can download it from http://netbeans.org.
2.1.2 Set JDK
After downloading the JDK, you need to install the development package and specify where to install it, and you will need this information later.
- On Windows, start the installer. You will be asked where you want to install the JDK. It is best not to accept the default location with spaces in the path name, such as c: \ Program Files \ Java \ jdkl.8.0_verj / o «. Just remove the Program Files part of the path name.
- On Mac, run the installer. This will install the software to /Libraiy/Java/JavaV_lMachines/jdkl.8.0_vers»_o«.jdk/Contents/Home. Use Finder to find this directory.
- On Linux, you only need to extract the .tar.gz file to a location of your choice, such as your home directory, or / opt. If installing from an RPM file, it is necessary to repeatedly check whether it is installed in /usr/java/jdkl.S.Ojersfofj. In this book, the installation directory is indicated by). For example, when it comes to as M) in the directory means
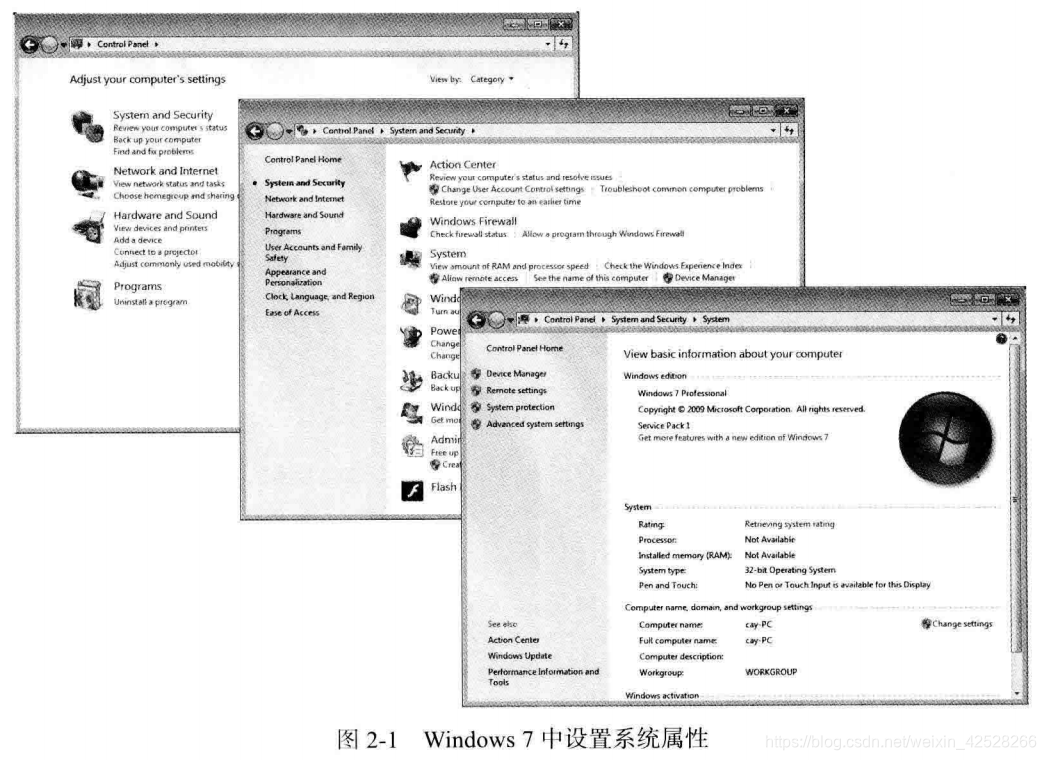
/opt/jdkl.8.0_31/binorc:\Java\jdkl_ 8_ 0_31\bindirectory. When installing the JDK on Windows or Linux, you need to complete an additional step: add the t / bin directory to the execution path. An execution path is a list of directories that the operating system traverses when searching for executable files. • On Linux, you need to add a line at the end of the 7.bashrc or 7.bash_profile file:export PATH=/d/t/bin:$PATHbe sure to use the correct path of the JDK, such as/opt/jdkl.8.0_31. - On Windows, start the control panel, select "System and Security" (System and Security,) and then select "System" (System), select Advanced System Settings (Advanced System Settings) (see Figure 2-1.) In the SystemProperties dialog box, click the "Advanced" tab, and then click the "Environment" button.
Scroll through the "System Variables" list until you find a variable named Path. Click the "Edit" button (see Figure 2-2). Add the yWhbin directory to the front of the path, and separate the newly added item with a semicolon, as shown below: jdk\bin\other stuff
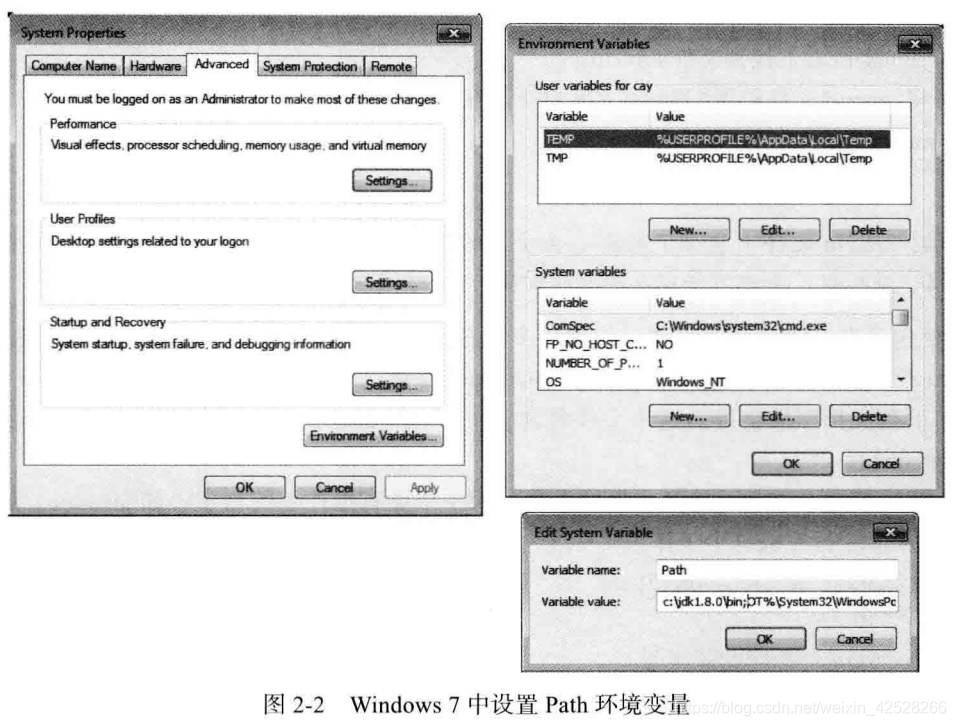
pay attention to replace _ / into the specific Java installation path, such as c:\Java\jdkL8.0_31. If you ignore the previous suggestion and want to keep the Program Files section, enclose the entire path in double quotes: " c:\ProgramFiles\Java\jdkl.8.0_31\bin"; other directories.
Save the settings. After that, all newly opened console windows will have the correct path. You can test whether the settings are correct as follows: Open a terminal window and key in:
javac -version
Then press enter. You should see the following information displayed:
javac 1.8.0J1
If you get something like " javac: command not found" (javac :: command not found) or " The name specified is not recognized as an internal or external command, operable program or batch file" (the specified name is not an internal or external command, executable program, or batch file), you need to go back and check your installation repeatedly.
2.1.3 Install library source files and documents
The library source file is released in the form of a compressed file src.Zip in the JDK, and it must be uncompressed to access the source code. It is recommended to follow the steps described below. It's very simple:
1) Make sure the JDK is installed and the jdk / bin directory is in the execution path.
2) Create a directory javasrc in the main directory. If you want, you can complete this step in a terminal window.
mkdir javasrc
3) Find the file src.zip in the jdk directory. 4) Unzip the src.zip file to the javasrc directory. In a terminal window, you can execute the following commands:
cd javasrc
jar xvf yrffc/src.zip
cd
Tip: The src.zip file contains the source code of all public libraries. To get more source code (for example: compiler, virtual machine, local methods and private auxiliary classes), please visit the website: http://jdk8.java.net.
The document is contained in a compressed file, which is a compressed file independent of the JDK. Directly from the Web site http://www.oracle.com/technetwork/java/javase/downloadsto download the document. The operation steps are as follows:
1) Download the compressed file. This file is named jdk-ver5/cw-docs-all.zip, which indicates the version number, such as 8u31. 2) Unzip the file and rename the doc directory to a more descriptive name, such as javadoc. If you want, you can do this from the command line:
jar xvf Downloads/jdk-wrswn-docs-al 1 . zip
mv doc javadoc
Here version is the corresponding version number.
3) Navigate to javadoc / api / index.html in the browser and add this page to the bookmark. Also install the program examples in this book. From http://horstmann.com/corejavadownload the sample. These programs are packaged in a zip file corejava.zip *. You can unzip the program to your home directory. They will be placed in the corejava directory. If you want, you can do this from the command line:jar xvf Downloads/corejava.zip
