Build a local OpenStack source
1. The installation system
configuration is as follows:
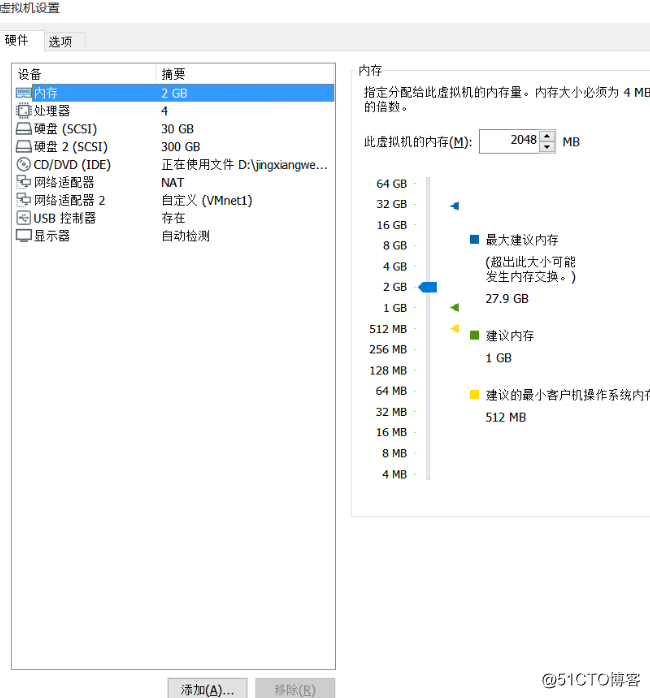
Centos 7.6 Virtual machine one
CPU: dual-core dual-thread
memory: 2G
hard disk: 30G system disk + 300G mounting disk
desktop installation-development tools to 
close the firewall and core protection
Second, simultaneous OpenStack production Environmental source
backup system comes with yum source
[root@localhost network-scripts]# cd /etc/yum.repos.d/
[root@localhost yum.repos.d]# mkdir bak
[root@localhost yum.repos.d]# mv C* bak/
[root@localhost yum.repos.d]# hostnamectl set-hostname opstkyumy
[root@localhost yum.repos.d]# su
[root@opstkyumy yum.repos.d]#
Edit Alibaba Cloud Centos 7 official source and OpenStack sourceEdit Alibaba
Cloud Centos 7 official source and Open copy the relevant repo file to /etc/yum.repos.d/ under
CentOS-QEMU-EV.repo
epel.repo
openstack.repo
CentOS -Base.repo
CentOS-Storage-common.repo
nginx.repoStack source
[root@opstkyumy yum.repos.d]# mkdir /abc
[root@opstkyumy yum.repos.d]# mount.cifs //192.168.254.1/linuxs /abc
Password for root@//192.168.254.1/linuxs:
[root@opstkyumy yum.repos.d]# cp /abc/yum.repos.d/* .
[root@opstkyumy yum.repos.d]# ls
bak               CentOS-QEMU-EV.repo         epel.repo   openstack.repo
CentOS-Base.repo  CentOS-Storage-common.repo  nginx.repo
Check if Alibaba Cloud is normal
[root@opstkyumy yum.repos.d]# yum repolistInstall related software
yum-utils: reposync synchronization tool
createrepo: edit yum library tool to do dependency relationship
plugin-priorities: control yum source update priority tool, this tool can be used to control the order of yum source retrieval, suggest it can be used in client side
[root@opstkyumy yum.repos.d]# yum install -y wget make cmake gcc gcc-c++ pcre-devel zlib-devel openssl openssl-devel createrepo yum-utilsCreate a source directory, mount a data disk, and synchronize the source to a local directory
[root@opstkyumy yum.repos.d]# mkdir /data
[root@opstkyumy yum.repos.d]# fdisk -l

磁盘 /dev/sdb:322.1 GB, 322122547200 字节,629145600 个扇区
Units = 扇区 of 1 * 512 = 512 bytes
扇区大小(逻辑/物理):512 字节 / 512 字节
I/O 大小(最小/最佳):512 字节 / 512 字节

磁盘 /dev/sda:32.2 GB, 32212254720 字节,62914560 个扇区
Units = 扇区 of 1 * 512 = 512 bytes
扇区大小(逻辑/物理):512 字节 / 512 字节
I/O 大小(最小/最佳):512 字节 / 512 字节
磁盘标签类型:dos
磁盘标识符:0x0001df55

   设备 Boot      Start         End      Blocks   Id  System
/dev/sda1   *        2048     2099199     1048576   83  Linux
/dev/sda2         2099200     6295551     2098176   82  Linux swap / Solaris
/dev/sda3         6295552    62914559    28309504   83  Linux
[root@opstkyumy yum.repos.d]#
[root@opstkyumy yum.repos.d]# mkfs.xfs /dev/sdb
meta-data=/dev/sdb               isize=512    agcount=4, agsize=19660800 blks
         =                       sectsz=512   attr=2, projid32bit=1
         =                       crc=1        finobt=0, sparse=0
data     =                       bsize=4096   blocks=78643200, imaxpct=25
         =                       sunit=0      swidth=0 blks
naming   =version 2              bsize=4096   ascii-ci=0 ftype=1
log      =internal log           bsize=4096   blocks=38400, version=2
         =                       sectsz=512   sunit=0 blks, lazy-count=1
realtime =none                   extsz=4096   blocks=0, rtextents=0
[root@opstkyumy yum.repos.d]# mount /dev/sdb /data
[root@opstkyumy data]# vim /etc/fstab
/dev/sdb        /data   xfs     defaults        0       0
[root@opstkyumy data]# mount -a     //也可以重启生效更稳妥
[root@opstkyumy data]# df -Th
文件系统               类型      容量  已用  可用 已用% 挂载点
/dev/sda3              xfs        27G  4.2G   23G   16% /
devtmpfs               devtmpfs  895M     0  895M    0% /dev
tmpfs                  tmpfs     910M     0  910M    0% /dev/shm
tmpfs                  tmpfs     910M   11M  900M    2% /run
tmpfs                  tmpfs     910M     0  910M    0% /sys/fs/cgroup
/dev/sda1              xfs      1014M  174M  841M   18% /boot
tmpfs                  tmpfs     182M  4.0K  182M    1% /run/user/42
tmpfs                  tmpfs     182M   24K  182M    1% /run/user/0
/dev/sr0               iso9660   4.3G  4.3G     0  100% /run/media/root/CentOS 7 x86_64
//192.168.254.1/linuxs cifs      455G  183G  273G   41% /abc
/dev/sdb               xfs       300G   33M  300G    1% /data
Start synchronization, synchronize the source to the local directory, the process is long, wait patiently,
you can use repo -r --repoid = repoid to specify the repo id to be queried, you can specify multiple (# reposync -r base -p / data #Sync here base directory to local)
update the new rpm package
reposync -np / data
[root@opstkyumy ~]# reposync -p /data
[root@opstkyumy data]# ls
base            epel    nginx             openstack-rocky  openstack-train
centos-qemu-ev  extras  openstack-queens  openstack-stein  updates
[root@opstkyumy data]# ls base/
Packages    //里面都是RPM包
[root@opstkyumy data]# ls epel/
Packages
[root@opstkyumy data]# ls nginx/
RPMS
[root@opstkyumy data]# ls openstack-rocky/  //里面都是RPM包
[root@opstkyumy data]# ls centos-qemu-ev/
[root@opstkyumy data]# ls extras/
Packages
[root@opstkyumy data]# ls updates/
Packages
3. Solve the OpenStack software environment dependencies
1. Create a software dependency library
[root@opstkyumy ~]# createrepo -po /data/base/ /data/base/
[root@opstkyumy ~]# createrepo -po /data/extras/ /data/extras/
[root@opstkyumy ~]# createrepo -po /data/updates/ /data/updates/
[root@opstkyumy ~]# createrepo -po /data/epel/ /data/epel/
[root@opstkyumy ~]# createrepo -po /data/openstack-queens/ /data/openstack-queens/
[root@opstkyumy ~]# createrepo -po /data/openstack-rocky/ /data/openstack-rocky/
[root@opstkyumy ~]# createrepo -po /data/openstack-stein/ /data/openstack-stein/
[root@opstkyumy ~]# createrepo -po /data/openstack-train/ /data/openstack-train/
[root@opstkyumy ~]# createrepo -po /data/centos-qemu-ev /data/centos-qemu-ev/
[root@opstkyumy ~]# createrepo -po /data/nginx /data/nginx
2. Update source data
[root@localhost ~]# createrepo --update /data/base
[root@localhost ~]# createrepo --update /data/extras
[root@localhost ~]# createrepo --update /data/updates
[root@localhost ~]# createrepo --update /data/epel
[root@localhost ~]# createrepo --update /data/openstack-queens
[root@localhost ~]# createrepo --update /data/openstack-rocky
[root@localhost ~]# createrepo --update /data/openstack-stein
[root@localhost ~]# createrepo --update /data/openstack-train
[root@localhost ~]# createrepo --update /data/centos-qemu-ev
[root@localhost ~]# createrepo --update /data/nginx
3. Update yum script
[root@opstkyumy ~]# mkdir /data/script
[root@opstkyumy ~]# vim /data/script/centos_openstack_yum_update.sh
#!/bin/bash
echo 'Updating Aliyum Source'
DATETIME=`date +%F_%T`
exec > /var/log/aliyumrepo_$DATETIME.log
     reposync -np /data
if [ $? -eq 0 ];then
      createrepo --update /data/base
      createrepo --update /data/extras
      createrepo --update /data/updates
      createrepo --update /data/epel
      createrepo --update /data/openstack-queens
      createrepo --update /data/openstack-rocky
      createrepo --update /data/openstack-stein
      createrepo --update /data/openstack-train
      createrepo --update /data/centos-ceph-nautilus
      createrepo --update /data/centos-nfs-ganesha28
      createrepo --update /data/centos-ceph-luminous
      createrepo --update /data/centos-qemu-ev
      createrepo --update /data/nginx
      createrepo --update /data/ceph-noarch
    echo "SUCESS: $DATETIME aliyum_yum update successful"
  else
    echo "ERROR: $DATETIME aliyum_yum update failed"
fi
[root@opstkyumy ~]# chmod +x /data/script/centos_openstack_yum_update.sh
4. Add the script to the scheduled task
将脚本加入到定时任务中
[root@opstkyumy ~]# crontab -e
00 13 * * 6 [ $(date +%d) -eq $(cal | awk 'NR==3{print $NF}') ] && /bin/bash /data/script/centos_openstack_yum_update.sh
Fourth, release the local OpenStack-yum source repository
1. Install nginx to open the directory permissions to ensure that the local machine can directly source the local yum
[root@opstkyumy ~]# groupadd nginx
[root@opstkyumy ~]# useradd -r -g nginx -s /bin/false -M nginx
[root@opstkyumy ~]# yum -y install nginx
[root@opstkyumy ~]# vim /etc/nginx/nginx.conf
worker_processes  1;
events {
    worker_connections  1024;
}
http {
    include       mime.types;
    default_type  application/octet-stream;
    sendfile        on;
    keepalive_timeout  65;
    server {
        listen       80;
        server_name  opstkyumy;
        root         /data;
        location / {
            autoindex on;
            autoindex_exact_size off;
            autoindex_localtime on;
            charset utf-8,gbk;
            index index.html;
        }
        error_page   500 502 503 504  /50x.html;
        location = /50x.html {
            root   html;
        }
    }
}
[root@opstkyumy nginx]# systemctl start nginx
[root@opstkyumy nginx]# systemctl stop firewalld
[root@opstkyumy nginx]# systemctl disable firewalld
[root@opstkyumy nginx]# setenforce 0
setenforce: SELinux is disabled
[root@opstkyumy nginx]# systemctl enable nginx
Created symlink from /etc/systemd/system/multi-user.target.wants/nginx.servi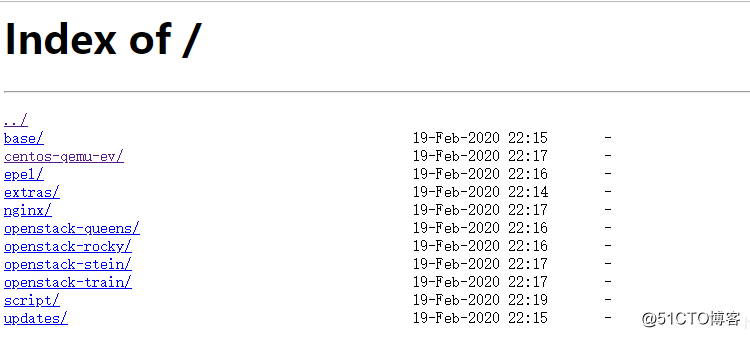
V. OpenStack client deploys local yum source warehouse
configuration network card
[root@localhost ~]# ifconfig

ens33: flags=4163<UP,BROADCAST,RUNNING,MULTICAST>  mtu 1500
        inet 192.168.254.40  netmask 255.255.255.0  broadcast 192.168.254.255
        inet6 fe80::172f:76ba:bad8:2ef7  prefixlen 64  scopeid 0x20<link>
        ether 00:0c:29:8d:1e:35  txqueuelen 1000  (Ethernet)
        RX packets 3712  bytes 632590 (617.7 KiB)
        RX errors 0  dropped 0  overruns 0  frame 0
        TX packets 176  bytes 15930 (15.5 KiB)
        TX errors 0  dropped 0 overruns 0  carrier 0  collisions 0

[root@localhost ~]# ping 192.168.254.152
PING 192.168.254.152 (192.168.254.152) 56(84) bytes of data.
64 bytes from 192.168.254.152: icmp_seq=1 ttl=64 time=1.23 ms
64 bytes from 192.168.254.152: icmp_seq=2 ttl=64 time=0.773 ms

--- 192.168.254.152 ping statistics ---
2 packets transmitted, 2 received, 0% packet loss, time 1002ms
rtt min/avg/max/mdev = 0.773/1.003/1.234/0.232 ms
Build a private warehouse
[root@localhost ~]# cd /etc/yum.repos.d/
[root@localhost yum.repos.d]# ls
bak  local.repo
[root@localhost yum.repos.d]# rm -rf local.repo
[root@localhost yum.repos.d]# vim openstack.repo
[base]
name=CentOS-$releasever - Base - data.template.com
baseurl=http://192.168.254.152/base/
enabled=1
gpgcheck=0
[updates]
name=CentOS-$releasever - Updates - data.template.com
baseurl=http://192.168.254.152/updates/
enabled=1
gpgcheck=0

[extras]
name=CentOS-$releasever - Extras - datas.template.com
baseurl=http://192.168.254.152/extras/
enabled=1
gpgcheck=0

[epel]
name=CentOS-$releasever - epel - datas.template.com
baseurl=http://192.168.254.152/epel/
failovermethod=priority
enabled=1
gpgcheck=0

#[openstack-queens]
#name=openstack-queens
#baseurl=http://192.168.254.152/openstack-queens/
#gpgcheck=0
#enabled=1

#[openstack-rocky]
#name=openstack-rocky
#baseurl=http://192.168.254.152/openstack-rocky/
#gpgcheck=0
#enabled=1

#[openstack-stein]
#name=openstack-stein
#baseurl=http://192.168.254.152/openstack-stein/
#gpgcheck=0
#enabled=1

[openstack-train]
name=openstack-train
baseurl=http://192.168.254.152/openstack-train/
gpgcheck=0
enabled=1

#[centos-ceph-luminous]
#name=centos-ceph-luminous
#baseurl=http://192.168.254.152/centos-ceph-luminous/
#gpgcheck=0
#enabled=1

#[centos-ceph-nautilus]
#name=centos-ceph-nautilus
#baseurl=http://192.168.254.152/centos-ceph-nautilus/
#gpgcheck=0
#enabled=1

#[centos-nfs-ganesha28]
#name=centos-nfs-ganesha28
#baseurl=http://192.168.254.152/centos-nfs-ganesha28/
#gpgcheck=0
#enabled=1

[centos-qemu-ev]
name=centos-qemu-ev
baseurl=http://192.168.254.152/centos-qemu-ev/
gpgcheck=0
enabled=1

[nginx]
name=nginx
baseurl=http://192.168.254.152/nginx/
gpgcheck=0
enabled=1

#[ceph-noarch]
#name=ceph-noarch
#baseurl=http://192.168.254.152/ceph-noarch/
#gpgcheck=0
#enabled=1
[root@localhost yum.repos.d]# yum clean all
[root@localhost yum.repos.d]# yum makecacheTest whether you can download the RPM package
[root@localhost yum.repos.d]# cd /opt
[root@localhost opt]# ls
rh
[root@localhost opt]# yumdownloader openstack-swift-account
[root@localhost opt]# ll
总用量 24
-rw-r--r--  1 root root 21264 10月 25 22:27 openstack-swift-account-2.23.1-1.el7.noarch.rpm
drwxr-xr-x. 2 root root     6 10月 31 2018 rh
Can be downloaded normally, the deployment is successful.
Six, configure the Alibaba Cloud time synchronization service, configure the NTP service,
configure the synchronization of the Ali clock, and configure it at the local source
[root@opstkyumy data]# yum -y install ntpdate
[root@opstkyumy data]# ntpdate ntp.aliyun.com
19 Feb 23:19:01 ntpdate[54480]: adjust time server 203.107.6.88 offset -0.002603 sec
[root@opstkyumy ~]# crontab -e
*/30 * * * * /usr/sbin/ntpdate ntp.aliyun.com >>/var/log/ntpdate.log
//可以先把时间调小一点,测试是否生效
[root@opstkyumy data]# cd /var/log/
[root@opstkyumy log]# systemctl restart crond
[root@opstkyumy log]# systemctl enable crond
[root@opstkyumy log]# ll | grep "ntp"
-rw-r--r-- 1 root root 84 Feb 19 23:22 ntpdate.log
[root@opstkyumy log]# tail -f /var/log/ntpdate.log
19 Feb 23:22:09 ntpdate[57911]: adjust time server 203.107.6.88 offset 0.005077 sec
19 Feb 23:23:09 ntpdate[59092]: adjust time server 203.107.6.88 offset -0.0019After the NTP clock synchronization is completed, the NTP service is installed to allow others to synchronize themselves
[root@opstkyumy log]# yum -y install ntp
[root@opstkyumy log]# vim /etc/ntp.conf
  8 restrict default nomodify notrap
 17 restrict 192.168.254.0 mask 255.255.255.0 nomodify notrap
 //原有的21-24行删除,加入下面配置
 21 fudeg 127.127.1.0 stratum 10
 22 server 127.127.1.0
NTP set the problem of no self-starting after booting and then restarting. Resolve:
by prohibiting the chronyd service to start self-starting and then restarting the system.
Chronyd is a time service that comes with Linux
[root@opstkyumy log]# systemctl disable chronyd.service
Removed symlink /etc/systemd/system/multi-user.target.wants/chronyd.service.
[root@opstkyumy log]# systemctl restart ntpd
[root@opstkyumy log]# systemctl enable ntpd
Created symlink from /etc/systemd/system/multi-user.target.wants/ntpd.service to /usr/lib/systemd/system/ntpd.service.
All deployments are complete