- 1.1, MySQL redeployment
- 1.2 Problems encountered in MySQL deployment (innodb_buffer_pool_size is not enough)
- 1.3、访问受限(Access denied for user ‘root’@‘localhost’ (using password: YES))
- 1.4. Access is restricted (Access denied for user 'root' @ 'localhost' (using password: NO))
- 1.5, several commands of MySQL
Second, Dbeaver connects to MySQL
3. Interview questions && homework for this course
One, MySQL regular deployment
1. Some small partners will have problems when deploying mysql, we need to see which user executes the command in which directory
mysql service-> mysql user to maintain
hadoop service-> hadoop user maintenance
cdh hdfs service->
hbase service maintained by hdfs user- > hbase user maintenance
2. There are two main versions of MySQL: MySQL5.6 and MySQL5.7. The following directories are written by J about MySQL deployment documents:
- https://github.com/Hackeruncle/mysql
Note: check isnot install; check whether it has been installed, do not find the problem until half of the installation time:
[root@hadoop001 local]# ps -ef|grep mysqld
root     21347 21311  0 12:47 pts/0    00:00:00 grep --color=auto mysqld
[root@hadoop001 local]# rpm -qa|grep -i mysql
3. Do not rename after decompression. It is better to make a soft connection. In the future, software upgrade will also intuitively query the version number:
1、解压之前先要创建几个必要的目录:arch归档目录、data数据目录、tmp临时目录
[root@hadoop local]# mkdir mysql/arch mysql/data mysql/tmp
[root@hadoop001 local]# tar -xzvf tar xzvf mysql-5.7.11-linux-glibc2.5-x86_64.tar.gz
[root@hadoop001 local]# ln -s mysql-5.7.11-linux-glibc2.5-x86_64/ mysql

//源文件和目标路径在一个文件夹,此处使用相对路径

//也可以使用绝对路径:
[root@hadoop local]# tar -xzvf /home/hadoop/software/mysql-5.7.11-linux-glibc2.5-x86_64.tar.gz

2、解压后需要注意的一点是文件权限(用户、用户组):
drwxr-xr-x  9  7161 wheel 4096 Feb  1  2016 mysql-5.7.11-linux-glibc2.5-x86_64
4. Create a user group, create a mysqladmin user and specify the group to which the mysqladmin user belongs
1、创建dba组,dba组的id是101
[root@hadoop001 local]# groupadd -g 101 dba

2、创建mysqladmin用户,-u表示指定mysqlamdin用户的id是514,-g表示指定这个用户的主组是dba组,-G表示把root组追加到dba组中去,-d表示指定mysqladmin的家目录是/usr/local/mysql
[root@hadoop001 local]# useradd -u 514 -g dba -G root -d /usr/local/mysql mysqladmin
useradd: warning: the home directory already exists.
Not copying any file from skel directory into it.

[root@hadoop001 local]# id mysqladmin
uid=514(mysqladmin) gid=101(dba) groups=101(dba),0(root)

3、groupadd的命令帮助
[root@hadoop001 local]# groupadd --help
Usage: groupadd [options] GROUP

Options:
  -f, --force                   exit successfully if the group already exists,
                                and cancel -g if the GID is already used
  -g, --gid GID                 use GID for the new group
  -h, --help                    display this help message and exit
  -K, --key KEY=VALUE           override /etc/login.defs defaults
  -o, --non-unique              allow to create groups with duplicate
                                (non-unique) GID
  -p, --password PASSWORD       use this encrypted password for the new group
  -r, --system                  create a system account
  -R, --root CHROOT_DIR         directory to chroot into
  -P, --prefix PREFIX_DIR       directory prefix

4、useradd的命令帮助:
  -g, --gid GROUP               name or ID of the primary group of the new
                                account
  -G, --groups GROUPS           list of supplementary groups of the new
                                account
  -u, --uid UID                 user ID of the new account
  -d, --home-dir HOME_DIR       home directory of the new account
3. At this time, the mysqladmin user is created, then we try to use su-mysqlamdin to switch, and we will find that the style is lost, how to solve it?
1、用户切换样式丢失:
[root@hadoop local]# su - mysqladmin
-bash-4.2$

2、解决办法:
copy 环境变量配置文件至mysqladmin用户的home目录中,为了以下步骤配置个人环境变量
[root@hadoop39 local]# cp /etc/skel/.* /usr/local/mysql  ###important
[root@hadoop ~]# su - mysqladmin
Last login: Sun Mar 15 01:36:29 EDT 2020 on pts/0
4. Need to create my.cnf file: a file already exists in the system in /etc/my.cnf, insurance operation: cp /etc/my.cnf /etc/my.cnf20200315; after making a backup, gg returns On the first line, dG clears all the contents of the file, press the i key to enter the insert mode, copy the following content to my.cnf.
[root@hadoop39 local]# vi /etc/my.cnf
[client]
port            = 3306
socket          = /usr/local/mysql/data/mysql.sock
default-character-set=utf8mb4

[mysqld]
port            = 3306
socket          = /usr/local/mysql/data/mysql.sock

skip-slave-start

skip-external-locking
key_buffer_size = 256M
sort_buffer_size = 2M
read_buffer_size = 2M
read_rnd_buffer_size = 4M
query_cache_size= 32M
max_allowed_packet = 16M
myisam_sort_buffer_size=128M
tmp_table_size=32M

table_open_cache = 512
thread_cache_size = 8
wait_timeout = 86400
interactive_timeout = 86400
max_connections = 600

# Try number of CPU's*2 for thread_concurrency
#thread_concurrency = 32

#isolation level and default engine
default-storage-engine = INNODB
transaction-isolation = READ-COMMITTED

server-id  = 1739
basedir     = /usr/local/mysql
datadir     = /usr/local/mysql/data
pid-file     = /usr/local/mysql/data/hostname.pid

#open performance schema
log-warnings
sysdate-is-now

binlog_format = ROW
log_bin_trust_function_creators=1
log-error  = /usr/local/mysql/data/hostname.err
log-bin = /usr/local/mysql/arch/mysql-bin
expire_logs_days = 7

innodb_write_io_threads=16

relay-log  = /usr/local/mysql/relay_log/relay-log
relay-log-index = /usr/local/mysql/relay_log/relay-log.index
relay_log_info_file= /usr/local/mysql/relay_log/relay-log.info

log_slave_updates=1
gtid_mode=OFF
enforce_gtid_consistency=OFF

# slave
slave-parallel-type=LOGICAL_CLOCK
slave-parallel-workers=4
master_info_repository=TABLE
relay_log_info_repository=TABLE
relay_log_recovery=ON

#other logs
#general_log =1
#general_log_file  = /usr/local/mysql/data/general_log.err
#slow_query_log=1
#slow_query_log_file=/usr/local/mysql/data/slow_log.err

#for replication slave
sync_binlog = 500


#for innodb options
innodb_data_home_dir = /usr/local/mysql/data/
innodb_data_file_path = ibdata1:1G;ibdata2:1G:autoextend

innodb_log_group_home_dir = /usr/local/mysql/arch
innodb_log_files_in_group = 4
innodb_log_file_size = 1G
innodb_log_buffer_size = 200M

#根据生产需要,调整pool size
innodb_buffer_pool_size = 2G
#innodb_additional_mem_pool_size = 50M #deprecated in 5.6
tmpdir = /usr/local/mysql/tmp

innodb_lock_wait_timeout = 1000
#innodb_thread_concurrency = 0
innodb_flush_log_at_trx_commit = 2

innodb_locks_unsafe_for_binlog=1

#innodb io features: add for mysql5.5.8
performance_schema
innodb_read_io_threads=4
innodb-write-io-threads=4
innodb-io-capacity=200
#purge threads change default(0) to 1 for purge
innodb_purge_threads=1
innodb_use_native_aio=on

#case-sensitive file names and separate tablespace
innodb_file_per_table = 1
lower_case_table_names=1

[mysqldump]
quick
max_allowed_packet = 128M

[mysql]
no-auto-rehash
default-character-set=utf8mb4

[mysqlhotcopy]
interactive-timeout

[myisamchk]
key_buffer_size = 256M
sort_buffer_size = 256M
read_buffer = 2M
write_buffer = 2M
- Production tuning changes parameters: innodb_buffer_pool_size = 1024m, J head company production library one 8G, one 12G; normal 6G or 8G is already very good.
5. Modify permissions:
1、修改/etc/my.cnf权限
[root@hadoop local]# chown -R mysqladmin:dba /etc/my.cnf
[root@hadoop local]# chmod -R 640 /etc/my.cnf
[root@hadoop local]# ll /etc/my.cnf
-rw-r----- 1 mysqladmin dba 2809 Mar 15 01:26 /etc/my.cnf

//640代表着root用户有读写权限,root用户组有读权限,其它用户用户组没有权限

2、因为创建了软连接,所以快捷方式和mysql文件权限都要进行修正,修正完后再次验证。
chown -R mysqladmin:dba mysql/*
chown -R mysqladmin:dba mysql-5.7.11-linux-glibc2.5-x86_64
[root@hadoop local]# chmod -R 755 mysql
[root@hadoop local]# chmod -R 755 mysql-5.7.11-linux-glibc2.5-x86_64/
6. Configure environment variables:
- Purpose: Directly display the current directory when switching to the mysqladmin user
1、配置.bashrc
[root@hadoop39 local]# vi mysql/.bashrc
# .bash_profile
# Get the aliases and functions

if [ -f ~/.bashrc ]; then
        . ~/.bashrc
fi

# User specific environment and startup programs
export MYSQL_BASE=/usr/local/mysql
export PATH=${MYSQL_BASE}/bin:$PATH


unset USERNAME

#stty erase ^H
set umask to 022
umask 022
PS1=`uname -n`":"'$USER'":"'$PWD'":>"; export PS1

## end

2、记得echo打印路径:
hadoop:mysqladmin:/usr/local/mysql:>echo $MYSQL_BASE
/usr/local/mysql
- Benefits: It is intuitive to see which directory the current user is in and where.
7. Configuration service and self-starting after booting?
1、进入到mysql安装目录
[root@hadoop local]# cd /usr/local/mysql

2、将服务文件拷贝到init.d下,并重命名为mysql
[root@hadoop mysql]# cp support-files/mysql.server /etc/rc.d/init.d/mysql

3、它是一个Shell脚本,赋予其可执行权限
[root@hadoop mysql]# chmod +x /etc/rc.d/init.d/mysql

4、如果以前系统下配置过mysql服务,使用此命令删除
[root@hadoop mysql]# chkconfig --del mysql

5、把mysql添加进系统服务列表
[root@hadoop mysql]# chkconfig --add mysql

6、设置开机自启动,经测试,这一步纯属鸡肋,无用
[root@hadoop mysql]# chkconfig --level 345 mysql on

7、编辑这个文件添加一行:切换为mysqladmin用户的时候执行启动mysql服务?
[root@hadoop mysql]# vi /etc/rc.local
#!/bin/bash
touch /var/lock/subsys/local
/usr/bin/setterm -blank 0 || true

su - mysqladmin -c "/etc/init.d/mysql start --federated"
8, yum install libaio package and initialization
- CentOS7 system initialization prompts the following error: bin / mysqld: error while loading shared libraries: libaio.so.1: cannot open shared object file: No such file or directory
第一步:
yum install -y libaio

第二步:
hadoop:mysqladmin:/usr/local/mysql:>bin/mysqld \
> --defaults-file=/etc/my.cnf \
> --user=mysqladmin \
> --basedir=/usr/local/mysql/ \
> --datadir=/usr/local/mysql/data/ \
> --initialize

bin/mysqld --defaults-file=/etc/my.cnf --user=mysqladmin --basedir=/usr/local/mysql --datadir=/usr/local/mysql/data/ --initialize

第三步:MySQL5.7是有密码的,查看临时密码方式如下:
hadoop:mysqladmin:/usr/local/mysql:>cat data/hostname.err | grep password
2020-03-15T06:22:58.865006Z 1 [Note] A temporary password is generated for root@localhost: 3Rp#hF/wb7Lm
9. Start MySQL
hadoop:mysqladmin:/usr/local/mysql:>bin/mysqld_safe --defaults-file=/etc/my.cnf &
[2] 16315
hadoop:mysqladmin:/usr/local/mysql:>Usage: grep [OPTION]... PATTERN [FILE]...
Try 'grep --help' for more information.
grep: write error: Broken pipe
2020-03-15T06:37:53.336054Z mysqld_safe Logging to '/usr/local/mysql/data/hostname.err'.
2020-03-15T06:37:53.411984Z mysqld_safe Starting mysqld daemon with databases from /usr/local/mysql/data
2020-03-15T06:37:53.912924Z mysqld_safe mysqld from pid file /usr/local/mysql/data/hostname.pid ended
1.1, MySQL redeployment
- There was really a problem during the deployment process, check the directory and user of the execution, and redeploy.
1. Delete the binlog file and data file:
- rm -rf arch/* data/*
- The arch is used to store binlog files. When a piece of data is written in the mysql database, a copy will fall under data, and it will be backed up and stored under binlog; for example, mysql is synchronized to hbase in production, and mysql is synchronized to es. The principle is to read Binlog file; you can also parse the binlog file into sql in some way.
1、解读/etc/my.cnf
对于mysql的binlog文件是由哪个决定的呢?
log-bin = /usr/local/mysql/arch/mysql-bin
2. Perform the initialization operation again:
hadoop:mysqladmin:/usr/local/mysql:>bin/mysqld --defaults-file=/etc/file --user=mysqladmin --basedir=/usr/local/mysql --datadir=/usr/local/mysql/data/ --initialize
mysqld: [ERROR] Could not open required defaults file: /etc/file
mysqld: [ERROR] Fatal error in defaults handling. Program aborted!
hadoop:mysqladmin:/usr/local/mysql:>bin/mysqld --defaults-file=/etc/my.cnf --user=mysqladmin --basedir=/usr/local/mysql --datadir=/usr/local/mysql/data/ --initialize
hadoop:mysqladmin:/usr/local/mysql:>cat data/hostname.err |grep password
2020-03-15T06:46:09.593936Z 1 [Note] A temporary password is generated for root@localhost: BdqP:fdPv2p)
1.2 Problems encountered in MySQL deployment (innodb_buffer_pool_size is not enough)
hadoop:mysqladmin:/usr/local/mysql:>service mysql status
 ERROR! MySQL is not running, but lock file (/var/lock/subsys/mysql) exists
hadoop:mysqladmin:/usr/local/mysql:>service mysql start
Starting MySQL............................................................. ERROR! The server quit without updating PID file (/usr/local/mysql/data/hostname.pid).
hadoop:mysqladmin:/usr/local/mysql:>service mysql start
Starting MySQL... SUCCESS!


2、实时打印日志:提示内存不够:
tail -f /usr/local/mysql/data/hostname.err

2020-03-15T07:43:01.225919Z 0 [Note] InnoDB: PUNCH HOLE support not available
2020-03-15T07:43:01.226028Z 0 [Note] InnoDB: Mutexes and rw_locks use GCC atomic builtins
2020-03-15T07:43:01.226069Z 0 [Note] InnoDB: Uses event mutexes
2020-03-15T07:43:01.226095Z 0 [Note] InnoDB: GCC builtin __sync_synchronize() is used for memory barrier
2020-03-15T07:43:01.226115Z 0 [Note] InnoDB: Compressed tables use zlib 1.2.3
2020-03-15T07:43:01.226165Z 0 [Note] InnoDB: Using Linux native AIO
2020-03-15T07:43:01.227915Z 0 [Note] InnoDB: Number of pools: 1
2020-03-15T07:43:01.228658Z 0 [Note] InnoDB: Using CPU crc32 instructions
2020-03-15T07:43:01.275648Z 0 [Note] InnoDB: Initializing buffer pool, total size = 2G, instances = 8, chunk size = 128M
2020-03-15T07:43:01.732071Z 0 [Note] InnoDB: Completed initialization of buffer pool
2020-03-15T07:44:00.743863Z 0 [ERROR] InnoDB: Cannot allocate 209715736 bytes of memory after 60 retries over 60 seconds. OS error: Cannot allocate memory (12). Check if you should increase the swap file or ulimits of your operating system. Note that on most 32-bit computers the process memory space is limited to 2 GB or 4 GB.
2020-03-15 03:44:00 0x7f5d1f05e740  InnoDB: Assertion failure in thread 140037929166656 in file ut0ut.cc line 935
InnoDB: Failing assertion: !m_fatal

3、修改了一个参数:
innodb_buffer_pool_size = 1G
InnoDB需要innodb buffer pool中处理缓存

//参考博客:https://www.cnblogs.com/wanbin/p/9530833.html
1.3、访问受限(Access denied for user ‘root’@‘localhost’ (using password: YES))
- Solution:
1、vi /etc/my.cnf
在任意一行中加上:skip-grant-tables     登录是跳过输入密码

2、重启mysql服务:
service mysql restart

3、mysql -uroot -p 提示输出密码的时候直接回车就进入了数据库界面:

4、update更新root用户的密码是960210,修改完后记得刷新权限:
mysql> update user set authentication_string=password('960210') where user='root';
mysql > flush privileges;

5、回到my.cnf把添加的那句话删除,再次重启mysql服务,使用我们修改过的密码尝试登陆:经测试没问题
- Grant permissions: All hosts can use root user + password to access this database:
mysql> grant all privileges on *.* to 'root'@'%' identified by '960210';
ERROR 1064 (42000): You have an error in your SQL syntax; check the manual that corresponds to your MySQL server version for the right syntax to use near 'to 'root'@'%' identified by '960210'' at line 1
mysql> grant all privileges on *.* to 'root'@'%' identified by '960210';
ERROR 1820 (HY000): You must reset your password using ALTER USER statement before executing this statement.
mysql> alter user root@localhost identified by '960210';
Query OK, 0 rows affected (0.00 sec)

mysql> grant all privileges on *.* to 'root'@'%' identified by '960210';
Query OK, 0 rows affected, 1 warning (0.00 sec)

mysql> flush privileges;
Query OK, 0 rows affected (0.01 sec)
1.4. Access is restricted (Access denied for user 'root' @ 'localhost' (using password: NO))
- Restricted access: the prompt password is incorrect: the possible reason is that there is no flush privileges to refresh after the password is changed
1.5, several commands of MySQL
1. Use the database
- use mysql;
2. The password field in MySQL5.7 has been updated: authentication_string
mysql> select user,authentication_string,host from user;
+-----------+-------------------------------------------+-----------+
| user      | authentication_string                     | host      |
+-----------+-------------------------------------------+-----------+
| root      | *9750FE1AB84430D9F83FBB448F1FF04E965785CA | localhost |
| mysql.sys | *THISISNOTAVALIDPASSWORDTHATCANBEUSEDHERE | localhost |
| root      | *9750FE1AB84430D9F83FBB448F1FF04E965785CA | %         |
+-----------+-------------------------------------------+-----------+
3 rows in set (0.00 sec)
- Expansion: It is an empty password in MySQL5.6, how to update the password in MySQL5.6, update user set password = password ('960210') where user = 'root'; Delete the data of empty account: delete from user where user = '';
- Note that MySQL is linked to user privileges, all need flush privileges;
Second, Dbeaver connects to MySQL
-
Prerequisites for connection:
-
grant all privileges on . to ‘root’@’%’ identified by ‘960210’;
-
flush privileges;
-
Dbeaver official website connection download: https://dbeaver.io/download/
1. As shown in the following figure:

2. Connection as shown in the following figure:
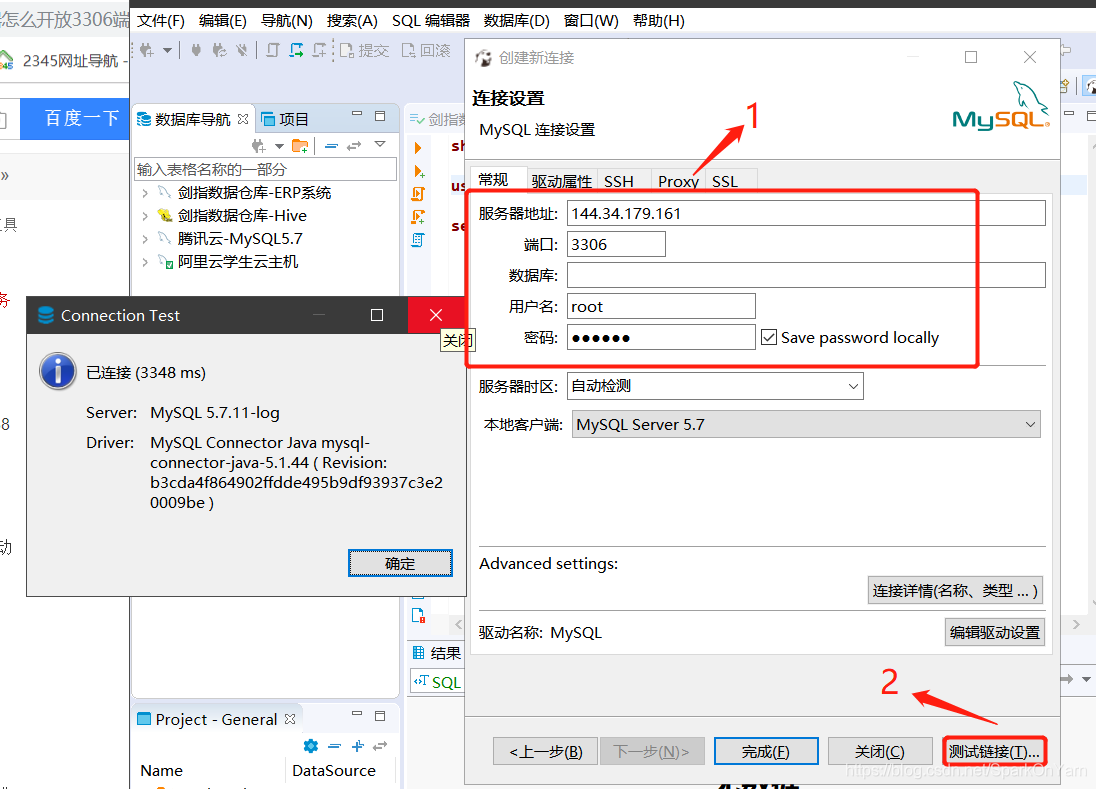
- At this point, the windows client connection dbeaver has been completed, dbeaver this tool basically covers most of the database connection in the big data development process.
2.1, / etc / hosts file configuration
- Expansion: The first line and the second line of the / etc / hosts file cannot be moved. The third line is the intranet IP + hostname mapping. When doing ping, it will find the ip according to the hostname; Use hostname instead, such as machine migration, IP changes, you only need to modify hostname.
[root@hadoop ~]# cat /etc/hosts
127.0.0.1   localhost localhost.localdomain localhost4 localhost4.localdomain4
::1         localhost localhost.localdomain localhost6 localhost6.localdomain6

144.34.179.161 hadoop
[root@hadoop ~]# ping hadoop
PING hadoop (144.34.179.161) 56(84) bytes of data.
64 bytes from hadoop (144.34.179.161): icmp_seq=1 ttl=64 time=0.097 ms
64 bytes from hadoop (144.34.179.161): icmp_seq=2 ttl=64 time=0.069 ms
64 bytes from hadoop (144.34.179.161): icmp_seq=3 ttl=64 time=0.079 ms
^C
--- hadoop ping statistics ---
3 packets transmitted, 3 received, 0% packet loss, time 2056ms
rtt min/avg/max/mdev = 0.069/0.081/0.097/0.015 ms
For example, windows access, IDEA development, are all external IP (virtual, may change), the hostname is uniformly configured in the code.
C:\Windows\System32\drivers\etc\hosts
Intranet server: direct connection
Springboard machine, bastion machine: can not do ip + hostname mapping, this is a machine that is specifically exposed and forwarded.
3. Interview questions && homework for this course
Interview questions:
- 1. Will the binlog files in the mysql / arch directory be filled up?
hadoop:mysqladmin:/usr/local/mysql/arch:>ll -h
total 4.1G
-rw-r----- 1 mysqladmin dba 1.0G Mar 15 04:57 ib_logfile0
-rw-r----- 1 mysqladmin dba 1.0G Mar 15 03:35 ib_logfile1
-rw-r----- 1 mysqladmin dba 1.0G Mar 15 03:36 ib_logfile2
-rw-r----- 1 mysqladmin dba 1.0G Mar 15 03:36 ib_logfile3
-rw-r----- 1 mysqladmin dba  98K Mar 15 03:36 mysql-bin.000001
-rw-r----- 1 mysqladmin dba  177 Mar 15 03:56 mysql-bin.000002
-rw-r----- 1 mysqladmin dba  201 Mar 15 04:00 mysql-bin.000003
-rw-r----- 1 mysqladmin dba  177 Mar 15 04:00 mysql-bin.000004
-rw-r----- 1 mysqladmin dba  177 Mar 15 04:36 mysql-bin.000005
-rw-r----- 1 mysqladmin dba  177 Mar 15 04:36 mysql-bin.000006
-rw-r----- 1 mysqladmin dba  177 Mar 15 04:42 mysql-bin.000007
-rw-r----- 1 mysqladmin dba 1.1K Mar 15 04:57 mysql-bin.000008
-rw-r----- 1 mysqladmin dba  830 Mar 15 05:09 mysql-bin.000009
-rw-r----- 1 mysqladmin dba  351 Mar 15 04:57 mysql-bin.index
2. Assignment:
- Organize nohup execution script
- Blog from the video on rundeckB
- How to write crontab every 10 seconds
- Use scenarios for soft connections
- Binary deployment of mysql
- redeployment of mysql
- dbeaver connect mysql
3.1, supplement
1. Ruoze Data github website
- https://ruozedata.github.io/archives/
2. Production mysql data recovery
- https://ruozedata.github.io/2019/05/30/%E4%B8%8A%E6%B5%B7%E6%9F%90%E5%85%AC%E5%8F%B8%E7%9A%84%E7%94%9F%E4%BA%A7MySQL%E7%81%BE%E9%9A%BE%E6%80%A7%E6%8C%BD%E6%95%91/
