MFS Distributed File System
What MFS that?
Is a fault tolerant network distributed file system, distributed file system is to some shared files across multiple computers folder, the set time to a shared folder, users want to access these folders, just open a folder, you can see all shared files within a folder link to this folder
MFS framework of the constituent members
Metadata server (Master): responsible for managing the file system in the whole system, maintain metadata, currently does not support high availability
Metadata log server (MetaLogger): Master backup server's log files change, when the master server is damaged, you can obtain recovery from the log file server
Data Storage Server (Chunk): real store data server
Client (Client): can be as NFS mount the same mount MFS file system
Shown below is a configuration diagram of an environment MFS

MFS build
Master server set up
1. Install dependencies
yum -y install gcc gcc-c++ zlib-devel
2. Set up user management
useradd -s /sbin/nologin mfs
3. extract the source package to compile and install
takes zxf MFS 1.6.27-5.tar.gz
cd mfs-1.6.27
./configure --prefix=/usr/local/mfs --with-default-user=mfs --with-default-group=mfs --disable-mfschunkserver --disable-mfsmount
make && make install
4. Copy the template to create a configuration file (Master server needs mfsexports, mfsmaster, mfsmetalogger these three files)
cd /usr/local/mfs/etc/mfs/
cp mfsexports.cfg.dist mfsexports.cfg
cp mfsmaster.cfg.dist mfsmaster.cfg
cp mfsmetalogger.cfg.dist mfsmetalogger.cfg
cd /usr/local/mfs/var/mfs/
cp metadata.mfs.empty metadata.mfs
5. is a group owner, and the file directory to mfs
chown -R mfs.mfs /usr/local/mfs
6.Master server requires mfsmaster.cfg (main configuration file) and mfsexports.cfg (the mount directory permissions and configuration files) , no need to modify here
mfsmaster.cfg (main profile)
#WORKING_USER = mfs \\运行masterserver的用户
#WORKING_GROUP = mfs \\运行masterserver的组
#SYSLOG_IDENT = mfsmaster \\在syslog中表示是mfsmaster产生的日志
#LOCK_MEMORY = 0 \\是否执行mlockall(),以避免mfsmaster进程溢出(默认为0)
#NICE_LEVEL = -19 \\运行的优先级(如果可以,默认是-19;注意:进程必须用root启动)
#EXPORTS_FILENAME = /usr/local/mfs/etc/mfs/mfsexports.cfg \\被挂载目录及其权限控制文件的存放位置
#TOPOLOGY_FILENAME = /usr/local/mfs/etc/mfs/mfstopology.cfg
#DATA_PATH = /usr/local/mfs/var/mfs \\数据存放路径
#BACK_LOGS = 50 \\metadata改变的log文件数目(默认是50)
#BACK_META_KEEP_PREVIOUS = 1
#REPLICATIONS_DELAY_INIT = 300
#REPLICATIONS_DELAY_DISCONNECT = 3600
#MATOML_LISTEN_HOST = \\metalogger监听的IP地址(默认是,代表任何IP)
#MATOML_LISTEN_PORT = 9419 \\metalogger监听的端口地址(默认是9419)
#MATOML_LOG_PRESERVE_SECONDS = 600
#MATOCS_LISTEN_HOST = \\用于chunkserver连接的IP地址(默认是,代表任何IP)
#MATOCS_LISTEN_PORT = 9420 \\用于chunkserver连接的端口地址(默认是9420)
#MATOCL_LISTEN_HOST =  \\用于客户端挂接连接的IP地址(默认是,代表任何IP)
#MATOCL_LISTEN_PORT = 9421  \\用于客户端挂接连接的端口地址(默认是4921)
#CHUNKS_LOOP_MAX_CPS = 100000
#CHUNKS_LOOP_MIN_TIME = 300  \\chunk的回环频率(默认是300秒)
#CHUNKS_SOFT_DEL_LIMIT = 10
#CHUNKS_HARD_DEL_LIMIT = 25
#CHUNKS_WRITE_REP_LIMIT = 2  \\在一个循环里复制到一个chunkserver的最大chunk数
#CHUNKS_READ_REP_LIMIT = 10  \\在一个循环里从一个chunkserver复制的最大chunk数
#ACCEPTABLE_DIFFERENCE = 0.1
#SESSION_SUSTAIN_TIME = 86400
#REJECT_OLD_CLIENTS = 0
#deprecated:
#CHUNKS_DEL_LIMIT - use CHUNKS_SOFT_DEL_LIMIT instead
#LOCK_FILE - lock system has been changed, and this option is used only to search for old lockfile
mfsexports.cfg (the mount directory permissions and configuration files)
#Allow everything but "meta".
/ rw,alldirs,maproot=0
#Allow "meta".
. rw
#第一部分:客户端的IP地址
#*表示所有IP地址
#单个IP地址
#IP地址/子网掩码
#IP地址网段
#第二部分:被挂接的目录
#/标识MFS根 .表示MFSMETA文件系统
#第三部分:客户端拥有的权限
#ro——只读模式共享
#rw——读写的方式共享
#alldirs——允许挂载任何指定的子目录
#admin——管理员权限
#maproot——映射为root,还是指定的用户
#Password——指定客户端密码
7. Start the service and see whether the success of open
/usr/local/mfs/sbin/mfsmaster start
ps -ef | grip mfs
Server set up Metalogge
1. Install dependencies
yum -y install gcc gcc-c++ zlib-devel
2. Create an administrative user
useradd -s /sbin/nologin mfs
3. Extract the installation package to install and compile
takes zxf MFS 1.6.27-5.tar.gz
cd mfs-1.6.27
./configure --prefix=/usr/local/mfs --with-default-user=mfs --with-default-group=mfs --disable-mfschunkserver --disable-mfsmount
make && make install
4. Copy the configuration file template (this server just open the log file)
cd /usr/local/mfs/etc/mfs/
cp mfsmetalogger.cfg.dist mfsmetalogger.cfg
5. Edit the log configuration file to add Master server IP address
vim mfsmetalogger.cfg
MASTER_HOST = 192.168.199.129
6. is a group owner, and the file is modified mfs
chown -R mfs.mfs /usr/local/mfs/
7. Turn MetaLog service and begin to see success
/usr/local/mfs/sbin/mfsmetalogger start
ps -ef | grip mfs
Chunk build server (two steps to build the same)
1. Install dependencies
yum -y install gcc gcc-c++ zlib-devel
2. Set up user management
useradd -s /sbin/nologin mfs
3. extract the source package to compile and install
takes zxf MFS 1.6.27-5.tar.gz
cd mfs-1.6.27
./configure --prefix=/usr/local/mfs --with-default-user=mfs --with-default-group=mfs --disable-mfsmaster --disable-mfsmount
make && make install
4. Copy the template configuration open mfschunkserver and mfshdd two files
cd /usr/local/mfs/etc/mfs/
cp mfschunkserver.cfg.dist mfschunkserver.cfg
cp mfshdd.cfg.dist mfshdd.cfg
5. Edit mfschunkserver.cfg configuration file to add Master server IP address
vim mfschunkserver.cfg
MASTER_HOST = 192.168.0.101
6. Modify mfshdd.cfg file, add the local share required to mount such a directory or disk, the living environment is best to use a separate partition or disk to mount this directory
vim mfshdd.cfg
/test
7. Create a mount directory
mkdir /test
chown -R mfs.mfs /data
8. whether to open service to start the service and view success
/usr/local/mfs/sbin/mfschunkserver start
ps -ef | grip mfs
Build client
1. Install dependencies
yum install gcc gcc-c++ zlib-devel fuse fuse-devel -y
2. In the / etc / profile and finally add the environment variable and run the file
vim /etc/profile
export PKG_CONFIG_PATH=/usr/local/lib/pkgconfig:$PKG_CONFIG_PATH
source /etc/profile
3. Create a user process management
useradd -s /sbin/nologin mfs
4. extracting installation package, compiler installation
takes zxf MFS 1.6.27-5.tar.gz
cd mfs-1.6.27/
./configure --prefix=/usr/local/mfs --with-default-user=mfs --with-default-group=mfs --disable-mfsmaster --disable-mfschunkserver --enable-mfsmount
make && make install
The fuse module is loaded into the kernel
modprobe fuse
6. Create a mount point and mount MFS
mkdir /mfs
/usr/local/mfs/bin/mfsmount /mfs -H 192.168.0.101
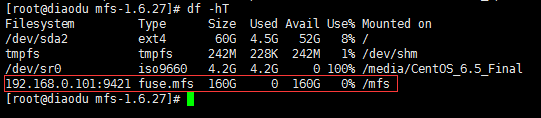
7. Check mount cases: df -ht
8. Create a test file test

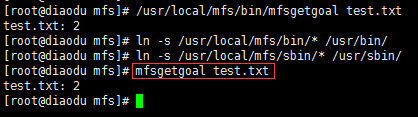
Added: command path optimization
ln -s /usr/local/mfs/bin/* /usr/bin/
ln -s /usr/local/mfs/sbin/* /usr/sbin/
Use this command you can not enter such a long path
Open the master graphical management interface (see below)
/usr/local/mfs/sbin/mfscgiserv
Direct access to port 9425 on the line

