Android Studio 中各种UI布局的介绍
前言
本文主要介绍了 Android Studio 中常见的UI布局。
一、Android 中常见的UI布局都有什么?
- LinearLayout(线性布局)
- RelativeLayout(相对布局)
- FrameLayout(帧布局)
- TableLayout(表格布局)
- ConstraintLayout(约束布局)
二、 这些UI布局分别是什么?怎么用?
1.LinearLayout(线性布局)
什么是LinearLayout
LinearLayout 会按照水平或者垂直方向依次排列子视图。通过 android:orientation 属性可以设定排列方向,取值为 horizontal(水平)或者 vertical(垂直)。
基本属性
android:orientation:
- android:orientation:此属性用于指定子视图的排列方向,有两个可选值:
horizontal:子视图会在水平方向上依次排列。
vertical:子视图会在垂直方向上依次排列。
android:gravity:
- android:gravity:用于设置子视图在 LinearLayout 中的对齐方式,例如 center(居中)、left(左对齐)、right(右对齐)等。
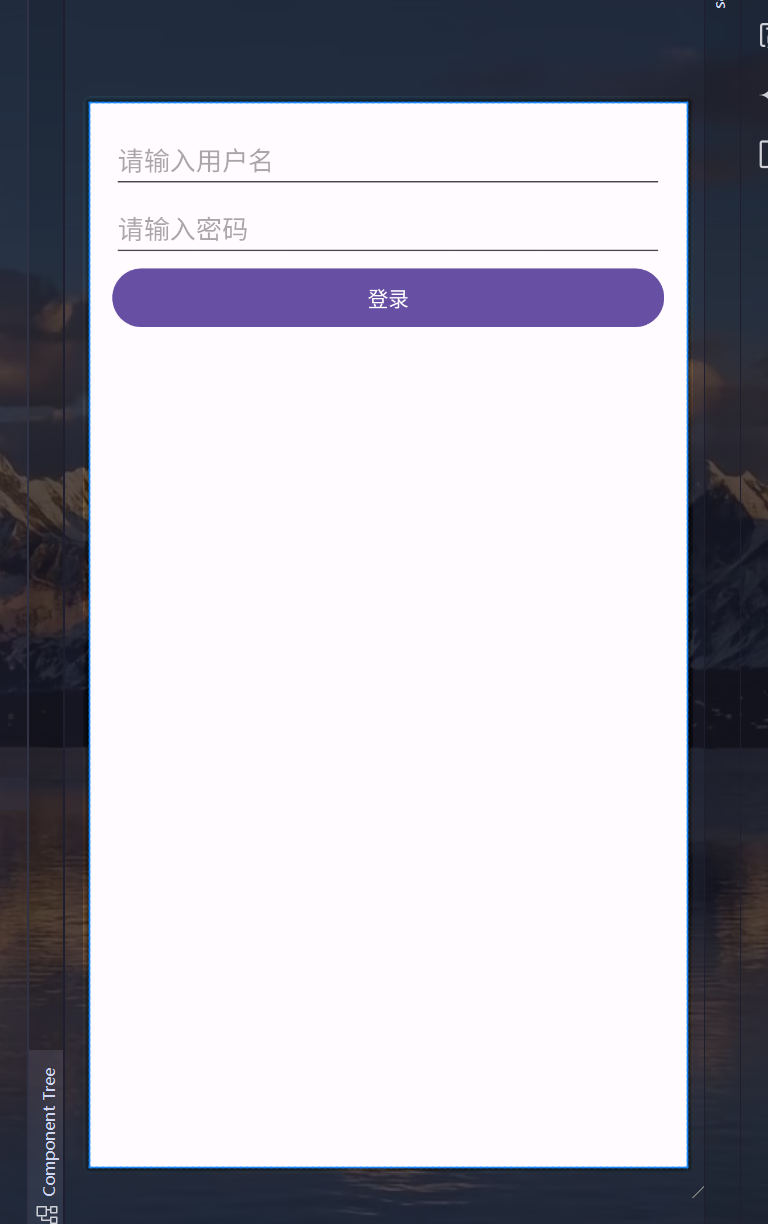
代码展示
<LinearLayout
    xmlns:android="http://schemas.android.com/apk/res/android"
    xmlns:app="http://schemas.android.com/apk/res-auto"
    xmlns:tools="http://schemas.android.com/tools"
    android:layout_width="match_parent"
    android:layout_height="match_parent"
    android:orientation="vertical"
    android:padding="16dp"
    tools:context=".MainActivity">

    <EditText
        android:layout_width="match_parent"
        android:layout_height="wrap_content"
        android:hint="请输入用户名" />

    <EditText
        android:layout_width="match_parent"
        android:layout_height="wrap_content"
        android:hint="请输入密码"
        android:inputType="textPassword" />

    <Button
        android:layout_width="match_parent"
        android:layout_height="wrap_content"
        android:text="登录" />

</LinearLayout>
效果展示
2.RelativeLayout(相对布局)
什么是RelativeLayout
RelativeLayout 是 Android 开发中常用的布局方式,它允许子视图根据其他视图或父布局的位置来确定自身位置。
基本属性
- 相对于父布局定位
- android:layout_alignParentLeft:将视图的左侧与父布局的左侧对齐。
- android:layout_alignParentRight:将视图的右侧与父布局的右侧对齐。
- android:layout_alignParentTop:将视图的顶部与父布局的顶部对齐。
- android:layout_alignParentBottom:将视图的底部与父布局的底部对齐。
- android:layout_centerInParent:将视图置于父布局的中心位置。
- android:layout_centerHorizontal:将视图置于父布局的水平中心位置。
- android:layout_centerVertical:将视图置于父布局的垂直中心位置。
- 相对于其他视图定位
- android:layout_above:将视图置于指定 ID 视图的上方。
- android:layout_below:将视图置于指定 ID 视图的下方。
- android:layout_toLeftOf:将视图置于指定 ID 视图的左侧。
- android:layout_toRightOf:将视图置于指定 ID 视图的右侧。
- android:layout_alignTop:将视图的顶部与指定 ID 视图的顶部对齐。
- android:layout_alignBottom:将视图的底部与指定 ID 视图的底部对齐。
- android:layout_alignLeft:将视图的左侧与指定 ID 视图的左侧对齐。
- android:layout_alignRight:将视图的右侧与指定 ID 视图的右侧对齐。
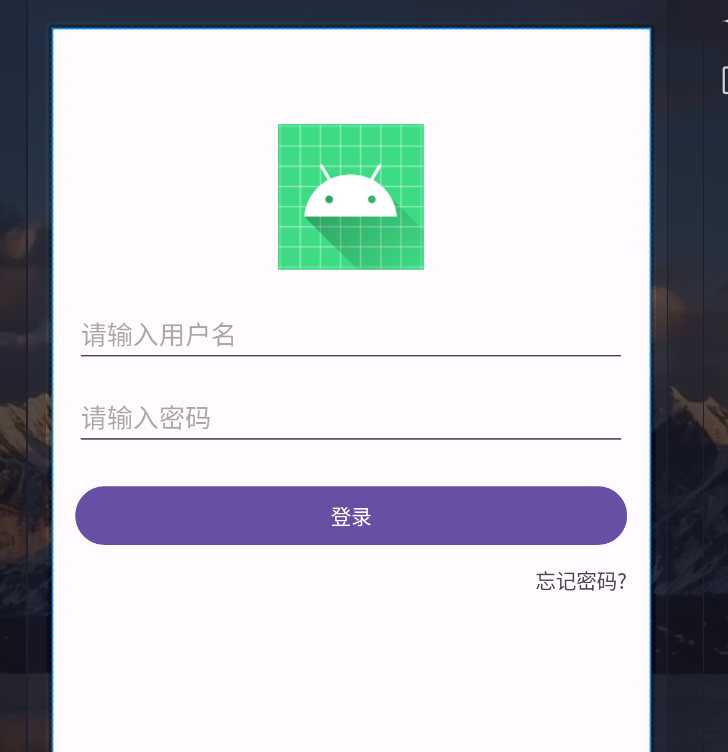
代码展示
<RelativeLayout
    xmlns:android="http://schemas.android.com/apk/res/android"
    xmlns:app="http://schemas.android.com/apk/res-auto"
    xmlns:tools="http://schemas.android.com/tools"
    android:layout_width="match_parent"
    android:layout_height="match_parent"
    android:padding="16dp"
    tools:context=".MainActivity">

    <ImageView
        android:id="@+id/logoImageView"
        android:layout_width="100dp"
        android:layout_height="100dp"
        android:layout_centerHorizontal="true"
        android:layout_marginTop="50dp"
        android:src="@mipmap/ic_launcher" />

    <EditText
        android:id="@+id/usernameEditText"
        android:layout_width="match_parent"
        android:layout_height="wrap_content"
        android:layout_below="@id/logoImageView"
        android:layout_marginTop="20dp"
        android:hint="请输入用户名" />

    <EditText
        android:id="@+id/passwordEditText"
        android:layout_width="match_parent"
        android:layout_height="wrap_content"
        android:layout_below="@id/usernameEditText"
        android:layout_marginTop="10dp"
        android:hint="请输入密码"
        android:inputType="textPassword" />

    <Button
        android:id="@+id/loginButton"
        android:layout_width="match_parent"
        android:layout_height="wrap_content"
        android:layout_below="@id/passwordEditText"
        android:layout_marginTop="20dp"
        android:text="登录" />

    <TextView
        android:id="@+id/forgotPasswordTextView"
        android:layout_width="wrap_content"
        android:layout_height="wrap_content"
        android:layout_below="@id/loginButton"
        android:layout_alignRight="@id/loginButton"
        android:layout_marginTop="10dp"
        android:text="忘记密码?" />

</RelativeLayout>
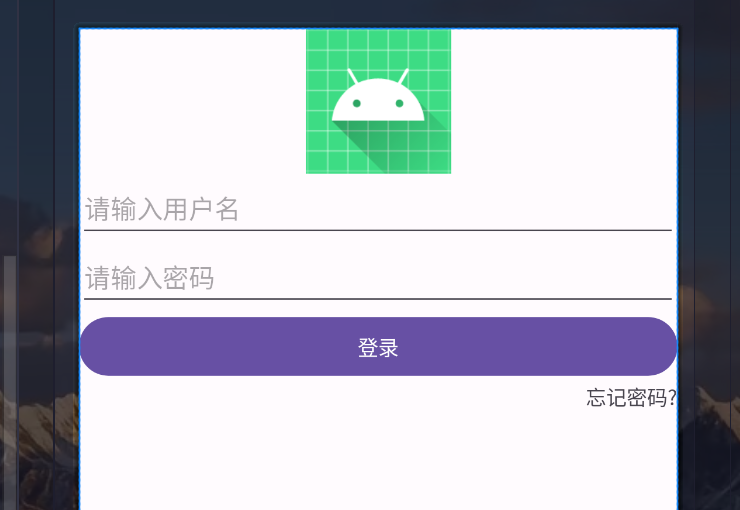
效果展示
3.FrameLayout(帧布局)
什么是FrameLayout
FrameLayout 会把所有子视图都放置在布局的左上角,并且这些子视图会按照添加的先后顺序依次层叠,后添加的视图会覆盖在先添加的视图之上。每个子视图默认都会填充整个 FrameLayout 的大小,不过可以通过设置 layout_width 和 layout_height 属性来调整其大小。
基本属性
android:foreground:
- android:foreground:为 FrameLayout 设置前景图像,该图像会显示在所有子视图之上,并且会随着 FrameLayout 的大小变化而变化。
android:foregroundGravity:
- android:foregroundGravity:用于指定前景图像的对齐方式,取值与 android:gravity 类似,例如 center、top、left 等。
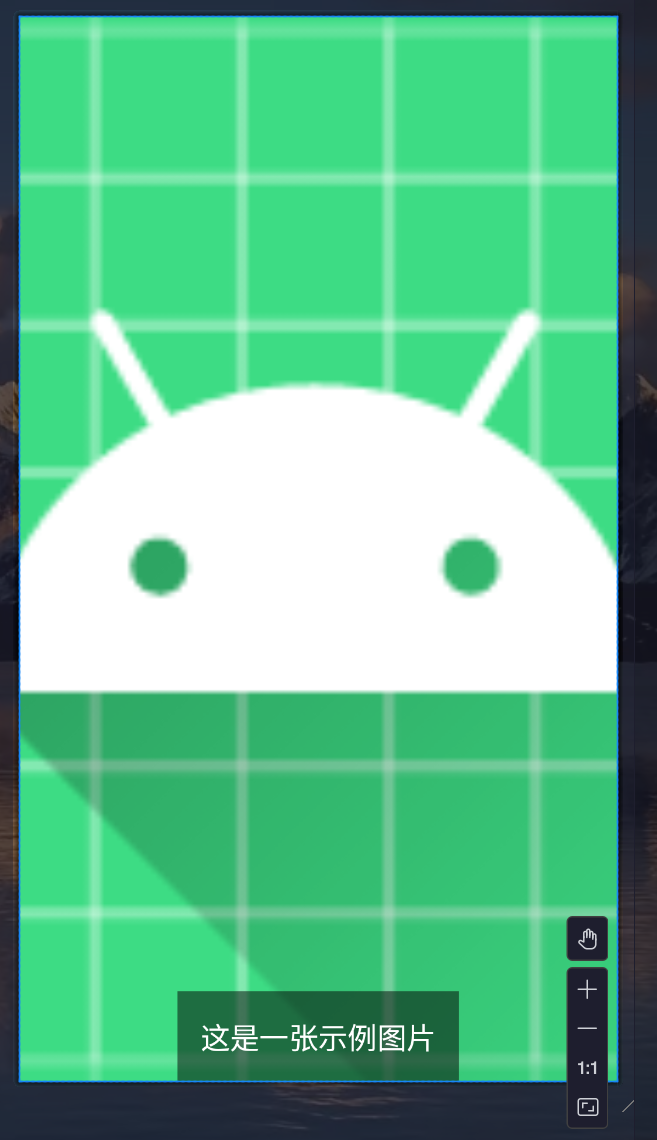
代码展示
<FrameLayout
    xmlns:android="http://schemas.android.com/apk/res/android"
    xmlns:app="http://schemas.android.com/apk/res-auto"
    xmlns:tools="http://schemas.android.com/tools"
    android:layout_width="match_parent"
    android:layout_height="match_parent"
    tools:context=".MainActivity">

    <ImageView
        android:layout_width="match_parent"
        android:layout_height="match_parent"
        android:src="@mipmap/ic_launcher"
        android:scaleType="centerCrop" />

    <TextView
        android:layout_width="wrap_content"
        android:layout_height="wrap_content"
        android:text="这是一张示例图片"
        android:textColor="#FFFFFF"
        android:textSize="20sp"
        android:padding="16dp"
        android:background="#80000000"
        android:layout_gravity="bottom|center_horizontal" />

</FrameLayout>
效果展示
4.TableLayout(表格布局)
什么是TableLayout
TableLayout 是 Android 中用于创建表格形式布局的一种视图容器,它能够将子视图按照表格的形式排列。
基本属性
android:stretchColumns:
- android:stretchColumns:指定需要拉伸的列索引,多个索引可用逗号分隔。被拉伸的列会自动填充剩余空间。例如,android:stretchColumns=“0,2” 表示第 1 列和第 3 列会被拉伸。
android:shrinkColumns:
- android:shrinkColumns:指定需要收缩的列索引,用于在内容超出布局宽度时收缩列宽。比如,android:shrinkColumns=“1” 表示第 2 列会在必要时收缩。
android:collapseColumns:指定需要隐藏的列索引。如 android:collapseColumns=“3” 会使第 4 列隐藏。
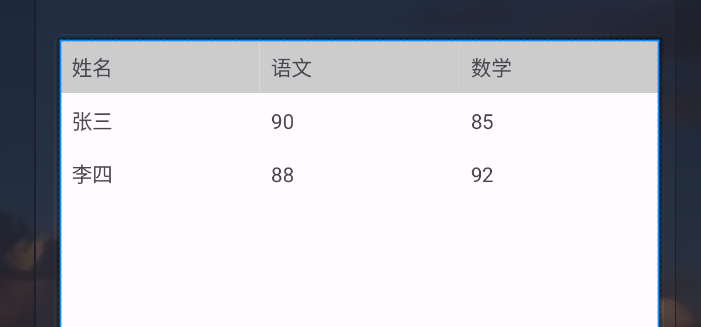
代码展示
<TableLayout
    xmlns:android="http://schemas.android.com/apk/res/android"
    xmlns:app="http://schemas.android.com/apk/res-auto"
    xmlns:tools="http://schemas.android.com/tools"
    android:layout_width="match_parent"
    android:layout_height="match_parent"
    android:stretchColumns="*"
    tools:context=".MainActivity">

    <TableRow>
        <TextView
            android:layout_width="wrap_content"
            android:layout_height="wrap_content"
            android:text="姓名"
            android:padding="8dp"
            android:background="#CCCCCC"/>

        <TextView
            android:layout_width="wrap_content"
            android:layout_height="wrap_content"
            android:text="语文"
            android:padding="8dp"
            android:background="#CCCCCC"/>

        <TextView
            android:layout_width="wrap_content"
            android:layout_height="wrap_content"
            android:text="数学"
            android:padding="8dp"
            android:background="#CCCCCC"/>
    </TableRow>

    <TableRow>
        <TextView
            android:layout_width="wrap_content"
            android:layout_height="wrap_content"
            android:text="张三"
            android:padding="8dp"/>

        <TextView
            android:layout_width="wrap_content"
            android:layout_height="wrap_content"
            android:text="90"
            android:padding="8dp"/>

        <TextView
            android:layout_width="wrap_content"
            android:layout_height="wrap_content"
            android:text="85"
            android:padding="8dp"/>
    </TableRow>

    <TableRow>
        <TextView
            android:layout_width="wrap_content"
            android:layout_height="wrap_content"
            android:text="李四"
            android:padding="8dp"/>

        <TextView
            android:layout_width="wrap_content"
            android:layout_height="wrap_content"
            android:text="88"
            android:padding="8dp"/>

        <TextView
            android:layout_width="wrap_content"
            android:layout_height="wrap_content"
            android:text="92"
            android:padding="8dp"/>
    </TableRow>

</TableLayout>
效果展示
5.ConstraintLayout(约束布局)
什么是LinearLayout
ConstraintLayout 是 Android 开发中一个强大且灵活的布局管理器,它在 Android Studio 中被广泛使用,具有灵活的约束关系,减少布局嵌套以及可视化编辑的特点。
基本属性
app:layout_constraintLeft_toLeftOf:
app:layout_constraintLeft_toRightOf:
- app:layout_constraintLeft_toLeftOf、app:layout_constraintLeft_toRightOf 等:这些属性用于指定视图左侧与其他视图或父布局的约束关系,类似的还有用于右侧、顶部、底部的约束属性。例如,app:layout_constraintLeft_toRightOf=“@id/anotherView”
表示该视图的左侧与 anotherView 的右侧对齐。
app:layout_constraintHorizontal_bias:
app:layout_constraintVertical_bias:
- app:layout_constraintHorizontal_bias、app:layout_constraintVertical_bias:用于设置视图在水平或垂直方向上的偏移比例,取值范围是 0 到 1。例如,app:layout_constraintHorizontal_bias=“0.5”
表示视图在水平方向上居中。
app:layout_constraintWidth_default:
app:layout_constraintHeight_default:
- app:layout_constraintWidth_default、app:layout_constraintHeight_default:可以设置视图宽度或高度的默认行为,如 “wrap” 表示包裹内容,“spread” 表示尽可能扩展。
代码展示
<androidx.constraintlayout.widget.ConstraintLayout
    xmlns:android="http://schemas.android.com/apk/res/android"
    xmlns:app="http://schemas.android.com/apk/res-auto"
    xmlns:tools="http://schemas.android.com/tools"
    android:layout_width="match_parent"
    android:layout_height="match_parent"
    tools:context=".MainActivity">

    <ImageView
        android:id="@+id/logoImageView"
        android:layout_width="100dp"
        android:layout_height="100dp"
        android:src="@mipmap/ic_launcher"
        app:layout_constraintTop_toTopOf="parent"
        app:layout_constraintStart_toStartOf="parent"
        app:layout_constraintEnd_toEndOf="parent"
        app:layout_constraintVertical_bias="0.2" />

    <EditText
        android:id="@+id/usernameEditText"
        android:layout_width="0dp"
        android:layout_height="wrap_content"
        android:hint="请输入用户名"
        app:layout_constraintTop_toBottomOf="@id/logoImageView"
        app:layout_constraintStart_toStartOf="parent"
        app:layout_constraintEnd_toEndOf="parent"
        app:layout_marginTop="20dp" />

    <EditText
        android:id="@+id/passwordEditText"
        android:layout_width="0dp"
        android:layout_height="wrap_content"
        android:hint="请输入密码"
        android:inputType="textPassword"
        app:layout_constraintTop_toBottomOf="@id/usernameEditText"
        app:layout_constraintStart_toStartOf="parent"
        app:layout_constraintEnd_toEndOf="parent"
        app:layout_marginTop="10dp" />

    <Button
        android:id="@+id/loginButton"
        android:layout_width="0dp"
        android:layout_height="wrap_content"
        android:text="登录"
        app:layout_constraintTop_toBottomOf="@id/passwordEditText"
        app:layout_constraintStart_toStartOf="parent"
        app:layout_constraintEnd_toEndOf="parent"
        app:layout_marginTop="20dp" />

    <TextView
        android:id="@+id/forgotPasswordTextView"
        android:layout_width="wrap_content"
        android:layout_height="wrap_content"
        android:text="忘记密码?"
        app:layout_constraintTop_toBottomOf="@id/loginButton"
        app:layout_constraintEnd_toEndOf="@id/loginButton"
        app:layout_marginTop="10dp" />

</androidx.constraintlayout.widget.ConstraintLayout>
效果展示
三、总结
- 本章内容主要讲述了UI的各种布局
- 详细介绍了各种布局的用法以及效果
- 可以在一些场景灵活运用
- 如有疑问欢迎大家评论及私信
- 下一章内容我们将介绍各种常用的控件,以及它们各自的用法
- 学习 Android Studio 关注我不迷路