本章概要
- Redis 集群缓存
9.3 Redis 集群缓存
不同于 Redis 单机缓存,Redis 集群缓存的配置要复杂一点,主要体现在配置上,缓存的使用还是和 Ehcache 2.x 缓存、Redis单机缓存一样。搭建 Redis 集群缓存主要分为三个步骤:①搭建 Redis 集群;②配置缓存;③使用缓存。
9.3.1 搭建 Redis 集群
Redis 集群的搭建已在 6.1.4 小节说过了,参考本专栏下的《六、Spring Boot 整合 NoSQL(2)》,先将集群搭建成功,并且能够在 Spring Boot 中通过 RedisTemplate 访问成功。
9.3.2 配置缓存
当 Redis 集群搭建成功,并且能够从 Spring Boot 项目中访问 Redis 集群后,只需要进行简单的 Redis 缓存配置即可
@Configuration
public class RedisCacheConfig {


    @Autowired
    RedisConnectionFactory conFactory;

    @Bean
    RedisCacheManager redisCacheManager() {


        Map<String, RedisCacheConfiguration> configMap = new HashMap<>();
        RedisCacheConfiguration redisCacheConfig =
                RedisCacheConfiguration.defaultCacheConfig()
                        .prefixKeysWith("sang:")
                        .disableCachingNullValues()
                        .entryTtl(Duration.ofMinutes(30));
        configMap.put("sang", redisCacheConfig);
        RedisCacheWriter cacheWriter =
                RedisCacheWriter.nonLockingRedisCacheWriter(conFactory);
        RedisCacheManager redisCacheManager =
                new RedisCacheManager(
                        cacheWriter,
                        RedisCacheConfiguration.defaultCacheConfig(),
                        configMap);
        return redisCacheManager;
    }
}
代码解释:
- 在配置 Redis 集群时,已经向 Spring 容器中注册了一个 JedisConnectionFactory 的实例,这里将其注入到 RedisCacheConfi 配置文件中备用(RedisConnectionFactory 是 JedisConnectionFactory 的父类)
- 在 RedisCacheConfig 中提供 RedisCacheManager 实例,该实例的构建需要三个参数,第一个参数是一个 cacheWriter,直接通过 nonLockingRedisCacheWriter 方法构造出来即可;第二个参数是默认的缓存配置;第三个参数是提前定义好的缓存配置
- RedisCacheManager 构造方法中第三个参数是一个提前定义好的缓存参数,他是一个 Map 类型的参数,该 Map 中的 key 就是指缓存名字,value 就是该名称的缓存所对应的缓存配置,例如key 的前缀、缓存过期时间等,若缓存注册中使用的缓存名称不存在于 Map 中,则使用 RedisCacheManager 构造方法中第二个参数所定义的缓存策略进行数据缓存。(例如:@Cacheable(value=“c1”) @Cacheable(value=“c2”)),c1存在于 configMap 集合中,因此使用的缓存策略是默认的缓存策略
- 此处默认缓存策略通过调用 RedisCacheManager 中的 defaultCacheConfig 方法获取,该方法的源码如下,由这段源码可以看到,默认的缓存过期时间为 0 ,即永不过期;第二个参数 true 表示允许存储 null ,第三个 true 表示开启 key 的前缀,第四个参数表示 key 的默认前缀是 “缓存名::”,接下来两个参数表示 key 和 value 的序列化方式,最后一个参数则是一个类型转换器
public static RedisCacheConfiguration defaultCacheConfig() {


    DefaultFormattingConversionService conversionService = new DefaultFormattingConversionService();

    registerDefaultConverters(conversionService);

    return new RedisCacheConfiguration(Duration.ZERO, true, true, CacheKeyPrefix.simple(),
                                       SerializationPair.fromSerializer(new StringRedisSerializer()),
                                       SerializationPair.fromSerializer(new JdkSerializationRedisSerializer()), conversionService);
}
- .prefixKeysWith(“sang:”) 设置了 key 的前缀为“sang:”,.disableCachingNullValues() 禁止缓存一个 null,.entryTtl(Duration.ofMinutes(30) 设置过期时间为 30 分钟
9.3.3 使用缓存
缓存配置完成后,首先在项目启动类中通过 @EnableCaching 注解开启缓存
@SpringBootApplication
@EnableCaching
public class RedisclustercacheApplication {


    public static void main(String[] args) {


        SpringApplication.run(RedisclustercacheApplication.class, args);
    }
}
然后创建一个 BookDao 使用缓存
@Repository
public class BookDao {


    @Cacheable(value = "c1")
    public String getBookById(Integer id) {


        System.out.println("getBookById");
        return "这本书是三国演义";
    }
    @CachePut(value = "c1")
    public String updateBookById(Integer id) {


        return "这是全新的三国演义";
    }
    @CacheEvict(value = "c1")
    public void deleteById(Integer id) {


        System.out.println("deleteById");
    }
    @Cacheable(value = "c2")
    public String getBookById2(Integer id) {


        System.out.println("getBookById2");
        return "这本书是红楼梦";
    }
}
最后创建单元测试
@RunWith(SpringRunner.class)
@SpringBootTest
public class RedisclustercacheApplicationTests {


    @Autowired
    BookDao bookDao;
    @Test
    public void contextLoads() {


        bookDao.getBookById(100);
        String book = bookDao.getBookById(100);
        System.out.println(book);
        bookDao.updateBookById(100);
        String book2 = bookDao.getBookById(100);
        System.out.println(book2);
        bookDao.deleteById(100);
        bookDao.getBookById(100);
        bookDao.getBookById2(99);
    }
}
运行结果如下
getBookById
这本书是三国演义
这是全新的三国演义
deleteById
getBookById
getBookById2
由单元测试可以看到,一开始做了两次查询,但是查询方法只调用了一次,因为第二次使用了缓存;接下来执行了更新,当更新成功后再去查询,此时缓存也已更新成功;接下来执行了删除,删除成功后再去执行查询,查询方法又被调用,说明缓存也被删除了;最后查询了一个id为99的记录,这次使用的是指定的缓存配置。在 Redis 服务器上也可以看到缓存结果,如图:
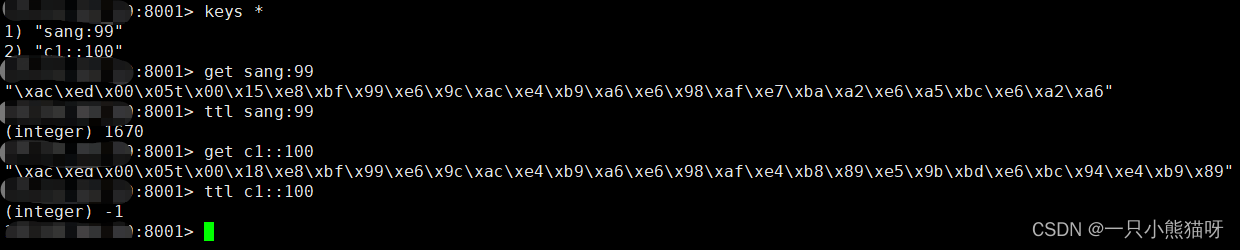
id 为 99 的记录使用的缓存名为 c2 ,因此key前缀是 sang: ,过期时间为 1670 ;而 id 为 100 的记录使用的缓存名称为 c1 ,因此使用了默认的缓存配置,默认的前缀为“缓存名::”,即 “c1::”,默认的过期时间是永不过期的。