前言
这篇文章会带领大家去了解kubernetes中的蓝绿部署、金丝雀发布、滚动更新等多种发布方式,我的原创文章内容较多,基本都在5000字以上,看不完先关注收藏哈,满满的都是干货~~
kubernetes多种发布方式概述
Kubernetes蓝绿部署,金丝雀发布,滚动更新的介绍
金丝雀发布(又称灰度发布、灰度更新):
金丝雀发布一般是先发1台机器,或者一个小比例,例如2%的服务器,主要做流量验证用,也称为金丝雀 (Canary) 测试,国内常称灰度测试。以前旷工下矿前,会先放一只金丝雀进去用于探测洞里是否有有毒气体,看金丝雀能否活下来,金丝雀发布由此得名。简单的金丝雀测试一般通过手工测试验证,复杂的金丝雀测试需要比较完善的监控基础设施配合,通过监控指标反馈,观察金丝雀的健康状况,作为后续发布或回退的依据。如果金丝测试通过,则把剩余的 V1 版本全部升级为 V2 版本。如果金丝雀测试失败,则直接回退金丝雀,发布失败。
滚动更新:
在金丝雀发布基础上的进一步优化改进,是一种自动化程度较高的发布方式,用户体验比较平滑,是目前成熟型技术组织所采用的主流发布方式。一次滚动式发布一般由若干个发布批次组成,每批的数量一般是可以配置的(可以通过发布模板定义)。例如,第一批1台(金丝雀),第二批10%,第三批 50%,第四批100%。每个批次之间留观察间隔,通过手工验证或监控反馈确保没有问题再发下一批次,所以总体上滚动式发布过程是比较缓慢的 (其中金丝雀的时间一般会比后续批次更长,比如金丝雀10 分钟,后续间隔 2分钟)。
蓝绿部署:
一些应用程序只需要部署一个新版本,并需要立即切到这个版本。因此,我们需要执行蓝/绿部署。在进行蓝/绿部署时,应用程序的一个新副本(绿)将与现有版本(蓝)一起部署。然后更新应用程序的入口/路由器以切换到新版本(绿)。然后,您需要等待旧(蓝)版本来完成所有发送给它的请求,但是大多数情况下,应用程序的流量将一次更改为新版本;Kubernetes不支持内置的蓝/绿部署。目前最好的方式是创建新的部署,然后更新应用程序的服务(如service)以指向新的部署;蓝绿部署是不停老版本,部署新版本然后进行测试,确认OK后将流量逐步切到新版本。蓝绿部署无需停机,并且风险较小。
Deployment定义
Deployment实现更新逻辑和更新策略是借助于ReplicaSet完成的,Deployment这种资源对象可以定义的字段有哪些,通过如下命令查看:
kubectl explain deploy
显示如下所示:
KIND: DeploymentVERSION: extensions/v1beta1DESCRIPTION: DEPRECATED - This group version of Deployment is deprecated by apps/v1beta2/Deployment. See the release notes for more information. Deployment enables declarative updates for Pods and ReplicaSets.#我们使用apps/v1FIELDS: apiVersion <string> APIVersion defines the versioned schema of this representation of an object. Servers should convert recognized schemas to the latest internal value, and may reject unrecognized values. More info: https://git.k8s.io/community/contributors/devel/api-conventions.md#resources kind <string> Kind is a string value representing the REST resource this object represents. Servers may infer this from the endpoint the client submits requests to. Cannot be updated. In CamelCase. More info: https://git.k8s.io/community/contributors/devel/api-conventions.md#types-kinds metadata <Object> Standard object metadata. spec <Object> Specificatio of the desired behavior of the Deployment. status <Object> Most recently observed status of the Deployment.
kubectl explain deploy.spec
显示如下:
KIND: DeploymentVERSION: extensions/v1beta1RESOURCE: spec <Object>DESCRIPTION: Specification of the desired behavior of the Deployment. DeploymentSpec is the specification of the desired behavior of the Deployment.FIELDS: minReadySeconds <integer> Minimum number of seconds for which a newly created pod should be ready without any of its container crashing, for it to be considered available. Defaults to 0 (pod will be considered available as soon as it is ready) paused <boolean> Indicates that the deployment is paused and will not be processed by the deployment controller.#暂停,当我们更新的时候创建pod先暂停,不是立即更新 progressDeadlineSeconds <integer> The maximum time in seconds for a deployment to make progress before it is considered to be failed. The deployment controller will continue to process failed deployments and a condition with a ProgressDeadlineExceeded reason will be surfaced in the deployment status. Note that progress will not be estimated during the time a deployment is paused. This is not set by default. replicas <integer> Number of desired pods. This is a pointer to distinguish between explicit zero and not specified. Defaults to 1. revisionHistoryLimit <integer> The number of old ReplicaSets to retain to allow rollback. This is a pointer to distinguish between explicit zero and not specified.#保留的历史版本数,默认是10个 rollbackTo <Object> DEPRECATED. The config this deployment is rolling back to. Will be cleared after rollback is done. selector <Object> Label selector for pods. Existing ReplicaSets whose pods are selected by this will be the ones affected by this deployment. strategy <Object> The deployment strategy to use to replace existing pods with new ones.#更新策略,支持的滚动更新策略 template <Object> -required- Template describes the pods that will be created.
kubectl explain deploy.spec.strategy
显示如下:
KIND: DeploymentVERSION: extensions/v1beta1RESOURCE: strategy <Object>DESCRIPTION: The deployment strategy to use to replace existing pods with new ones. DeploymentStrategy describes how to replace existing pods with new ones.FIELDS: rollingUpdate <Object> Rolling update config params. Present only if DeploymentStrategyType = RollingUpdate. type <string> Type of deployment. Can be "Recreate" or "RollingUpdate". Default is RollingUpdate.#支持两种更新,Recreate和RollingUpdate#Recreate是重建式更新,删除一个更新一个#RollingUpdate 滚动更新,定义滚动更新的更新方式的,也就是pod能多几个,少几个,控制更新力度的
kubectl explain deploy.spec.strategy.rollingUpdate
显示如下:
KIND: DeploymentVERSION: extensions/v1beta1RESOURCE: rollingUpdate <Object>DESCRIPTION: Rolling update config params. Present only if DeploymentStrategyType = RollingUpdate. Spec to control the desired behavior of rolling update.FIELDS: maxSurge <string> The maximum number of pods that can be scheduled above the desired number of pods. Value can be an absolute number (ex: 5) or a percentage of desired pods (ex: 10%). This can not be 0 if MaxUnavailable is 0. Absolute number is calculated from percentage by rounding up. By default, a value of 1 is used. Example: when this is set to 30%, the new RC can be scaled up immediately when the rolling update starts, such that the total number of old and new pods do not exceed 130% of desired pods. Once old pods have been killed, new RC can be scaled up further, ensuring that total number of pods running at any time during the update is atmost 130% of desired pods.#我们更新的过程当中最多允许超出的指定的目标副本数有几个;它有两种取值方式,第一种直接给定数量第二种根据百分比,百分比表示原本是5个,最多可以超出20%,那就允许多一个最多可以超过40%,那就允许多两个 maxUnavailable <string> The maximum number of pods that can be unavailable during the update. Value can be an absolute number (ex: 5) or a percentage of desired pods (ex: 10%). Absolute number is calculated from percentage by rounding down. This can not be 0 if MaxSurge is 0. By default, a fixed value of 1 is used. Example: when this is set to 30%, the old RC can be scaled down to 70% of desired pods immediately when the rolling update starts. Once new pods are ready, old RC can be scaled down further, followed by scaling up the new RC, ensuring that the total number of pods available at all times during the update is at least 70% of desired pods.#最多允许几个不可用
Deployment部署应用的更新策略演示
假设有5个副本,最多一个不可用,就表示最少有4个可用,deployment是一个三级结构,deployment控制replicaset,replicaset控制pod,用deployment创建一个pod
cd /root/demo-test
创建一个deploy-demo.yaml文件
deploy-demo.yaml配置文件内容如下:
apiVersion: apps/v1kind: Deploymentmetadata: name: myapp-deploy namespace: testspec: replicas: 3 selector: matchLabels: app: myapp release: canary template: metadata: labels: app: myapp release: canary spec: containers: - name: myapp image: myapp:v1 ports: - name: http containerPort: 80
kubectl apply -f deploy-demo.yaml
kubectl get deploy -n test
可看到创建的控制器名字是myapp-deploy
期望的pod值是2,当前值是2,就绪状态是2,可用的是2
kubectl get rs -n test
显示如下:
上面表示创建deploy的时候也会创建一个rs(replicaset),7657db6c59这个随机数字是我们引用pod的模板template的名字的hash值
kubectl get pods -n test
显示如下:
deploy在实现中心应用时,可以直接编辑配置文件实现,比方说想要修改副本数,把两个变成3个,打开deploy-demo.yaml,直接修改replicas数量,把2变成3,修改之后保存退出,执行如下
kubectl apply -f deploy-demo.yaml
apply不同于create,apply可以执行多次;create执行一次,再执行就会报错有重复。
kubectl get pods
可以看到pod副本数变成了3个
kubectl describe deploy myapp
查看myapp这个控制器的详细信息
Name: myapp-deployNamespace: defaultCreationTimestamp: Thu, 27 Dec 2018 15:47:48 +0800Labels: <none>Annotations: deployment.kubernetes.io/revision=1 kubectl.kubernetes.io/last-applied-configuration={"apiVersion":"apps/v1","kind":"Deployment","metadata":{"annotations":{},"name":"myapp-deploy","namespace":"default"},"spec":{"replicas":3,"selector":{...Selector: app=myapp,release=canaryReplicas: 3 desired | 3 updated | 3 total | 3 available | 0 unavailableStrategyType: RollingUpdate#默认的更新策略rollingUpdateMinReadySeconds: 0RollingUpdateStrategy: 25% max unavailable, 25% max surge#最多允许多25%个pod,25%表示不足一个,可以补一个Pod Template: Labels: app=myapp release=canary Containers: myapp: Image: ikubernetes/myapp:v1 Port: 80/TCP Host Port: 0/TCP Environment: <none> Mounts: <none> Volumes: <none>Conditions: Type Status Reason ---- ------ ------ Progressing True NewReplicaSetAvailable Available True MinimumReplicasAvailableOldReplicaSets: <none>NewReplicaSet: myapp-deploy-69b47bc96d (3/3 replicas created)Events: Type Reason Age From Message ---- ------ ---- ---- ------- Normal ScalingReplicaSet 26m deployment-controller Scaled up replica set myapp-deploy-69b47bc96d to 2 Normal ScalingReplicaSet 4m deployment-controller Scaled up replica set myapp-deploy-69b47bc96d to 3
案例演示
例1:金丝雀发布
打开一个标签监测更新过程
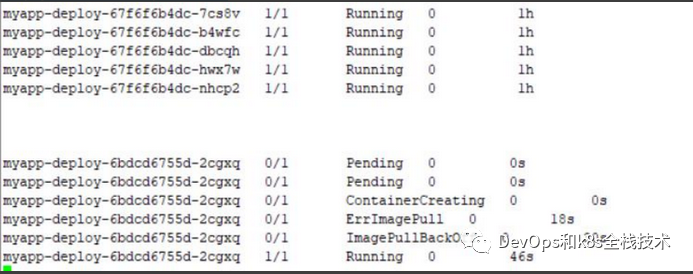
kubectl get pods -l app=myapp -n test -w,(也可以使用kubectl rollout statusdeployment myapp-deploy,显示Waiting for deployment "myapp-deploy"rollout to finish: 1 out of 5 new replicas have been updated),下面命令执行完之后显示如下,之前的pod还在,新创建了一个pod,没有立即删除。
打开另一个标签操作如下:
kubectl set image deployment myapp-deploy myapp:v2 -n test && kubectl rolloutpause deployment myapp-deploy -n test
注:上面的步骤解释说明
把myapp这个容器的镜像更新到myapp:v2版本,更新镜像之后,创建一个新的pod就立即暂停,这就是我们说的金丝雀发布;如果暂停几个
小时之后没有问题,那么取消暂停,就会依次执行后面步骤,把所有pod都升级。(1)解除暂停
打开一个新的标签
kubectl get pods -l app=myapp -n test -w
打开另一个标签
kubectl rollout resume deployment myapp-deploy -n test
在刚才监测的界面可以看到如下一些信息,下面过程是把余下的pod里的容器都更新到新的版本:
myapp-deploy-6bdcd6755d-llrw8 0/1 Pending 0 0smyapp-deploy-6bdcd6755d-llrw8 0/1 ContainerCreating 0 0smyapp-deploy-67f6f6b4dc-7cs8v 0/1 Terminating 0 1hmyapp-deploy-67f6f6b4dc-7cs8v 0/1 Terminating 0 1hmyapp-deploy-67f6f6b4dc-7cs8v 0/1 Terminating 0 1hmyapp-deploy-67f6f6b4dc-7cs8v 0/1 Terminating 0 1hmyapp-deploy-6bdcd6755d-llrw8 1/1 Running 0 16smyapp-deploy-67f6f6b4dc-nhcp2 1/1 Terminating 0 1hmyapp-deploy-6bdcd6755d-r4mrl 0/1 Pending 0 0smyapp-deploy-6bdcd6755d-r4mrl 0/1 Pending 0 1smyapp-deploy-6bdcd6755d-r4mrl 0/1 ContainerCreating 0 1smyapp-deploy-67f6f6b4dc-nhcp2 0/1 Terminating 0 1hmyapp-deploy-67f6f6b4dc-nhcp2 0/1 Terminating 0 1hmyapp-deploy-6bdcd6755d-r4mrl 1/1 Running 0 5smyapp-deploy-67f6f6b4dc-hwx7w 1/1 Terminating 0 1hmyapp-deploy-6bdcd6755d-j8nj8 0/1 Pending 0 0smyapp-deploy-6bdcd6755d-j8nj8 0/1 Pending 0 0smyapp-deploy-6bdcd6755d-j8nj8 0/1 ContainerCreating 0 0smyapp-deploy-67f6f6b4dc-nhcp2 0/1 Terminating 0 1hmyapp-deploy-67f6f6b4dc-nhcp2 0/1 Terminating 0 1hmyapp-deploy-67f6f6b4dc-hwx7w 0/1 Terminating 0 1hmyapp-deploy-6bdcd6755d-j8nj8 1/1 Running 0 4smyapp-deploy-67f6f6b4dc-dbcqh 1/1 Terminating 0 1hmyapp-deploy-6bdcd6755d-lpk5b 0/1 Pending 0 1smyapp-deploy-6bdcd6755d-lpk5b 0/1 Pending 0 1smyapp-deploy-6bdcd6755d-lpk5b 0/1 ContainerCreating 0 1smyapp-deploy-67f6f6b4dc-dbcqh 0/1 Terminating 0 1hmyapp-deploy-6bdcd6755d-lpk5b 1/1 Running 0 4smyapp-deploy-67f6f6b4dc-b4wfc 1/1 Terminating 0 1hmyapp-deploy-67f6f6b4dc-b4wfc 0/1 Terminating 0 1hmyapp-deploy-67f6f6b4dc-hwx7w 0/1 Terminating 0 1hmyapp-deploy-67f6f6b4dc-hwx7w 0/1 Terminating 0 1hmyapp-deploy-67f6f6b4dc-b4wfc 0/1 Terminating 0 1hmyapp-deploy-67f6f6b4dc-b4wfc 0/1 Terminating 0 1hmyapp-deploy-67f6f6b4dc-dbcqh 0/1 Terminating 0 1hmyapp-deploy-67f6f6b4dc-dbcqh 0/1 Terminating 0 1h
kubectl get rs -n test
可以看到replicaset控制器有2个了
(2)回滚
如果发现刚才升级的这个版本有问题可以回滚,查看当前有哪几个版本:
kubectl rollout history deployment myapp-deploy -n test
显示如下:
上面可以看到第一版没了,被还原成了第三版,第三版的前一版是第二版
kubectl get rs -n test -o wide
显示如下:
可以看到上面的rs已经用第一个了,这个就是还原之后的rs
例2:滚动更新
(1) kubectl get pods -l app=myapp -n test -w
在一个窗口监测,打开另外一个窗口按如下操作:
cd /root/demo_test
cat deploy-demo.yaml
把myapp:v1改成myapp:v3
保存退出,执行如下
kubectl apply -f deploy-demo.yaml
再在监测的那个窗口可以看到信息如下:
pending表示正在进行调度,ContainerCreating表示正在创建一个pod,running表示运行一个pod,running起来一个pod之后再Terminating(停掉)一个pod,以此类推,直到所有pod完成滚动升级
在另外一个窗口执行kubectl get rs -n test,显示如下:
上面可以看到rs有两个,上面那个是升级之前的,已经被停掉,但是可以随时回滚,kubectl rollout history deployment myapp-deploy -n test
查看myapp-deploy这个控制器的滚动历史,显示如下:
回滚的话操作如下:
kubectl rollout undo
(2) 扩容到5个
cat deploy-demo.yaml
修改replicas数值是5
kubectl apply -f deploy-demo.yaml
kubectl get pods -n test显示如下:

上面说明扩容成功了
(3)修改maxSurge和maxUnavailable用来控制滚动更新的更新策略
修改更新策略最多不可用0个,也就是少不能少于5个,最大不能超过6个
kubectl patch deployment myapp-deploy -p '{"spec":{"strategy":{"rollingUpdate":{"maxSurge":1,"maxUnavailable":0}}}}' -n test
kubectl describe deployment myapp-deploy -n test
查看myapp-deploy这个控制器的详细信息
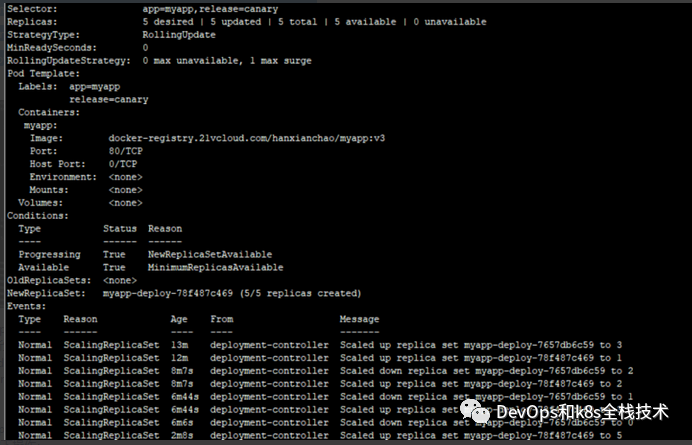
上面可以看到RollingUpdateStrategy: 0 max unavailable, 1 max surge
这个rollingUpdate更新策略变成了刚才设定的,因为我们设定的pod副本数是5,0和1表示最少不能少于5个pod,最多不能超过6个pod
这个就是通过控制RollingUpdateStrategy这个字段来设置滚动更新策略的
例3:蓝绿部署
lan.yaml配置文件内容如下:
apiVersion: apps/v1
kind: Deployment
metadata:
name: myapp-v1
namespace: blue-green
spec:
replicas: 3
selector:
matchLabels:
app: myapp
version: v1
template:
metadata:
labels:
app: myapp
version: v1
spec:
containers:
- name: myapp
image: janakiramm/myapp:v1
imagePullPolicy: IfNotPresent
ports:
- containerPort: 80
lv.yaml配置文件内容如下:
apiVersion: apps/v1
kind: Deployment
metadata:
name: myapp-v2
namespace: blue-green
spec:
replicas: 3
selector:
matchLabels:
app: myapp
version: v2
template:
metadata:
labels:
app: myapp
version: v2
spec:
containers:
- name: myapp
image: janakiramm/myapp:v2
imagePullPolicy: IfNotPresent
ports:
- containerPort: 80
service_lanlv.yaml 配置文件内容如下:
apiVersion: v1
kind: Service
metadata:
name: myapp-lan
namespace: blue-green
labels:
app: myapp
version: v1
spec:
type: NodePort
ports:
- port: 80
nodePort: 30062
name: http
selector:
app: myapp
version: v1
cd /root/demo_test/lanlv
kubectl apply -f lan.yaml
kubectl apply -f lv.yaml
kubectl get pods -n blue-green
显示如下:
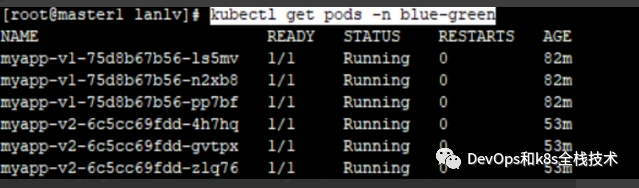
上面可以看到有两个pod,一个是myapp-v1这个是蓝程序(升级之前的程序),一个是myapp-v2这个是绿程序(升级之后的程序),蓝绿程序一起运行kubectl apply -f service_lanlv.yaml
kubectl get svc -n blue-green
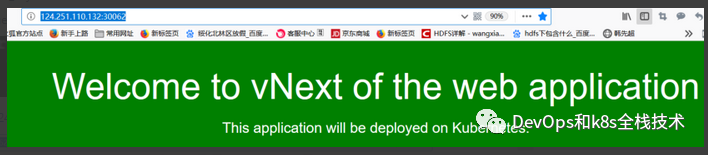
在浏览器访问http://<k8s集群任何一个节点ip>:port 显示如下:

修改service_lanlv.yaml 配置文件,修改标签,让其匹配到绿程序(升级之后的程序)
service_lv.yaml 文件内容如下:
apiVersion: v1
kind: Service
metadata:
name: myapp-lan
namespace: blue-green
labels:
app: myapp
version: v2
spec:
type: NodePort
ports:
- port: 80
nodePort: 30062
name: http
selector:
app: myapp
version: v2
kubectl apply -f service_lv.yaml
kubectl get svc -n blue-green 显示如下:

在浏览器访问http://<k8s集群任何一个节点ip>:port
显示如下: