记录笔记,在博客园中有很多实现Token的方法,这是我看过他们学到的,然后找到适合自己的解决方案,自己无聊总结一下学习经验写下的
WebApi后端接口实现Token验证
Token是在客户端频繁向服务端请求数据,服务端频繁的去数据库查询用户名和密码并进行对比,判断用户名和密码正确与否,并作出相应提示,在这样的背景下,Token便应运而生。Token是服务端生成的一串字符串,以作客户端进行请求的一个令牌,当第一次登录后,服务器生成一个Token便将此Token返回给客户端,以后客户端只需带上这个Token前来请求数据即可,无需再次带上用户名和密码。

第一步:安装NuGet包
Install-Package Microsoft.AspNet.WebApi.Owin
Install-Package Microsoft.Owin.Host.SystemWeb
Install-Package Microsoft.AspNet.Identity.Owin
Install-Package Microsoft.Owin.Cors
第二步:在项目下添加Startup 类
public class Startup
    {

        public void Configuration(IAppBuilder app)
        {
            // 有关如何配置应用程序的详细信息,请访问 http://go.microsoft.com/fwlink/?LinkID=316888
            ConfigAuth(app);

            HttpConfiguration config = new HttpConfiguration();
            WebApiConfig.Register(config);
            app.UseCors(CorsOptions.AllowAll);
            app.UseWebApi(config);
        }
        public void ConfigAuth(IAppBuilder app)
        {
            OAuthAuthorizationServerOptions option = new OAuthAuthorizationServerOptions()
            {
                AllowInsecureHttp = true,
                TokenEndpointPath = new PathString("/token"), //获取 access_token 授权服务请求地址
                AccessTokenExpireTimeSpan = TimeSpan.FromDays(1), //access_token 过期时间
                Provider = new SimpleAuthorizationServerProvider(), //access_token 相关授权服务
                RefreshTokenProvider = new SimpleRefreshTokenProvider() //refresh_token 授权服务
            };
            app.UseOAuthAuthorizationServer(option);
            app.UseOAuthBearerAuthentication(new OAuthBearerAuthenticationOptions());
        }
    }
第三步:添加SimpleAuthorizationServerProvider类=》access_token 相关授权服务
 public class SimpleAuthorizationServerProvider : OAuthAuthorizationServerProvider
    {
        public override Task ValidateClientAuthentication(OAuthValidateClientAuthenticationContext context)
        {
            context.Validated();
            return Task.FromResult<object>(null);
        }
        public override async Task GrantResourceOwnerCredentials(OAuthGrantResourceOwnerCredentialsContext context)
        {
            context.OwinContext.Response.Headers.Add("Access-Control-Allow-Origin", new[] { "*" });
            //GetData accService = new GetData();
            //string md5Pwd = LogHelper.MD5CryptoPasswd(context.Password);
            //bool flag = accService.GetCRMJurisdictionService(context.UserName);
            //if (!flag)
            //{
            // context.SetError("invalid_grant", "对不起,您当前没有权限!");
            // return;
            //}

            //授权验证=》根据自己的业务逻辑进行 业务授权

            var identity = new ClaimsIdentity(context.Options.AuthenticationType);
            identity.AddClaim(new Claim("sub", context.UserName));
            identity.AddClaim(new Claim("role", "user"));
            context.Validated(identity);
        }
    }
第四步:添加SimpleRefreshTokenProvider类 refresh_token 授权服务
public class SimpleRefreshTokenProvider : AuthenticationTokenProvider
    {
        private static ConcurrentDictionary<string, string> _refreshTokens = new ConcurrentDictionary<string, string>();

        /// <summary>
        /// 生成 refresh_token
        /// </summary>
        public override void Create(AuthenticationTokenCreateContext context)
        {
            context.Ticket.Properties.IssuedUtc = DateTime.UtcNow;
            context.Ticket.Properties.ExpiresUtc = DateTime.UtcNow.AddDays(60);

            context.SetToken(Guid.NewGuid().ToString("n"));
            _refreshTokens[context.Token] = context.SerializeTicket();
        }

        /// <summary>
        /// 由 refresh_token 解析成 access_token
        /// </summary>
        public override void Receive(AuthenticationTokenReceiveContext context)
        {
            string value;
            if (_refreshTokens.TryRemove(context.Token, out value))
            {
                context.DeserializeTicket(value);
            }
        }
    }
以上就是配置Token的步骤,使用token验证也很简单,只需在相应的Controller或Action加上[Authorize]标记
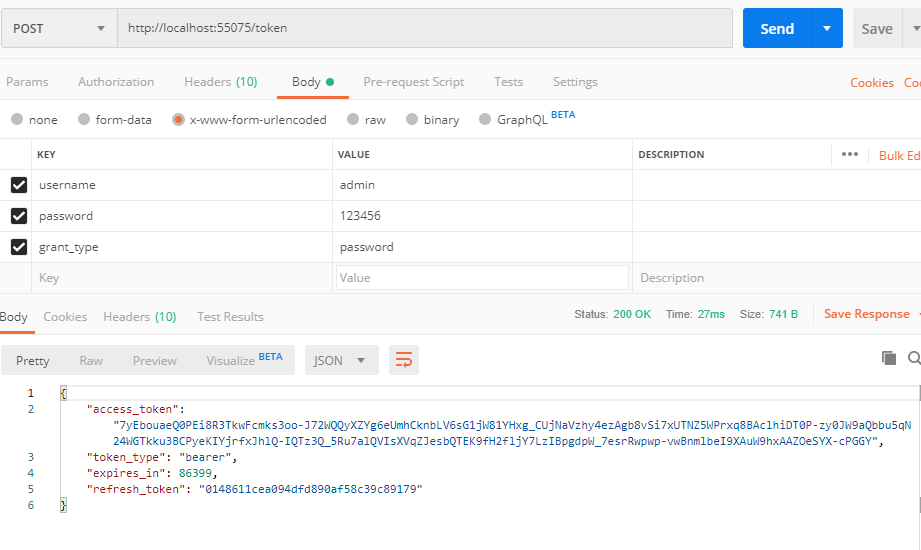
第五步:获取token
获取token, POST请求本地http://localhost:55075/token

请求头 Content-Type:application/x-www-form-urlencoded

参数BODY格式:

grant_type=password

username=admin

password=123456
第六步:访问API的时候在http请求头中加上Authorization:bearer Token就可以成功请求接口了